| Author |
Message |
Jerry
Samba Member
Joined: October 28, 2007
Posts: 1367

|
 Posted: Sat Feb 07, 2009 6:05 pm Post subject: 67 sportsmobile resto thread Posted: Sat Feb 07, 2009 6:05 pm Post subject: 67 sportsmobile resto thread |
 |
|
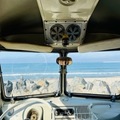
Well, we have our first split bus underway. We picked this up last weekend & started stripping out the PO's messes. (you would not believe some crap we tore out) The body is in rough shape, but nothing too major. Today we know a little more of what we need from Gerson. This camper was originally velvet green, & where the pop-top comes down to meet the top, for some reason was rusted pretty bad, I guess the rubber seal at one time was removed. We removed the engine, gas tank, windows & all seals. I'm sanding at least 1" around the perimeter of the rust spots, getting it down to bare metal. I know someone had tried to repair this before but evidently failed. I have a friend of mine to guide me through some of the painting to ensure this won't happen again for some time. I don't know the displacement of the engine but it's a dual port that needs freshening up. I plan on doing a compression test soon. The worst part of this project is the PO cut the bulkhead out of it, which I'll have to find. (bye-bye m-plate!)  Here's some pics ... Here's some pics ...
_________________
Looking for SO34 parts.
thevwcompound *instagram*
Last edited by Jerry on Sat Feb 07, 2009 6:17 pm; edited 1 time in total |
|
| Back to top |
|
 |
Bruce Jackson
Samba Member
Joined: January 10, 2009
Posts: 45
|
| Posted: Sat Feb 07, 2009 6:16 pm Post subject: |
|
|
| Nice...thats too bad about the bulkhead...Keep the pics coming! |
|
| Back to top |
|
|
von_hansel 
Samba Member
Joined: June 12, 2006
Posts: 635
Location: Inland Empire
|
| Posted: Sat Feb 07, 2009 8:29 pm Post subject: Re: 67 sportsmobile resto thread |
|
|
I had the same "thunderbird products" sticker on my deck lid in the same spot on my 67 og paint velvet green standard.
good luck with the resto. That bus has tons of potential
_________________
| Mugatu wrote: |
| von_hansel is so hot right now |
|
|
| Back to top |
|
|
Jerry
Samba Member
Joined: October 28, 2007
Posts: 1367
|
| Posted: Mon Feb 09, 2009 12:40 pm Post subject: Re: 67 sportsmobile resto thread |
|
|
| norman wrote: |
I had the same "thunderbird products" sticker on my deck lid in the same spot on my 67 og paint velvet green standard.
good luck with the resto. That bus has tons of potential |
Maybe its your old bus? Would there be anything I could look at to tell if it was yours?
Having a lot of fun with this one. This is our second restoration. The first was a bay window. We removed the seats, had to use bolt cutters. They cut through the floor to bolt in the seats. Got the engine pulled, before we pulled it we got it started. Runs rough, but runs. So we will re-build it. We will have to order some panels, some of the rust is just too bad. Looking for a bulkhead and seating for the front. I (Kelli) named this one Rusty bus. Lots of sanding and grinding to do. What a great way to spend a sunny day flinging shit in your loved ones face. 
_________________
Looking for SO34 parts.
thevwcompound *instagram* |
|
| Back to top |
|
|
Jerry
Samba Member
Joined: October 28, 2007
Posts: 1367
|
| Posted: Mon Feb 09, 2009 7:33 pm Post subject: |
|
|
Got some blasting done today, it's the only way to salvage the metal that's not all the way through that I know of... here's some pics.
After the blasting session, I started exploring the nose section, pulled the mat out of the floorboard & kickpanels & found out it's been in a wreck. The lower nose is all bondo, & the frame piece (I don't know what it's called) holds the bumper on is totally rusted out. I was wondering why the channel that holds the kickpanels was bent a little, now I know. I guess I need to learn to cut & weld.
_________________
Looking for SO34 parts.
thevwcompound *instagram* |
|
| Back to top |
|
|
brettsvw
Samba Member
Joined: November 22, 2007
Posts: 2145
Location: Florida
|
|
| Back to top |
|
|
brettsvw
Samba Member
Joined: November 22, 2007
Posts: 2145
Location: Florida
|
|
| Back to top |
|
|
Jerry
Samba Member
Joined: October 28, 2007
Posts: 1367
|
| Posted: Tue Feb 10, 2009 6:42 pm Post subject: |
|
|
It is sorta wierd about the rust thing, just goes to show you why parts busses are needed. I bought the blaster at tractor supply for about 100 bucks & after 8 hrs of blasting, the tip disfigured & failed. I've pretty much had trouble w/it right out of the gate. Another thing about it, it seems no matter how I set the adjustments, (has 2 valves, 1 for the air, & 1 to force the sand) it quits after about 1 minute & I have to fool w/ the valves again. It's exhausting, frustrating at best. It just barely get the job done. If you do buy one of these cheapies, get extra tips, & never pour sand into it without screening first. I've learned the hard way thats for sure. Also, your neighbors will love you! I bought a cabinet from there as well, & I'm very satisfied with it, great for tins & such. On another note, I did a compression test today on that dual port that came w/it: #1, 120 #2, 125 #3, 125 #4 125 I'm very pleased. 
_________________
Looking for SO34 parts.
thevwcompound *instagram* |
|
| Back to top |
|
|
Jerry
Samba Member
Joined: October 28, 2007
Posts: 1367
|
| Posted: Sun Feb 15, 2009 5:59 pm Post subject: |
|
|
Well, I cut the nose off today, also started on the passenger dogleg. I'm really in need of finding out the name of the parts I need to order. It would be nice to actually look at the part I'm replacing. I don't know the difference between an "a" pillar & a "b" pillar. I know my bay pretty well because it was intact. I know the bus was involved in a frontal collision at some point. I dont know how to take the rusty panel off that is underneath the front bottom plate under the nose. It seems it's welded to the frame where the bumper bolts on. The floor, in addition to being rusted through, is also disfigured where the bottom of the kickpanels slip into. I plan on replacing it as well but the piece directly behind the heat tube, is bent & rusted pretty bad as well. This piece also has the holes where the wiring harness passes through at 3 points. It also welds to the inner lower piece I was referring to before. Can anyone direct me from this point? My camera ran out of power after I peeled away the skin from the two outer frames, (where the door hinges are). Also I have the dogleg almost off, according to some pictures on a different thread. I plan on removing the harness, cutting the floor the rest of the way out, & trying to straighten the piece directly behind the heater tube. If someone can name these pieces for me & give me some direction from here, I sure would appreciate it. Here's some pics...
_________________
Looking for SO34 parts.
thevwcompound *instagram* |
|
| Back to top |
|
|
Jerry
Samba Member
Joined: October 28, 2007
Posts: 1367
|
| Posted: Tue Mar 03, 2009 9:45 pm Post subject: |
|
|
damn it
_________________
Looking for SO34 parts.
thevwcompound *instagram*
Last edited by Jerry on Tue Mar 03, 2009 10:05 pm; edited 4 times in total |
|
| Back to top |
|
|
Jerry
Samba Member
Joined: October 28, 2007
Posts: 1367
|
| Posted: Tue Mar 03, 2009 9:48 pm Post subject: |
|
|
Wow it took me longer to screw the pictures up on this thread, than it took to cut the nose off. I thought I knew how to post a pic.
_________________
Looking for SO34 parts.
thevwcompound *instagram* |
|
| Back to top |
|
|
blobaugh
Samba Member

Joined: December 14, 2007
Posts: 102
|
| Posted: Tue Mar 03, 2009 10:06 pm Post subject: |
|
|
| Wow, glad you ripped those front seats out quick! They were nasty! |
|
| Back to top |
|
|
Jerry
Samba Member
Joined: October 28, 2007
Posts: 1367
|
| Posted: Tue Mar 03, 2009 10:08 pm Post subject: |
|
|
Here's some more progress of the cargo floor section, even the lower part of the bulkhead was rotton, some of the top-hat channel was ok
_________________
Looking for SO34 parts.
thevwcompound *instagram* |
|
| Back to top |
|
|
Jerry
Samba Member
Joined: October 28, 2007
Posts: 1367
|
| Posted: Tue Mar 03, 2009 10:10 pm Post subject: |
|
|
I found a hole in the frame after I took out the rear outrigger 
_________________
Looking for SO34 parts.
thevwcompound *instagram* |
|
| Back to top |
|
|
Jerry
Samba Member
Joined: October 28, 2007
Posts: 1367
|
| Posted: Tue Mar 03, 2009 10:16 pm Post subject: |
|
|
This is what I'm worried about the most, there seems to be an inner rocker aft of the c-pillar thats, rotton as well, the outer rocker was rotton too, I don't want to take this out right now without some reassurance from you guys thats done this before, this & whats left of the b-pillar is whats holding the roof on... maybe I should do this in phases could anyone direct me?
_________________
Looking for SO34 parts.
thevwcompound *instagram* |
|
| Back to top |
|
|
Jerry
Samba Member
Joined: October 28, 2007
Posts: 1367
|
| Posted: Tue Mar 03, 2009 10:19 pm Post subject: |
|
|
I roved the rest of the floor, headlight surround taking a sawzall around the heater pipe
drilled out spotwelds,
_________________
Looking for SO34 parts.
thevwcompound *instagram* |
|
| Back to top |
|
|
Jerry
Samba Member
Joined: October 28, 2007
Posts: 1367
|
| Posted: Tue Mar 03, 2009 10:23 pm Post subject: |
|
|
Does anyone know if a replacement inner valance comes w/ the angled part w/ a hole drilled in it (in the 2nd pic)? I held up on this, I was unsure.
_________________
Looking for SO34 parts.
thevwcompound *instagram* |
|
| Back to top |
|
|
Jerry
Samba Member
Joined: October 28, 2007
Posts: 1367
|
| Posted: Tue Mar 03, 2009 10:29 pm Post subject: |
|
|
Frontal damage caused this, it's funny how the bottom part is came away unscathed, while the top part of the channel is mangled. I was thinking of heating this & trying to reform it. Any suggestions?
I'm going to try to keep as much of the original pillars as possible, the dogled rot is just in the lower section, maybe I can just buy the piece that's rotton & keep the top part,
_________________
Looking for SO34 parts.
thevwcompound *instagram* |
|
| Back to top |
|
|
Jerry
Samba Member
Joined: October 28, 2007
Posts: 1367
|
| Posted: Tue Mar 03, 2009 10:33 pm Post subject: |
|
|
After sweeping up a bit... (looks a little lighter)
At least I recycle I wonder how much rust by the pound is going for nowadays?
_________________
Looking for SO34 parts.
thevwcompound *instagram* |
|
| Back to top |
|
|
Jerry
Samba Member
Joined: October 28, 2007
Posts: 1367
|
| Posted: Tue Mar 03, 2009 10:46 pm Post subject: |
|
|
Should I set my front floor in to get a reference point on the a-pillars first? I think the only part that hasn't been hit or rusted away is the piece between the seat pans. I was thinking that should be where I start with fitting the panels. Any suggestions or insight would be appreciated. I'm just a worker that can research, nothing more at this point. I am having a good time working on this though, (sure beats sitting on the couch). This bus sure isn't going to be a showbus, but I would like to be able to go down the road knowing I've don'e all that I can to make it safe. I'm just uncertain where to start exactly. I can now grab the passenger a-pillar & move it (with some force) about 3/8" or so. I think that would make a huge difference how the door, nose & dogleg would fit. Thank you much for any suggestions you can add. Also, could anyone tell me which part of the heater tube to remove to install the floor?
_________________
Looking for SO34 parts.
thevwcompound *instagram* |
|
| Back to top |
|
|
|


