| Author |
Message |
19typethree67
Samba Member

Joined: April 18, 2007
Posts: 351
Location: Grand Rapids, MI

|
 Posted: Thu Mar 19, 2009 8:28 pm Post subject: I'm Bringin' Fasty Back.......Yeah! (many pics) Posted: Thu Mar 19, 2009 8:28 pm Post subject: I'm Bringin' Fasty Back.......Yeah! (many pics) |
 |
|
Just thought I would start a little thread on my build. I bought this 67 Fastback from a fine VW aficionado in Canton, Michigan, back in 2003. It needed a lot more work than I imagined but it's definitely been a learning experience..........still have a ways to go. Couldn't have gotten to this point without all the fine folks here on The Samba - many thanks!
Some pics from the last 2+ years of restoration:
"Sublime"
typical battery tray rust
minus motor and body w/ more rust
welded and painted pan
engine mess
pan/powertrain complete(nearly) last summer
engine closeup - still needs axle tube rubber sleeve clamps and a few other items
Rusted heater channel - both needed replacing
new channel
"paint" in the ass removal!
hopefully ready for paint this summer |
|
| Back to top |
|
 |
FASTBACKDON
The other insensitive jerk like Neil

Joined: October 08, 2004
Posts: 3592
Location: TORRANCE CALIF
|
| Posted: Thu Mar 19, 2009 8:35 pm Post subject: |
|
|
wow good job I like it good choice going with a Fastback
_________________
FUCK CANCER FUCK CANCER FUCK CANCER!!
Mom 25 months of standing up to Cancer R.I.P I miss you so much.
Buy my best friends stuff
http://www.thesamba.com/vw/classifieds/search.php?username=56TIMOTEO
(21:10:42) Jennepher: Russell is our proudest achievment. I feel like Samba created him from a little nugget of crap into a full blown adult. |
|
| Back to top |
|
|
Blitzkrieg_
Samba Member
Joined: July 12, 2007
Posts: 229
Location: South Africa
|
| Posted: Fri Mar 20, 2009 12:22 am Post subject: |
|
|
Very nice work.
Love the Fuchs wheels  |
|
| Back to top |
|
|
abgwin
Samba Member

Joined: August 22, 2004
Posts: 1490
Location: Toledo, oHIo
|
| Posted: Fri Mar 20, 2009 7:35 am Post subject: |
|
|
| nicely done! |
|
| Back to top |
|
|
6d8fasty
Samba Member
Joined: June 19, 2008
Posts: 220
|
| Posted: Fri Mar 20, 2009 7:52 am Post subject: |
|
|
| nice fastback, i love the green color! |
|
| Back to top |
|
|
kpadams
Samba Member

Joined: February 11, 2009
Posts: 48
Location: Coral Gables, FL
|
| Posted: Fri Mar 20, 2009 8:25 am Post subject: |
|
|
| You are making serious progress. It looks really nice. -Kevin |
|
| Back to top |
|
|
19typethree67
Samba Member
Joined: April 18, 2007
Posts: 351
Location: Grand Rapids, MI
|
| Posted: Wed Jun 10, 2009 8:07 pm Post subject: |
|
|
So I decided to get the outer panels soda blasted because I'm really tired of scraping the 5 plus layers of paint off this bad boy. I was quite disappointed when I got them back because I found quite a bit of holes and filler. Should I take the filler off, bang out the dents, fill in the holes and apply more filler as necessary? Or can I sand the current filler down and add a little glazing putty? The soda blast left the filler quite rough with a lot of holes.
First timer here with the body work, so I don't really know the correct route. I know this should probably be in the paint/body forum, but I'm a little partial to the opinions of my type 3 homies! What do you fellers think? Thanks
|
|
| Back to top |
|
|
my65rhd
Samba Member
Joined: March 11, 2003
Posts: 1212
|
| Posted: Wed Jun 10, 2009 8:10 pm Post subject: |
|
|
| I sure love project pics. Coming along very nice....Kyle |
|
| Back to top |
|
|
Critter1
Samba Member

Joined: August 04, 2004
Posts: 1575
Location: Sacramento
|
| Posted: Wed Jun 10, 2009 8:25 pm Post subject: |
|
|
Definitely weld up any holes rather than using filler. I'm no body man, but I would remove ALL of the old filler and start fresh. You never know what is lurking underneath. There may be holes that need welded up. The last thing you want on your new paint job is a hole from where the "old" filler broke off. Thats no fun. You've came this far, you might as well take it that one step further to ensure your peace of mind. Thats my two cents... 
_________________
Justin |
|
| Back to top |
|
|
19typethree67
Samba Member
Joined: April 18, 2007
Posts: 351
Location: Grand Rapids, MI
|
| Posted: Fri Jun 12, 2009 7:09 pm Post subject: |
|
|
| Thanks everyone for the love and advice. I decided to give it a go today. Got my torch, scraper, welder, hammers and dollys working like crazy....what better way to learn this stuff eh? |
|
| Back to top |
|
|
Bobnotch
Samba Member

Joined: July 06, 2003
Posts: 22431
Location: Kimball, Mi
|
| Posted: Sat Jun 13, 2009 7:58 am Post subject: |
|
|
I agree with Critter, remove the old bondo and stuff as you never know whats hiding under it. You've already found a bunch of extra mirror holes. It looks like someone went thru the trouble to fill in the side moulding trim (your extra holes). Are you going to fill those holes again, or open them up? Looks great with what you've done so far.
_________________
Bob 65 Notch S with Sunroof
71 Notch ...aka Krunchy; build pics here;
http://www.thesamba.com/vw/forum/viewtopic.php?t=249390 -been busy working
64 T-34 Ghia...aka Wolfie, under construction... http://www.thesamba.com/vw/forum/viewtopic.php?t=412120
| Tram wrote: |
| "Friends are God's way of apologizing for relatives." |
| Tram wrote: |
| People keep confusing "restored" and "restroyed". |
|
|
| Back to top |
|
|
Notched
Samba Member

Joined: January 19, 2003
Posts: 2365
Location: Pacific Northwest
|
| Posted: Sat Jun 13, 2009 9:41 am Post subject: |
|
|
Fantastic job.
Did you fab up your own inner rocker panels?
I too, love project pics!!
_________________
Phillip Bradfield
Current stock: '57 Panel Bus, '63 Rat Notch, '64 Baja, '66 Variant, '67 Convertible Ghia, '68 Squareback, '69 Squareback, '69 Fastback
Southern Oregon VW Club -- http://www.sovw.org
Oregon VW Forum -- http://www.oregonvw.org |
|
| Back to top |
|
|
19typethree67
Samba Member
Joined: April 18, 2007
Posts: 351
Location: Grand Rapids, MI
|
| Posted: Sun Sep 13, 2009 7:09 pm Post subject: |
|
|
| Notched wrote: |
Fantastic job.
Did you fab up your own inner rocker panels?
I too, love project pics!! |
Thanks Notched, I actually bought the inner panels from someone here on the Samba. They seemed to fit quite well, I should be bolting them onto the chassis soon!
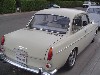
So I got er' painted over the past couple weeks. Here are some pics:
Naked Fenders.....Cover your eyes.
Pretty bad corner here, I hammered it out as much as I could, but it needed more filler than I wanted to get it straight.
Some K-36 primer in action.
Used my Dad's Pole Barn, it was actually roomier than it looks.
I painted my sisters hood while I was at it. Olds Intrigue, makes the VW hood look like a trunk-lid. Amazing how light the Olds hood was for it's size, thin metal maybe. Or maybe titanium? 
Shiny black!
Back in black on the chassis. Check out my son Drew, either he has to go the bathroom or he's a little hustler. Cracked me up when I took a good look at the photo, I didn't even notice when I snapped the pic.
Gotta say the whole painting process was a big pain in the ass. I won't look at another auto-body repair bill the same again. Much respect for those in the trade.
p.s. - how do I edit the thread title? |
|
| Back to top |
|
|
69AUSSQR
Samba Member
Joined: September 01, 2008
Posts: 81
Location: Brisbane, Australia
|
| Posted: Sun Sep 13, 2009 7:32 pm Post subject: |
|
|
Much respect.
I did my own car bodywork / respray about 9 years ago. Now i just pay....
Lookin good.  |
|
| Back to top |
|
|
dcdubs
Samba Member
Joined: January 29, 2003
Posts: 860
Location: the Great Northwest
|
| Posted: Sun Sep 13, 2009 7:40 pm Post subject: |
|
|
that car is gonna look sweet are those 15"s? carrera rs wheels?
_________________
dcdubs/glcustoms
AllRightGarageDoorsNW.com |
|
| Back to top |
|
|
19typethree67
Samba Member
Joined: April 18, 2007
Posts: 351
Location: Grand Rapids, MI
|
| Posted: Sun Sep 13, 2009 7:58 pm Post subject: |
|
|
| 69AUSSQR wrote: |
Much respect.
I did my own car bodywork / respray about 9 years ago. Now i just pay....
Lookin good. |
Thanks for the kind words, it actually looks better in the pics than close up. It needs some color sanding and polishing to get the orange peel out.
I think I will take a little pride in knowing that I did all the work, but I will likely be in your camp if I ever decide to restore another. Way way way too much sanding!
| dcdubs wrote: |
| that car is gonna look sweet are those 15"s? carrera rs wheels? |
They are actually knock-off Fuchs, 15X7". I will be using two of these in the back as I went to the shorter axles. I have some 15X5.5" for the front that I am cleaning up.....also knock-offs. The real Fuchs are too pricey for me, I would end up parking two feet away from every curb and end up getting my side-view mirror knocked off every week. |
|
| Back to top |
|
|
Bobnotch
Samba Member
Joined: July 06, 2003
Posts: 22431
Location: Kimball, Mi
|
| Posted: Mon Sep 14, 2009 4:46 am Post subject: |
|
|
Looks good, real good. Painting it black is even harder, due to having to get everything even straighter. Did you seal the bare metal with DP 90 before doing your filler work? Just asking, because doing so seems to hold up better in the long run (at least on my side of the state). Nice job, now the really hard work can begin, re-assembly without scratching the new paint.
You'll find that some of parts and pieces that were on the car before might now be marginal (in looks) for going back on. Lots of cleaning and detailing still to be done as well. Keep up the good work, and post more progress pics. 
_________________
Bob 65 Notch S with Sunroof
71 Notch ...aka Krunchy; build pics here;
http://www.thesamba.com/vw/forum/viewtopic.php?t=249390 -been busy working
64 T-34 Ghia...aka Wolfie, under construction... http://www.thesamba.com/vw/forum/viewtopic.php?t=412120
| Tram wrote: |
| "Friends are God's way of apologizing for relatives." |
| Tram wrote: |
| People keep confusing "restored" and "restroyed". |
|
|
| Back to top |
|
|
19typethree67
Samba Member
Joined: April 18, 2007
Posts: 351
Location: Grand Rapids, MI
|
| Posted: Mon Sep 14, 2009 9:29 am Post subject: |
|
|
| Bobnotch wrote: |
Looks good, real good. Painting it black is even harder, due to having to get everything even straighter. Did you seal the bare metal with DP 90 before doing your filler work? Just asking, because doing so seems to hold up better in the long run (at least on my side of the state). Nice job, now the really hard work can begin, re-assembly without scratching the new paint.
You'll find that some of parts and pieces that were on the car before might now be marginal (in looks) for going back on. Lots of cleaning and detailing still to be done as well. Keep up the good work, and post more progress pics. |
I did use a self-etch primer. I think it was a DX-1791 if I remember correctly. Told to use one light coat and let dry for 1/2 hr. before primer. Hopefully it holds up well.
I definitley have some detailing to do as I noticed a little primer overspray into the spare-tire well area after I had to do additional work to the front clip get that sort-of straight.
I have a question about the wiring harness as it has been quite some time since I disassembled it. Looking at Bert3's progress pics I think the harness starts in the front trunk by the gas tank (goes to the front lights) then into the fuse panel area - over the drivers side heater channel then out to the drivers rear quarter than around and into the engine bay? Then from there over to the passenger quarter and into the passenger rear tail light? Is that the right path to take? Any pointers on getting it in.....besides lots of patience?
Thanks! |
|
| Back to top |
|
|
jimmynotch
Samba Member

Joined: February 11, 2003
Posts: 2901
Location: sacramento
|
| Posted: Mon Sep 14, 2009 11:09 am Post subject: |
|
|
The harness is actually two harnesses, the front one from the bulkhead forward and the big one from the fuses rearward. IIRC, yours goes through the heat channel, right? I was always told to leave a section of the old harness in there to help pull the new one through. Also, do yourself a favor and add 3-4 extra wires to pull with the harness so you can cleanly install a tach, oil temp, etc. without having to drill holes and stuff later on.
_________________
Jim in Sacto -
| my wonderful loving supportive wife wrote: |
| You guys are dorks. |
1965 1500-S Notchback --"Maggy"
1971 Type 2 Double Cab --"George"
TOOB member #2 |
|
| Back to top |
|
|
Bobnotch
Samba Member
Joined: July 06, 2003
Posts: 22431
Location: Kimball, Mi
|
| Posted: Mon Sep 14, 2009 11:31 am Post subject: |
|
|
| 19typethree67 wrote: |
I have a question about the wiring harness as it has been quite some time since I disassembled it. Looking at Bert3's progress pics I think the harness starts in the front trunk by the gas tank (goes to the front lights) then into the fuse panel area - over the drivers side heater channel then out to the drivers rear quarter than around and into the engine bay? Then from there over to the passenger quarter and into the passenger rear tail light? Is that the right path to take? Any pointers on getting it in.....besides lots of patience?
Thanks! |
I normally start at the fuse box, and work my way in both directions. Yes, you've got the right idea on how it's run though. Wrap the wires together, and cover them with some masking tape to hepl direct them thru the grommets. Like I said, starting at the fuse box, then run the main harness down the "A" post to the floor heater outlet, then back to the Voltage Regulator. You might have some trouble trying to get the harness to pass thru between the rear seat upright floor kick panel and the body, but there is room for it to pass thru. The rest of the harness passes thru the hole in the inner fender by the VR, and then up and over the rear inner fender arch (held in place by strips of metal in 2 places). The wiring harness will then split into the left and right tail light sections. The right section passes thru a grommet under the side air intake, and then thru another grommet into the engine compartment. It'll split again here, to seperate the engine from the right tail light, with the tail light harness running along the front of the engine bay (held in place by strips of metal), and then around to the right side and out another grommet to the tail light.
For the front, again wrap the end for the fuse box, and the other 2 ends as well, and feed the fuse box end into the car. Now you can lay out the rest of it, since most of it just lays on sheetmetal inside the trunk (it literally wraps around 2 sides of it). Put those 2 ends thru the inner trunk grommets for now, as those 2 ends that are now dangling thru the trunk grommets on the sides go thru the head light bucket grommets and connect to the head lights and to the connector for the parking light / turn signals. Now you just have to connect all the ends to their respect points. I hope this helps.
_________________
Bob 65 Notch S with Sunroof
71 Notch ...aka Krunchy; build pics here;
http://www.thesamba.com/vw/forum/viewtopic.php?t=249390 -been busy working
64 T-34 Ghia...aka Wolfie, under construction... http://www.thesamba.com/vw/forum/viewtopic.php?t=412120
| Tram wrote: |
| "Friends are God's way of apologizing for relatives." |
| Tram wrote: |
| People keep confusing "restored" and "restroyed". |
|
|
| Back to top |
|
|
|


