| Author |
Message |
rusty57
Samba Member

Joined: October 21, 2003
Posts: 2089
Location: Bakersfield,CA.

|
 Posted: Mon Mar 30, 2009 4:28 pm Post subject: Posted: Mon Mar 30, 2009 4:28 pm Post subject: |
 |
|
I was actually being sarcastic!!! Not about the nice car part, bu the heating part. If it's lasted this long, maybe there is no urgency. Take your time.
_________________
67 Ghia coupe, Retired military.
www.TagDefender.com |
|
| Back to top |
|
 |
project bug
Samba Member
Joined: May 12, 2007
Posts: 90
|
| Posted: Mon Mar 30, 2009 4:51 pm Post subject: |
|
|
| rusty57 wrote: |
| I was actually being sarcastic!!! Not about the nice car part, bu the heating part. If it's lasted this long, maybe there is no urgency. Take your time. |
Lol... Well, he did crack a head not long ago. It has about 2000 miles on the CB heads right now. Whether or not it was caused by a heat issue I'm not sure.
It does have a oil temp gauge but the sensor is broken. I plan on fixing that along with adding a cylinder temp gauge.
I'm not really in a panic situation but I like things to be right ya know?
Most of my background is engineering related along with high horsepower development including forced induction.
I was a bit hesitant about taking the motor out because I know it will cause me to reseal the motor, take the heads off... Measure the bore.... Check the clutch.... and also figure out everything else I can about the motor.
However, due to my experience in thermodynamics I can see a full tin set helping out quite a bit with propagation of exhaust heat.
To me spending a couple hundred bucks to fix it might save me some engine work over the winter since I plan to put some miles on it.
_________________
1964 Sunroof |
|
| Back to top |
|
|
project bug
Samba Member
Joined: May 12, 2007
Posts: 90
|
| Posted: Thu Apr 16, 2009 5:55 am Post subject: |
|
|
Well, the parts are piling up.
Over the past few weeks I've been ordering parts and tearing everything down. The motor is out ready for cleaning and resealing. I also removed almost every damn polished piece including the firewall junk.
I'm glad I tore the motor down to figure out what I have since the PO didn't know too much.
What I know now.
2187
FK8 cam
Not sure on rocker ratio since I see no stampings.
The heads were not CB but Empi big bore. At first I started to panic but
found out they are cast by a OEM supplier... Plus they appear to be ported a bit so I roll with them for a while.
44 IDF's with 36 vents. Made in Spain.
All and all the engine and carbs are REALLY clean on the inside.
Aftermarket 009... I'll change to something better in the future.
It also had a stock Sachs clutch in it which seems a little burnt, and the flywheel has some glaze on it. The slip was evident when shifting around half throttle. The flywheel didn't blue at all so I should be able to clean it up.
My little parts pile is adding up every day and I should be ready pretty soon.
Bugpack 1 5/8 merged header
Hideout muffler, both coated.
OE 36 hp shroud and tins
New pushrod tubes
KEP stage one with a super disc
New oil cooler with a fan
Tune up bits... Plugs, wires, and so on.
Brakes are sorted out now.
I think that's about it for now.... The weather seems to be taking a turn and I need to get it done so I can drive it. My girlfriend keeps making fun of me since I haven't had it a month and I already tore it apart. lol
Man, considering how easy this car is to work on I don't know if I ever want to build another dry sump big block Chevy again.
_________________
1964 Sunroof |
|
| Back to top |
|
|
deluxekombi67
Samba Member

Joined: July 21, 2004
Posts: 940
Location: Ft. Lauderdale, Florida
|
| Posted: Fri Apr 17, 2009 1:59 pm Post subject: Re: My 64 beetle somewhat Cal look project |
|
|
| project bug wrote: |
I don't mind the Centerlines for now but I think I might change to a speedmaster.
|
I love the centerlines...they make the car stand out...not everyone has them these days...especially if they are real...id keep them.
_________________
67 bugs are only days away from being a Fat Chick!
_______________________________________
OG 1973 standard with factory OG PAINT Porsche phone dial rims with hand painted crests
Hell yea i LOVE the Mullholland look and im from Florida so what?  |
|
| Back to top |
|
|
project bug
Samba Member
Joined: May 12, 2007
Posts: 90
|
| Posted: Fri Apr 17, 2009 5:50 pm Post subject: Re: My 64 beetle somewhat Cal look project |
|
|
| deluxekombi67 wrote: |
I love the centerlines...they make the car stand out...not everyone has them these days...especially if they are real...id keep them. |
Thanks man.
I do believe they are real. Both front and back wheels are two piece. The fronts are riveted and the backs are bolted together.
They may stick around for a bit since I've spent my budget for the summer. The only thing I don't like is the rear offset. I wish the back tucked in so I could lower the back a little.
_________________
1964 Sunroof |
|
| Back to top |
|
|
Endicott jb
Bondo King
Joined: February 17, 2008
Posts: 1902
Location: Havre, MT
|
| Posted: Fri Apr 17, 2009 7:15 pm Post subject: |
|
|
Looks like a great starting point. Most of the work already done so you can fine tune things to your discretion.
_________________
Josh
OORAH!!
1965 vw beetle(Mayble)
1968 vw beetle(Caroline)
1974 VW Panel Bus
2003 Dodge 2500 5.9 Cummins(Katey)
.|_____|.
(0\_!_/0)
.||......||.
Don't drink and post
http://i540.photobucket.com/albums/gg353/endicott_jb/IMG_20110113_085237.jpg
When life throws you curveballs switch to boomerangs. |
|
| Back to top |
|
|
project bug
Samba Member
Joined: May 12, 2007
Posts: 90
|
| Posted: Sun Apr 19, 2009 11:49 am Post subject: |
|
|
| Endicott jb wrote: |
| Looks like a great starting point. Most of the work already done so you can fine tune things to your discretion. |
Thank you.
It's a good base for sure, and with the changes I plan I'll be able to drive it while collecting parts for the pan off.
Still can't believe I found it in Michigan.
_________________
1964 Sunroof |
|
| Back to top |
|
|
project bug
Samba Member
Joined: May 12, 2007
Posts: 90
|
| Posted: Tue Apr 21, 2009 7:24 pm Post subject: |
|
|
Here's some pics of my progress over the weekend.
My girlfriend keeps poking fun at me since I haven't owned the car a month and it's already up in the air.
The paint behind the stainless steel wasn't very nice so I decided to paint it black for now. Tar boards may also be installed before the engine goes back in. When I do the pan off this will all be body color. I also installed new tail light lenses to get rid of the blue dots.
I have almost all the removed parts cleaned and ready for assembly. For some reason the 2 valve cover hoses were not clamped tight. As they wept the fan would pick up oil and scatter it throughout the engine. Everything was FILTHY!
A close up of the IDF's I didn't bother rebuilding them since they have no issues at the time.
This would be considered 91mm bore right? The battery in my dial caliper is dead.
That's about it for now. The parts are piling up and I work on it when I can.
_________________
1964 Sunroof |
|
| Back to top |
|
|
gonebuggy
Samba Member
Joined: June 23, 2005
Posts: 691
Location: Canada
|
| Posted: Tue Apr 21, 2009 7:34 pm Post subject: |
|
|
92mm Bore
Great work! Keep it up!
Alex |
|
| Back to top |
|
|
OTO X58
Samba Member
Joined: March 27, 2004
Posts: 3102
Location: Santa Cruz, CA
|
| Posted: Tue Apr 21, 2009 8:01 pm Post subject: |
|
|
| gonebuggy wrote: |
92mm Bore
Great work! Keep it up!
Alex |
Which is bad news, unfortunately. the 92mm pistons are put into the same cylinders as 90.5 pistons, which results in a thinner cylinder wall. That means that the engine will run hot. If it's in your budget, I'd go ahead and either buy 90.5 pistons/cylinders or have the case machined for 94m pistons/cylinders. The parts are relatively the same cost (about 200 bucks, i think) but the 94s will end up costing more because the case and heads need to be machined to make them fit. on the upside, it's more displacement! And the machine work shouldn't cost that much.
It's cool to see that you took it all apart to improve it! If you end up installing the factory style tarboard, it might be a good idea to put something through it right in front of the fan inlet area. When that tarboard gets hot, it gets soft and can warp right into the fan inlet and block the airflow. In the past, on my beater-ass cars, i've just used self-tapping screws with fender washers on them right in that area, to hold the tarboard back. But maybe you can find a cleaner way.
Keep up the good work, man!
_________________
-Thomas
RIP HBB 10.10.84 - 12.25.09
1958 Ragtop Bug Build - Subaru Swap!
1957 Gazelle Beige Ghia FOR SALE
1957 Dove Blue Kombi field find |
|
| Back to top |
|
|
project bug
Samba Member
Joined: May 12, 2007
Posts: 90
|
| Posted: Tue Apr 21, 2009 9:12 pm Post subject: |
|
|
| RoachGhia wrote: |
| gonebuggy wrote: |
92mm Bore
Great work! Keep it up!
Alex |
Which is bad news, unfortunately. the 92mm pistons are put into the same cylinders as 90.5 pistons, which results in a thinner cylinder wall. That means that the engine will run hot. If it's in your budget, I'd go ahead and either buy 90.5 pistons/cylinders or have the case machined for 94m pistons/cylinders. The parts are relatively the same cost (about 200 bucks, i think) but the 94s will end up costing more because the case and heads need to be machined to make them fit. on the upside, it's more displacement! And the machine work shouldn't cost that much.
It's cool to see that you took it all apart to improve it! If you end up installing the factory style tarboard, it might be a good idea to put something through it right in front of the fan inlet area. When that tarboard gets hot, it gets soft and can warp right into the fan inlet and block the airflow. In the past, on my beater-ass cars, i've just used self-tapping screws with fender washers on them right in that area, to hold the tarboard back. But maybe you can find a cleaner way.
Keep up the good work, man! |
Thanks guys.
Well, I measured piston travel which is 80mm so it figures out at 2118 cc's. A little smaller than the guy told me but it's no biggie besides the wall thickness issue. Looking at the engine out of the car it spins awesome, crank end play is great, and it still has very good cross hatches on the walls. Judging by what I've seen I wouldn't be suprised if it has 2000 miles on it since the rebuild.
In all reality I think I'll put it back together as is and try to keep it cool while I collect parts for another motor. I've been waiting close to 8 years to have another toy and I'd rather do some driving this summer, ya know? It will see limited miles and I don't plan on taking it to the strip so I hope it will be ok.
Plus if I decided to swap out cylinders and slugs I would be tempted to pick up a set of new heads to get away from the Empi's. Not even mentioning what I would find if I took apart the trans. It feels good but seems to be weeping some fluid....And so on, and so on....
As it sits right now I have about 5 grand in it with parts, just putting me over my budget for the summer.
Thanks for the tip on the tar board, I was thinking of installing a round plate by the fan area to prevent what you spoke of.
_________________
1964 Sunroof |
|
| Back to top |
|
|
estofer
Samba Member

Joined: November 25, 2004
Posts: 867
Location: Lawrence, Kansas
|
| Posted: Tue Apr 21, 2009 9:28 pm Post subject: Re: My 64 beetle somewhat Cal look project |
|
|
[quote="project bug"]
| deluxekombi67 wrote: |
They may stick around for a bit since I've spent my budget for the summer. The only thing I don't like is the rear offset. I wish the back tucked in so I could lower the back a little. |
Just a thought.... I know your bug is a 64, but it looks like it could possibly have "long Axle" set up that came on late 66 and 67 swing axle bugs. Is it possible that when the engine was upgraded to a 12v swing axle tranny was pulled out of a 67 and installed in the 64???
On my bug the Prior owner replaced one of the rear axles with a long axle and the other was short. The stance in the rear of your car with the clearance of the rear fenders reminds me of how my bug looked with the long axle.
I don't recall the details exactly but it has something to do with measuring the length the end casting of the axle tube to determine if you have a long or short set up. If you search the forms you will find more detail on what I am talking about.
Sorry for being so vague but it is late and I am half asleep 
_________________
1964 Type 1 Vert "Ruby"
2019 Tiguan
2020 Tiguan |
|
| Back to top |
|
|
project bug
Samba Member
Joined: May 12, 2007
Posts: 90
|
| Posted: Wed Apr 22, 2009 5:05 am Post subject: Re: My 64 beetle somewhat Cal look project |
|
|
| estofer wrote: |
Just a thought.... I know your bug is a 64, but it looks like it could possibly have "long Axle" set up that came on late 66 and 67 swing axle bugs. Is it possible that when the engine was upgraded to a 12v swing axle tranny was pulled out of a 67 and installed in the 64???
On my bug the Prior owner replaced one of the rear axles with a long axle and the other was short. The stance in the rear of your car with the clearance of the rear fenders reminds me of how my bug looked with the long axle.
I don't recall the details exactly but it has something to do with measuring the length the end casting of the axle tube to determine if you have a long or short set up. If you search the forms you will find more detail on what I am talking about.
Sorry for being so vague but it is late and I am half asleep |
I gave this some thought when I bought the car. It's on my list of things to measure but I haven't done the research on dimensions yet.
If I happen to have the long set up I may switch it back when I do the pan off.
_________________
1964 Sunroof |
|
| Back to top |
|
|
project bug
Samba Member
Joined: May 12, 2007
Posts: 90
|
| Posted: Tue Apr 28, 2009 10:53 am Post subject: |
|
|
Hey guys,
I put the motor back in the car last night to start mocking up the tin work as well as the seals... I did a bunch of searching on this stuff but haven't found anything to relevant. Considering the car had NO tins or seals I'm kind of shooting in the dark.
I installed the "J" style seal like "A" in my fancy drawing. Looking at the pieces it makes sense to install it this way.
However, this poses issues.
1- the seal crashes into the valve covers so much there is NO way the upper cylinder tins will fit in the slot of the seal.
2- If the breast plate bolts to the welded nuts on the edges of the cylinder tins it won't happen.
Am I wrong in my assumption of the seal orientation and "B" is correct?
As it looks right now I think I'm better off using the cylinder tins then fabricating my own breast plate and pulley tin combo. The original pulley tin does not clear the oil pump and pulley.
Speaking of cylinder tins I don't think my OEM style 3 piece kit as going to clear my J-tubes at all. I may have to make some of those too. I assume just using the small deflectors by themselves is a no no.
Thanks for any help.
_________________
1964 Sunroof |
|
| Back to top |
|
|
project bug
Samba Member
Joined: May 12, 2007
Posts: 90
|
| Posted: Sat May 16, 2009 3:02 pm Post subject: |
|
|
Double post, sorry.
_________________
1964 Sunroof
Last edited by project bug on Sat May 16, 2009 3:26 pm; edited 1 time in total |
|
| Back to top |
|
|
project bug
Samba Member
Joined: May 12, 2007
Posts: 90
|
| Posted: Sat May 16, 2009 3:05 pm Post subject: |
|
|
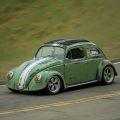
Well, it runs again.
I still have a few things to do like replacing the oil cooler and moving it under the vehicle, and make a breast plate since the one I bought runs into a few things. Budget didn't allow the oil cooler yet but I should be able to replace it within the next month.
This is how it sits as of today.
I think the engine looks much better and should run cooler... So far it seems ok but I still need a cylinder temp gauge. Drove it to work yesterday with no problems but I do have to do a little tweaking. For some odd reason I get one pop out of the exhaust within 5 seconds after turning it off... It's odd, I've never had an engine do that before.
It sounds MUCH better too.
_________________
1964 Sunroof
Last edited by project bug on Sat May 16, 2009 3:18 pm; edited 1 time in total |
|
| Back to top |
|
|
neonrick
Samba Member

Joined: February 03, 2006
Posts: 579
Location: Tampa, Florida
|
| Posted: Sat May 16, 2009 3:06 pm Post subject: |
|
|
| NICE!!!!!!!! |
|
| Back to top |
|
|
project bug
Samba Member
Joined: May 12, 2007
Posts: 90
|
| Posted: Sat May 16, 2009 3:27 pm Post subject: |
|
|
| neonrick wrote: |
| NICE!!!!!!!! |
Thank you sir.
_________________
1964 Sunroof |
|
| Back to top |
|
|
project bug
Samba Member
Joined: May 12, 2007
Posts: 90
|
| Posted: Tue May 19, 2009 12:23 pm Post subject: |
|
|
I thought I did a good job. 
_________________
1964 Sunroof |
|
| Back to top |
|
|
OTO X58
Samba Member
Joined: March 27, 2004
Posts: 3102
Location: Santa Cruz, CA
|
| Posted: Tue May 19, 2009 12:58 pm Post subject: |
|
|
| project bug wrote: |
| I thought I did a good job. |
Looks good to me! I love the color of the shroud against the body color, and the red wires are a nice contrast. I hate the oil cooler, but you already said you're working on moving it.
I don't understand the problem you're having with the seals though, even with the diagrams. But as a general rule, engine tins fit like crap, and take a lot of patience to get installed, especially when you have to use aftermarket parts. Can you take a picture of the part that you're having trouble with?
In my experience, the pulley tin will not clear an aftermarket oil pump with a full-flow fitting in it, so that little bit will have to be trimmed most likely. So you're not doing anything wrong, it's just a common problem there.
Good job, man! keep it up, and have fun with it!
_________________
-Thomas
RIP HBB 10.10.84 - 12.25.09
1958 Ragtop Bug Build - Subaru Swap!
1957 Gazelle Beige Ghia FOR SALE
1957 Dove Blue Kombi field find |
|
| Back to top |
|
|
|


