| Author |
Message |
totemwesty
Samba Member

Joined: February 17, 2009
Posts: 134
Location: Bend, Oregon

|
 Posted: Sun May 09, 2010 9:56 pm Post subject: Posted: Sun May 09, 2010 9:56 pm Post subject: |
 |
|
Thanks guys....Alright, so today I spent time on headlights. The assemblies were complete but needed new bulb and bit crusty inside housings. Dissasembly featured flying spring/clips that had ranges up to 12 ft. There location in garage was only revealed but a quiet Tink Tink Tink upon landing  Rubber grommets had petrified. Basically cleaned em up and painted. Reassembly featured 3 false starts and couldn't remember set up for a bit. Rubber grommets had petrified. Basically cleaned em up and painted. Reassembly featured 3 false starts and couldn't remember set up for a bit.
Nothin special here but I do like the little running lights 
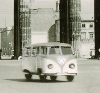
Hardly the light at the end of the tunnel for this project but runner, low and high beams are present now
_________________
"I set sail for the new world, then I burned down the mast.... It wasn't the first time, and I know it wont be the last..." Bloodkin
'67 Westy Pop Top
Last edited by totemwesty on Wed Aug 16, 2017 5:15 pm; edited 1 time in total |
|
| Back to top |
|
 |
Keysar
Samba Grammar Tutor

Joined: April 16, 2008
Posts: 1663
Location: PNW
|
| Posted: Sun May 09, 2010 10:01 pm Post subject: |
|
|
Looking great! 
_________________
| Clara wrote: |
| ...but mainly perfecting my tossing peanuts shells out the window into the air scoops technique. |
|
|
| Back to top |
|
|
totemwesty
Samba Member
Joined: February 17, 2009
Posts: 134
Location: Bend, Oregon
|
| Posted: Sat May 15, 2010 5:53 pm Post subject: |
|
|
Got the rear lights dialed intoday...Not good bulb contact cuase prongs were kind of crudy. I took them out of housing and sanded em up, this spot has always been suspect in my past VWs so it feels like reward
I was solo and needed brakes on....after an array of efforts in the cab that included cinder block, boards, cords, etc. I was underneath pedals and.....  ....put a cheater between brake pedal and master cyl.....brake on long as I needed. ....put a cheater between brake pedal and master cyl.....brake on long as I needed.
Heres the lenses ohhhh wowwww, I know, but do note non original screw and rust from it on trim ring
The buckets intalled with new seals and the lenses reveal bright brakes/turn signal, and runner lights all on now.....next up plate light and I am over wiring for a bit 
_________________
"I set sail for the new world, then I burned down the mast.... It wasn't the first time, and I know it wont be the last..." Bloodkin
'67 Westy Pop Top |
|
| Back to top |
|
|
totemwesty
Samba Member
Joined: February 17, 2009
Posts: 134
Location: Bend, Oregon
|
| Posted: Sun May 16, 2010 6:09 pm Post subject: |
|
|
Hi Guys....So the door windows assemblies got attention today. Both sides had all parts exept latch rail on inside. They worked fine but are kinda weathered so I sanded em down. Left original paint on the inside. Full dissasembely would be nice down the line but some pretty rusty screws prevented it here.
So I cut old seal in half and by working back and forth in channel it basically came out in 2 crusty strips.
So now I have them ready to reinstall. I got em looking fine and made sure to sand/clean debris from seal channel so my new seals will be easier to put in. Thanks for looking.
_________________
"I set sail for the new world, then I burned down the mast.... It wasn't the first time, and I know it wont be the last..." Bloodkin
'67 Westy Pop Top |
|
| Back to top |
|
|
totemwesty
Samba Member
Joined: February 17, 2009
Posts: 134
Location: Bend, Oregon
|
| Posted: Mon May 17, 2010 10:15 am Post subject: |
|
|
Things went well this morning. I was able to get new seals slid in window assemblies w/ ease! I mounted assemblie on door and got everything aligned. The door seal under assemblie was tricky and needed lube and as it was wedged tight around posts. Then the bolt holes were high and so I started under-sill nuts to draw it down. I then needed to use a screwdriver in lower holes as lever to get upper bolts started. Shut door and seal to body will need the old talc tip from thread Hazetguy resently revived....pics, enjoy, have a good day....
_________________
"I set sail for the new world, then I burned down the mast.... It wasn't the first time, and I know it wont be the last..." Bloodkin
'67 Westy Pop Top |
|
| Back to top |
|
|
brettsvw
Samba Member
Joined: November 22, 2007
Posts: 2145
Location: Florida
|
|
| Back to top |
|
|
totemwesty
Samba Member
Joined: February 17, 2009
Posts: 134
Location: Bend, Oregon
|
| Posted: Thu Jun 10, 2010 4:17 pm Post subject: |
|
|
So here is whats on the workbench today. I went to the Northwest Bug In last week-end. Was going through swap and pretty much right away I spotted fried eggs on a table. Always been missing these so wasnt sure if there are right and left?...."yeah man...10 bucks for both..." so got em and later saw R and L. Bulbs in em too so I put them on today.
I have this box of seals that came w/ the bus...these few dont have tags and I dont recognize them. Could someone help me and tell me where they go? In return I will do the right thing....Dedicate a picture of these installed to them in my thread!  Thanks for visiting today. Thanks for visiting today.
_________________
"I set sail for the new world, then I burned down the mast.... It wasn't the first time, and I know it wont be the last..." Bloodkin
'67 Westy Pop Top |
|
| Back to top |
|
|
EverettB 
Administrator

Joined: April 11, 2000
Posts: 69820
Location: Phoenix Metro
|
| Posted: Thu Jun 10, 2010 4:45 pm Post subject: |
|
|
| totemwesty wrote: |
I have this box of seals that came w/ the bus...these few dont have tags and I dont recognize them. Could someone help me and tell me where they go? In return I will do the right thing....Dedicate a picture of these installed to them in my thread! Thanks for visiting today.
|
The 3 sticking out look like the engine decklid seal. There are 4 pieces though.
The grey square seal in the background looks like a cargo door seal piece.
And what looks like a fan belt in the upper left.
_________________
How to Post Photos
Everett Barnes - [email protected] | My wanted ads
"Water is the only drink for a wise man" | "Communication prevents complaints"
Stop dead photo links! Post your photos to The Samba Gallery! |
|
| Back to top |
|
|
totemwesty
Samba Member
Joined: February 17, 2009
Posts: 134
Location: Bend, Oregon
|
| Posted: Fri Jun 11, 2010 3:18 pm Post subject: |
|
|
Hi all....He was right! Today I put on engine decklid seals. Here is a pic as promised w/ a nod to E.B.
Also spent some time going over window sets. Kinda strange corrosion on these. Weird dust present as I sanded em up and later my fingers were all dry and figidy. Anyways all the screens are in good shape w/out holes. Some of them wont open but the turn mech. seems fine. I suspect the steel rivets and vaguely recall a quote from majorwoody about what he would do to the engineer who decided on them....Oh well, other than that they are ready to go back in! Have a good week-end.
_________________
"I set sail for the new world, then I burned down the mast.... It wasn't the first time, and I know it wont be the last..." Bloodkin
'67 Westy Pop Top |
|
| Back to top |
|
|
LAGrunthaner
Samba Member

Joined: March 18, 2007
Posts: 5508
Location: 1st Coast
|
| Posted: Sat Jun 12, 2010 4:26 am Post subject: |
|
|
totemwesty, nice work very motivating quick question what paint did you use in the headlight buckets and what paint did you use on the roof panels?
_________________
American Red Cross Safe And Well:
https://www.redcross.org/about-us/news-and-events/...bsite.html
Maui Roadsters 
www.mauiroadsters.com
http://www.oacdp.org
| Lind wrote: |
| Have you considered simply starting with a nicer bus? I don't know what your skills are, but the race is easier if you can see the finish line. If you are not a runner, don't start off doing a marathon. |
|
|
| Back to top |
|
|
totemwesty
Samba Member
Joined: February 17, 2009
Posts: 134
Location: Bend, Oregon
|
| Posted: Sat Jun 12, 2010 1:11 pm Post subject: |
|
|
Good day. Linda, I used dupli-cote primer gray for paint on those parts. Not so scuff-resistant though but got em even look. I got these seatbelts w/ bus. The PO had them anchored w/ giant washer through some factory hole in pedistall area The latches and recoil worked well. I decided to re-use them for now as they are safe and have a kinda old look to them. They only needed one bit of modification and were ready to re-install  ...Sits a bit off in my head but something for down the line....Thanks. ...Sits a bit off in my head but something for down the line....Thanks.
_________________
"I set sail for the new world, then I burned down the mast.... It wasn't the first time, and I know it wont be the last..." Bloodkin
'67 Westy Pop Top
Last edited by totemwesty on Wed Aug 16, 2017 5:17 pm; edited 1 time in total |
|
| Back to top |
|
|
Adam
Samba Member

Joined: November 08, 2009
Posts: 624
Location: Petaluma, Ca
|
| Posted: Sat Jun 12, 2010 9:56 pm Post subject: |
|
|
| Great progress. I like this tread |
|
| Back to top |
|
|
totemwesty
Samba Member
Joined: February 17, 2009
Posts: 134
Location: Bend, Oregon
|
| Posted: Sun Jun 27, 2010 3:56 pm Post subject: |
|
|
Good day everyone.....Alright well I spent some time contourted up in the cab today. All stationary windows are now in w/ new seals. The side window was installed w/ friend who knew how. Then I did the pass. side windshield install solo. I tried drivers windshield but couldnt reach since pass. windshield was in and so waited for a friend to help. Great, now for some fun stuff like rear-veiw mirror. I finnesed the snubber out before paint and it was well recieved by windsheild post w/ just a twist in. Kersnapp and the ashtray was in. Antenna on tight and extends fully. I believe the hand possition nessecary to install speedo is the same possition for *%#! in sign-language. Gas guage not so much. Grab handle sturdy, parcel-tray in, kick boards in.
Its nothing for me to say as things move along and this Bus becomes more complete it becomes rewarding
_________________
"I set sail for the new world, then I burned down the mast.... It wasn't the first time, and I know it wont be the last..." Bloodkin
'67 Westy Pop Top
Last edited by totemwesty on Wed Aug 16, 2017 5:18 pm; edited 1 time in total |
|
| Back to top |
|
|
maxxh2o
Samba Member

Joined: February 24, 2009
Posts: 9
Location: Eugene, Oregon
|
| Posted: Sat Nov 20, 2010 2:59 pm Post subject: |
|
|
| Looking good J.....keeping it clean and looking nice! |
|
| Back to top |
|
|
xavi_242
Samba Member

Joined: May 06, 2005
Posts: 1672
Location: Barcelona (SPAIN)
|
| Posted: Sat Nov 20, 2010 3:05 pm Post subject: |
|
|
any update on this?
_________________
1967 Split SO-42 Dormobile |
|
| Back to top |
|
|
totemwesty
Samba Member
Joined: February 17, 2009
Posts: 134
Location: Bend, Oregon
|
| Posted: Wed Aug 16, 2017 5:08 pm Post subject: Re: Cloud 9... '67 SO42 |
|
|
It took quite some time but I finally got it done. After gathering information I took my bus to the DMV with all necessary forms to apply for a title. The bus was inspected and the application was reviewed.
_________________
"I set sail for the new world, then I burned down the mast.... It wasn't the first time, and I know it wont be the last..." Bloodkin
'67 Westy Pop Top |
|
| Back to top |
|
|
totemwesty
Samba Member
Joined: February 17, 2009
Posts: 134
Location: Bend, Oregon
|
| Posted: Wed Aug 16, 2017 5:30 pm Post subject: Re: Cloud 9... '67 SO42 |
|
|
After waiting patiently the title and plates/registration arrived. Now to get back to work on my bus.
_________________
"I set sail for the new world, then I burned down the mast.... It wasn't the first time, and I know it wont be the last..." Bloodkin
'67 Westy Pop Top |
|
| Back to top |
|
|
srfndoc
Samba Member

Joined: August 21, 2010
Posts: 3275
Location: SoCal
|
| Posted: Wed Aug 16, 2017 6:12 pm Post subject: Re: Cloud 9... '67 SO42 |
|
|
Nice thread revival. Westy is looking good.
_________________
RPM=(MPH*336* (R&P*4th*1.26))/Tire Diameter in inches |
|
| Back to top |
|
|
totemwesty
Samba Member
Joined: February 17, 2009
Posts: 134
Location: Bend, Oregon
|
| Posted: Mon Aug 21, 2017 4:31 pm Post subject: Re: Cloud 9... '67 SO42 |
|
|
Hi everyone. Today the bus is up on stands. I am getting new tires. The bus has not been on the road since '82, some of the tires were likely quite older than that. They were all obviously worn out but it was interesting to see the old manufacturers and logos. Cordova, Sears, Continental, etc. The Rims overall are in good shape with some missing hubcap clips and 2 minor dings. Currently researching new tire specs and makes.
_________________
"I set sail for the new world, then I burned down the mast.... It wasn't the first time, and I know it wont be the last..." Bloodkin
'67 Westy Pop Top |
|
| Back to top |
|
|
LAGrunthaner
Samba Member
Joined: March 18, 2007
Posts: 5508
Location: 1st Coast
|
| Posted: Tue Aug 22, 2017 4:16 am Post subject: Re: Cloud 9... '67 SO42 |
|
|
Congratulations totemwesty, looking forward to more updates after you get the new tires.
_________________
American Red Cross Safe And Well:
https://www.redcross.org/about-us/news-and-events/...bsite.html
Maui Roadsters
www.mauiroadsters.com
http://www.oacdp.org
| Lind wrote: |
| Have you considered simply starting with a nicer bus? I don't know what your skills are, but the race is easier if you can see the finish line. If you are not a runner, don't start off doing a marathon. |
|
|
| Back to top |
|
|
|


