| Author |
Message |
Sigurd
Samba Member
Joined: April 18, 2006
Posts: 2639
Location: Rockford, IL

|
 Posted: Tue Oct 27, 2009 5:50 am Post subject: Piston notching, and it's not a race engine! Posted: Tue Oct 27, 2009 5:50 am Post subject: Piston notching, and it's not a race engine! |
 |
|
First, the details:
94 x 69
ported 041s (40 x 35.5, 57cc)
120 w/1.25 rockers ~0.520" at the valve
0.045" deck
Is there any reason that I should have to think about notching my pistons with this setup? I was cc-ing the chambers last night in preparation for flycutting when it occurred to me to check valve/piston interference. I turned the head over with the cc plate in place and miked out about 0.450" lift before the valve hit the plate.
This engine had about 1/8" of clearance between full lift and TDC when I put it together last spring. I got a new valve and port job a few weeks ago.
I already have this question sent out to the guys that did the headwork. I also don't have my cylinders now (getting cut down for deck.
Should I just wait until I get all the parts back? Am I being paranoid? |
|
| Back to top |
|
 |
Eaallred
Samba Member

Joined: May 18, 2003
Posts: 5756
Location: West Valley City, Utah
|
| Posted: Tue Oct 27, 2009 6:36 am Post subject: |
|
|
You can clay it to be sure and rotate the engine for the markings.
Most likley you are fine, the valves are never at full lift when the piston is at TDC.
_________________
Eric Allred
You have to remember something: Everybody pities the weak; Jealousy you have to earn. |
|
| Back to top |
|
|
nsracing
Samba Member

Joined: November 16, 2003
Posts: 9481
Location: NOVA
|
| Posted: Tue Oct 27, 2009 6:45 am Post subject: |
|
|
You are not paranoid. 
But you should checking valve-to-piston clearance anyway in ANY build.
I use light springs like the Type IV rocker springs and use that as temporary springs.
Put a cylinder in its INTAKE stroke to full lift and push down on the INTAKE valve...measure dimension until valve touches top of piston.
Put said cylinder in EXHAUST stroke to full lift and then push down on EXHAUST valve....measure dimension until valve touches top of piston.
Allow a little more clearance to the exhaust as the piston will be in collision w/ valve. I like 0.060 inch minimum for exhaust and 0.050 for intake.
The intake can be set w/ tighter clearance since the valve will be chasing the piston during the intake stroke.
Just make sure the valve guide tops are trimmed enough to clear all the retainers in full lift.
If the heads were not flycut deep, it is rare you have to notch pistons for small cams. But of course, it has to be checked anyway...part of the build. |
|
| Back to top |
|
|
Sigurd
Samba Member
Joined: April 18, 2006
Posts: 2639
Location: Rockford, IL
|
| Posted: Tue Oct 27, 2009 7:06 am Post subject: |
|
|
Thanks guys. I am using some light springs I got from AC.N to check. I can push the valve down with two fingers.
| Eaallred wrote: |
You can clay it to be sure and rotate the engine for the markings.
Most likley you are fine, the valves are never at full lift when the piston is at TDC. |
I keep hearing 0.120" clearance being thrown around. So this is NOT measured with the piston at TDC? Instead, I'm supposed to measure it when the valve is at full lift? That sounds like I'm creating an interference engine, whereby if a valve were to hang open at full lift, the piston would smack it on the way back up. But I guess even if were a non-interference engine, hanging a valve open would be a problem, huh? |
|
| Back to top |
|
|
Stripped66
Samba Member
Joined: May 31, 2005
Posts: 3470
Location: Charleston, SC
|
| Posted: Tue Oct 27, 2009 7:09 am Post subject: |
|
|
To reinforce what Eric and Nick said, checking valve clearance is a necessary part of the build. Not doing so means that you are placing trust in a cam that was indexed properly when it was ground, and cam gears that were indexed properly when they were machined. If either of these two components are not up to spec, you could end up with too much advance at the cam and an intake valve that opens too early.
Obviously, not a likely scenario, but it's also something that you cannot check just by looking at the parts. Mock it up, clay the piston, and check the clearance to be certain.
_________________
| 66brm wrote: |
| Bodacious wrote: |
| Why not just make a custom set of wires with a Y splice in them. Then you could just run one distributor. |
I don't think electrickery works that way |
|
|
| Back to top |
|
|
Sigurd
Samba Member
Joined: April 18, 2006
Posts: 2639
Location: Rockford, IL
|
| Posted: Tue Oct 27, 2009 8:19 am Post subject: |
|
|
Right. I understand the importance. I just want to make sure I have the method right.
A) Set piston at TDC. Note position of valves. Try to push them down 0.060".
-or-
B) Set valve at full lift. Push valve down 0.060". Repeat for other valve.
 |
|
| Back to top |
|
|
Stripped66
Samba Member
Joined: May 31, 2005
Posts: 3470
Location: Charleston, SC
|
| Posted: Tue Oct 27, 2009 9:16 am Post subject: |
|
|
C) Put clay on the piston, rotate the crankshaft through the exhaust stroke and intake stroke. Pull heads off and measure the thickness of the clay where the valve made it's impression.
You're really interested in the valve-to-piston clearance *around* 10-20 degrees before TDC on the exhaust stroke (for exhaust valve clearance) and *around* 10-20 degrees after TDC on the intake stroke (for intake valve clearance). Crank rotation beyond that range *typically* has the piston sufficiently away from the valve, even at full lift. These are not clearances you can measure at either TDC, or the crank position where you experience full valve lift. This clearance critically depends on your cam's duration, lobe separation angle, cam timing, and rate at which the valve opens.
_________________
| 66brm wrote: |
| Bodacious wrote: |
| Why not just make a custom set of wires with a Y splice in them. Then you could just run one distributor. |
I don't think electrickery works that way |
|
|
| Back to top |
|
|
Sigurd
Samba Member
Joined: April 18, 2006
Posts: 2639
Location: Rockford, IL
|
| Posted: Tue Oct 27, 2009 10:25 am Post subject: |
|
|
| Thanks. That helped. I kept thinking I could do this with a dial indicator. |
|
| Back to top |
|
|
SGKent 
Samba Member

Joined: October 30, 2007
Posts: 41031
Location: Citrus Heights CA (Near Sacramento)
|
| Posted: Tue Oct 27, 2009 10:53 pm Post subject: |
|
|
| Quote: |
| That sounds like I'm creating an interference engine, whereby if a valve were to hang open at full lift, the piston would smack it on the way back up |
many engines with overhead valves will tag a piston if the valve were to hang fully open. Use clay and measure the clearance. Unless you are running domes or a high lift cam / rockers you won't normally run into clearance issues. VW's use gears to turn the cam and doesn't have timing belts so we rarely see piston to valve tags unless something else goes wrong like a tight valve guide or broken valve spring at high rpm If your timing gear breaks you have bigger problems than tagging a piston with a valve. The T4 engine that came with our bus was so far gone that there was no bearing shell left in #3 rod. The rod was so loose that the piston was tagging the head. Even so there was no valve to piston contact.
_________________
Most people dont know what theyre doing, and a lot of them are really good at it. - George Carlin |
|
| Back to top |
|
|
Eaallred
Samba Member
Joined: May 18, 2003
Posts: 5756
Location: West Valley City, Utah
|
| Posted: Wed Oct 28, 2009 6:33 am Post subject: |
|
|
Clay is the sure-fire, fool proof way to check your piston to valve clearance.
You can't just put it at TDC and see what the clearance is, because due to the cam timing, where your valve is closest to the piston is never actually at TDC.
I put a light "test spring" on the valve and a dial indicator on the rocker and rotate the engine over fully 'functional' while pushing the valve in monitoring the dial indicator. I find the point at which there is the least amount of movement.
.100" is plenty of clearance for most engines. My race engine spinning 9K with heavy 48mm steel valves was still lightly tagging my piston tops at .100" so I ended up going all the way to .150" to eliminate it.
But again, clay the top of the piston and rotate the engine with the valve train 'functioning' and see exactly how much clearance you have. It's fool proof.
_________________
Eric Allred
You have to remember something: Everybody pities the weak; Jealousy you have to earn. |
|
| Back to top |
|
|
fatalifeaten
Samba Member

Joined: November 16, 2006
Posts: 181
Location: Mesa AZ
|
| Posted: Wed Oct 28, 2009 6:52 am Post subject: |
|
|
Sorry to ask what's probably an obvious question, but when you guys say "clay the piston", can you explain the process you're referring to? Do you just work a chunk of clay over the piston top, run it through a cycle, and measure?
_________________
Daily Driven Dubz. Phoenix Family
"I want to know God's thoughts. The rest are details"
--Albert Einstein
'66 Beetle
'63 Beetle |
|
| Back to top |
|
|
Stripped66
Samba Member
Joined: May 31, 2005
Posts: 3470
Location: Charleston, SC
|
| Posted: Wed Oct 28, 2009 7:06 am Post subject: |
|
|
Yep.
_________________
| 66brm wrote: |
| Bodacious wrote: |
| Why not just make a custom set of wires with a Y splice in them. Then you could just run one distributor. |
I don't think electrickery works that way |
|
|
| Back to top |
|
|
Sigurd
Samba Member
Joined: April 18, 2006
Posts: 2639
Location: Rockford, IL
|
| Posted: Wed Oct 28, 2009 7:09 am Post subject: |
|
|
| I wish I had my crank and pistons back. I want to do this this weekend. |
|
| Back to top |
|
|
fatalifeaten
Samba Member
Joined: November 16, 2006
Posts: 181
Location: Mesa AZ
|
| Posted: Wed Oct 28, 2009 7:13 am Post subject: |
|
|
Thanks 
_________________
Daily Driven Dubz. Phoenix Family
"I want to know God's thoughts. The rest are details"
--Albert Einstein
'66 Beetle
'63 Beetle |
|
| Back to top |
|
|
SGKent
Samba Member
Joined: October 30, 2007
Posts: 41031
Location: Citrus Heights CA (Near Sacramento)
|
| Posted: Wed Oct 28, 2009 12:30 pm Post subject: |
|
|
yes, the valve will leave an impression in the clay where it interferes with the clay. You then measure how deep the clay is where the valve stopped making its impression.
_________________
Most people dont know what theyre doing, and a lot of them are really good at it. - George Carlin |
|
| Back to top |
|
|
nsracing
Samba Member
Joined: November 16, 2003
Posts: 9481
Location: NOVA
|
| Posted: Fri Oct 30, 2009 3:21 am Post subject: |
|
|
On a full race motors w/ deeply flycut heads and FK 89 or 98 cam, I can tell you that the clay method will not be needed until you have made the pockets in the piston tops. As you will find out that the valves will touch the pistons before you even get to full lift. So what are you claying?
Also, you cannot just keep putting deeper pockets in the pistons tops as you might come out on the bottom as you cut. Unless you are using Wiseco or KB or other "eyebrow" pistons designed for this pocketing, Mahles on the other hand need extra care as the pistons tops are not that thick.
Your stock height heads and that particular cam Engle 120 will have plenty of valve-to-piston clearance. But just check for the interference anyway. The quickest way and no clean up is just w/ the dial indicator. Once you are at full lift and pushed down on the valve and you did not touch anything going down by 0.100 inch....I say you have plenty of clearance, don't you think? Do you need to measure down to 1/2 inch???
88mm strokes and long rods plus CB Eliminators w/ very large valves and 42cc chambers, FK 89 or 98, you WILL have interference before full lift.
Also, I did not find the clay method appealling since you can hit the clay early and bottom out without completely squashing the clay. W/ just indicator, you have a clear shot.
Just my 2 cents. |
|
| Back to top |
|
|
neil68
Samba Member

Joined: March 17, 2007
Posts: 3440
Location: Calgary, Canada
|
| Posted: Fri Oct 30, 2009 10:49 am Post subject: claying the piston |
|
|
| fatalifeaten wrote: |
| Sorry to ask what's probably an obvious question, but when you guys say "clay the piston", can you explain the process you're referring to? Do you just work a chunk of clay over the piston top, run it through a cycle, and measure? |
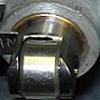
I just use plasticine (pic 1). After going through two rotations, then just slice the clay and measure the thickness (pic 2). I use 0.080"-0.100" as safe clearance. These pics show my former 2017 cc with Engle 120/1.25's and 0.055" DH...lots of room, well over 0.120"...
_________________
Neil.
Der Kleiner Rennwagens
68 Beetle 2332 cc, 204 WHP
12.5 seconds @ 107 mph
Dynojet Test: https://www.youtube.com/watch?v=M9B_H3eklAo |
|
| Back to top |
|
|
nsracing
Samba Member
Joined: November 16, 2003
Posts: 9481
Location: NOVA
|
| Posted: Fri Oct 30, 2009 10:24 pm Post subject: |
|
|
Neil, looks like the exhaust is fine. But the intake valve w/ much larger valve area is very close to the piston top, is it not?
From the looks of that clay, the edge of the intake has completely ruptured the edge of that clay.
Did you notch the piston for the intake? |
|
| Back to top |
|
|
Sigurd
Samba Member
Joined: April 18, 2006
Posts: 2639
Location: Rockford, IL
|
| Posted: Sat Oct 31, 2009 6:25 am Post subject: |
|
|
| My one fear about the clay is that when I cut it, it will either compress or rip. |
|
| Back to top |
|
|
neil68
Samba Member
Joined: March 17, 2007
Posts: 3440
Location: Calgary, Canada
|
| Posted: Sat Oct 31, 2009 11:28 am Post subject: clay |
|
|
| nsracing wrote: |
Neil, looks like the exhaust is fine. But the intake valve w/ much larger valve area is very close to the piston top, is it not?
From the looks of that clay, the edge of the intake has completely ruptured the edge of that clay.
Did you notch the piston for the intake? |
No, I just tore the plasicine when I removed it, so the plasticine just looks thin over there. I actually switched to an FK8 for two years, and then a Web 86C and still have not had to notch the pistons.
Going to a Web 226 next, so I may have to finally notch the piston tops 
_________________
Neil.
Der Kleiner Rennwagens
68 Beetle 2332 cc, 204 WHP
12.5 seconds @ 107 mph
Dynojet Test: https://www.youtube.com/watch?v=M9B_H3eklAo |
|
| Back to top |
|
|
|


