| Author |
Message |
johnshenry 
Samba Member

Joined: September 21, 2001
Posts: 9363
Location: Northwood, NH USA

|
 Posted: Sat Sep 07, 2013 7:26 am Post subject: Posted: Sat Sep 07, 2013 7:26 am Post subject: |
 |
|
| 52 split wrote: |
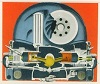
| what was the factory way or tool used to install the weld nuts. they did not drill four holes for the bumps and then weld them. some type of press and weld method?at that stage with my car thanks. |
As you can see in the pic above, they were spotwelded on the flange, one on each side.
_________________
John Henry
'57 Deluxe
'56 Single Cab |
|
| Back to top |
|
 |
splitjunkie
Samba Member
Joined: April 04, 2006
Posts: 4091
|
| Posted: Sat Sep 07, 2013 8:12 am Post subject: |
|
|
| 52 split wrote: |
| what was the factory way or tool used to install the weld nuts. they did not drill four holes for the bumps and then weld them. some type of press and weld method?at that stage with my car thanks. |
There would be a spot welder with a head that would hold the weld nut with either two or four tips depending on the type of weld nut. If you are doing them yourself they you would want to drill the holes, weld from the back side with a MIG or TIG and then grind smooth. If you have a regular spot welder you could do the two or four spot welds one at a time.
_________________
Chris
You know, a lot of these scratches will buff right out... Jerry Seinfeld |
|
| Back to top |
|
|
johnshenry
Samba Member
Joined: September 21, 2001
Posts: 9363
Location: Northwood, NH USA
|
| Posted: Wed Oct 23, 2013 6:12 pm Post subject: |
|
|
Welded on the right side floorpan tonight. First I masked off the tunnel and sprayed the facing surfaces with weld through primer. I had "modified" a set of long reach clamps to make them "longer reach" and used them to press the pan edge tight along the tunnel lip. The tip on the topside has a forked end so it can go around the weld. It was real easy to line everything up and rest the MIG nozzle on the tunnel and get a perfect alignment with the hole for the rosette weld.
_________________
John Henry
'57 Deluxe
'56 Single Cab |
|
| Back to top |
|
|
GLHTurbo
Samba Member
Joined: March 30, 2009
Posts: 1376
Location: New Jersey
|
| Posted: Wed Oct 23, 2013 6:42 pm Post subject: |
|
|
nice work...like the clamp!
_________________
1957 Beetle
1966 Bus |
|
| Back to top |
|
|
greenoval
Samba Member
Joined: January 26, 2006
Posts: 96
Location: Massachusetts
|
| Posted: Fri Oct 25, 2013 4:47 am Post subject: |
|
|
| John, is the outrigger welded to the support at the torsion tube or does it just rest on it ? |
|
| Back to top |
|
|
Jerry Hundley
Samba Member

Joined: April 20, 2006
Posts: 1181
Location: Chester, Va
|
| Posted: Fri Oct 25, 2013 5:04 am Post subject: |
|
|
I love the clamps. great idea
_________________
Jerry Hundley (AKA Slammed 66)
Because Stock Sucks!!!!
70 baywindow deluxe
65 slammed bug
69 bug
64 drag buggy |
|
| Back to top |
|
|
johnshenry
Samba Member
Joined: September 21, 2001
Posts: 9363
Location: Northwood, NH USA
|
| Posted: Fri Oct 25, 2013 5:53 am Post subject: |
|
|
| greenoval wrote: |
| John, is the outrigger welded to the support at the torsion tube or does it just rest on it ? |
You know I don't remember, but let me go back and look at my "before" pics, I took a lot of them. I think there was a very light tack weld there, not much of anything.
_________________
John Henry
'57 Deluxe
'56 Single Cab |
|
| Back to top |
|
|
johnshenry
Samba Member
Joined: September 21, 2001
Posts: 9363
Location: Northwood, NH USA
|
| Posted: Fri Oct 25, 2013 6:02 am Post subject: |
|
|
The clamp worked OK, but at that arm length, didn't really give the needed clamping force. As many probably know, it was critically important for the panels to be pressed together for these types of welds. Otherwise, not only do you get a gap, but on these "thin metal on thick" rosette welds, you will burn away the sheet metal very fast as you have to have a pretty hot setting. Of course I only took pictures of the "pretty" welds.
The other thing worth mentioning is the weld through primer. I have had issues with the MIG arc not "taking" to the lower panel when it has the primer on it. Somewhere some said that you had to grind off the facing panel/lips primer right under the hole. I tried that with a Dremel and didn't have much luck, so I just started welding. Once I got the MIG set up right I go pretty good welds. I ran it pretty hot, about 6.5/10 on my Miller and fairly slow wire speed for that heat. Best case, you get those nice little flat "pool" welds that need very little grinding.
This is one of the reasons I wanted to do the chassis first: to further hone my welding skills before going on to the bod which will need LOTS of welding. With any kind of welding, the more you do, the better you get at it.
I will use a seamsealer on both the top and bottom at the pan/tunnel interface. I'll "pinky finger" it in real close so it won't look like a bathroom caulking job. I may first give the welded areas a light sandblast to get the texture consistent everywhere, before primer. The black paint on the tunnel now is just a black primer.
_________________
John Henry
'57 Deluxe
'56 Single Cab |
|
| Back to top |
|
|
ZwitterND
Samba Member
Joined: September 08, 2005
Posts: 1451
Location: Fargo, ND
|
| Posted: Fri Oct 25, 2013 3:09 pm Post subject: |
|
|
Has anyone tried using panel adhesive for the tunnel section of the pan?
_________________
Bill |
|
| Back to top |
|
|
lovethatconvertible
Samba Member
Joined: August 22, 2008
Posts: 1434
Location: Las Vegas N. V.
|
| Posted: Mon Jan 13, 2014 7:56 pm Post subject: |
|
|
| Well, Update or anything going on in that shop of yours? |
|
| Back to top |
|
|
johnshenry
Samba Member
Joined: September 21, 2001
Posts: 9363
Location: Northwood, NH USA
|
| Posted: Wed Jan 15, 2014 2:30 pm Post subject: |
|
|
Lots of stuff going on in the shop, but not all of it VW, and even less (unfortunately) in the way of work on the '51. I did start grinding down the floorpan welds the other night. A fairly tedious process with how many of them that there are.
I'll post more pics as progress continues....
_________________
John Henry
'57 Deluxe
'56 Single Cab |
|
| Back to top |
|
|
eurodub
Samba Member

Joined: August 05, 2007
Posts: 1321
|
| Posted: Fri Oct 10, 2014 9:40 pm Post subject: |
|
|
Let's revive this wonderful thread just to let you know John that at least i am thinking about your split and your work 
This is where it all started...
Hope everything is well with you and during this autumn/winter break you can finish that pan early enough for some spring break photo shoot 
_________________
1960 1200 model 117 deluxe ragtop
1974 T2 Westfalia Campmobile
1976 MK1 Golf |
|
| Back to top |
|
|
Tempie
Samba Member
Joined: March 19, 2004
Posts: 311
Location: Belgium
|
| Posted: Mon Dec 29, 2014 9:30 am Post subject: |
|
|
Any progress?
_________________
When a deluxe is not enough.... you go standard 
Early 55 standard sunroof
Visit the Standard Split and Oval Beetle group!!
VW Standard Split and Oval Beetle |
|
| Back to top |
|
|
johnshenry
Samba Member
Joined: September 21, 2001
Posts: 9363
Location: Northwood, NH USA
|
| Posted: Mon Oct 29, 2018 9:56 am Post subject: Re: '51 Standard Chassis Restoration |
|
|
For the sake of closure of a thread, I sold this '51 project a couple weeks ago. It went to a good friend and hardcore vintage enthusiast who WILL finish the car and WILL drive it. I could not have picked a better person to have it.
I sold it because I figured that I would probably never finish it myself AND I surrendered to a whim and bought another driveable vintage VW last month....
_________________
John Henry
'57 Deluxe
'56 Single Cab |
|
| Back to top |
|
|
sinclair
Samba Member

Joined: July 01, 2004
Posts: 396
Location: New Forest UK
|
| Posted: Mon Oct 29, 2018 1:43 pm Post subject: Re: '51 Standard Chassis Restoration |
|
|
| johnshenry wrote: |
For the sake of closure of a thread, I sold this '51 project a couple weeks ago. It went to a good friend and hardcore vintage enthusiast who WILL finish the car and WILL drive it. I could not have picked a better person to have it.
I sold it because I figured that I would probably never finish it myself AND I surrendered to a whim and bought another driveable vintage VW last month.... |
Same reason I passed mine on and Ive had loads of good times since with half a dozen old drivers. |
|
| Back to top |
|
|
mr. warehouse
Samba Member

Joined: February 27, 2001
Posts: 5001
Location: Nor Cal 707
|
| Posted: Mon Oct 29, 2018 3:47 pm Post subject: Re: '51 Standard Chassis Restoration |
|
|
| johnshenry wrote: |
For the sake of closure of a thread, I sold this '51 project a couple weeks ago. It went to a good friend and hardcore vintage enthusiast who WILL finish the car and WILL drive it. I could not have picked a better person to have it.
I sold it because I figured that I would probably never finish it myself AND I surrendered to a whim and bought another driveable vintage VW last month.... |
I did a similar deal. I traded a bus I had no desire to finish for a nice bus I could drive and enjoy with my family right now. Best decision I've made in a while.
Good for you! |
|
| Back to top |
|
|
drpete
Samba Member

Joined: May 04, 2004
Posts: 779
Location: NorCal
|
| Posted: Thu Jan 10, 2019 11:40 pm Post subject: Re: '51 Standard Chassis Restoration |
|
|
Time to re-energize this thread. John mentioned he had sold this car. Im the lucky buyer that will resume the restoration. John and I share (among other things) a passion for VWs and the friendships and experiences these cars help create. We first met many years ago during a Solvang (California) Rallye and show. Weve since had fun at the SoCal Treffen, and other Solvang shows as well as a couple shows in Europe.
This is my first split window bug; previously I had a 54 oval ragtop, along with some buses (including a 54 Barndoor with an operating 2-level vintage toy-train layout). Im really excited about this 51 Standard.
The cars metal work and paint will be done by a trusted fellow here in Northern California. Ill try to document some of his steps as we go along. After his body and paint work is complete, Ill do the assembly at home. All stock...we want her to look and drive just as she did in 1951. The car goes to his shop next week, after resting 2 months in my workshop/barn at home.
It'll be nice to get this early bug back on the road. She's the perfect car for a future September Solvang Rallye...
_________________
Happy to be alive. Hey Dad, Mom, wish you were here to see all this.
Pete Keesling
Driving a VW every day..... |
|
| Back to top |
|
|
Grant Reiling
Samba Slow-Change Artist
Joined: November 28, 2003
Posts: 491
Location: behind the wheel
|
| Posted: Fri Jan 11, 2019 6:41 am Post subject: Re: '51 Standard Chassis Restoration |
|
|
| drpete wrote: |
Time to re-energize this thread. John mentioned he had sold this car. Im the lucky buyer that will resume the restoration. John and I share (among other things) a passion for VWs and the friendships and experiences these cars help create. We first met many years ago during a Solvang (California) Rallye and show. Weve since had fun at the SoCal Treffen, and other Solvang shows as well as a couple shows in Europe.
This is my first split window bug; previously I had a 54 oval ragtop, along with some buses (including a 54 Barndoor with an operating 2-level vintage toy-train layout). Im really excited about this 51 Standard.
The cars metal work and paint will be done by a trusted fellow here in Northern California. Ill try to document some of his steps as we go along. After his body and paint work is complete, Ill do the assembly at home. All stock...we want her to look and drive just as she did in 1951. The car goes to his shop next week, after resting 2 months in my workshop/barn at home.
It'll be nice to get this early bug back on the road. She's the perfect car for a future September Solvang Rallye...
|
Very exciting Pete, it will be interesting to see and track the progress.(And park our split sunroofs next to each other)  
Congratulations! What a great project for 2019!
Grant
_________________
1952 Azure Blue 12G (LHD Deluxe 3-fold sunroof Sedan).
"What you really know is possible in your heart is possible.
We make it possible by our will.
What we imagine in our minds becomes our world. Thats just one of many things I have learned from water."
Misaru Emoto
The Hidden Messages in Water |
|
| Back to top |
|
|
johnshenry
Samba Member
Joined: September 21, 2001
Posts: 9363
Location: Northwood, NH USA
|
| Posted: Fri Jan 11, 2019 9:52 am Post subject: Re: '51 Standard Chassis Restoration |
|
|
While I had a number of people interested in this car, I could not be happier that "Doctor" Pete now has it. Why? Because I KNOW he will finish it and I KNOW that he will DRIVE it, as it should be. And Pete is now my go-to Type 2 guru as he and I now both own '56 single cabs.
Looking forward to seeing this split done and Pete, thanks for keeping this thread going. Build threads are the best...!
_________________
John Henry
'57 Deluxe
'56 Single Cab |
|
| Back to top |
|
|
mr. warehouse
Samba Member
Joined: February 27, 2001
Posts: 5001
Location: Nor Cal 707
|
| Posted: Fri Jan 11, 2019 12:11 pm Post subject: Re: '51 Standard Chassis Restoration |
|
|
Where's the like button?
Congratulations to Pete and John.
I look forward to watching the progress on this and seeing it at the California shows. |
|
| Back to top |
|
|
|


