| Author |
Message |
Mr Slug
Samba Member
Joined: December 06, 2009
Posts: 143
Location: United Kingdom

|
 Posted: Sun Dec 06, 2009 8:45 am Post subject: Beetle - Schwimmer replica Posted: Sun Dec 06, 2009 8:45 am Post subject: Beetle - Schwimmer replica |
 |
|
Hi, new guy here.
Just registered and figured I would share with you guys my project.
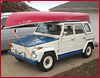
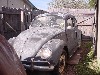
I have been trying to build a VW166 type vehicle, using a stock Beetle as a basis and donor. Been on the project in my spare time for about six months, I recon another six months left to completion.
But, as with all these projects, I could use a bit of help and maybe some assistance with parts.
The ride height is giving me some problems, and I figured maybe I could use Trekker/Thing reduction boxes, tubes and shafts. Maybe trekker/Thing spindles up front ? could I just use the spindles, or would I need the whole front beam.
These might sound like dumb questions, but be mindful that 6 months ago I had never even took a close look at a Veedubbaya, and this is practically a vertical learning curve for me.
Some pictures for your amusement.
|
|
| Back to top |
|
 |
DannyK
Samba Member
Joined: October 11, 2009
Posts: 113
Location: Rogers,Ar.
|
| Posted: Sun Dec 06, 2009 8:53 am Post subject: |
|
|
Looks great ! Nice fab work. Keep us posted with your progress.  |
|
| Back to top |
|
|
Glenn 
Mr. 010

Joined: December 25, 2001
Posts: 76937
Location: Sneaking up behind you
|
| Posted: Sun Dec 06, 2009 8:56 am Post subject: |
|
|
WOW... you got skills.
Keep the update coming.
_________________
Glenn
74 Beetle Specs | 74 Beetle Restoration | 2180cc Engine
"You may not get what you pay for, but you always pay for what you get"
Member #1009
#BlueSquare |
|
| Back to top |
|
|
JWDW
Samba Member
Joined: August 08, 2009
Posts: 174
Location: Phoenix Area
|
| Posted: Sun Dec 06, 2009 11:05 am Post subject: |
|
|
| you can use just the spindles and arms from a thing/treker/safari or just the spindle and flip the control arms around but you have to change the buall joints I believe, I have a set of them forsale just so you know.... nice work on the schwim but how much of that bug is under that nearly all fabbed up body? looks like a lot of one off panels. Did you have any OG parts on that or is it all from scratch? |
|
| Back to top |
|
|
Chad1376
Samba Member

Joined: January 29, 2005
Posts: 1435
Location: Henderson, Nevada
|
| Posted: Sun Dec 06, 2009 11:06 am Post subject: |
|
|
Very impressive work!!! I'd love to see some of the in-between steps, like how you fabricated the entire rear bodywork, deck-lid, and cool dimples in middle of the seats. Do you plan on really Schwimming it when you're done?
_________________
My never ending 1302 Autocross Project:
http://www.shoptalkforums.com/viewtopic.php?f=51&a...02b8f83f22 |
|
| Back to top |
|
|
kdf38
Samba Member

Joined: March 07, 2002
Posts: 896
|
| Posted: Sun Dec 06, 2009 12:01 pm Post subject: Re: Beetle - Schwimmer replica |
|
|
Just use the tracks instead 
| Mr Slug wrote: |
Hi, new guy here.
Just registered and figured I would share with you guys my project.
I have been trying to build a VW166 type vehicle, using a stock Beetle as a basis and donor. Been on the project in my spare time for about six months, I recon another six months left to completion.
But, as with all these projects, I could use a bit of help and maybe some assistance with parts.
The ride height is giving me some problems, and I figured maybe I could use Trekker/Thing reduction boxes, tubes and shafts. Maybe trekker/Thing spindles up front ? could I just use the spindles, or would I need the whole front beam.
These might sound like dumb questions, but be mindful that 6 months ago I had never even took a close look at a Veedubbaya, and this is practically a vertical learning curve for me.
Some pictures for your amusement.
|
|
|
| Back to top |
|
|
BlastMasterMannyFresh
Samba Member

Joined: November 21, 2001
Posts: 6102
Location: #31peach

|
| Posted: Sun Dec 06, 2009 12:33 pm Post subject: |
|
|
| wow, impresive work bro, keep the pictures coming. |
|
| Back to top |
|
|
Mr Slug
Samba Member
Joined: December 06, 2009
Posts: 143
Location: United Kingdom
|
| Posted: Sun Dec 06, 2009 12:46 pm Post subject: |
|
|
Thank you for the very posative comments, and thank you Glenn for tidying up my post - I was not sure where to put it.
JWDW, thank you very much indeed - would you be kind enough to PM me the cost of those spindle parts ?
To answer a few of your questions.
Yes, this will be a swimming VW. There are, as yet, no 166 original parts, all of it is fabricated by myself by altering standard Beetle parts or useing sheet metal and fabrication at home - I hope to use all standard VW parts.
I don't have access to a real VW166, so have used a plastic model and whatever pictures I can get get off the Interweb, and books.
This is only a very rough working prototype, I hope to be able to make these to order in the future. If that happens, I would take the trouble to borrow a real one to copy.
The most tiresome, but perhaps important task is a reasonably accurate assessment of the shape and size. I have done a lot of internet research, and have several books and pictures of VW 166. The most useful item is the model.
To decide the shapes I bent wire to suit the model, then carefully drew around the wire on a piece of paper. then, by disecting multiple tangents that I drew on the curves, the centre of the radius can be found. Measureing back to the arc gives a figure and that can be calcalated up to full scale. It is a little tricky because many of the shapes have several centres, and different radius, however, It is one of the few things on the project that I do have formal training at. I am a bricklayer and it is the same method that bricklayers use to set out the formers under arched openings like doorways etc.
By useing pi, the lengths of the steel sections can be calcalated into a cutting list befor bending. It is of course also possible to calcalate out the surface areas of steel, and for that matter the volume within the vessel. I guess Mr Porsche had to do that to figure the displacement to weight ratio to confirm that it would all actually float. The way I figure it - if his did - mine will !.........as long as I am fairly accurate.
Some pictures of the process.
All very laborious, But neccersary. It is much easier and cheaper to alter or throw away a piece of card or ply then a sheet of steel.
Rear bulkhead / engine firewall.
|
|
| Back to top |
|
|
63ziggy
Samba Member
Joined: June 19, 2005
Posts: 1100
Location: The Woodlands, Texas
|
| Posted: Sun Dec 06, 2009 12:49 pm Post subject: |
|
|
more pics from start
great looking fab, would love to see step by step if available |
|
| Back to top |
|
|
Mr Slug
Samba Member
Joined: December 06, 2009
Posts: 143
Location: United Kingdom
|
| Posted: Sun Dec 06, 2009 12:53 pm Post subject: |
|
|
Chad, you asked about the seats.
As usual, starts with research - that generally means the interweb
and stealing pictures. This picture was copied from a VW166 hulk that is being restored in Germany.
Then the model is measured, and my collection of photographs studied. Next I measure the hull and figure out a size for the seat.
Next step is a wooden mockup - that can also double as a former.
Then, hired a pipe bender. (Actually this one is for electrical conduit)
Then off we go - bending, shapeing the pipework. Welding that together, and constantly checking the fit.
Making cardboard templates and eventually steel sheets to clad the frames. Punching holes, welding, grinding, you get the idea.
The pictures kinda explain the chronology of events.
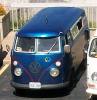
Here is one of the pictures I work from, and a photograph of the model I scale up from. In the middle is my own beetle/166 creation.
A fair comparison I feel. What do you guys think ?
Finally, a coat of primer - phew !..........
|
|
| Back to top |
|
|
Mr Slug
Samba Member
Joined: December 06, 2009
Posts: 143
Location: United Kingdom
|
| Posted: Sun Dec 06, 2009 1:29 pm Post subject: |
|
|
For those of you that requested more intermediate step pictures, here are a couple of the mudguards and rear cowling - as you can see, I just have some pretty unsophisticated tooling 
|
|
| Back to top |
|
|
bigbulli
Samba Member

Joined: September 30, 2000
Posts: 575
Location: ENGLAND
|
| Posted: Sun Dec 06, 2009 1:36 pm Post subject: |
|
|
Awesome fabrication!
_________________
1954 Barndoor
1955 Oval |
|
| Back to top |
|
|
Emeritusx
Samba Member
Joined: June 20, 2008
Posts: 2775
Location: 12 inches behind the wheel
|
| Posted: Sun Dec 06, 2009 1:43 pm Post subject: |
|
|
Schweet....
_________________
82 Westy ☢, 66 Splitty ☮, 73 Type 181 ✠ |
|
| Back to top |
|
|
tstracy39
Samba Member

Joined: May 14, 2008
Posts: 3294
Location: Seattle, WA
|
| Posted: Sun Dec 06, 2009 2:37 pm Post subject: |
|
|
Very nice work. I can't work in steel myself because of arthritis in my wrists, everything I build has to be wood or fiberglass, so I always get kind of jealous when I see so many great parts turned out in steel. How will you be making the connection between the swing axles and body (or do I call it a hull) watertight? Just curious, keep up the good work.
_________________
Check my classifieds for kewl gauges:
http://www.thesamba.com/vw/classifieds/search.php?username=tstracy39
| EverettB wrote: |
| I like your fork. |
|
|
| Back to top |
|
|
cage66
Samba Member

Joined: January 14, 2005
Posts: 2039
Location: reno,nv. cultwagen.com
|
| Posted: Sun Dec 06, 2009 2:38 pm Post subject: |
|
|
SERIOUSLY IMPRESSIVE  |
|
| Back to top |
|
|
1973 MELLOW YELLOW
Samba Member

Joined: August 28, 2007
Posts: 62
Location: United Kingdom
|
| Posted: Sun Dec 06, 2009 2:58 pm Post subject: |
|
|
Hello Mr Slug
I've been following on VZi, great progress.  |
|
| Back to top |
|
|
Mr Slug
Samba Member
Joined: December 06, 2009
Posts: 143
Location: United Kingdom
|
| Posted: Sun Dec 06, 2009 3:18 pm Post subject: |
|
|
| 1973 MELLOW YELLOW wrote: |
Hello Mr Slug
I've been following on VZi, great progress. |
Hi Mellow, Yeah, I thought I would broaden it a little, can't hurt to get different, and varied opinions.
Ts Tracy - I figured on useing a similar design to the real 166, like a rubber boot or sleeve fitted between the axle tubes and body.
There are hundreds of ways for the water to get in, and I am looking at them all one at a time - scratching my head over brake pipes today, but found the solution on another amphibious truck I have - a 1943 Ford GPA.
Thanks for the interest, and great comments boys, |
|
| Back to top |
|
|
mike yapps
Samba Member

Joined: July 25, 2004
Posts: 514
|
| Posted: Sun Dec 06, 2009 3:30 pm Post subject: |
|
|
| HOLY COW!!! That is awesome! I like the tool you made to bevel the holes. I may have to use that idea. |
|
| Back to top |
|
|
mnussbau
Samba Member

Joined: August 26, 2006
Posts: 4589
Location: Central Maryland
|
| Posted: Sun Dec 06, 2009 4:50 pm Post subject: |
|
|
There's no way that's the same car! Simply amazing work.
_________________
Mike
Sold my sedan
Parts... |
|
| Back to top |
|
|
kubelmann
Samba Member

Joined: April 13, 2003
Posts: 3266
|
| Posted: Sun Dec 06, 2009 5:12 pm Post subject: |
|
|
| You obviously have a combination of skills and talents.... I see the boat making pattern skill from my boat building experience but them you cross over to amazing metal working. Unbelievable!!!! My hat is off to you. Most humbly, K-mann |
|
| Back to top |
|
|
|


