| Author |
Message |
datsnice
Samba Member
Joined: May 11, 2009
Posts: 100
Location: Denver

|
 Posted: Tue May 06, 2014 12:57 am Post subject: wire path for interior cabinet sink light? Posted: Tue May 06, 2014 12:57 am Post subject: wire path for interior cabinet sink light? |
 |
|
I finally got my auxilliary battery installed via the GoWesty battery kit, and mounted a BlueSea fuse block in the bottom cabinet under sink so I can hook up accessories.
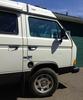
I'm installing LED strips above the length of the sink/stove and side table, and I'd like to remove the stock overhead cabin light (circled in red) and use those wires for one of the strips. Does anyone know where those wires are run? It makes sense that they run under the length of the shelf, but I removed the end cap behind the drivers' headrest and I don't see wires. Do they connect to the relay mounted right behind the drivers seat (bottom right corner of pic)?
Also, any advice for running a wire across to the slider door? I'd like to mount a dimmer switch and/or another LEDstrip above the slider door so I can light everything before I get in!
Don't have the Bently, as I'm sure wiring is covered...so any help (pictures especially) are much appreciated. Thanks!
_________________
1989 Vanagon 2WD Full Camper
EJ22 Subaru Conversion
"Greyboy" |
|
| Back to top |
|
 |
the craigness
Samba Member

Joined: March 25, 2014
Posts: 188
Location: Queens, NYC
|
| Posted: Tue May 06, 2014 5:11 am Post subject: |
|
|
| I'm doing the exact same thing. I'm a low voltage electrical contractor by trade and my specialty is routing cables. I will be posting my "Adventures" putting in LED strip lights in my 84 Camper this week. This light is powered all the time. It doesn't seem to be fused to the kitchen pump/fridge and most likely travels to the front to mate with the light above the drivers door. I would disconnect the ground on the battery before you play with it or locate the fuse. I'm installing a switch for the new LED lights above the closet door with a red LED (So I can find it in the dark). I am installing my ebay sourced LED lights in a Home Depot aluminum "U" channel so the light can be focused downward and not in my eyes. I'm polishing the inside with rubbing compound and painting the outside of the "U" channel brown to match the cabinet trim. Since the LED lights are so low draw, i'm tapping off the hot circuit and installing smaller lights in the pop top and under the rear AC (or headbanger locker) also switched. I'll post the progress with part numbers and where I sourced stuff. Good luck! |
|
| Back to top |
|
|
datsnice
Samba Member
Joined: May 11, 2009
Posts: 100
Location: Denver
|
| Posted: Tue May 06, 2014 9:11 am Post subject: |
|
|
That'd be awesome to see what you come up with. I've got the same idea for LED placements around the bus, and I'm off to the HomeDepot to check out the u-channel idea. If you come up with a route plan for sending wires through the shelf, or even across to the slider door that'd be great. (ps- i love pictures. ha!)
When you say you are tapping the 'hot circuit", what do you mean by that? Sorry, noobie electrician...
Good luck and look forward to seeing progress, I'll do the same...
_________________
1989 Vanagon 2WD Full Camper
EJ22 Subaru Conversion
"Greyboy" |
|
| Back to top |
|
|
1621
Samba Member
Joined: May 15, 2006
Posts: 2174
|
| Posted: Tue May 06, 2014 10:28 am Post subject: |
|
|
IIRC, the wires for the light run to the rear of the van in a channel route red into the shelf itself. You may find it helpful to pull down the entire shelf to make work simpler.
I used the driver's side overhead light to run power to lights above the slider. I also added a center light from a Jetta, and a passenger side overhead light on the same line. I use LED drop in replacements throughout the van so as not to worry about overloading the circuit. Find a bit more info here http://www.thesamba.com/vw/forum/viewtopic.php?t=283738&highlight=light+slider+switch
_________________
'85 Westy |
|
| Back to top |
|
|
madspaniard
Samba Member

Joined: August 18, 2008
Posts: 3795
Location: Alameda, CA
|
| Posted: Tue May 06, 2014 11:02 am Post subject: |
|
|
| 1621 wrote: |
IIRC, the wires for the light run to the rear of the van in a channel route red into the shelf itself. You may find it helpful to pull down the entire shelf to make work simpler.
|
That is right, the wires run front to back inside the upper body metal channel and they come out thru an opening in the channel out to the shelf just where the light fixture is located.
I also installed a slider door-activated light in the AC plenum over my rear bench and a passenger door courtesy light. For the passenger door light I ran the wires from driver side dome light to passenger side dome light in the headliner. For light over rear bench I ran three wires from the light in the AC plenum out to the closet cabinet and along/under the driver's side shelf (aka spice rack). Two wires connect to power and ground at the driver's side light that you want to replace with LEDs (cabin light), the third wire is switch ground and continues its run from under the spice rack, under the headliner and down the B pillar to the slider door switch.
_________________
1991 Westy auto w/ Peloquin TBD
"The only difference between me and a madman is that I'm not mad - Salvador Dali |
|
| Back to top |
|
|
yycwesty
Samba Member
Joined: August 20, 2012
Posts: 403
Location: Calgary
|
| Posted: Tue May 06, 2014 1:27 pm Post subject: |
|
|
Any thoughts on how to take that shelf down..Haven't got a manual yet. I assuming you have to raise the top to access certain screws
Al |
|
| Back to top |
|
|
campism
Samba Member
Joined: September 07, 2007
Posts: 4487
Location: Richmond VA
|
| Posted: Tue May 06, 2014 1:28 pm Post subject: Re: wire path for interior cabinet sink light? |
|
|
| datsnice wrote: |
I'm installing LED strips above the length of the sink/stove and side table, and I'd like to remove the stock overhead cabin light (circled in red) and use those wires for one of the strips. Does anyone know where those wires are run?
|
Shortly after getting my '87 Westy in '06 I installed a second fluorescent over the stove and the wiring is routed into a channel on top of that piece. Best to remove the entire curtain tray, as its called, for better access. I think the actual power wire comes up from the middle of the driver's side to feed into that routed channel. Good luck!
_________________
'87 Westy in Wolfram Grey Metallic |
|
| Back to top |
|
|
kamzcab86
Samba Moderator

Joined: July 26, 2008
Posts: 7915
Location: Arizona
|
| Posted: Tue May 06, 2014 1:44 pm Post subject: |
|
|
| yycwesty wrote: |
Any thoughts on how to take that shelf down..Haven't got a manual yet. I assuming you have to raise the top to access certain screws
Al |
Here are my notes from when I removed the A/C vent plenum, which required dropping the shelf/spice rack/tray/curtain track/whateveryoucallit...
Removal of storage tray/curtain track assembly:
- there are three screws in the center, behind the curtain track; be sure these are lined up with the holes in the metal bracket when reinstalling
- there is one bolt at the closet-end (10mm nut)
- there is one screw at the very front, behind the drivers seat headrest
- there are four screws on top, where the pop-top lifting frame sits
- there are two screws on top, mounting the bed hinge to the vans body
- place a couple of boxes on top of the stove and rear table to support the assembly while you work; the lights wires will prevent the assembly from dropping far enough for the whole assembly to rest on the stove
_________________
~Kamz 
1986 Cabriolet: www.Cabby-Info.com
 1990 Vanagon Westfalia: Old Blue's Blog 1990 Vanagon Westfalia: Old Blue's Blog
2016 Golf GTI S
"Real knowledge is to know the extent of one's ignorance." - 孔子 |
|
| Back to top |
|
|
Timwhy
Samba Member
Joined: January 01, 2009
Posts: 4002
Location: Maine
|
|
| Back to top |
|
|
datsnice
Samba Member
Joined: May 11, 2009
Posts: 100
Location: Denver
|
| Posted: Tue May 06, 2014 3:59 pm Post subject: |
|
|
Timwhy that setup under the sink looks awesome! I'll add that to my list along with that knife magnet holder. 
Another question: What is everyone using for their dimmers and switches? I see a lot of the cheap ones on Amazon (http://www.amazon.com/Ledwholesalers-Inline-Volt-Dimmer-Strips/dp/B004T9ITQ0/ref=pd_sim_hi_20?ie=UTF8&refRID=1FTB5RJ0RB1E2DJCZ9VF) but they ship from China and take almost a month to arrive!
Thanks everyone for the input, just what I needed was a place to start and get this rolling. Keep posting the LED mods, its good to get some new ideas I hadn't thought of.
_________________
1989 Vanagon 2WD Full Camper
EJ22 Subaru Conversion
"Greyboy" |
|
| Back to top |
|
|
datsnice
Samba Member
Joined: May 11, 2009
Posts: 100
Location: Denver
|
| Posted: Tue May 06, 2014 7:13 pm Post subject: |
|
|
| the craigness wrote: |
| I'm doing the exact same thing. I'm a low voltage electrical contractor by trade and my specialty is routing cables. I will be posting my "Adventures" putting in LED strip lights in my 84 Camper this week. This light is powered all the time. It doesn't seem to be fused to the kitchen pump/fridge and most likely travels to the front to mate with the light above the drivers door. I would disconnect the ground on the battery before you play with it or locate the fuse. I'm installing a switch for the new LED lights above the closet door with a red LED (So I can find it in the dark). I am installing my ebay sourced LED lights in a Home Depot aluminum "U" channel so the light can be focused downward and not in my eyes. I'm polishing the inside with rubbing compound and painting the outside of the "U" channel brown to match the cabinet trim. Since the LED lights are so low draw, i'm tapping off the hot circuit and installing smaller lights in the pop top and under the rear AC (or headbanger locker) also switched. I'll post the progress with part numbers and where I sourced stuff. Good luck! |
What tool do you use for running/pushing/pulling wires through these hard to reach spaces? Definitely not my specialty.
_________________
1989 Vanagon 2WD Full Camper
EJ22 Subaru Conversion
"Greyboy" |
|
| Back to top |
|
|
tarandusVDub
Samba Member
Joined: August 27, 2010
Posts: 1649
Location: Between Here and There
|
| Posted: Tue May 06, 2014 7:22 pm Post subject: |
|
|
| datsnice wrote: |
Timwhy that setup under the sink looks awesome! I'll add that to my list along with that knife magnet holder.
Another question: What is everyone using for their dimmers and switches? I see a lot of the cheap ones on Amazon (http://www.amazon.com/Ledwholesalers-Inline-Volt-Dimmer-Strips/dp/B004T9ITQ0/ref=pd_sim_hi_20?ie=UTF8&refRID=1FTB5RJ0RB1E2DJCZ9VF) but they ship from China and take almost a month to arrive!
Thanks everyone for the input, just what I needed was a place to start and get this rolling. Keep posting the LED mods, its good to get some new ideas I hadn't thought of. |
I'm curious about dimmers too ~ can you use them on any LEDs?
_________________
1990 Syncro 16" DoppleKabine 2.1 DJ 112i
________________________
Sold: 1972 Bay Campmobile; 1984 Westy, base model, 2WD. |
|
| Back to top |
|
|
kamzcab86
Samba Moderator
Joined: July 26, 2008
Posts: 7915
Location: Arizona
|
| Posted: Tue May 06, 2014 7:39 pm Post subject: |
|
|
| datsnice wrote: |
| Keep posting the LED mods, its good to get some new ideas I hadn't thought of. |
There's already a thread for that, which includes dimmers and stores to get everything at (most common probably being superbrightleds.com): http://www.thesamba.com/vw/forum/viewtopic.php?t=439269 .
_________________
~Kamz
1986 Cabriolet: www.Cabby-Info.com
1990 Vanagon Westfalia: Old Blue's Blog
2016 Golf GTI S
"Real knowledge is to know the extent of one's ignorance." - 孔子 |
|
| Back to top |
|
|
K58
Samba Member
Joined: July 01, 2006
Posts: 1173
Location: Santa Barbara
|
| Posted: Tue May 06, 2014 8:02 pm Post subject: |
|
|
Amazon for LED's is a crapshoot...don't bother
Superbrightleds has everything and at reasonable prices.
Sidenote:
I bought a couple of led motion sensor lights that fit nicely into the webbing on the rear of my front seat covers. They come on as soon as I open the slding door and shut of after 80 sec. No wiring necessary.
_________________
Westy HID Projector Retrofit |
|
| Back to top |
|
|
Westified
Samba Member
Joined: May 01, 2012
Posts: 402
Location: Miami, FL
|
| Posted: Wed May 07, 2014 7:37 am Post subject: Kitchen Wiring 84 Westy |
|
|
Here are some photos of my kitchen wiring. The OP requested where the wires go. They run in a roof channel on the drivers side from the kitchen light forward to the drivers dome light, then down the A pillar to the fuse panel. For the 1984 Westy they use fuse #8 on the fuse panel by the drivers left knee. I used posi-taps to tap into the original kitchen light wiring, these taps are non destructive and can be removed. They work very well.
Regarding access to these wires, you don't need to drop the spice rack/tray above the kitchen. Just remove the metal tray on top of the tray. Do this by removing three screws on the end piece behind the drivers head, then locate the screws holding the tray down, there are several. Two are under the upper bunk and require a right angle screw driver or better yet a screwdriver bit on a 1/4" socket drive tool. You can then lift the tray off and will see what you see in my photos. To wire over the sliding door I ran another wire across above the rear seat into the air ducts above the slider. You just remove the trim piece on the ceiling. I think this is easier than removing the ceiling above the driver. I used rubber grommets where ever I drilled holes to pass wires through to protect them. I also sleeved the wire running across the ceiling. I replaced the standard kitchen bulb which is a halogen G4 bulb on the 1984 westy with a Dr. LED G4 led bulb which just plugs right in. I put a Dr Led fixture under the A/C cabinet again tying into the kitchen light using posi-taps. I ran 18 guage wire. I also put a Dr Led light fixture over the slider that has a high/low setting. I also put a fluorescent fixture over the sink. All this still draws less watts than the original halogen bulb and don't give off heat.
I hope this helps
_________________
1984 Westy Wolfsburg, owned since 1987. FAS 2.0 NA engine conversion in 2022. |
|
| Back to top |
|
|
datsnice
Samba Member
Joined: May 11, 2009
Posts: 100
Location: Denver
|
| Posted: Wed May 07, 2014 2:15 pm Post subject: Re: Kitchen Wiring 84 Westy |
|
|
| Westified wrote: |
Here are some photos of my kitchen wiring. The OP requested where the wires go. They run in a roof channel on the drivers side from the kitchen light forward to the drivers dome light, then down the A pillar to the fuse panel. For the 1984 Westy they use fuse #8 on the fuse panel by the drivers left knee. I used posi-taps to tap into the original kitchen light wiring, these taps are non destructive and can be removed. They work very well.
Regarding access to these wires, you don't need to drop the spice rack/tray above the kitchen. Just remove the metal tray on top of the tray. Do this by removing three screws on the end piece behind the drivers head, then locate the screws holding the tray down, there are several. Two are under the upper bunk and require a right angle screw driver or better yet a screwdriver bit on a 1/4" socket drive tool. You can then lift the tray off and will see what you see in my photos. To wire over the sliding door I ran another wire across above the rear seat into the air ducts above the slider. You just remove the trim piece on the ceiling. I think this is easier than removing the ceiling above the driver. I used rubber grommets where ever I drilled holes to pass wires through to protect them. I also sleeved the wire running across the ceiling. I replaced the standard kitchen bulb which is a halogen G4 bulb on the 1984 westy with a Dr. LED G4 led bulb which just plugs right in. I put a Dr Led fixture under the A/C cabinet again tying into the kitchen light using posi-taps. I ran 18 guage wire. I also put a Dr Led light fixture over the slider that has a high/low setting. I also put a fluorescent fixture over the sink. All this still draws less watts than the original halogen bulb and don't give off heat.
I hope this helps
[pics] |
Westified - thanks a ton for the post, this description with pics is exactly what I was looking for and haven't been able to find anywhere!
_________________
1989 Vanagon 2WD Full Camper
EJ22 Subaru Conversion
"Greyboy" |
|
| Back to top |
|
|
DeanZimmer
Samba Member
Joined: October 12, 2011
Posts: 34
Location: Winnipeg Manitoba
|
| Posted: Wed May 07, 2014 2:36 pm Post subject: |
|
|
Thank you very much Westified!
I was just thinking about doing this, your post could not have come at a better time.
Dean |
|
| Back to top |
|
|
datsnice
Samba Member
Joined: May 11, 2009
Posts: 100
Location: Denver
|
| Posted: Wed May 07, 2014 3:51 pm Post subject: |
|
|
For what its worth, I just found this handy vehicle search engine on superbrightleds.com - Nice resource to find straight up replacement LEDs for the stock lighting...
http://www.superbrightleds.com/cat/led-vehicle-rep...64-1112--/
_________________
1989 Vanagon 2WD Full Camper
EJ22 Subaru Conversion
"Greyboy" |
|
| Back to top |
|
|
K58
Samba Member
Joined: July 01, 2006
Posts: 1173
Location: Santa Barbara
|
| Posted: Wed May 07, 2014 7:19 pm Post subject: |
|
|
Great pics!
That will help with my next project.
Thanks
_________________
Westy HID Projector Retrofit |
|
| Back to top |
|
|
Westified
Samba Member
Joined: May 01, 2012
Posts: 402
Location: Miami, FL
|
| Posted: Wed May 07, 2014 7:34 pm Post subject: |
|
|
You guys are welcome. Another couple of tips. Disconnect your battery negative terminal before working on the electrical. Also, if you are going to put a light over your engine under the A/C cabinet, be careful not to drill or screw into the AC drip tray. I mounted my light all the way to the rear where there is a small shelf area above it, thereby avoiding the drip tray. 
_________________
1984 Westy Wolfsburg, owned since 1987. FAS 2.0 NA engine conversion in 2022. |
|
| Back to top |
|
|
|


