| Author |
Message |
supercub
Samba Member

Joined: June 07, 2010
Posts: 358
Location: Wisconsin

|
 Posted: Fri Sep 23, 2011 5:57 pm Post subject: Posted: Fri Sep 23, 2011 5:57 pm Post subject: |
 |
|
| Thanks. I am very happy with how well the interior has turned out aside from my headliner install, which is a bit rough. |
|
| Back to top |
|
 |
supercub
Samba Member
Joined: June 07, 2010
Posts: 358
Location: Wisconsin
|
| Posted: Sat Oct 22, 2011 6:01 pm Post subject: |
|
|
Progress has been a little slow lately. I have been tending to other vehicles recently. I had to replace a blower motor resistor and its burned wiring connector on my GMC Safari and put a long overdue new set of tires on it. I also had to do some rust repair on my daily rider Honda Supercub. About an inch and a half of its swing arm was rusted out along the bottom below where the shock mounts. It's not readily visible and has probably been there for longer than the six years I've owned it but once I noticed it, I just had to fix it. Today I picked up a new windshield from a local VW shop. It was the dreaded Fuyao window that I have read so many horror stories about on here. I mustered up the courage to give it a try though. I was just waiting for the deadly "crack" every time the wire got a little tough to pull, but it slid in very smoothly and fits great with no leaks!
The new windshield.
|
|
| Back to top |
|
|
supercub
Samba Member
Joined: June 07, 2010
Posts: 358
Location: Wisconsin
|
| Posted: Wed Nov 16, 2011 7:31 pm Post subject: |
|
|
| I've been really slacking on updating this for a while. I've kind of been slacking on the car lately too. Its getting so close and I keep telling myself I need to just make one big push and build an engine and finish it up. But motivation has been a little lacking. I have started pulling apart the 40 hp engine that was in it and probably found out why the car was parked so many years ago. When I took off the 1-2 valve cover, I noticed one valve adjuster was set very different from the others. Bad sign. Once I pulled that head I saw that the number one exhauxt valve had a chunk missing and was sitting deeper in its seat than the other 3. Funny thing is there is no damage on the piston or head from the chunk. In fact the pistons look fairly good and faint hone marks are still visible on the cylinder walls. This engine definitely didn't go very far. The other cylinder head has two bad cracks from the number 3 spark plug, one to the intake valve and one to the exhaust valve. So another set of heads is in order if the case turns out okay. |
|
| Back to top |
|
|
supercub
Samba Member
Joined: June 07, 2010
Posts: 358
Location: Wisconsin
|
| Posted: Fri Dec 23, 2011 1:32 pm Post subject: |
|
|
| I have finally accumulated all of the parts that I need to rebuild the little 40 hp. The case turned out to be good but that was about all that was still good. Cracked heads, crank had already been turned .030 undersize, a loose rod small end bushing, worn out cam and lifters, and two scored cylinders meant this was going to be a full-out rebuild. I managed to find a set of rebuilt '65 only 373 heads to go with the '65 case. As luck would have it, the case still had the '65 only upper studs installed. There was about a one inch stack of washers on each upper stud to fit the older 371 heads. I've got new 77mm pistons and cylinders , rebuilt connecting rods, a new cam and lifters. I also rounded up all the other parts needed to finish the engine off. I will still have to make two pieces of tin since I am replacing the heat exchangers with J-tubes. The exchangers had rust holes in several spots and I had already eliminated the possibility of heat when I patched the rusted heater channels earlier on. I just bought a used intake manifold today and unplugged the exhaust crossover. I used the steel cable in the drill method along with some penetrating oil and compressed air. I had it cleared in less than half an hour. Now the rebuild can begin. I neglected to take pictures of the teardown but I'll try to do better documenting the reassembly. |
|
| Back to top |
|
|
supercub
Samba Member
Joined: June 07, 2010
Posts: 358
Location: Wisconsin
|
| Posted: Sun Jan 01, 2012 4:46 pm Post subject: |
|
|
Finally some engine assembly progress! I've almost got the crankcase internals reassembled. Nearly everything for this little 40 hp engine is either new or reconditioned, so I'm hoping for the best.
|
|
| Back to top |
|
|
supercub
Samba Member
Joined: June 07, 2010
Posts: 358
Location: Wisconsin
|
| Posted: Sun Jan 15, 2012 4:06 pm Post subject: |
|
|
Since the last update, I have mated the crankcase halves, set the endplay to .004mm and installed the pistons/cylinders and the heads. The progress was not without a few setbacks though. My old oil sump plate had been abused and warped from over tightening, so I bought a new one. I go to install the new plate and one nut won't go onto its stud. The threads are trashed. No big deal, I'll just pull the dead stud out and replace it. I go to turn it and its not coming out. Crap! This is the stud that holds the oil pickup. I remembered that there was one nut missing from the sump plate when I took the engine apart. I had looked at the stud at that time and noted it needed to be replaced but I'd do it later. Ha! I forgot about it until I already had the case mated. Well I ended up bending/grinding the special 10mm box end wrench and after several hours, I had the stud and nut replaced. I went to put on my new aftermarket sump plate again and the nuts tighten up but it's still not tight. They bottomed out in on the studs before they tightened against the plate. What now!? Turns out that the metal that the plate is made of is only like 1/3 as thick as the original one. Aghh! So I carefully straightened my original back into shape and installed it. It fits great! So much work for a stupid sump plate. Also I had managed to install the distributor drive one tooth off so I corrected that to have the vacuum can in the proper place.
Here is the engine as of this afternoon.
|
|
| Back to top |
|
|
supercub
Samba Member
Joined: June 07, 2010
Posts: 358
Location: Wisconsin
|
| Posted: Sun Jan 29, 2012 1:39 pm Post subject: |
|
|
The engine is getting closer now. Nearly all of the tin is on. Yesterday I fabricated and installed some industrial-style lower tins since I am running J-tubes in place of the rusted out heat exchangers. Today I installed the exhaust which was more of a pain then I had expected. The left preheat port was off by over a 1/4" side to side and front to back. I had to cut it loose, reposition it, and reweld it back to the muffler. Now the exhaust is all tightened up and fits good.
|
|
| Back to top |
|
|
supercub
Samba Member
Joined: June 07, 2010
Posts: 358
Location: Wisconsin
|
| Posted: Sat Feb 04, 2012 6:19 pm Post subject: |
|
|
The engine is nearly ready to put back into the car. I had the generator rebuilt last week and installed it and the fan shroud today. The little 40 hp has come a long way from the worn out lump it started out as. Actually there is very little that was reusable, so it is hardly even the same engine anymore. After all this work, I hope it will run good.
As pulled from the car.
After many hours and dollars. Almost ready to go back in.
|
|
| Back to top |
|
|
supercub
Samba Member
Joined: June 07, 2010
Posts: 358
Location: Wisconsin
|
| Posted: Sat Apr 14, 2012 6:53 pm Post subject: |
|
|
I guess I should wrap this up since the car has been running for about a month now and I have driven it about 700 miles over the past couple of weeks. After a couple of teething problems that needed attention, it works well.
|
|
| Back to top |
|
|
70 140
Samba Member
Joined: September 22, 2002
Posts: 8471
Location: Ontario Canada
|
| Posted: Sat Apr 14, 2012 6:58 pm Post subject: |
|
|
| Nice work on the engine. That thing looks like a fun driver. |
|
| Back to top |
|
|
sportin-wood
Samba Member

Joined: September 12, 2010
Posts: 2007
Location: Texas
|
| Posted: Sat Apr 14, 2012 8:43 pm Post subject: |
|
|
Nice work on Sylvester! So I take it after all of the engine work, you had no issues with getting it running right? Just out of curiosity, why didn't you paint the RF fender and the passenger door? I know the dents throughout the car were for character...just think those mismatched parts take away from the overall look...(IMHO).
By the way....nice touch leaving the little Sylvester sticker on the glove box door. 
_________________
.
Paused 66 project bug
.
"Relax, all right? My old man is a television repairman. He's got this ultimate set of tools. I can fix it." --- Jeff Spicoli |
|
| Back to top |
|
|
supercub
Samba Member
Joined: June 07, 2010
Posts: 358
Location: Wisconsin
|
| Posted: Sun Apr 15, 2012 6:22 am Post subject: |
|
|
70 140 Thanks for the compliment. It is really fun to drive. It's actually the first air-cooled VW I have ever driven so it is a totally new experience.
sportin-wood the engine ran really well right from the first fire up. I've done a few engines before (non-VW) and usually there was something that wasn't quite set up right and they coughed and hiccuped a little bit at first, but this this thing just fired up and ran like it had been running for years. It had a really bad oil leak from the front main though. It actually turned out to be the wrong seal between the flywheel and crank. It had the metal gasket when I took it apart so that is what I used when I reassembled it, though I was using a different crankshaft. The new crank was one that should have used a paper gasket so once it was switched, the leak basically stopped. As far as leaving the mismatched panels, I don't really have a good answer. At the time that I painted it, I was really into the cobbled together look that it had. I still like it in a weird sort of way. In any case, if it comes to annoy me, the rest was just painted with Krylon so with about $20 and an afternoon it can all be matching. The Sylvester sticker is the single most important part of the car. There was actually an "EXIT" sticker on the inside of the old windshield which was always good for a laugh, but sadly the windshield was cracked and broke during removal. |
|
| Back to top |
|
|
sportin-wood
Samba Member
Joined: September 12, 2010
Posts: 2007
Location: Texas
|
| Posted: Sun Apr 15, 2012 7:12 am Post subject: |
|
|
Still an overall nice job bringing him back to life. I wish I had your welding skills...I know I'm gonna need it on my '66 build! Being a couple of hours from you, I know what you mean by dealing with Texas' summer heat that's hard to be motivated to work in. Not everyone has an air conditioned indoor shop to work out of (wouldn't that be nice!).
_________________
.
Paused 66 project bug
.
"Relax, all right? My old man is a television repairman. He's got this ultimate set of tools. I can fix it." --- Jeff Spicoli |
|
| Back to top |
|
|
supercub
Samba Member
Joined: June 07, 2010
Posts: 358
Location: Wisconsin
|
| Posted: Sun Apr 15, 2012 8:35 am Post subject: |
|
|
| Yeah it took me quite a bit of trial and error before I could weld decently. I was terrible for a long time. I took a welding class back when I was in school and used to get so frustrated I would end up sneaking out early. I would still love to get better and try TIG welding again. I know if you don't already have a welder they can seem pretty expensive, but compared to the cost of having the work done at a shop, it's not so bad. It is really scary making your first cut on a car, but once you get the hang of making panels and welding them in, it opens up a lot more possibilities with potential projects. The summers can be brutal, especially last summer. After working all day outside in 100+ degrees, the last thing I wanted to do was come home and do it some more. |
|
| Back to top |
|
|
supercub
Samba Member
Joined: June 07, 2010
Posts: 358
Location: Wisconsin
|
| Posted: Sun Jun 07, 2020 6:10 pm Post subject: Re: My 1966 Beetle rebuild |
|
|
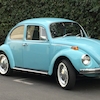
Today marks 10 years with this '66 Beetle as well as 10 years since I joined The Samba. A decade ago I dragged home this decrepit little car and slowly rebuilt it over the next year and a half. Of course I had high hopes for it, but during the past decade this VW has totally exceeded my expectations. So much so that it has become my longest-owned car.
The VW has taken me on several trouble free cross-country trips including two to California and back; once from TX in 2013 and once from WI in 2019. It has been to both coasts and many places in between. The car has served daily driver duties spring, summer, and fall since I moved north in 2013. The cheapo Krylon spray paint job has aged surprisingly well but it is getting thin in places.
I've put a bit over 73,000 miles on it since I got it going again in early 2012. Last year I installed the third set of tires on the car. There have been a few hiccups and breakdowns here and there, but I am proud to say that the car has only been towed twice, first when I brought it home and again when I moved to from TX to NH, when I pulled it behind my van. The most memorable breakdown has to be when the condenser took a dump at the top of a mountain pass in NH killing the engine. I was able to coast around five miles down almost into the next town. It was amusing careening down that bumpy, twisty mountain road under the power of gravity alone.
The engine hasn't been out of the car in eight years and hopefully won't have to be until I hit 100,000 miles, which should be in another couple of years. At that point I plan to pull it, take it apart, get the heads redone and replace anything else needed then. The car averages about 30mpg and uses (leaks) about 2/3 of a quart of oil every 3000 miles.
I have enjoyed this VW immensely and hope to still have it in another 10 years.
Here are a couple of current pictures from a drive I took this evening.
|
|
| Back to top |
|
|
mukluk
Samba Member

Joined: October 18, 2012
Posts: 7023
Location: Clyde, TX
|
| Posted: Sun Jun 07, 2020 7:20 pm Post subject: Re: My 1966 Beetle rebuild |
|
|
Still one of my favourites here. Happy 10th anniversary, and here's wishing you many more pleasant miles to come.

_________________
1960 Ragtop w/Semaphores "Inga" |
|
| Back to top |
|
|
supercub
Samba Member
Joined: June 07, 2010
Posts: 358
Location: Wisconsin
|
| Posted: Tue Jun 09, 2020 6:13 pm Post subject: Re: My 1966 Beetle rebuild |
|
|
| mukluk wrote: |
Still one of my favourites here. Happy 10th anniversary, and here's wishing you many more pleasant miles to come.
|
Thank you. I really like your '60 ragtop as well. |
|
| Back to top |
|
|
kpf
Samba Member
Joined: March 01, 2017
Posts: 852
Location: California, US
|
| Posted: Tue Jun 09, 2020 9:40 pm Post subject: Re: My 1966 Beetle rebuild |
|
|
Congratulations! You are an inspiration to us all!
_________________
1971 Super Beetle |
|
| Back to top |
|
|
supercub
Samba Member
Joined: June 07, 2010
Posts: 358
Location: Wisconsin
|
| Posted: Thu Jun 11, 2020 2:45 pm Post subject: Re: My 1966 Beetle rebuild |
|
|
| kpf wrote: |
| Congratulations! You are an inspiration to us all! |
Thanks. |
|
| Back to top |
|
|
supercub
Samba Member
Joined: June 07, 2010
Posts: 358
Location: Wisconsin
|
| Posted: Fri Aug 21, 2020 5:48 am Post subject: Re: My 1966 Beetle rebuild |
|
|
Here is the '66 under a huge silver maple near Palmyra, WI. It was a nice morning and I drove around a bit taking some landscape pictures around the area. This was the only one with the VW though.
|
|
| Back to top |
|
|
|


