| Author |
Message |
Chubber
Samba Member
Joined: November 12, 2003
Posts: 334
Location: Clermont, Central Florida

|
 Posted: Tue Oct 19, 2010 8:25 am Post subject: Another Bus Resto picture book Posted: Tue Oct 19, 2010 8:25 am Post subject: Another Bus Resto picture book |
 |
|
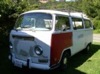
My family has owned my 71 since mid 1973 when we bought it used in Arlington, VA. It's two months older than I am. I grew up in this van and our family has driven it on 4 continents. I can't even count how many engines we have rebuilt for this van (my Dad likes to take the el-cheapo approach to rebuilding, often leading to 5-10k mile rebuilds)
The last repaint to the van was in about 1987 when we painted it in a paint booth in Spain. In about 1997 my Dad hit a guy who pulled out in front of him, wrinkling the drivers side center panel. I pulled the windshield and welded up the rust, plus replaced the battery tray in about 2003. I pulled the tank and painted the engine compartment while rebuilding the engine in 2004.
It lived outside pretty much all of it's life until 2005 when I moved to Florida and finally got a garage. Much of the time it was in a car port or had a car cover on it (or a blue tarp or plastic tarp) but often was just parked out in the elements. For many years that was in the rust belt of PA and DC and it shows some of the signs of rough living.
I just sold my 74 Super Convertible to make room in the garage and get some funds for the restoration. It's finally cooled off enough in Florida to make being in the garage bearable again and I figure i have until April to make real progress in the evening.
Sit back, grab a cold beverage and come along for the ride. I'm no professional body man but I have some experience and am honest when I make mistakes. It won't be a concourse winning restoration but I am aiming for a solid extension of it's lifespan for another 20+ years. I'm not saying that I will never half-ass anything, but it should be minimal and not cause more trouble than it's worth.
Feel free to chime in and give me tips or tricks to fixing something if you know of a way to make my life easier. Ill always appreciate it.
Without further ado, here are some pics to get us started. I am in the tear-down and take notes stage at this point.
_________________
Chubber
'71 Deluxe 7 Passenger Bus (Resto thread)
'72 Fastback
'74 Super Beetle Convertible (Sold)
Last edited by Chubber on Thu Oct 21, 2010 7:14 am; edited 1 time in total |
|
| Back to top |
|
 |
Chubber
Samba Member
Joined: November 12, 2003
Posts: 334
Location: Clermont, Central Florida
|
| Posted: Tue Oct 19, 2010 8:28 am Post subject: |
|
|
_________________
Chubber
'71 Deluxe 7 Passenger Bus (Resto thread)
'72 Fastback
'74 Super Beetle Convertible (Sold) |
|
| Back to top |
|
|
Chubber
Samba Member
Joined: November 12, 2003
Posts: 334
Location: Clermont, Central Florida
|
|
| Back to top |
|
|
Bisbeetle
Samba Member
Joined: August 20, 2010
Posts: 131
Location: Bisbee by the Sea
|
| Posted: Tue Oct 19, 2010 6:45 pm Post subject: |
|
|
| I look forward to seeing more of this, Chubber. My '71 has a bit less rust, but in all the same places, and I like your approach as spelled out above. |
|
| Back to top |
|
|
Chubber
Samba Member
Joined: November 12, 2003
Posts: 334
Location: Clermont, Central Florida
|
| Posted: Wed Oct 20, 2010 9:00 pm Post subject: |
|
|
Teardown continues unabated. Tonight I ripped into the door panels: front, side sliding and rear as well as breaking down the seat pillars and the walk through area. There is a bit of rust hiding here and there, mostly where moisture or salt had a chance to sit and work out of sight, inside body cavities and between pinchwelds. I know I have some real rocker panel work on both sides, wheel well welding and a bunch of window sills.
On the interior side there are a few broken or missing pieces and Ill be trolling Samba and some junk yards for replacements. I don't have an unlimited budget for all of this, especially considering paint, supplies, replacement metal, welding wire and gas, upgrades like insulation, a new wiring harness, etc.
Just for fun, I went through the WCM site and threw everything into the cart that I could easily identify from mind. All window and door rubber, the interior panels, seat upholstery, a new front rubber mat, etc. The total came to $2400, just for the obvious stuff! 
Bis, my bus didn't have much bad rust either, until I started taking things apart...
Anyway, on to the pics...
Inside this door looks pretty good.
Right side is even nicer
But I know that there is rust in the corner.
My rear hatch is in great shape
This is the worst spot on the sliding door
_________________
Chubber
'71 Deluxe 7 Passenger Bus (Resto thread)
'72 Fastback
'74 Super Beetle Convertible (Sold) |
|
| Back to top |
|
|
Chubber
Samba Member
Joined: November 12, 2003
Posts: 334
Location: Clermont, Central Florida
|
| Posted: Wed Oct 20, 2010 9:10 pm Post subject: |
|
|
Took me a bit to figure out the panels on the seat pedestals
This is bad on both sides. At the very top/bottom of the B pillar, it catches window leaks from above, door leaks from inside and wheel well spray from below, plus taking stress from the jacking point. It's a bad spot and I can tell it's going to be a pain to fix.
I need a new one of these, plus the rubber gasket
Then my camera ran out of battery before I got a shot of all of the pedestal cleaned of rubber baby bumpers and the walk-through rubber pulled up.
I sure wish I could wave my magic wand and have this dry-ice blasted to remove rust without leaving sand all over the place. Sandblasting unibodies is no picnic and I don't want to do that if I can help it. I'm pretty handy with a needle scaler and a knotted wire wheel.
Tomorrow if I get a chance will be all the glass and maybe the front door parts. Maybe even the headliner once the glass is out.
I have decided to leave the dashboard and steering wheel in place for now and will tape over all of that until I have done the body work. That way I can at least still start it and pull in/out of the garage so I can do the worst wire wheeling and the like outside in the driveway and spare my garage the worst of the mess. I don't want to get primer and the like all over my dash, but once I pull it I can no longer drive it and pushing it in and out of the garage by myself, especially when you can't steer, is not fun. Plus, it's fun driving it sitting on a milk crate.
_________________
Chubber
'71 Deluxe 7 Passenger Bus (Resto thread)
'72 Fastback
'74 Super Beetle Convertible (Sold) |
|
| Back to top |
|
|
danilo209
Samba Member
Joined: June 21, 2010
Posts: 81
Location: Stockton, CA
|
| Posted: Wed Oct 20, 2010 9:28 pm Post subject: |
|
|
looks like a nice project. post pictures as you go.
_________________
1974 Westfalia tin top (sold) 
1956 VW Allied 20-2 Fiberglass buggy (in parts)
1971 German Look Super Beetle (Sold)
1967 Ruby Red Bug |
|
| Back to top |
|
|
PicklePickle
Samba Member

Joined: February 24, 2008
Posts: 933
Location: Gonzales, LA
|
| Posted: Thu Oct 21, 2010 8:59 am Post subject: |
|
|
It would be great to see the bus well taken care of long enough for your kids to get to drive or even inherit it one day. I have a feeling within the next 20 years they are going start really pushing our old girls off the road for one reason or another (EPA, safety, fuel, or even traffic compatibility).
Transportation as we know it is on the cusp of tremendous change over the next quarter century.
I try to remind everyone with classics of that fact. I think people that care about classic vehicles have somewhat of an obligation to understand that in the not so distant future (probably in our lifetime) these will sit--non-drive-able on public roads--in garages and collector halls. Just make sure yours stays one that is "worth" keeping for that reason or else it's inevitably bound for the great scrap heap in the sky!
Great bus (and color scheme) BTW!
_________________
"Aircooled VWs are like roaches in that if you let one in, they'll soon be nesting all around you in great numbers."
-------------------------------------------------
1970 Yellow Beetle aka "Melbourne" |
|
| Back to top |
|
|
jtauxe 
Samba Member

Joined: September 30, 2004
Posts: 5780
Location: Los Alamos, New Mexico
|
| Posted: Thu Oct 21, 2010 9:35 am Post subject: |
|
|
One hint, of which you are probably already aware, is to label all the fasteners and other small bits, and put them in baggies for reassembly. Although it seems so obvious what went where as you take it apart, it becomes less than obvious when it is time to put it back together.
Looks like a great project. Enjoy!
_________________
John
"Travelling in a fried-out Kombi, on a hippie trail, head full of zombie..." - Colin Hay and Ron Strykert
http://vw.tauxe.net
1969 Transporter, 1971 Westfalia, 1976, 1977, 1976, 1977, 1971, 1973, 1977 Westfalias,
1979 Champagne Sunroof, 1974 Westfalia Automatic, 1979 Transporter, 1972 Sportsmobile, 1973 Transporter Wild Westerner, 1974 Westfalia parts bus, 1975 Mexican single cab *FOR SALE*, 1978 Irish 4-door double cab RHD
|
|
| Back to top |
|
|
Chubber
Samba Member
Joined: November 12, 2003
Posts: 334
Location: Clermont, Central Florida
|
| Posted: Thu Oct 21, 2010 11:17 am Post subject: |
|
|
| jtauxe wrote: |
| ...label all the fasteners and other small bits, and put them in baggies for reassembly. |
That's funny. My wife and I were talking about how I was going to approach the tear down. I just said "Nah, I just throw everything in a big box".
But I do put things in ziplocks, grouped by location like "left front seat" and "right front seat" and "sliding door".
I also have a spiral bound notebook I keep close at hand to take quick notes about what is missing (like when there are only 3 out of 4 screws holding something on) or broken or just needs restoration outside of the main stuff. (Like my inner door handles are very sticky for some reason. Perhaps too many Slurpees over the years...) It's disorganized, but I can review it later for things I should be buying or later transferring to my shopping list in case I am trolling a junk yard or something.
_________________
Chubber
'71 Deluxe 7 Passenger Bus (Resto thread)
'72 Fastback
'74 Super Beetle Convertible (Sold) |
|
| Back to top |
|
|
Chubber
Samba Member
Joined: November 12, 2003
Posts: 334
Location: Clermont, Central Florida
|
| Posted: Sun Oct 24, 2010 7:05 pm Post subject: |
|
|
Time for an update. Didn't get a ton of work done over the weekend, had to deliver the Z-bed to a guy in Tampa, then spent an hour talking to Corky at Sunray and trying to break through his delusions about how much some stuff is worth. A mostly clean piece of sheet metal from a bus buried in the mud, that I have to cut out, isn't worth $150. Outside mirrors with peeling chrome on the mounts and missing seals are NOT worth $40 each. Sheesh.
Anyway, my big jobs for the weekend were to pull the windows and beltline trim, the rear lights and latches and the sliding door covers on both sides. There isn't much to show for action shots, it was mostly just trying not to bend the chrome trim and not break the glass.
Windows are out and trim is off. I recovered 17 of the 51 clips.
Headliner before
During
(how the rear bow connects to the little tabs over the rear hatch)
Dang, broke one of the dome lights. (Or maybe it was always broken, it only worked sporadically, but I always blamed that on the door buttons)
_________________
Chubber
'71 Deluxe 7 Passenger Bus (Resto thread)
'72 Fastback
'74 Super Beetle Convertible (Sold) |
|
| Back to top |
|
|
Chubber
Samba Member
Joined: November 12, 2003
Posts: 334
Location: Clermont, Central Florida
|
| Posted: Sun Oct 24, 2010 7:19 pm Post subject: |
|
|
Pulled all of the rear lights and farkles
Looked at the sliding door covers
I had soaked these screws in P-Blaster, Kroil and GM Heat Riser spray for 3 days, twice a day. It's what all that drippy oil is you see in the pictures. But they still wouldn't budge. So I got out one of my favorite tools
and ground the heads off. The one behind the sliding door swingarm was trouble, but I got it. I did nick the door swing arm. I hope I didn't cause a rusty spot in the future. I gotta get some silver primer on it soonest.
A little judicious banging (trying not to do one part too much and kink them)
and out they came
There was a lot of surface rust on the covers and a few little rust throughs but the channels were pretty good overall.
One question I ran into was: What is this heavy galvanized steel bar that rides in the pinch where the cover goes on:
You can see it in the gap here:
It has a screw on one end right where the door locking mechanism is. What purpose does this bar serve? Something to adjust the cover position or something?
Up next will probably be an inventory of what sheet metal and rust repair panels I already have (been buying it when I see it at swaps for cheap and stashing it away.) and doing some wire wheeling on the window frames to decide how bad they are and how much I will have to cut out.
I bought a gallon of the Masterseries primer. Probably overkill, but there are some other things I may want to paint as well and I may paint them first to get an idea of spraying setup.
My general plan is to start at the top and work my way down. I know there is some heavy work to be done on the rocker panels and the bottom of the B pillars, but I need to wire wheel it down to see what I am dealing with.
_________________
Chubber
'71 Deluxe 7 Passenger Bus (Resto thread)
'72 Fastback
'74 Super Beetle Convertible (Sold) |
|
| Back to top |
|
|
Chubber
Samba Member
Joined: November 12, 2003
Posts: 334
Location: Clermont, Central Florida
|
| Posted: Sun Oct 31, 2010 12:29 pm Post subject: |
|
|
Work continued over the last week, mostly in pulling out the last of the interior rear of the steering wheel and some general cleanup work.
I covered the dash in heavy plastic and bagged the steering and shifter and the like. Just don't want to get overspray on them.
Once I took the nose pan off I saw that the black Rustoleum that I had spread around down there about 10 years ago was still holding up pretty well.
But you can see that the passenger floor boards are still suffering. Luckily none of the frame members are rotten (with the exception of above the drivers front jack point, but it's still straight enough to scab on new metal)
I had gone over the interior and scraped all of the tar board off and some of the glue bits
A quick vacuum turned up a goodly sized pile of rust, dust and cruft of all vintages
So this Saturday morning I pulled her out in the driveway
I fired up the pressure washer, put on the 15 degree tip and went to town. Did the outside top to bottom and then inside top to bottom and the bottom front to back.
It was nice to be able to reach my wand deep into the air scoops, the frame boxes and the like and really give it hell. It's a 3500 PSI washer and I borrowed my neighbor's "turbo nozzle" that spins a fine stream around and around. It worked for some stuff, like old glue, but the regular nozzle worked better for dirt and regular rust because you could aim the ricochet better than the turbo. But both did a great job on knocking off all kinds of old petrified dirt, loose rust, loose paint, underbody that wasn't really bonded, even some loose Bondo and old bits of headliner that were still glued. It's almost impossible to sand off old headliner glue because it clogs the paper, so the blaster was great getting it out of the tops of all the windows.
I found some Bondo I didn't even know about
What amazed me is that the roof is in great shape. A couple of little rusty spots but otherwise still quite clean. I have no idea how I am going to paint this without orange peel, as it's so far from the gun even when reaching down into it from the ladder.
It got these rear deck panels very clean. What looks like a lot of glue is just thin smears compared to the globs that were on there before
The front seat areas got really clean too.
I didn't get a picture of it, but I swept up at least 2 shoeboxes full of rust and old paint and undercoating and little bits of this and that from the driveway once I pushed the bus back inside.
_________________
Chubber
'71 Deluxe 7 Passenger Bus (Resto thread)
'72 Fastback
'74 Super Beetle Convertible (Sold) |
|
| Back to top |
|
|
SheepSlapper
Samba Member

Joined: September 16, 2010
Posts: 44
Location: Spokane, WA
|
| Posted: Sun Oct 31, 2010 7:07 pm Post subject: |
|
|
| Chubber wrote: |
One question I ran into was: What is this heavy galvanized steel bar that rides in the pinch where the cover goes on...
...It has a screw on one end right where the door locking mechanism is. What purpose does this bar serve? Something to adjust the cover position or something? |
That's the retaining strip that keeps the runner cover on. You loosen the screw on the end and push it towards the back of the bus so the runner cover comes off. I just pulled that yesterday myself 
_________________
1970 Dormobile (Dorothy) |
|
| Back to top |
|
|
Chubber
Samba Member
Joined: November 12, 2003
Posts: 334
Location: Clermont, Central Florida
|
| Posted: Mon Nov 01, 2010 5:20 am Post subject: |
|
|
| SheepSlapper wrote: |
| Chubber wrote: |
One question I ran into was: What is this heavy galvanized steel bar that rides in the pinch where the cover goes on...
...It has a screw on one end right where the door locking mechanism is. What purpose does this bar serve? Something to adjust the cover position or something? |
That's the retaining strip that keeps the runner cover on. You loosen the screw on the end and push it towards the back of the bus so the runner cover comes off. I just pulled that yesterday myself |
That makes sense. I guess that side has less screws that on the drivers side. So it works like a kind of wedge lock. Thanks.
_________________
Chubber
'71 Deluxe 7 Passenger Bus (Resto thread)
'72 Fastback
'74 Super Beetle Convertible (Sold) |
|
| Back to top |
|
|
Studt's 73
Samba Member
Joined: April 09, 2010
Posts: 145
Location: Pacific, Missouri
|
| Posted: Wed Nov 10, 2010 12:08 pm Post subject: |
|
|
Looks like you got yourself a good project. Without a ton of rust like mine you should be on the road in no time. I would be great to see this bus keep getting handed down, something a little sentimental about it I guess. I'm in the process of doing a complete resto on my 73, there might some information on there that can help you with your. Feel free to check it out and let me know it I can help in any way.
http://www.thesamba.com/vw/forum/viewtopic.php?t=428697&highlight=
_________________
Got YJ |
|
| Back to top |
|
|
Chubber
Samba Member
Joined: November 12, 2003
Posts: 334
Location: Clermont, Central Florida
|
| Posted: Wed Nov 10, 2010 1:08 pm Post subject: |
|
|
Studt, yeah, I was reading your thread a week or so ago. I agree, a lot of mine isn't nearly as bad as yours.
I have the sheet metal I need ordered, except for some good replacement cargo floor metal, so once it comes in Ill be digging in and taking out metal. For now I have just been working on wire brushing and sanding off surface rust for those parts I am not replacing.
_________________
Chubber
'71 Deluxe 7 Passenger Bus (Resto thread)
'72 Fastback
'74 Super Beetle Convertible (Sold) |
|
| Back to top |
|
|
Studt's 73
Samba Member
Joined: April 09, 2010
Posts: 145
Location: Pacific, Missouri
|
| Posted: Wed Nov 10, 2010 6:36 pm Post subject: |
|
|
| Chubber wrote: |
Studt, yeah, I was reading your thread a week or so ago. I agree, a lot of mine isn't nearly as bad as yours.
I have the sheet metal I need ordered, except for some good replacement cargo floor metal, so once it comes in Ill be digging in and taking out metal. For now I have just been working on wire brushing and sanding off surface rust for those parts I am not replacing. |
If I were you I would try to find a donor for the cargo floor. A lot of the replacement cargo floor you find now is more like metal roofing material. I could be wrong on this, but that is what everyone told me. I got a donor bus from Way Out Salvage for $400, got the cargo floor, both c & b pillars, and a lot more. Might be worth it to try and find something original.
_________________
Got YJ |
|
| Back to top |
|
|
Chubber
Samba Member
Joined: November 12, 2003
Posts: 334
Location: Clermont, Central Florida
|
| Posted: Sat Nov 27, 2010 5:59 pm Post subject: |
|
|
Finally, have another stint of work to show off. I had to take almost a month off due to a non-profit event I help run and it sucks up all of my time.
Anyway, my Bus Depot sheet metal came in. Some was great, some wasn't so great. I'm going to have to dolly a lot of curves flat and close up some seams with hammer and dolly work, I can tell already.
Do you folks usually remove the black paint before you install it? I ask because I am doing some paint stripping and it would be easy to remove that cheap paint and reprime with good stuff before I try to install it.
Anywho... Down to work
While I have been working on non-Bus stuff, I found an hour here or there to do all of the wire brushing in the cargo area and rear deck. It took a while, but it gives be a much better idea of what needs to be replaced as a unit vs just patched up.
Question for the peanut gallery: For the seat base plates, they look like they are just welded on the top, front and back. I should be able to just cut them out, right? I didn't see anything that looked like plug or spot welds on them.
Next to get torn up was a "repair" made by my father back in the early to mid 80's. There was a brake fluid spill and/or windshield leak that was never detected due to the rubber mat, and a bunch of the drivers floor was rusting out. To keep from Fred Flinstoneing it one day he "patched" it with a piece of galvanized flashing on each side and some roofing tar between to seal it up.
And, for 20+ years, it held up very well, at least on the parts you could see.
I peeled up the edge to see how it was
Holy Smokes! That's a lot of tar. It was probably 1/2 a gallon between the top and bottom by the time he was done. My Dad loves roofing tar...
Total coverage:
I started scraping it with a screwdriver and realized that was for chumps. I grabbed my air hammer, sharpened the chisel on the grinder for a second, and started chipping away at it.
It was up to 3/4 of an inch thick in places. I still haven't chipped the bottom, but Ill probably leave that off until I cut for the new piece. No use chipping off tar that will just get cut out anyway.
Once I got 99% of the tar off of there (It doesn't help the grinder any, either) it was pretty bad.
I popped the replacement panel in there just to see how far over it went and how much I would have to fix outside of the original repair.
One problem is that the rust comes up the seat base about 3/4 inch, above the replacement panel. I am going to have to fabricate a 1 inch "edge" piece for my replacement panel that goes UP to blend into the seat base to get total coverage. That's a bummer. I have to pull the clutch and the steering tube flange cover to test fit this better.
_________________
Chubber
'71 Deluxe 7 Passenger Bus (Resto thread)
'72 Fastback
'74 Super Beetle Convertible (Sold) |
|
| Back to top |
|
|
Chubber
Samba Member
Joined: November 12, 2003
Posts: 334
Location: Clermont, Central Florida
|
| Posted: Sat Nov 27, 2010 6:15 pm Post subject: |
|
|
Another thing I got some time to do during the day today was to put paint stripper on the bumper parts and start stripping off some previous work so I could do it right.
About 10 years ago I painted the front bumper. In my young-n-dumb days I just sanded it by hand, sprayed on some Rustoleum rusty metal primer and then a couple of spray cans of white. 99% of the white paint just fell off over the next couple of years, leaving only Rustoleum. It wasn't pretty. It looked 99% rusty, but that was just the primer. The metal underneath is almost perfect.
About 6 years ago I tore the rear bumper down and repainted it while I had the motor out for rebuilding. At least I used a 4 1/2 grinder wire wheel to clean it down to the original primer and take out any rust, then welded up a few pinholes that had developed and repainted with clean primer and Rustoleum in a jamb gun. It looked 100 times better, but wasn't holding up really well, being easy to chip and fading badly.
So I got some Ace Hardware paint stripper, put a nice coat of it on all of the parts and covered with cheap garbage bags to keep it from evaporating so quickly.
Rear bumper:
I also had the belly pan laying around, so I gave it a quick coat of paint stripper as well. I have put a couple of coats of black Rustoleum on this thing in the years past. Because I am going to clean stuff right, then use Masterseries silver, then black on the chassis black stuff, I wanted to clean this up too.
Once the stripper had kicked in and everything was nice and bubbly, I fired up the 3400psi pressure washer and blasted the paint to kingdom come. Undercoating + paint stripper + 3400psi = clean to the original primer:
Just need to bang out the dents and sand all over with 80 then 120 then prime and paint.
The bumpers got less clean, mostly just down to the original paint or sometimes the primer. But it sure saved me a ton of sandpaper or wire wheeling.
The bumper brackets had too much rust on them to do much good, they will need to be heavily sand blasted anyway. I have a Wanted ad on craigslist right now to see if someone is willing to let me rent their sandblasting cabinet or give me a deal on basic blasting. Nobody just does small-batch sandblasting. I called two large auto-body places near my house and both told me that they only have little hand-held blasters for taking out paint chip rust. I need a cabinet for bumpers or wheels and stuff. Ill probably just end up buying a bucket blaster and living with it for this small project.
I thought I took a picture of my finished parts but I can't find it. They were good, but all will still need plenty of time with the DA sander to clean up.
_________________
Chubber
'71 Deluxe 7 Passenger Bus (Resto thread)
'72 Fastback
'74 Super Beetle Convertible (Sold) |
|
| Back to top |
|
|
|


