| Author |
Message |
Bruce Wayne
Samba Member
Joined: May 15, 2007
Posts: 1210

|
 Posted: Sun Mar 27, 2011 4:59 pm Post subject: Posted: Sun Mar 27, 2011 4:59 pm Post subject: |
 |
|
| Sodo wrote: |
Very nice. Nothing like being wide open as soon as the top goes up. Every westy-camper knows how it goes, a big messy pile of 'stuff' on the front seats. Especially with a small family!
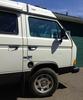
For those who want more space but can't undertake such a big modification, GoWesty has a rain fly kit that provides some storage space there, accessible thru the tent front window.
(GoWesty photo from http://www.gowesty.com/ec_view_details.php?id=4046 |
I concur. |
|
| Back to top |
|
 |
Howesight
Samba Member

Joined: July 02, 2008
Posts: 3274
Location: Vancouver, B.C.
|
| Posted: Sun Mar 27, 2011 8:30 pm Post subject: |
|
|
I did a bit more today. On Friday, I picked up some waterproof rip-stop nylon and hardware from a local supplier of outdoors fabrics and hardware called Outdoor Innovations in Vancouver (from Nylon to Gore-Tex, from canvas to Sunbrella - - great store!). This is the material I am using for my "GrosserWasserStopper" rainfly. I am doing the fly first and the pop-top canvas second.
I decided to install all the hardware needed for my GrosserWasserStopper.
So here are some pics:
1. The pic below shows the foam foller I used to apply gel coat over the fibreglass work I did. It gives a texture close to the factory Westy roof texture.
2. The pic below shows the luggage rack drain hole and attached spigot from the above point of view.
3. The pic below shows. if you can make it out, the texture.
4. The pics below show the 1/2" by 1/2" fibreglass rail for mounting the tent. I made it using 1/2" by 1/2" vinyl trim from Home Depot which I roughed up on all four sides with course sandpaper and fibreglassed into place. It sits in the round channel under the "peaks" surrounding the luggage rack. Due to following this area, these channels are slightly rounded, following the factory contour.
5. Next, I cut the 1/2" by 1/4'' solid extruded aluminum from "The Metal Supermarket" (only $10.00 for all I needed!), drilled and countersank the holes, shaped the curve in my vise, and dry-fit the aluminum extrusions.
6. Then I started installing the male snaps to hold my GrosserWasserStopper It turns out that there are 6 fibreglass "nibs" that Westfalia molded right into the Westy top that are just the right size for installing snaps.
Here are pics of the "nibs" into which I have already drilled holes:
(snaps already installed in the above pic)
7. Below is the brand of snap fasteners I got which comes with a tool for fastening the female snaps to your fabric. For the male snaps that attached to the factory "nibs", I had to dremel off 3/16' off the screws to ensure I would not break through the factory fibreglass. I pre-drilled 1/8" holes, installed the snaps part way to create threads (since the screws would not self-tap as well after shrtening), dremel cut them and then installed.
8. Then I installed four snaps into the stiffening strip I installed at the leading edge of the luggage rack, as seen in the pic below:
9. I pondered how to attach the snaps in the approximately 10 other locations where they are required. I decided I am going to use epoxy putty to attach "nibs" where needed. I am going to use the epoxy putty designed to repair holes in gas tanks. I'll post the pics when I do that step.
_________________
'86 Syncro Westy SVX |
|
| Back to top |
|
|
Spinal Tap
Samba Member
Joined: August 01, 2008
Posts: 413
Location: Chicago IL
|
| Posted: Mon Mar 28, 2011 9:40 am Post subject: |
|
|
| Howesight wrote: |
I am leaving the "luggage rack" as it is formed from the factory. This allows me to put odds and ends and camp chairs up there.
BUT, I am also making a "lid" for this area to cover it for aerodynamics improvement and hopefully a little less wind noise. This is why I have to attach drain plumbing to the drain holes on the "luggage" area.
As it turns out, there will still be a space of about 1.5" to 2" between the bottom of the luggage rack and the steel roof which will accomodate the front portion of the tent when the poptop is down plus, if I am lucky, my "pillow board" from my upper berth. |
Well, this is pretty brilliant.
I'm very curios to see your lid. I've been thinking about a lid for a while, I just don't have the skills to put something together. I'd love to have one to cut down on the wind noise, and improve gas mileage. So I'll certainly be keeping an eye on this! Way to go!
_________________
'85 Westy
'74 MG-B
| RCB wrote: |
| Its called tact...and tact is the ability to tell someone to go to hell in such a manner that they anticipate the trip. |
|
|
| Back to top |
|
|
Howesight
Samba Member
Joined: July 02, 2008
Posts: 3274
Location: Vancouver, B.C.
|
| Posted: Sun Apr 10, 2011 3:56 pm Post subject: |
|
|
More fun in Raincouver, BC! I finally found a little time to do more on my "Big Top". Unfortunately, the weather has not been helpful. My garage will not allow me open to pop my top, so it's tarp time on the driveway today during the trial fitting.
Anyway, I used some ripstop nylon to fabric-ate my GrosserWasserStopper. My good friend is a whiz with sewing and will get all the credit for the craftsmanship on sewing.
Here are some pics of the trial fit to determine where the lower hem will be located. For anyone wanting to make their own GrosserWasserStopper, I'll post the dimensions when the final cut and final sewing are complete.
By the way, I would NOT recommend that anyone try to make a WasserStopper as per GoWesty's version as their price is unbeatable. I have spent far more on just materials, so I can say that their item is priced right. I want to credit them with the best execution of this concept which many people, I'm sure, have thought about, but they got right and at the right price point. I only made mine because I need a custom size, and while doing so, I implemented it differently for my specific needs.
I got the fabric, nylon webbing, stainless steel snaps, velcro and other notions at a great local store that has every kind of outdoor fabric and hardware imaginable. It's all in plain view so you dan't have to describe the indescribeable widget you want. His prices are higher than online prices, but the convenience factor and ability to buy any size piece of any fabric, velcro, etc. easily outweighs the prices which are not bad by any standard. The store: Outdoor Innovations, in Vancouver.
_________________
'86 Syncro Westy SVX |
|
| Back to top |
|
|
jackbombay
Samba Member

Joined: October 19, 2007
Posts: 2723
Location: Eastern Idaho
|
|
| Back to top |
|
|
Howesight
Samba Member
Joined: July 02, 2008
Posts: 3274
Location: Vancouver, B.C.
|
| Posted: Mon May 02, 2011 12:11 am Post subject: |
|
|
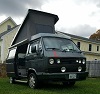
Well, we now have proof of concept. I have been busy and have installed the luggage rack drains, made a new pop-top tent out of Sunbrella, completed the GrosserWasserStopper (now re-named the SuperFly), and tested the whole shebang with a 4-day trip to the Halcyon Hotsprings with wife, step-daughter, step-daughter's best frined, and waaaay too much clothes for all three of them. I remind them that it's camping, not a Vogue shoot, but this has no impact on them.
Anyway, I am happy to report that the whole concept worked incredibly well and it is SOOOO nice having a place to put all the stuff that we bring along without having to clutter up the front seats nor all the otherwise useable space in the Westy.
It was cold at nights, about -2C (28F for you yanks) and we just used one compact electric space heater since this hotsprings has hookups in the RV area. We were toasty and not havingt to open up the front window like we used to have to do helped keep our warm air in.
Here are some pics of the almost finished product:
Now that I have tested the concept, I can finish with:
1. Sewing on the vinyl welting to the tent;
2. Sewing in the screens and windows; and
3. Painting the fibreglass top body-colour.
While I am at it, let me make a shameless plug for Sunbrella - - this stuff is fantastic - - it does not get wet. Water just beads right off it. I may have made the Superfly for nothing!
_________________
'86 Syncro Westy SVX |
|
| Back to top |
|
|
tschroeder0
Samba Member
Joined: April 14, 2008
Posts: 2096
Location: Boulder CO
|
| Posted: Mon May 02, 2011 1:49 am Post subject: |
|
|
this is looking very cool...I found a "bagawest" it accomplishes kind of the same thing, and yeah, it's nice to actually use the overhead space. Nice work.
here's a pic (page down to see it)
http://damdecoeur.ifrance.com/documents/Divers_gadgets.htm |
|
| Back to top |
|
|
1621
Samba Member
Joined: May 15, 2006
Posts: 2174
|
| Posted: Mon May 02, 2011 3:35 am Post subject: |
|
|
Very nice work! 
Do you have any shots of the interior?
_________________
'85 Westy |
|
| Back to top |
|
|
jackbombay
Samba Member
Joined: October 19, 2007
Posts: 2723
Location: Eastern Idaho
|
|
| Back to top |
|
|
GBA 88West LA
Samba Member
Joined: September 04, 2008
Posts: 1279
Location: New Hampshire
|
| Posted: Mon May 02, 2011 9:24 am Post subject: |
|
|

_________________
88 Westy GL Vanaru 07 2.5 EJ25/AA Trans/oiling plates, 1.14 3rd-.77-4th..solar powered cabin |
|
| Back to top |
|
|
fastwagens
Samba Member

Joined: March 01, 2004
Posts: 1028
Location: Michigan (The other west coast)
|
| Posted: Mon May 02, 2011 1:29 pm Post subject: |
|
|
| bravo, very cool. |
|
| Back to top |
|
|
BlackDogVan
Samba Member

Joined: December 21, 2007
Posts: 855
Location: Vancouver Island
|
| Posted: Mon May 02, 2011 2:55 pm Post subject: |
|
|
Very cool. Looking forward to seeing how you finish it up on the inside. I know know the mini deflector idea was raised before, here's a EV pic. One of those might be an easy addition & only make things better.
_________________
Gone but not forgotten - 1991 Carat - AAZ transmogriffied to mTDi.
Still addicted, looking for Doka... |
|
| Back to top |
|
|
canasync
Samba Member
Joined: June 28, 2010
Posts: 656
Location: BC
|
| Posted: Mon May 02, 2011 7:35 pm Post subject: |
|
|
Looks good, I like it. Post some interior pics.
_________________
1987 Syncro
3 knobs
PumpeDüse TDI (17mm Garret Turbo, bigger injectors, stage 4 malone tune, intercooled)
Cruise Control
Remote Start/locks
Custom Lift
Custom Bumpers with receivers
Coast Mountain Hightop - Comming Soon
1985 2wd Vanagon Pre-runner in the making
soon to be powered by 2.5L Subaru
Custom Lift |
|
| Back to top |
|
|
burleymotorsports
Samba Member

Joined: July 17, 2005
Posts: 332
|
|
| Back to top |
|
|
a914622
Samba Member

Joined: July 29, 2004
Posts: 840
Location: Westend of HWY2 , Wash
|
| Posted: Mon May 02, 2011 9:56 pm Post subject: |
|
|
Looks great. The idea of more room makes me want to add a pop top.
But the question has to be asked, does the Eurovan top fit on the vanagon? I parked next to one and was shocked how close in size they are.
jcl
_________________
87 gl powerd buy 2.5subaru
75 914 getting 2.2t subaru scratch that SVX subaru |
|
| Back to top |
|
|
Howesight
Samba Member
Joined: July 02, 2008
Posts: 3274
Location: Vancouver, B.C.
|
| Posted: Mon May 02, 2011 10:28 pm Post subject: |
|
|
Thanks for all the compliments. It was, and continues to be, a fun project. Now that I have done all the hard parts, especially the thinking and planning, I know I could do it again in one third of the time.
Regarding the Eurovan top on the Vanagon, I am quite sure it would not fit. Making it fit would not be easy.
As for interior pics, I took some tonight, but if my camera has wide-angle capability, I have not figured out how to do it.
Here are the pics:
Tons of room for bags, pillows, pets(?), small children, etc etc!
In the two pics below, you can see the clear tubing I used for the luggage rack drains to connect the PVC fittings on top and on the sides. The clear tubing allows me to easily see any clogs and deal with them. When I remove the tent to install the windows and the welting, I will install grommets on the tent where the rough holes are cut for the clear tubing to pass through.
In the pic below, you can see I have not yet removed the driver's side luggage rack mount. It will come out later when I pull back the headliner for some wiring.
In the pic below, I am sitting on the roof over the dirver's seat while taking the pic.
Below is a close-up of the luggage rack drain holes.
_________________
'86 Syncro Westy SVX |
|
| Back to top |
|
|
Gruppe B
Samba Member
Joined: January 16, 2007
Posts: 1331
|
| Posted: Sun Jun 24, 2012 9:36 pm Post subject: |
|
|
I love this design!
Can you give an update on this project.
How is it holding up, any changes, etc
great work! |
|
| Back to top |
|
|
Howesight
Samba Member
Joined: July 02, 2008
Posts: 3274
Location: Vancouver, B.C.
|
| Posted: Tue Jul 10, 2012 4:40 pm Post subject: |
|
|
The tent is about to finally receive the three-window treatment on my custom Sunbrella "Big Top".
I need to give my seamstress some indication how to stitch up the windows and zippers. I like both the GoWesty style and the Ateliers style, but between them I like the Ateliers PK approach the best with the contrasting strip of material along the windows.
Does anyone have any pics of the interior of their three-window poptop tents that would show how the pieces and zippers are fitted?
In the meantime, I got my SVX installed with my Tom Shiels harness, got my AA rebuilt transaxle, rebuilt locking front diff and decoupler installed also. Many thanks to Daryl Christiansen and Tom Shiels for their particular forms of magic and excellent customer service!
_________________
'86 Syncro Westy SVX |
|
| Back to top |
|
|
Howesight
Samba Member
Joined: July 02, 2008
Posts: 3274
Location: Vancouver, B.C.
|
| Posted: Mon Jul 23, 2012 8:51 pm Post subject: |
|
|
Well, it took a while, but I finally got the three windows sewn in on the Big Top. We were in the Kootenays this week and it sure is cool up top now.
[img]
Love my new SVX install too - - this was the maiden voyage. SmallCar clutch release o-ring failed - - waaaaah!
Smallcar was honourable and quickly shipped me a replacement bellhousing. My customer service experience with them has been outstanding.
A side note: Average mileage over 1,500 miles was 20 mpg (imperial gallons). This is better than the dying WBX was getting. I am running a 0.70 4th gear and 28.5 inch tires. Mostly drove at between 70 and 80 mph. Very happy and intend to test again at 65 mph to see what mileage this combo can yield without the lead foot.
_________________
'86 Syncro Westy SVX |
|
| Back to top |
|
|
DAIZEE
Samba Member
Joined: January 26, 2010
Posts: 7552
Location: Greater Toronto Area Ontario West Side
|
| Posted: Mon Jul 30, 2012 12:56 am Post subject: |
|
|
Innovative and thinking ahead of the box! Nice (grand) job.
_________________
'09 2.5L Jetta 5 cylinder, 5 spd, super turbo, see thread in H2O Cooled Jetta, etc...
83.5 Vanagon L Riviera Model with 98 1.9L TD AAZ 4 speed Daily Driver 3 out of 4 seasons (sold)
84 Vanagon GL Wolfsburg Westy WBX 4 speed (sold) |
|
| Back to top |
|
|
|


