| Author |
Message |
OLD VW NUT
Samba Member
Joined: February 23, 2011
Posts: 2776
Location: High Desert of Washington 98823

|
 Posted: Wed Aug 10, 2011 12:20 am Post subject: OLD VW NUT's 2110 Build notes - pics posted Posted: Wed Aug 10, 2011 12:20 am Post subject: OLD VW NUT's 2110 Build notes - pics posted |
 |
|
I've decided to take my current engine build 'public' to let some of you young whipper-snappers see how it's done - and to solicit advice if anyone has a better way - and I'm sure there are better ideas.
Most of this build is set in stone however - plans have been made - parts have been bought - and the short block is assembled and on the engine stand - and the bank account is shot! The only major part I haven't bought yet is the exhaust system - waiting for the bank account to recover before buying that - have to make do with whats on hand for a few months.
I'm waiting for new head studs - crap - I cut a couple too short and I refuse to assemble an engine with too little threads in the case or a head nut without at least one thread sticking out the top. I'm going to build an 1849 (88x76mm) next so I'll be able to use the short studs on it. This motor has 5.5" H beam rods and needed the longer studs. I also need the cylinder shims from the machinist 25 miles away - he hasn't called yet.
Maybe tomorrow.
Anyway - here it is - I'll be adding some pics I took of drilling and tapping the oil galley so I could clean it sufficiently - and a few shots of the crank and cam in the case half. Since they need to be resized from a 10mp camera I'll have to do some editing work on them - so give me some time to post them - tomorrow I GOLF!!! No car work on Wednesdays
-----------------------------------------------------------------
OLD VW NUT's 2110 Build notes
Bottom End
Case VW AD case AS-41, machine work by RIMCO
welded #3 web with deep stud - OS main saddles first cut - standard thrust - case was nearly 'virginal' and could have gotten by with a .010" cut if there were bearings for such a thing and I might have been able to use it as a standard case - not bad for an engine case that is almost 40 years old
CB 82mm 4340 crank - 5.5" 'H' rods
KS steel backed main bearings
Clevite rod bearings
Mahle 90.5 forged piston/cylinder set standard ring kit
Sand seal machined - EMPI 7" black degreed pulley (we'll see how this works out)
factor 8mm stud inserts - CB chromoly studs nuts & washers
------------------------------------------------
Valve Train
CB 2242 cam with 298 deg duration - 248 deg advertised with .389" lift at the cam - .486" with 1.25 rockers
with CB aluminum cam gear - Engle lifters - Manton chromoly pushrods - CB 1.25:1 rocker kit solid shaft
Cam has a relatively gentle (slow) ramp and should be kind to the lifter bores of which all were near perfect - lifters fit tight with no observable- side motion
-------------------------------------------------
Oil system
CB full flow 26mm oil pump (Shadeck) - standard remote mount oil filter kit
OG type 1 doghouse cooler - new stock oil control plungers/springs
CB 1.5 quart sump with drain from L/H valve cover to sump - visit Muffler Mike's website to see why I've done this
http://mufflermike.com/news2007.html
page down to the 1-18-2007 entry - this will explain why you should do this if you experience low oil pressure when you get on your engine for even brief sprints. No oil? - soon no engine! I may add a drain for the R/H side as well since it holds some oil too. A tee between the covers before entering the sump should suffice. AFAIK there is no ideal way other than to add a sump if you want to mod your engine in this manner and even a small sump will add a reservoir of cool oil for climbing long hills and for right foot sprints. The more oil you have the more time you get before overheating all your oil. Oil acts as a heat sink to your bearings and heads.
Blowby control will be handled by a CB oil tower with vents from left and right hand valve covers channeled to it - no cutesy lawn mower air filters for this motor - this will vent to the road with a down-pipe from the tower
--------------------------------------------------
Cooling system
Stock doghouse shroud with OG 35mm fan - used OG thermostat flaps with OG thermostat - type 3 cool tin in black
See also the above oil section - I've always seen the oiling system as part of the cooling system since it carries a lot of heat from the engine
--------------------------------------------------
Exhaust system
For now - 1 3/8" single quiet header system with J-pipes - once funding is available a fully merged 1 1/2 or 1 5/8" ceramic coated system is planned - I just don't have the $800 to drop on one right now
---------------------------------------------------
Induction system
Dual EMPI HPMX 44mm (Weber 44 IDF clones) set up and test ran by ACE and Art Thraen in Salt Lake Ut - CB Performance linkage - ACE throttle springs - all sitting on CB style offset manifolds
- Jetting TBA
All fed into CB Los Panchito heads with 40x35mm valves and dual springs - intake manifolds have been machine matched to heads - gaskets reworked to clear interference
Heads buttoned down with CB chromoly 8mm head studs nuts and washers
Clean up port polishing by me
---------------------------------------------------
Other details
All rotating and reciprocating parts have been balanced to within a gnats ass (or two).
Deck height adjusted to .042" with 59cc heads for final compression ratio of right at 9:1.
Dual HPMX carbs will feed vacuum signal to an aircooled.com SVDA distributor with Pertronix point replacement system - coil is a standard 35k volt unit
Flywheel is a 12 pound forged unit from CIP1 - and clutch kit is the standard Kennedy 1700 pound stage 1 with included disc.
There will be no glitzy chrome fan housing and cylinder tins. I think a pair of 44mm two throat carbs provide all the glitz and glamor any ACVW engine needs. Chrome is all talk - hp cuts the crap.
Target is for a very drive-able daily 71 Karmann Ghia on 91-92 pump gasoline - no ethanol - I have several stations in my area that are ethanol free - this gives a better burn and slightly better mileage although this isn't my goal - speed - and reliability are paramount - but most of all reliability! RPMs will top out at 6500 - my goal is for around 130hp at the crank - should be doable. I'll never know for sure since there are no engine dynos around me AFAIK. Maybe a chassis dyno run will get done some time in the future - we'll see.
As I said - pictures will be coming - maybe tomorrow night. If I've left out any details please ask - I'm happy to answer any questions.
===================================
OK - as promised - PICS! Porn for the VW nuts!
This one shows clearly what it looks like to have the #3 web area welded up - this area is prone to cracking in the AS 21 case but not so much with the AS 41 case with deep stud on #3 at the top front stud location. I've had one of these deep stud cases crack on me so this is something like paying an insurance policy.
Here are the simple tools I used to pull the galley plugs to allow a thorough cleaning - this is a MUST DO step to insure a clean oil supply to the bearings. The flat bar is made for pulling nails - worked great for pulling the galley plugs. Motor got a jet-wash after cleaning the galley passages with a gun cleaning kit.
Cylinder spigots opened up for 90.5/92mm cylinders - the machined surfaces are like a mirror
Here is a good shot of what a case looks like after being clearanced for the 82mm crank - rods - as noted above are CB 'H' rods - very strong
Here is a good shot of what the clearance tool does to the internal bracing of the main web area - can't have the crank or rods beating the case apart
Thats all for now folks. I'll be posting some shots of the short block after being assembled. I'll try to get a few shots of setting the deck height and the rocker geometry. Pretty straight forward operations but unless you've done it a time or two it might be a mystery to you. Since I've already buttoned up the case and the crank - cam - lifters etc - all the important stuff is inside I can't get pics of them. My chromoly head studs will be here sometime today so I can get on with the top end assembly. I'll need the cylinder shims that are at the machine shop being surfaced down a bit to get deck height right at .040" which will give me 9:1 compression.
Right now it's time to get ready for a round of golf with some buddies.
TTYL.
OLD VW NUT
_________________
71 Ghia Coupe - stock body - no rust! Powered by a 2110 W/Dual HPMX 44's - Rancho Pro Street Transaxle - A/C by Gilmore
Other car - 2013 VW Golf TDI |
|
| Back to top |
|
 |
earthquake
Samba Member

Joined: January 10, 2008
Posts: 3984
Location: SANDY VALLEY, NEVADA
|
| Posted: Wed Aug 10, 2011 9:02 am Post subject: |
|
|
One problem I see is using cool tins with a thermostat, I think I would just use the under cylinder deflectors. I think the cool tins block the flow of air over the thermostat and it might not open
Casey
_________________
74 CLASS 11 LOOK-A-LIKE
69 DUNE BUGGY
79 INTERNATIONAL SCOUT II
05 SCION XB SERIES RELEASE 2[#437]
95 Chevy C3500 dually
98 Ford E150
Link to Kelly J. Nolte 3/20/53 - 11/6/08
https://time-zonelabs.blogspot.com/p/about-kelly.html
DEATH TO CHINGERS!
[From a military recruitment poster in the novel "The Stainless Steel Rat" By Harry Harrison] |
|
| Back to top |
|
|
DarthWeber
Samba Member

Joined: November 24, 2007
Posts: 7543
Location: Whittier,CA
|
| Posted: Wed Aug 10, 2011 10:01 am Post subject: |
|
|
No Chrome Tin!!?? That just kills it for me! 
Seriously, thanks for posting your build! CB cam with Engle lifters, interesting combo. With 6.5:1 dynamic it should run cool as a cucumber on 91. Looks like it'll be a really good motor! 
_________________
| Mitey62 wrote: |
| Swapped the Compufire for a Bosch blue and some points I had sitting around, started 1st crank. Took her out for a drive, pulls harder, more RPM, and runs smoother. I think I'll be sticking with points from now on. |
| RockCrusher wrote: |
JB weld the case halves....that'll keep the fretting to a minimum.  |
|
|
| Back to top |
|
|
Matthew
Samba Member
Joined: January 29, 2004
Posts: 1760
Location: Eastern Tennessee
|
| Posted: Wed Aug 10, 2011 10:24 am Post subject: |
|
|
| DarthWeber wrote: |
No Chrome Tin!!?? That just kills it for me!
Seriously, thanks for posting your build! CB cam with Engle lifters, interesting combo. With 6.5:1 dynamic it should run cool as a cucumber on 91. Looks like it'll be a really good motor! |
That cam has less .050" duration than the Engle 120 (248 vs 253). Seems like dynamic cr would be a bit higher than 6.5:1, no?
_________________
1965 Beetle sedan
Click to view image |
|
| Back to top |
|
|
DarthWeber
Samba Member
Joined: November 24, 2007
Posts: 7543
Location: Whittier,CA
|
| Posted: Wed Aug 10, 2011 10:34 am Post subject: |
|
|
| Matthew wrote: |
| That cam has less .050" duration than the Engle 120 (248 vs 253). |
Yes, but you have to look at the difference between advertised and running durations on both cams. W120 = 41, CB2242 = 50.
_________________
| Mitey62 wrote: |
| Swapped the Compufire for a Bosch blue and some points I had sitting around, started 1st crank. Took her out for a drive, pulls harder, more RPM, and runs smoother. I think I'll be sticking with points from now on. |
| RockCrusher wrote: |
| JB weld the case halves....that'll keep the fretting to a minimum. |
|
|
| Back to top |
|
|
kielbasa
Samba Member

Joined: November 28, 2007
Posts: 1443
Location: Garbage Grove, CA
|
| Posted: Wed Aug 10, 2011 12:59 pm Post subject: |
|
|
You got your motor back that dirty? Is this another thing rimco sucks at... Cleaning parts?
_________________
Gotta give my props to:
Wolfsburg Motorsports
Dubbers Toy Box
Jeff's VW Speed and Fab
4inbore.com
Kielbasa Industries |
|
| Back to top |
|
|
OLD VW NUT
Samba Member
Joined: February 23, 2011
Posts: 2776
Location: High Desert of Washington 98823
|
| Posted: Wed Aug 10, 2011 4:53 pm Post subject: |
|
|
Thanks for the replies guys.
As for the cool tin and stock type 1 thermostat its my understanding that the sled tins have more to do with insuring the thermostat works properly. I've seen a few motors years ago with overheating problems that had stock thermostats but the owner took off the sleds for one reason or another. Installing the sleds cured the overheating. I've used this combo before many years ago and it seemed to work just fine. Since I have j-tubes instead of heater boxes my main concern has been getting the gap blocked off from having no heater boxes and the cooler air that would interfere with the thermostat - in other words - keeping it artificially cool. Type 3 tins allow the exhausted air to flow down under the motor just like the type one tins do.
_________________
71 Ghia Coupe - stock body - no rust! Powered by a 2110 W/Dual HPMX 44's - Rancho Pro Street Transaxle - A/C by Gilmore
Other car - 2013 VW Golf TDI |
|
| Back to top |
|
|
OLD VW NUT
Samba Member
Joined: February 23, 2011
Posts: 2776
Location: High Desert of Washington 98823
|
| Posted: Wed Aug 10, 2011 4:57 pm Post subject: |
|
|
| kielbasa wrote: |
| You got your motor back that dirty? Is this another thing rimco sucks at... Cleaning parts? |
That motor went to Rimco that dirty! I asked them if it mattered and they didn't care. Since I had to unplug the oil galley to clean them it seemed natural to clean the case after getting the plugs out so the jet washer could do it's job. I'm of the mind that doing the same job twice is silly. The case is very clean inside and out. The old silver paint that someone put on it is nearly gone. When I get done it'll all be flat black. I never paint the heads.
_________________
71 Ghia Coupe - stock body - no rust! Powered by a 2110 W/Dual HPMX 44's - Rancho Pro Street Transaxle - A/C by Gilmore
Other car - 2013 VW Golf TDI |
|
| Back to top |
|
|
RockCrusher
Samba Member

Joined: August 03, 2010
Posts: 4596
Location: Parkesburg, PA
|
| Posted: Thu Aug 11, 2011 11:07 am Post subject: |
|
|
Looks good to me. Only suggestion I would add is to double drain the 3/4 head and forget the 1/2 head. Do 2 separate drains into the sump with no more than 45* fittings (straight if you can swing it but most likely not). We are well familiar with the issue you're referring too and with MM's solution and we concur on that. You really don't need an extra sump if you can run the lines to the stock sump on the 1/2 side. I prefer the extra sump solution though. Thanks for sharing Old Nut.
RC
_________________
[email protected] Please use email for all general inquiries.
I will be happy to speak to anyone who has a serious inquiry (meaning real potential business for RC enterprises) or a parts order. Due to machining noise causing missed calls all calls will be returned promptly. |
|
| Back to top |
|
|
bugnut68
Samba Member
Joined: June 10, 2003
Posts: 4180
Location: Eugene, OR
|
| Posted: Thu Aug 11, 2011 11:55 am Post subject: |
|
|
| kielbasa wrote: |
| You got your motor back that dirty? Is this another thing rimco sucks at... Cleaning parts? |
It's up to the builder to get everything spic and span during the build...but it looks like the OP already answered your question. |
|
| Back to top |
|
|
OLD VW NUT
Samba Member
Joined: February 23, 2011
Posts: 2776
Location: High Desert of Washington 98823
|
| Posted: Thu Aug 11, 2011 12:50 pm Post subject: |
|
|
| RockCrusher wrote: |
Looks good to me. Only suggestion I would add is to double drain the 3/4 head and forget the 1/2 head. Do 2 separate drains into the sump with no more than 45* fittings (straight if you can swing it but most likely not). We are well familiar with the issue you're referring too and with MM's solution and we concur on that. You really don't need an extra sump if you can run the lines to the stock sump on the 1/2 side. I prefer the extra sump solution though. Thanks for sharing Old Nut.
RC |
Thanks for the advice RC. I like having the extra oil reserve the thin-line sump gives me - 1 1/2 quart more. And the lower drain location should help the oil to drain from the 3/4 valve cover quicker. I'm not planning on taking my car to the strip - just daily driving - and the occasional stop-light drag. I'm more into having a car that handles well (the Ghia handles great) that can accelerate out of a corner with more torque than a stock motor. I think I have that - at least. I'm close to some isolated stretches of twisting turning roads - very few cars on them - and I hardly ever see a sheriff or stater on them.
CB's 'C' channel aluminum covers are flat at the bottom center so it should be easy to seal. Looking them over this morning and test fitting them to the head with the rocker assembly on it appears it would be a tight fit to have a drain at the front and back on the bottom of the cover without running into interference problems with the rockers/pushrods unless I had an aluminum pipe heli-arc welded in place - not a bad idea since then it'd have a drain area that wasn't raised up from a fitting being bolted in place. I'll figure out a way to measure actual clearance and see what's at the local NAPA store that can be used. Or just go down to the local muffler shop where my nephew works - he could add those short aluminum pipes to the bottom of the cover. The other option is to put that pipe in the head - no having to remove the plumbing and I could copper hard-line it.
I haven't decided what to use or where to drain that head from. Maybe 1/2" oil line? Hard copper? Maybe bigger - like 5/8"? Don't know. The local NAPA guys are very helpful - maybe they can locate a formed oil line that has a gentle 90* bent coming off the head and at the right height to enter the sump without having to put much bend in it. I have to make it easy (relatively) to remove for valve adjustment. I don't want that to become a major project every 3000 miles. A hose clamp should be easy enough to remove even if it is unsightly. Hey - the carbs are on top! Thats where everyone is gonna look - right?
I've never heard of the 1/2 head side filling up in any substantial amounts but I've been searching for any evidence of problems on that side. The 3/4 side is well documented - 1/2 not a problem? Thats good! Seems like every ACVW I've ever crawled under had oil leaking out the 3/4 side and the 1/2 side was fairly dry by comparison.
Looks like I can forget the 1/2 drain then? Thanks. That'll make plumbing a bit easier. Just have to figure out the plumbing now.
Time to head out to the shop - UPS just dropped off some CB head studs - rocker shims - exhaust barrel nuts - small hex intake manifold nuts. Time to have some fun. Gotta get the R/H head bolted down (temp) and see if it takes the same rocker shims and pushrod length as the L/H does. It should - but you never know. And that is why I check - and recheck - and then check again.
_________________
71 Ghia Coupe - stock body - no rust! Powered by a 2110 W/Dual HPMX 44's - Rancho Pro Street Transaxle - A/C by Gilmore
Other car - 2013 VW Golf TDI |
|
| Back to top |
|
|
RockCrusher
Samba Member
Joined: August 03, 2010
Posts: 4596
Location: Parkesburg, PA
|
| Posted: Fri Aug 12, 2011 7:17 am Post subject: |
|
|
I have the EMPI C-channel valve cover and used 2 brass 45* elbows. After deep taping the cover and fitting the elbows I cut the excess threads of on the inside so there are no interference issues. The bigger the line the better. If you don't vent that cover the oil will be pumped back to the sump under pressure.
RC
_________________
[email protected] Please use email for all general inquiries.
I will be happy to speak to anyone who has a serious inquiry (meaning real potential business for RC enterprises) or a parts order. Due to machining noise causing missed calls all calls will be returned promptly. |
|
| Back to top |
|
|
OLD VW NUT
Samba Member
Joined: February 23, 2011
Posts: 2776
Location: High Desert of Washington 98823
|
| Posted: Thu Apr 11, 2013 6:40 pm Post subject: Pics of the Ghia after paint |
|
|
Time for an update after taking over a year off from car building. The motor is all but together - I have to fit the air conditioner pump (Gilmore) to the motor with the carbs in place - I'll be looking for interference between parts. Flywheel hasn't been torqued yet. It is nearly ready to power the Ghia once the car is back together. I'm getting closer - should be driving it in a month or so with any luck.
The Ghia body has been worked over pretty good - body work took a few days. This was not a frame-off resto since the car only has 125k on it. It was literally rust-free except for the battery tray. The repop part fit 'ok' but could have been better. The body to motor seal slot lines up at least.
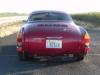
All in all I'm very happy with the paint. After it gets wet sanded to remove the irregularities it should really shine. Anyway here's a few pics of the Ghia. Paint is DuPont Nason - the base coat is a satin finish and looks awesome on its own - with the clear coat in place it looks wet and glossy - very nice! I'm really jazzed to see this finished. Color is Toreador Red. Its actually more subtle than in these pics - I had the camera set to 'vivid'. The DuPont Nason is the best paint I've ever worked with - the car is already dry and the clear is hard as a rock.
The new dash pieces are next - along with the headliner. New seals - freshly tinted windows etc. Carpet kit - a pair of very nice 2006 Acura leather seats - and more! I still have to find the right door and quarter panels to match the carpet and seats. The subwoofer speakers and stereo are waiting their turn - along with a couple of amps to drive the speakers and sub.
Anyway here's the pics...
_________________
71 Ghia Coupe - stock body - no rust! Powered by a 2110 W/Dual HPMX 44's - Rancho Pro Street Transaxle - A/C by Gilmore
Other car - 2013 VW Golf TDI |
|
| Back to top |
|
|
Altema
Samba Member
Joined: June 20, 2010
Posts: 2904
Location: Lower Michigan
|
| Posted: Thu Apr 11, 2013 7:48 pm Post subject: |
|
|
Looking good, and that color really rocks. Congrats on shifting into high gear. Mind if I ask what size and type those tires are?
Paul |
|
| Back to top |
|
|
OLD VW NUT
Samba Member
Joined: February 23, 2011
Posts: 2776
Location: High Desert of Washington 98823
|
| Posted: Thu Apr 11, 2013 8:02 pm Post subject: |
|
|
Thanks - it took a lot to get to this point! Seems like I'm over the 'hump' to getting this done. I hope so. It should go together pretty easily now that the paint is done.
The car is at my nephew's house but I'll take a wag on tire size. I'm pretty sure they are 14" - 195 14 70 Federal's. The wheels are Western Mags. I had to use a 1/4" spacer on the front to keep from hitting the calipers - and I had coil over shocks installed on the rears to keep the passenger side from rubbing the tire. The wheels/tires won't be staying on the car - I have plans on stock chrome slots with the flat hubcaps. I may keep the coil overs since I'm installing a Gilmore AC unit and want as much ground clearance as I can get. That may change - lots of things may change. I think you know how that goes...
_________________
71 Ghia Coupe - stock body - no rust! Powered by a 2110 W/Dual HPMX 44's - Rancho Pro Street Transaxle - A/C by Gilmore
Other car - 2013 VW Golf TDI |
|
| Back to top |
|
|
Altema
Samba Member
Joined: June 20, 2010
Posts: 2904
Location: Lower Michigan
|
| Posted: Sat Apr 13, 2013 7:07 am Post subject: |
|
|
By the way, thanks for the link to Mike's page. The photos of a running engine with viewing glass on the rocker covers was a revelation. I knew extra oil got forced into the left side... but not THAT much! The head half full at 3000 rpm, and I often hum along at 4000? 
I know what I'm going to do with that provision on my deep sump now, just have to find the best spot on the head for the drain.
Paul |
|
| Back to top |
|
|
OLD VW NUT
Samba Member
Joined: February 23, 2011
Posts: 2776
Location: High Desert of Washington 98823
|
| Posted: Sun Jul 28, 2013 12:56 am Post subject: |
|
|
I thought I'd bump this thread to the top since I've finally got the 2110 in the Ghia - and fired it up this evening!!! Hot-Damn! The motor sounds sweet as hell! The EMPI HPMX 44's are working very well - not a hitch to getting them running right. Having Art Thraen set them up paid off big time! Well worth the money IMO. I've got the two of them connected by a vacuum line to a aircooled.net SVDA and the timing mark is as steady as a rock. I haven't drove the car yet - I seem to be one hose short of an A/C kit - and a few other misc odds and ends that need to be done. Filters need to be installed - the rain shield hits the CB oil breather so that will be altered or removed - haven't decided on that course of action yet. And the hood springs hit the top of the air filters so I'll probably be installing a pair of charged struts to raise and lower the engine cover.
So many things go into a car after its been torn down - painted - interior - an AC kit (Gilmore) - a new custom motor that required many hours of fitting and dicking around with to get things just right. Seems in his rush to go on vacation last August Gilmore forgot the hose that runs from the dryer to the condenser. My local NAPA guys will be building a hose Monday morning to replace the one that didn't get here. I'd still recommend the Gilmore kit - everything fits pretty well but there is some fabrication work that needed to be done - the pump interfered with the cross-bar linkage and needed to be lowered about 2". It wasn't going to work as-is. The brace that runs from the #3 exhaust was useless - a new one was fabricated that makes the mounting bracket solid as a rock. And I hear that he's done away with that brace in favor of one going to the oil/gen stand. I think the brace I made will work just fine.
I'm smiling from ear to ear this evening. A motor that I started over 2 years ago is finally in the car and running. Its always a relief to get a motor like this started up and not have any problems. The only 'problem' was the after market pulley tin hitting the front side of the crank pulley which made a horrendous noise. Not sure I'm in love with the Bug Pack Mondo muffler either - but the ceramic coated header/muffler should leave no doubt to onlookers that this Ghia means business. Not much muffling going on - and the chromoly pushrods aren't the quietest either. Yes - they've been set to loose zero lash. Sounds great when it first fires up but as the motor warms up the lash increases and those things are noisy. I can almost hear them over the sounds from the Mondo muffler.
I'll post some pics of the car later this week. It needs a final buff and wax job. Right now its dirty (dust) - and the interior needs to be put in place. I'll be driving it in less than a week! WOW! Cannot wait!
_________________
71 Ghia Coupe - stock body - no rust! Powered by a 2110 W/Dual HPMX 44's - Rancho Pro Street Transaxle - A/C by Gilmore
Other car - 2013 VW Golf TDI |
|
| Back to top |
|
|
Rome
Samba Member
Joined: June 02, 2004
Posts: 9651
Location: Pearl River, NY
|
| Posted: Sun Jul 28, 2013 6:12 am Post subject: |
|
|
| Glad to read of your encouraging update. Congratulations on getting the engine finished and running! Now we're all eager to get your impressions of the first drive, when the car is safely together. |
|
| Back to top |
|
|
OLD VW NUT
Samba Member
Joined: February 23, 2011
Posts: 2776
Location: High Desert of Washington 98823
|
| Posted: Sun Jul 28, 2013 8:40 am Post subject: |
|
|
I'll probably post a video some time in the next few weeks taking the car through its paces on some twisting roads local to me. Pics will be coming soon - as I mentioned in my last post the paint needs a final buff and wax. I love the deep red paint with the tinted windows. The windshield is new and has no tint - just a 3" strip of dark tint across the top - no logos - just a dark tint.
I'm still trying to 'get over' how well the EMPI carbs work. I've installed dual Webers before and never had them run this smooth at startup. And the throttle response is FAST! The light weight flywheel helps in that regard but this isn't the first 12 pound flywheel I've ever installed.
Can't wait for that first drive! It'll be difficult not to jamb that throttle to the metal for 500 miles. Gotta break it in good. I won't baby it but I won't bring it to 'full song' for at least 500 miles.
In case you couldn't tell - I'm stoked!
_________________
71 Ghia Coupe - stock body - no rust! Powered by a 2110 W/Dual HPMX 44's - Rancho Pro Street Transaxle - A/C by Gilmore
Other car - 2013 VW Golf TDI |
|
| Back to top |
|
|
spanky324
Samba Member
Joined: September 28, 2006
Posts: 1070
Location: Greeley Pa
|
| Posted: Sun Jul 28, 2013 9:03 am Post subject: |
|
|
| Without help from Art the Empis wouldn't be the same I bet!! |
|
| Back to top |
|
|
|


