| Author |
Message |
mikewire
Samba Member

Joined: March 22, 2010
Posts: 805
Location: San Antonio, TX

|
 Posted: Mon Dec 28, 2020 11:25 am Post subject: Re: Photos Seat Reupholstery Posted: Mon Dec 28, 2020 11:25 am Post subject: Re: Photos Seat Reupholstery |
 |
|
| Globespotter wrote: |
| The hog rings are used to attach the bottom cover to the seat base. They basically grabbed around the wire or string and allowed you to pull the cover tighter by attaching to the metal frame underneath. |
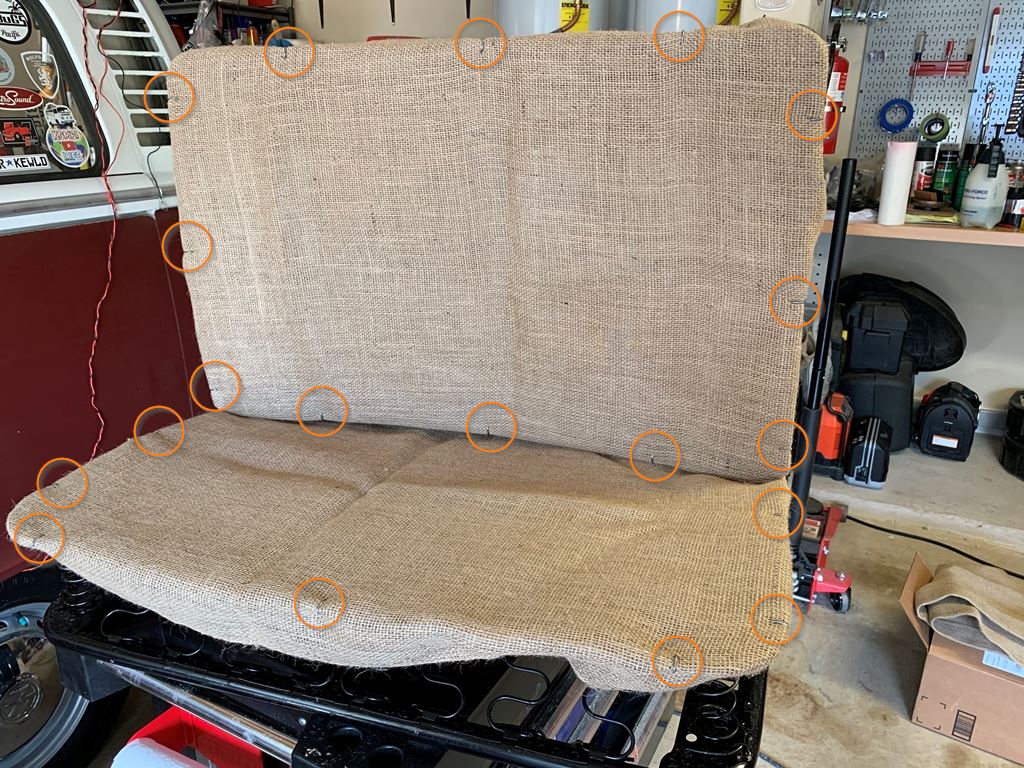
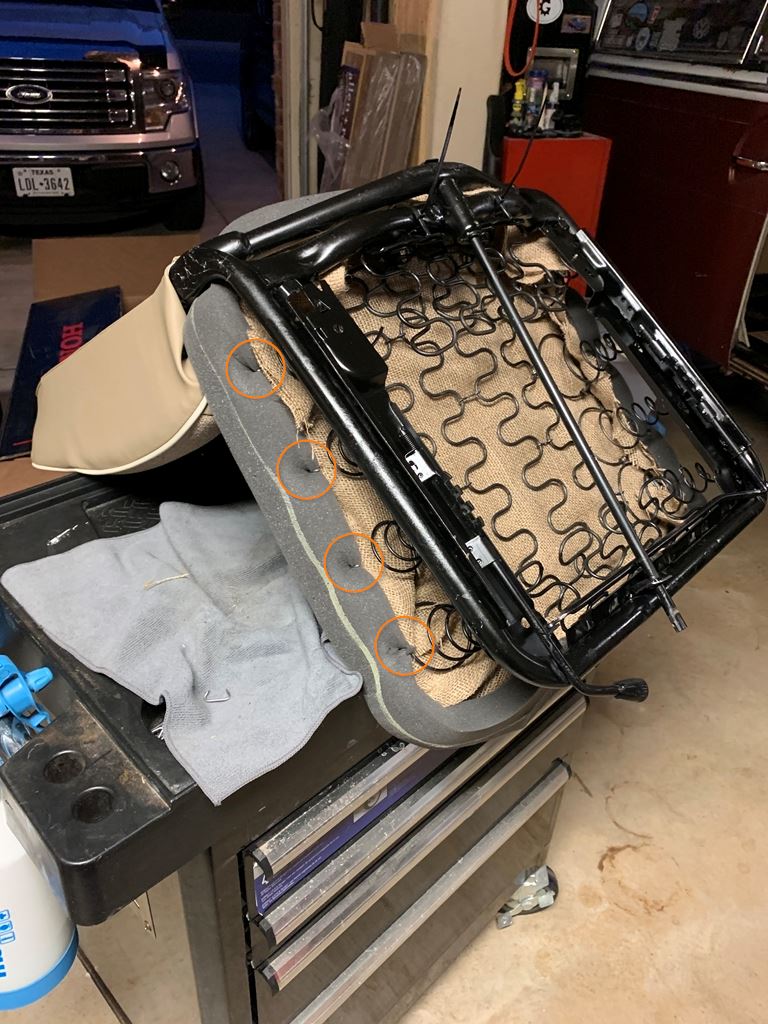
This exactly. I used hog rings on the burlap covering the frame and since I used the foam cushions, I secured those with hog rings as well.
For your application, I wouldn't use hog rings on the coco husks. I believe the coco pads just sit over the canvas material...however I wouldn't want them shifting around on your canvas, so I would probably secure them to your canvas with spray adhesive...? Maybe someone else has experience with that and could chime in with advise.
For clarity, here I highlighted where I used the hog rings:


Addressing your other questions:
- Coco cushions: not sure on sliding the coco husks over the frames and I don't know how pliable they are...but from what I'm thinking you're going to have to make them fit over, so just be careful not to tear them.
- Seat bottom cover wire: I can't tell from your pictures of your frames, but maybe you can show us - on your frames, do you have the "V" tabs securing the vinyl edges of the seat material to the frame? Mine do and in some spots where the wire ran through the bottom edge at the back/bottom of the seats, the vinyl is punctured by the "V" and secured in place with help of the wire. If that doesn't make sense, I can take a couple of pictures of mine for you.
- Thinner wire: as far as the wire to the frame, take pictures before you disassemble, and put the new ones on just like the old, and secure them in the same spots. And yes, the wire ends will twist together - the wire helps secure the bottom of the covers are secure to the frames and don't get pulled around over time. You can trim the excess after secured. Also, those "V" shaped tabs are somewhat pliable and you can bend them slightly as needed, but be careful not to bend them too many times or they weaken and will break.
BTW, those are going to look great when you're done, please show us your progress as you go!
_________________
-Mike
@countdowngarage
@bigskyeuro
1972 VW Kombi 9 Passenger Deluxe w/ 2.0L F.I. VWAC swap
1965 VW Beetle Deluxe Bahama Blue |
|
| Back to top |
|
 |
dr8track
Samba Member

Joined: July 18, 2005
Posts: 501
Location: Seattle area

|
 Posted: Mon Dec 28, 2020 4:48 pm Post subject: Re: Photos Seat Reupholstery Posted: Mon Dec 28, 2020 4:48 pm Post subject: Re: Photos Seat Reupholstery |
 |
|
I'm running into a few challenges, but am forging ahead. I had hoped to finish last night, but I wore myself out trying to wrestle these covers into place. Here's the progress so far.
The seats went pretty smoothly, but the seat backs are a pain! I don't see any possible way that bottom flap of plaid material is going to wrap under the seat back and attach to the metal bar in back like the original did. These covers could have definitely been bigger and they would still have fit snugly. As it is, there just isn't enough material to reach that bar.
I'm going to try a couple of things. First I'm going to swap the gray batting for some thinnere batting I got. That should give me a bit more fabric to work with on the cover.
However, I'm doubtful its going to be enough. My second option is to stitch a strip of orange vinyl to that plaid fabric to give me enough length to pul it tight and attach it to the bar in back.
I'll send an update later.
_________________
1974 Westfalia Deluxe Campmobiles - Lake Stevens, WA |
|
| Back to top |
|
 |
dr8track
Samba Member

Joined: July 18, 2005
Posts: 501
Location: Seattle area

|
 Posted: Mon Dec 28, 2020 10:58 pm Post subject: Re: Photos Seat Reupholstery Posted: Mon Dec 28, 2020 10:58 pm Post subject: Re: Photos Seat Reupholstery |
 |
|
Here is the almost finished results. I haven't cut holes for the headrests yet.
I do have a question someone can hopefully answer. I needlessly removed the driver seat back adjustment rod. Now I can't remember how it reattached.
Wondering if anyone might give me some guidance.
_________________
1974 Westfalia Deluxe Campmobiles - Lake Stevens, WA |
|
| Back to top |
|
 |
mikewire
Samba Member

Joined: March 22, 2010
Posts: 805
Location: San Antonio, TX

|
|
| Back to top |
|
 |
dr8track
Samba Member

Joined: July 18, 2005
Posts: 501
Location: Seattle area

|
 Posted: Tue Dec 29, 2020 2:16 pm Post subject: Re: Photos Seat Reupholstery Posted: Tue Dec 29, 2020 2:16 pm Post subject: Re: Photos Seat Reupholstery |
 |
|
Exactly what I needed. Thank you! I now know the order to reassemble it, I'm just struggling to get the rounded end of the bracket to align with the threaded screw hole in the frame. No matter how hard I push on the bracket I can't get it down far enough to line the bracket up with the hole. I'll wait until the muscle (my wife  ) gets home to lend an extra set of hands. ) gets home to lend an extra set of hands.
Just about finished although I admit I'm paranoid about trying to cut the headrest holes. Hard to explain w/o photos, but that tall lip the coco fiber back created at the top of the chair back left about an inch and a half difference in height between the top of the coco fiber and the frame where the holes for the headrest are. It created a saggy gap at the back edge of the top of the chair back so I added several layers of batting to fill the space. As a result I can't easily feel the head rest holes through the vinyl.
what I will probably do is use the old covers as a template to mark the holes.
Wish me luck! 
_________________
1974 Westfalia Deluxe Campmobiles - Lake Stevens, WA |
|
| Back to top |
|
 |
dr8track
Samba Member

Joined: July 18, 2005
Posts: 501
Location: Seattle area

|
 Posted: Sat Jan 02, 2021 12:45 am Post subject: Re: Photos Seat Reupholstery Posted: Sat Jan 02, 2021 12:45 am Post subject: Re: Photos Seat Reupholstery |
 |
|
Thanks to everyone for all the photos and advice. Here's a couple pix of the seats installed and the new pedestal rubber. I'm holding off installing the new orange carpet until I get some wiring work completed.
The only thing I'm not totally satisfied with is that the big round seat adjustment knob doesn't seem to be working right since I disassembled it when working on the upholstery. (photo taken before reassembly)
I got it all put back together but it doesn't turn far before it binds up. I believe its supposed to adjust the position of the seat back? Whatever it's supposed to do its not doing it.
Also I still haven't attempted to cut the holes for the headrests. That will be a project for another day.
_________________
1974 Westfalia Deluxe Campmobiles - Lake Stevens, WA |
|
| Back to top |
|
 |
dr8track
Samba Member

Joined: July 18, 2005
Posts: 501
Location: Seattle area

|
 Posted: Sun Apr 18, 2021 5:20 pm Post subject: Re: Photos Seat Reupholstery Posted: Sun Apr 18, 2021 5:20 pm Post subject: Re: Photos Seat Reupholstery |
 |
|
I thought I'd finish off my thread with some photos of my front cab. Here's what work I did:
1. Refinished headliner
2. New seat pedestal rubber
3. Hand made kick panels covered with orange vinyl
4. New component speakers in kick panels
5. New orange carpet
6. Orange bordered floor mats
7. New seat upholstery for bucket seats and box top
8. And a nifty little cloth trash bin that my sister made 
Thanks for all the help and advice along the way!
_________________
1974 Westfalia Deluxe Campmobiles - Lake Stevens, WA |
|
| Back to top |
|
 |
plywoodkid
Samba Member
Joined: April 17, 2018
Posts: 217
Location: Ventura County, CA

|
 Posted: Mon Apr 19, 2021 9:57 pm Post subject: Re: Photos Seat Reupholstery Posted: Mon Apr 19, 2021 9:57 pm Post subject: Re: Photos Seat Reupholstery |
 |
|
All,
I have really learned a lot from watching JL in Lakewood, California.
Honest and down to earth. Makes the covers and shows you how to put them on. For the average DIY guy.
https://fb.watch/4_60_xLWtm/ |
|
| Back to top |
|
 |
|

