| Author |
Message |
belaw
Samba Member
Joined: October 04, 2011
Posts: 5
Location: Baton Rouge, Louisiana

|
 Posted: Tue Oct 04, 2011 9:30 am Post subject: Floor pan replacement Posted: Tue Oct 04, 2011 9:30 am Post subject: Floor pan replacement |
 |
|
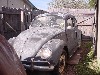
I recently acquired a '74 Thing that I plan to rebuild for my daughter. Many years ago it was parked under a tree and a limb fell through the top. Long story short, it needs new floor pans on both sides.
I've read several articles on floor pan replacement on beetles, and would definately prefer to do a "body on" floor pan replacement. Is there any reason I couldn't do this with a Thing? Is there any "Thing specific" tips on floor pan replacement, or would it be the same as what I've read it the beetle floor pan replacement write-ups? |
|
| Back to top |
|
 |
oasis
Samba Member
Joined: December 12, 2002
Posts: 2168
|
| Posted: Tue Oct 04, 2011 9:38 am Post subject: |
|
|
The Thing has a pan specific to itself. Beetle and Super Beetle pans will not work as they are too narrow. Karmann Ghia pans will work with minimal supplementary work. I have no experience with any of it, but a search here should yield plenty of results since it was here where I had learned this.
_________________
Now: 2003 New Beetle Turbo S / 1990 Single Cab Transporter / 2014 Tiguan R-Line 4motion / 2013 Tiguan S / 2002 Golf GLS TDI
Past: 1974 Thing Acapulco / 2009 Eos Komfort / 1997 Jetta GT / 2002 Cabrio GLX / 2002 Passat GLS / 1971 Super Beetle / 1993 EuroVan MV Westfalia / 1981 Pickup LX / 1985 Vanagon / 1986 Jetta GLI |
|
| Back to top |
|
|
belaw
Samba Member
Joined: October 04, 2011
Posts: 5
Location: Baton Rouge, Louisiana
|
| Posted: Tue Oct 04, 2011 10:24 am Post subject: |
|
|
| I'm definately planning on using the correct floor pans; my question is more about the procedure for replacing them. |
|
| Back to top |
|
|
63ziggy
Samba Member
Joined: June 19, 2005
Posts: 1100
Location: The Woodlands, Texas
|
| Posted: Tue Oct 04, 2011 12:33 pm Post subject: |
|
|
I am sure some one here has done body on. I did body off. sooo much easier. it will save time in cutting away, welding, grinding, sealing and painting top and bottom of pans.
yes more to disconnect. i would do it again.
I think you may have problems with jack point mount/reinforcement bar as well as reinforcement plates in front end of pan.
here's a couple pics of mine in progress
note the jack point mount and front reinforcement plate still in place. I did leave front plate in place. jackpoint and bar eventually cut away and were re-used.
|
|
| Back to top |
|
|
Semper_Dad
Samba Member
Joined: May 14, 2005
Posts: 3510
Location: Indiana
|
|
| Back to top |
|
|
vgajames
Samba Member

Joined: June 13, 2002
Posts: 805
Location: Texas
|
| Posted: Tue Oct 04, 2011 6:48 pm Post subject: |
|
|
I would suggest ya pull the body off.Its not that hard and a few of your pals can help set it off to the side. You can get to everything much easier
and it will turn out better too.I used Ghia pans on my Thing. |
|
| Back to top |
|
|
NOVA Airhead
Samba Member

Joined: July 20, 2005
Posts: 5221
Location: Richmond, VA
|
|
| Back to top |
|
|
belaw
Samba Member
Joined: October 04, 2011
Posts: 5
Location: Baton Rouge, Louisiana
|
| Posted: Wed Oct 05, 2011 7:40 am Post subject: |
|
|
| 63ziggy wrote: |
I did body off. sooo much easier. it will save time in cutting away, welding, grinding, sealing and painting top and bottom of pans.
yes more to disconnect. i would do it again. |
To be honest I'm really leaning toward doing this body-on to make sure everything stays in proper alignment, but your post does raise another question I've been wondering about.
The rockers on a Thing seem pretty rigid (and preliminary inspections shows that my rockers are solid). Can I pull the body as-is, or do I need to weld supports across the door openings to keep it from flexing (or breaking in two!)? |
|
| Back to top |
|
|
63ziggy
Samba Member
Joined: June 19, 2005
Posts: 1100
Location: The Woodlands, Texas
|
| Posted: Wed Oct 05, 2011 8:12 am Post subject: |
|
|
I did not add any cross supports and did not have any issues. I did have to remove the outer driver's rocker. I did add a support across the drivers doors while that was in progress.
if your rockers are solid, you should have no problem. here's a pic of the dolly I made for the body. I could roll he pan underneath for storage and only take up 1 garage slot. you could go longer on side supports and capture support across front and rear of body.
my body was stripped. no windshield/weight, no gas tank. all misc items had been pulled from body. not intentional but would take extra weight off body while suspended. support the corners where the body would be bolted will take away potential stress/flex (in my opinion).
|
|
| Back to top |
|
|
car barn
Samba Member

Joined: October 02, 2008
Posts: 137
Location: Michigan
|
| Posted: Thu Oct 06, 2011 6:42 pm Post subject: |
|
|
I just did mine with the body on. I used Ghia pans.
Not too difficult, just time and patience. I did one side at a time so I could use the other side to help as a guide to put it back together. I took the old pan out (basically Swiss cheese) and cleaned up/ground down all the spot welds. While it was out I did the lower half of the inner rocker (full of mice nests). Once that was in I dry fitted the pans about a dozen times trimming and grinding to make them fit just right. I dont think my new pans were the best stamping, but they fit great after a bit of reshaping the boarders. Once that was good I drilled 1/4 inch holes all along the tunnel and front and back edges for plug welding. I did a couple larger (around 3/8") holes for the reinforcement plates in front. Then I bolted the pans to the new inner rocker then welded away. After the pan was welded in I did the complete outer rocker. That also took a long time for grinding and shaping to get it to fit right. I supported the inner rocker/pan edge by using a floor jack and some angle iron. I didnt lift the car, just took off some of the downward pressure so it wouldnt sag. I took measurement between the doors post and across car before I started the project and nothing sagged or moved during the process. I've added some pictures as well to show you my progress.
|
|
| Back to top |
|
|
wbrown45
Samba Member

Joined: July 08, 2008
Posts: 1318
Location: ada, ok
|
| Posted: Thu Oct 06, 2011 7:45 pm Post subject: |
|
|
| car barn wrote: |
I just did mine with the body on. I used Ghia pans.
Not too difficult, just time and patience. I did one side at a time so I could use the other side to help as a guide to put it back together. I took the old pan out (basically Swiss cheese) and cleaned up/ground down all the spot welds. While it was out I did the lower half of the inner rocker (full of mice nests). Once that was in I dry fitted the pans about a dozen times trimming and grinding to make them fit just right. I dont think my new pans were the best stamping, but they fit great after a bit of reshaping the boarders. Once that was good I drilled 1/4 inch holes all along the tunnel and front and back edges for plug welding. I did a couple larger (around 3/8") holes for the reinforcement plates in front. Then I bolted the pans to the new inner rocker then welded away. After the pan was welded in I did the complete outer rocker. That also took a long time for grinding and shaping to get it to fit right. I supported the inner rocker/pan edge by using a floor jack and some angle iron. I didnt lift the car, just took off some of the downward pressure so it wouldnt sag. I took measurement between the doors post and across car before I started the project and nothing sagged or moved during the process. I've added some pictures as well to show you my progress.
|
Very nice job!
_________________
OK Thang |
|
| Back to top |
|
|
63ziggy
Samba Member
Joined: June 19, 2005
Posts: 1100
Location: The Woodlands, Texas
|
| Posted: Fri Oct 07, 2011 5:16 am Post subject: |
|
|
agree nice job
I like the cheater bar with the rachet. you could break any stubborn bolt loose.
great photos showing steps. in my opinion, can't beat visual aids. |
|
| Back to top |
|
|
eaker02
Samba Member
Joined: December 08, 2010
Posts: 71
Location: Rome,GA
|
| Posted: Fri Oct 07, 2011 6:49 am Post subject: |
|
|
Carbarn or anyone. Have you already welded in new seat rails? If so, do you have any measurements. I need install the rail on the passenger side. My other one was so rusted wasn't able to get what angles and position anything was.
And did you buy your seat rail from thing shop or able to use you old one?
thanks
Ron |
|
| Back to top |
|
|
SilverThing 
Samba Member
Joined: July 19, 2004
Posts: 810
Location: Everett
|
| Posted: Fri Oct 07, 2011 9:31 am Post subject: |
|
|
| 63ziggy wrote: |
| I like the cheater bar with the rachet. you could break any stubborn bolt loose. |
Or break your ratchet. Ask me how I know.  (it was actually two ratchets and a breaker bar) (it was actually two ratchets and a breaker bar)
_________________
"I like how everyone likes talking about Zeke's Thing yet he's the only one that's ever seen it." - Katie
"I've seen pictures..." - Jeremy |
|
| Back to top |
|
|
car barn
Samba Member
Joined: October 02, 2008
Posts: 137
Location: Michigan
|
| Posted: Fri Oct 07, 2011 5:21 pm Post subject: |
|
|
Or just rip the head right off the bolt...ask me how I know.
Thanks guys... you're the only ones that would appreciate something like fresh floor pans and rockers. By the way I got the pans and rockers at CPI and ordered them all at once with one of there 15-20% off sales... basically gets you free shipping. They aren't the best reproductions but not horrible (what I could afford).
I ended up reusing my seat rails, seat belt bolt, jack point mount and front reinforcement plate. I just cut them out of the old floorboard and wire wheeled them to clean them up. I'll use POR15 on everything once it's all welded.
Ron-I'm going out tonight to work on it some more so I'll take some measurements on the seat rails and get back with you.
I just welded the passenger pans in today so I have lots of grinding to do, then the right outer rocker after that.
Thanks,
Kirk |
|
| Back to top |
|
|
car barn
Samba Member
Joined: October 02, 2008
Posts: 137
Location: Michigan
|
| Posted: Sat Oct 08, 2011 12:21 am Post subject: |
|
|
| eaker02 wrote: |
Carbarn or anyone. Have you already welded in new seat rails? If so, do you have any measurements. I need install the rail on the passenger side. My other one was so rusted wasn't able to get what angles and position anything was.
And did you buy your seat rail from thing shop or able to use you old one?
thanks
Ron |
So these are the measurements I got from my car for the seat rails. I'm guessing they'd be symmetrical. I dropped a straight edge from the rear seat cross brace and measured to the very ends of the seat rails to get the length measurements. 12 3/4" on the outboard and 12" on the inboard.
For the width I measured from the bottom flat of the rocker surface (not the pan) to the flat of the seat rail (not the little flared bumps at the ends). 5 1/8 in the front and 4 1/4 in the back.
Take a look at the picture and hopefully it will help explain what I'm trying to say.
Good luck,
Kirk
|
|
| Back to top |
|
|
eaker02
Samba Member
Joined: December 08, 2010
Posts: 71
Location: Rome,GA
|
| Posted: Sat Oct 08, 2011 3:10 pm Post subject: |
|
|
Thanks Carbarn, that's exactly what I was looking for.. I knew there was an offset but wasn't sure how much?
Ron |
|
| Back to top |
|
|
belaw
Samba Member
Joined: October 04, 2011
Posts: 5
Location: Baton Rouge, Louisiana
|
| Posted: Wed Oct 12, 2011 6:40 am Post subject: |
|
|
Thanks for all the input and guidance.
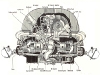
Several of the posts reference the "front reinforcement plate." What and where is that? |
|
| Back to top |
|
|
car barn
Samba Member
Joined: October 02, 2008
Posts: 137
Location: Michigan
|
| Posted: Wed Oct 12, 2011 6:46 am Post subject: |
|
|
It's the rectangular metal bracket at the top of the picture. It supports the floor pan near where your feet go.
|
|
| Back to top |
|
|
belaw
Samba Member
Joined: October 04, 2011
Posts: 5
Location: Baton Rouge, Louisiana
|
| Posted: Wed Oct 12, 2011 7:09 am Post subject: |
|
|
| car barn wrote: |
| It's the rectangular metal bracket at the top of the picture. It supports the floor pan near where your feet go. |
Thanks- a picture really is worth a thousand words! |
|
| Back to top |
|
|
|


