| Author |
Message |
19-VW-74
Samba Member
Joined: June 28, 2009
Posts: 757
Location: Utah

|
 Posted: Wed Feb 01, 2023 6:57 pm Post subject: Re: Austin's 1974 Standard Beetle Body-off Restoration Project Posted: Wed Feb 01, 2023 6:57 pm Post subject: Re: Austin's 1974 Standard Beetle Body-off Restoration Project |
 |
|
I needed a good muffler setup for my new header, but I wanted something really quiet. Quieter than a Quiet Pack. So I decided to build something from parts. I built an exhaust using an MSL muffler by AP Exhaust and a Walker resonator.
First, I sourced some 1.75" mandrel bends and start measuring and cutting. I mounted the collector first so that it would clock properly. The EMPI collector flange is 1.75" ID, so the tubing fit perfectly and I could weld it on the inside for a clean look.
After a few dozen mock ups and lots of cutting and grinding, I was satisfied with the result, so I welded the whole lot up.
The forward mount bolts to the lower exhaust stud on cyl #1.
_________________
-Austin
My 1974 Standard Beetle Build:
http://www.thesamba.com/vw/forum/viewtopic.php?t=492617 |
|
| Back to top |
|
 |
19-VW-74
Samba Member
Joined: June 28, 2009
Posts: 757
Location: Utah
|
| Posted: Wed Feb 01, 2023 7:03 pm Post subject: Re: Austin's 1974 Standard Beetle Body-off Restoration Project |
|
|
With the exhaust all welded up, I pulled it back off, cleaned and scuffed it, and hit it with some Rustoleum silver BBQ paint. That stuff is fantastic. It still looks new after over 1000 miles.
I took it on a highway drive in 20F weather and measured the temps of the heat risers and the manifold with an IR thermometer. It looks like the heat riser mods are working well.
Right heat riser tube:
Manifold right side:
Left heat riser tube:
Manifold left side:
_________________
-Austin
My 1974 Standard Beetle Build:
http://www.thesamba.com/vw/forum/viewtopic.php?t=492617 |
|
| Back to top |
|
|
19-VW-74
Samba Member
Joined: June 28, 2009
Posts: 757
Location: Utah
|
| Posted: Wed Feb 01, 2023 7:10 pm Post subject: Re: Austin's 1974 Standard Beetle Body-off Restoration Project |
|
|
For those interested in a sound clip, this should show how quiet the exhaust is. I was shooting for stock sound levels, but a little hp bump.
I'm not sure what it did for performance (it feels peppy, but it could be that the carb is adjusted properly now).
It is nice to drive with such a mellow sound, not much louder than my Subaru.
I used a decibel meter to compare it to the stock muffler with taper tips. It is the same volume as the stock muffler with taper tips at all speeds except idle. It is actually quieter at idle by 2-3db.
This is a cold start in 20F weather. The choke is sticking a little bit.
Link
This is hot idle. Its running very nice after some carb tubing.
Link
_________________
-Austin
My 1974 Standard Beetle Build:
http://www.thesamba.com/vw/forum/viewtopic.php?t=492617 |
|
| Back to top |
|
|
19-VW-74
Samba Member
Joined: June 28, 2009
Posts: 757
Location: Utah
|
| Posted: Wed Feb 01, 2023 7:41 pm Post subject: Re: Austin's 1974 Standard Beetle Body-off Restoration Project |
|
|
This was back in July of 2022, but I took the bug to its first show!
_________________
-Austin
My 1974 Standard Beetle Build:
http://www.thesamba.com/vw/forum/viewtopic.php?t=492617 |
|
| Back to top |
|
|
19-VW-74
Samba Member
Joined: June 28, 2009
Posts: 757
Location: Utah
|
| Posted: Wed Feb 01, 2023 7:43 pm Post subject: Re: Austin's 1974 Standard Beetle Body-off Restoration Project |
|
|
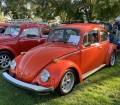
And back in September, I was able to hit another show!
Very cool to live in an area with so many ACVWs.
And a glamour shot from the driveway, right before the show.
Bumpers are in the works...
_________________
-Austin
My 1974 Standard Beetle Build:
http://www.thesamba.com/vw/forum/viewtopic.php?t=492617 |
|
| Back to top |
|
|
19-VW-74
Samba Member
Joined: June 28, 2009
Posts: 757
Location: Utah
|
|
| Back to top |
|
|
Glenn 
Mr. 010

Joined: December 25, 2001
Posts: 76941
Location: Sneaking up behind you
|
| Posted: Wed Feb 01, 2023 8:07 pm Post subject: Re: Austin's 1974 Standard Beetle Body-off Restoration Project |
|
|
| 19-VW-74 wrote: |
| Bumpers are in the works... |
What's the plan... stock?
Gotta love a 74 with the big bumpers.
_________________
Glenn
74 Beetle Specs | 74 Beetle Restoration | 2180cc Engine
"You may not get what you pay for, but you always pay for what you get"
Member #1009
#BlueSquare |
|
| Back to top |
|
|
19-VW-74
Samba Member
Joined: June 28, 2009
Posts: 757
Location: Utah
|
| Posted: Wed Feb 01, 2023 9:06 pm Post subject: Re: Austin's 1974 Standard Beetle Body-off Restoration Project |
|
|
Stock.
These are rechromed German bumpers from Super Beetle Solutions.
Waited nearly 6 months for them.
They are very nice - not perfect, but excellent for about $1k for the pair when I bought them. Way cheaper than any chrome shop.
I can't mount them yet because several of the bumper mounting holes are stripped or bolts broken off in them. I'm going to cut them out and weld in new nut inserts when the weather gets warmer.
_________________
-Austin
My 1974 Standard Beetle Build:
http://www.thesamba.com/vw/forum/viewtopic.php?t=492617 |
|
| Back to top |
|
|
Buggeee
Samba Member

Joined: December 22, 2016
Posts: 4421
Location: Stuck in Ohio
|
| Posted: Thu Feb 02, 2023 6:43 am Post subject: Re: Austin's 1974 Standard Beetle Body-off Restoration Project |
|
|
Thank you for the excellent write up on the exhaust system. From the heat risers, to the mandrels, a modern resonator and even the BBQ paint, all useful insights and info and I think I'd like to try that this season to expand the life experience.
I just ordered a couple sets of those Toyota light kits. That was a nice find. Thank you for the part number. The included relay wiring harness makes them irresistible.
I've mentioned before this is a beautiful car you built.
p.s. Don't be mad at the cats. They may have peed on your wheels but saved your beautiful headliner from mice damage. After multiple days of effort on a novice install, my headliner got a mouse hole the first winter. All the traps and poison blocks in the world didn't save it. I've got a cat now guarding the area and there is not a mouse dropping anywhere!
_________________
1966 Sportsmobile Camper https://www.thesamba.com/vw/forum/viewtopic.php?t=...mp;start=0
72 Super Duper http://www.thesamba.com/vw/forum/viewtopic.php?t=672387
(adopted out) 61 Turkis Pile https://www.thesamba.com/vw/forum/viewtopic.php?t=728764
| SnowDaySyncro wrote: |
| Every setback is an opportunity to learn stuff and to buy new tools. |
|
|
| Back to top |
|
|
Glenn
Mr. 010
Joined: December 25, 2001
Posts: 76941
Location: Sneaking up behind you
|
| Posted: Thu Feb 02, 2023 7:17 am Post subject: Re: Austin's 1974 Standard Beetle Body-off Restoration Project |
|
|
| 19-VW-74 wrote: |
Stock.
These are rechromed German bumpers from Super Beetle Solutions.
Waited nearly 6 months for them.
They are very nice - not perfect, but excellent for about $1k for the pair when I bought them. Way cheaper than any chrome shop.
I can't mount them yet because several of the bumper mounting holes are stripped or bolts broken off in them. I'm going to cut them out and weld in new nut inserts when the weather gets warmer. |
Very nice.
_________________
Glenn
74 Beetle Specs | 74 Beetle Restoration | 2180cc Engine
"You may not get what you pay for, but you always pay for what you get"
Member #1009
#BlueSquare |
|
| Back to top |
|
|
Glenn
Mr. 010
Joined: December 25, 2001
Posts: 76941
Location: Sneaking up behind you
|
| Posted: Thu Feb 02, 2023 7:38 am Post subject: Re: Austin's 1974 Standard Beetle Body-off Restoration Project |
|
|
FYI...
The rubber sleeves on the shock mounts on mine are genuine VW, you were still able to get them back in 1999. I've since used bicycle tire tubes on other cars i've worked on.
I suggest painting the back. Mine are the original that were re-chromed. But I painted the back with a POR15 product.
_________________
Glenn
74 Beetle Specs | 74 Beetle Restoration | 2180cc Engine
"You may not get what you pay for, but you always pay for what you get"
Member #1009
#BlueSquare |
|
| Back to top |
|
|
APPLEGREENVW
Samba Member

Joined: November 30, 2003
Posts: 2388
Location: Seekonk,Massachusetts USA
|
|
| Back to top |
|
|
19-VW-74
Samba Member
Joined: June 28, 2009
Posts: 757
Location: Utah
|
| Posted: Thu Feb 02, 2023 12:01 pm Post subject: Re: Austin's 1974 Standard Beetle Body-off Restoration Project |
|
|
Thanks for the tip on the bicycle tubes, I'm definitely going to use that.
I looked inside these bumpers and they look like they have been painted with the very same stuff. Thick sparkly silver paint. They did a good job. I'll probably wax the inside and out before I put them on.
_________________
-Austin
My 1974 Standard Beetle Build:
http://www.thesamba.com/vw/forum/viewtopic.php?t=492617 |
|
| Back to top |
|
|
19-VW-74
Samba Member
Joined: June 28, 2009
Posts: 757
Location: Utah
|
| Posted: Thu Feb 02, 2023 12:02 pm Post subject: Re: Austin's 1974 Standard Beetle Body-off Restoration Project |
|
|
| APPLEGREENVW wrote: |
Nice job, on that Empi header pre-heat tubing.  |
Thanks! It runs great with it. No cold weather running issues.
_________________
-Austin
My 1974 Standard Beetle Build:
http://www.thesamba.com/vw/forum/viewtopic.php?t=492617 |
|
| Back to top |
|
|
19-VW-74
Samba Member
Joined: June 28, 2009
Posts: 757
Location: Utah
|
| Posted: Sun Feb 05, 2023 5:57 pm Post subject: Re: Austin's 1974 Standard Beetle Body-off Restoration Project |
|
|
| Buggeee wrote: |
| Thank you for the excellent write up on the exhaust system. From the heat risers, to the mandrels, a modern resonator and even the BBQ paint, all useful insights and info and I think I'd like to try that this season to expand the life experience. |
Thanks for the feedback! I thought it was a worthwhile endeavor. I don't have a lot of complaints about the Beetle, but excess road noise is on that list. And my wife is much more likely to come for a drive with me if she doesn't get overwhelmed by the noise.
| Buggeee wrote: |
I just ordered a couple sets of those Toyota light kits. That was a nice find. Thank you for the part number. The included relay wiring harness makes them irresistible.. |
Glad to help. I love the lights myself. They do have a lot of foreground light, so on a lowered beetle, it can be a little distracting, but only if I'm already tired. The high beams are next level. Long distance spotlight with some flood lighting for the roadside.
| Buggeee wrote: |
I've mentioned before this is a beautiful car you built. |
Thanks again!
| Buggeee wrote: |
p.s. Don't be mad at the cats. They may have peed on your wheels but saved your beautiful headliner from mice damage. After multiple days of effort on a novice install, my headliner got a mouse hole the first winter. All the traps and poison blocks in the world didn't save it. I've got a cat now guarding the area and there is not a mouse dropping anywhere! |
You're probably right about that. I love my parents cats, really. This cat (Todd) kept me company for hours while I got my car ready to leave my parents' garage. He just hangs out within arms reach whenever I'm working on something in that garage. I fixed my sister's Subaru over thanksgiving and he just sat on top of the engine and tried to stay involved.
I was very pleased to find that there was no wiring damage due to mice, even though it sat for so long.
_________________
-Austin
My 1974 Standard Beetle Build:
http://www.thesamba.com/vw/forum/viewtopic.php?t=492617 |
|
| Back to top |
|
|
19-VW-74
Samba Member
Joined: June 28, 2009
Posts: 757
Location: Utah
|
| Posted: Sun Feb 05, 2023 6:32 pm Post subject: Re: Austin's 1974 Standard Beetle Body-off Restoration Project |
|
|
Here's a small project I worked on last Summer. Since most accidents are rear-end collisions, and with the epidemic of people driving with their faces in their phones, I wanted to protect my investment in my Beetle.
So, since the Beetle has no 3rd brake light, I decided to design my own that would be a drop-in with (almost) no modification to the car. The only modification was splicing the power wire into the brake light circuit under the back seat.
I designed the part in CAD software to match the curved surface on the rear windshield. This was my first iteration.
After a few changes in the design and a couple failed 3D prints, I came up with a solution that came out just about perfect. This housing holds a standard 6" round LED trailer light.
I mounted it to the rear glass with 3M outdoor mounting tape and it has held solid for about 6 months now.
I also wired in a flasher module to really grab attention of those behind me. This is legal where I live, but not in some states.
The housing hides the wiring as well, and runs it right up under the glass to tuck in the carpet.
Outside view:
Inside view with the cover for the wiring:
And a video of the working light:
Link
_________________
-Austin
My 1974 Standard Beetle Build:
http://www.thesamba.com/vw/forum/viewtopic.php?t=492617 |
|
| Back to top |
|
|
hulbyw
Samba Member
Joined: April 24, 2021
Posts: 127
Location: Australia
|
| Posted: Tue Feb 07, 2023 2:30 am Post subject: Re: Austin's 1974 Standard Beetle Body-off Restoration Project |
|
|
Love your work. Thanks for sharing.
Now that you have been living with the Glass Action kick panels for a while, are you still happy that they don't intrude on the leg/foot room? |
|
| Back to top |
|
|
19-VW-74
Samba Member
Joined: June 28, 2009
Posts: 757
Location: Utah
|
| Posted: Wed Feb 08, 2023 12:28 pm Post subject: Re: Austin's 1974 Standard Beetle Body-off Restoration Project |
|
|
| hulbyw wrote: |
Love your work. Thanks for sharing.
Now that you have been living with the Glass Action kick panels for a while, are you still happy that they don't intrude on the leg/foot room? |
Thanks! Yes, I have been pleased with the kick panels. I've never had any complaints about leg room.
_________________
-Austin
My 1974 Standard Beetle Build:
http://www.thesamba.com/vw/forum/viewtopic.php?t=492617 |
|
| Back to top |
|
|
19-VW-74
Samba Member
Joined: June 28, 2009
Posts: 757
Location: Utah
|
| Posted: Fri Feb 10, 2023 12:50 pm Post subject: Re: Austin's 1974 Standard Beetle Body-off Restoration Project |
|
|
One of my biggest complaints about this car, besides being pretty slow, is that the seats are horribly uncomfortable.
This may be because I used the TMI foam instead of the coconut hair pads when I reupholstered the stock seats and I also have a bad back (and I'm not even 30 yet).
Ever since I got the interior installed in this car, my head has rubbed on the headliner. I'm 5'9", but I have to crane my neck to look past the A-pillar. And long trips on the freeway were just awful. Again, maybe this was because of the TMI foam? I even took apart the front seats and removed the extra 1" of foam that I added to supplement the aging springs. Still, my head rubbed on the headliner.
So I looked around for aftermarket or other OEM options to make the ride more fun and comfortable.
I see that Corbeau makes some very nice seats, with drop-in brackets that mount directly to the 73+ seat pedestal and rails.
Link
I was seriously considering these, but they are pricey at $1200+ for the basic sport seats with brackets. Also the light tan doesn't match the rest of my TMI Tan #13 interior.
I then discovered some cheap Miata seats on FB Marketplace, and started googling a bit to find out if affordable upholstery kits were made for these cars. Turns out, there are lots of inexpensive options for reupholstering Miata seats in several colors. So I picked up some cheap NA Miata seats (<1996) and ordered a Tan upholstery kit off ebay for only $110.
_________________
-Austin
My 1974 Standard Beetle Build:
http://www.thesamba.com/vw/forum/viewtopic.php?t=492617 |
|
| Back to top |
|
|
19-VW-74
Samba Member
Joined: June 28, 2009
Posts: 757
Location: Utah
|
| Posted: Fri Feb 10, 2023 1:08 pm Post subject: Re: Austin's 1974 Standard Beetle Body-off Restoration Project |
|
|
I picked these seats up for $40 for the pair on FB marketplace, with the original slider rails.
They were obviously in rough shape, but useable, and hey, they were $40.
I got to work tearing into the passenger seat first, so that I could do trial fits with the seat in the car without making the car immobile.
Before tearing into the upholstery, I figured I would create the mounting brackets first, so that I could be a little more careless with the old upholstery when mocking it up on the concrete floor. After all, the seats would need a lot of test fits to get the height and fit right for me.
These are the brackets, made from 1.25" square tubing. It took about 12 feet of tubing to complete both brackets.
The brackets are a drop in fit and mount directly to the stock pedestal and slider rails. I don't have too many in-process pics because I was trying to move fast (and ended up in the urgent care after cutting my hand on the grinder). Here are a few pics of the welds.
The brackets are different widths, because the Miata pass. seat is actually wider by about an inch. And the mounting points are not symmetrical on the Miata sliders. They are not mirror images of one another.
Here is the driver side complete and mocked up in the car. You can see that the front and rear cross rails are pitched at an angle forwards and rearwards. This is to match the mounting bolt angle on the Miata seat rails. The angle is different from front to rear.
The front mounting tab is held in place with a bolt, nyloc nut, and several washers to take up any slack. There was an annoying amount of slack on one of the pedestals, due to the poor quality of the Zito pans. I had to cut and weld the pedestals so the gap for the front sliding rail would be consistent.
The rear legs on each side of the bracket bolt directly to the left and right seat rails. I used large fender washers from an old shock mounting kit, then ground some flats on the washer and welded it to a bolt. I used a smaller washer to take up the gap between the leg and slider rail, so that the washer and bracket would not be bent/warped when the bolt is tight.
_________________
-Austin
My 1974 Standard Beetle Build:
http://www.thesamba.com/vw/forum/viewtopic.php?t=492617 |
|
| Back to top |
|
|
|


