| Author |
Message |
Madeouttaglass
Samba Member
Joined: September 18, 2013
Posts: 228
Location: Shelter Cove, California

|
 Posted: Thu Jan 23, 2014 6:27 am Post subject: Posted: Thu Jan 23, 2014 6:27 am Post subject: |
 |
|
| designer wrote: |
| Is it possible to insert a post at the beginning of your thread? I'd volunteer to make an index for this thing if it can get put on the front end. I keep having to roll through the whole thing to find what i'm looking for and i thought it'd be nice to have a table of contents with page #'s to jump to in order to find specific topics covered. |
That would be fantastic! I've also used this thread for a reference. I have a few page numbers scribbled on a legal pad but a real index would be very helpful.
I'm sure this thread will be a go to guide for many people for years to come.
_________________
My 1987 Syncro Westy build:
http://www.thesamba.com/vw/forum/viewtopic.php?t=575358&highlight= |
|
| Back to top |
|
 |
Hodakaguy
Samba Member

Joined: April 25, 2012
Posts: 661
Location: Eastern WA
|
|
| Back to top |
|
|
Hodakaguy
Samba Member
Joined: April 25, 2012
Posts: 661
Location: Eastern WA
|
|
| Back to top |
|
|
Madeouttaglass
Samba Member
Joined: September 18, 2013
Posts: 228
Location: Shelter Cove, California
|
|
| Back to top |
|
|
quest4adv
Samba Member

Joined: June 13, 2014
Posts: 18
Location: Corrales, New Mexico
|
| Posted: Sat Jun 21, 2014 9:32 am Post subject: |
|
|
Read this whole thread last night until about 1:00am.
WOW, I mean just WOW! Great job and thanks for sharing it with us! You have evil skills and tools man!
I've seen your stuff on ADV, great job! |
|
| Back to top |
|
|
Hodakaguy
Samba Member
Joined: April 25, 2012
Posts: 661
Location: Eastern WA
|
| Posted: Thu Jun 26, 2014 5:38 pm Post subject: |
|
|
Time to set the bus up with an on board Solar charging system. 
The biggest draw back to the bus in it's current state is the lack of a solar charging system, as it sits now I can get a couple days of dry camping with the battery system before I either need to drive the bus to charge the batteries or plug into shore power/generator so the on board charger can top them back up. This was a real pain last summer at camp outs/airshows etc where I had to pack everything back up and go for a drive to keep the batt's topped off.
Originally I was planning on building a custom roof rack with the solar panels installed in the bottom of the rack, but once installed the rack would pretty much be useless other than looks. A friend Curtis Long had developed a super clean panel setup for his bus so I contacted him and asked if he would share the plans, Curtis was gracious enough to share his cad files so I decided to replicate his setup instead of re-invent the wheel.
This setup consists of three 110W flex panels giving a capacity of 330W total. This is really overkill for the bus when it's sunny out, but will provide usable power when conditions are less than ideal. The setup is mounted low on the roof with custom fabricated brackets and an aluminum panel that the solar panels are mounted on. The aluminum panel has cut outs to keep the panels cool. Once everything is mounted and tightened up on the roof the assembly takes on a 5 deg bend to match the curve in the roof. You end up with a very clean setup that is low and out of the way.
Here's a couple pictures of Curtis's setup on his Syncro.....very nice.
Fast forward to today....This afternoon the local fab shop called and let me know my water jetted pieces were ready to be picked up. With parts now in hand the project can get started.
Here's the aluminum panel that the solar panels will attach to.
And the stainless steel brackets that will hold the assembly to the roof.
The upper bracket will mount on the aluminum panel like this
Here's how the bracket assy will look when attached to the bus. There will be a neoprene pad placed between the roof and the bottom of the lower bracket.
And the Blue Sky MPPT controller that will be installed in the rear cabinet to control the charging of the batts.
More to come soon.
Hodakaguy
_________________
My Syncro Build: http://www.thesamba.com/vw/forum/viewtopic.php?t=517384
My Unimog Build: https://advrider.com/f/threads/meet-the-trotn-turtle-unimog-u1300l-build.1143869/
My Tacoma Builds: https://advrider.com/f/threads/hodakaguys-overland-tacoma-builds-on-to-new-adventures.1274770/
My 4wd Sprinter Build here:https://www.thesamba.com/vw/forum/viewtopic.php?p=9334401#9334401 |
|
| Back to top |
|
|
fleet_maintenance
Samba Member

Joined: November 01, 2013
Posts: 323
Location: Upstate NY
|
| Posted: Fri Jun 27, 2014 8:03 am Post subject: |
|
|
| Super clean panel design. It will look great on your van. Happy to see you're still improving. You have really put together one of the cleanest (and thorough) builds I've seen in a long time! I've kind of gone through withdrawl since you finished. Thanks for updating. How's the van been performing? |
|
| Back to top |
|
|
zeohsix
Samba Member
Joined: August 31, 2012
Posts: 501
Location: United States
|
| Posted: Fri Jun 27, 2014 9:02 am Post subject: |
|
|
If your friend wants to make some money just let us know how much he would charge for that bracket assembly 
_________________
I'm Cheap! I'll build that Syncro Westy myself and save money but, my labor is "FREE" especially if I ever go to sell it! One thing is I will know the quality of the parts and labor that went into the build and rest better when I'm actually driving said Westy down the road! |
|
| Back to top |
|
|
tarandusVDub
Samba Member
Joined: August 27, 2010
Posts: 1649
Location: Between Here and There
|
| Posted: Fri Jun 27, 2014 9:08 am Post subject: |
|
|
| zeohsix wrote: |
| If your friend wants to make some money just let us know how much he would charge for that bracket assembly |
^^X2
_________________
1990 Syncro 16" DoppleKabine 2.1 DJ 112i
________________________
Sold: 1972 Bay Campmobile; 1984 Westy, base model, 2WD. |
|
| Back to top |
|
|
Hodakaguy
Samba Member
Joined: April 25, 2012
Posts: 661
Location: Eastern WA
|
|
| Back to top |
|
|
Hodakaguy
Samba Member
Joined: April 25, 2012
Posts: 661
Location: Eastern WA
|
|
| Back to top |
|
|
Hodakaguy
Samba Member
Joined: April 25, 2012
Posts: 661
Location: Eastern WA
|
| Posted: Fri Jun 27, 2014 7:40 pm Post subject: |
|
|
Today progress.
My Father and I started off today by gathering up the needed Stainless Steel hardware then getting to work on the brackets.
First up we cut the heads off some 8mm bolts to turn them into studs for the lower bracket. Since the under side of the lower bracket rests on the top of the bus it needs to be completely flush.
Studs welded in and 6mm nuts welded to the back of the top piece.
Back side of the bracket where the studs were welded in. After this shot I touched them up with a grinder and they are now completely flat.
This is how the two brackets will be bolted together.
Next up we set the whole assembly on top of the bus and marked the locations where the top brackets need to attach to the aluminum panel. Once the panel was marked we drilled the needed holes in the panel.
And bolted up the upper brackets.
Next up we loosely bolted up the bottom brackets to the rest of the assy and set the whole assy on top of the bus again so we could mark the locations for the bottom bracket holes.
Once the holes were marked we removed the assy and drilled the holes.
Bolting everything to the roof. I used fender washers on the inside lip of the fiberglass top, I added a bead of adhesive to the washer to lock them in place so any vibrations/movements in the bolts won't wear a oval hole into the fiberglass over time.
And the whole mount setup is now mounted up :clap. The assy fits great and really hugs the top nicely.
Well that's all the progress for today. Tomorrow we'll start on installing the solar panels and routing the wiring. Once everything is assembled I'll remove the brackets for the last time and powder coat them black.
More to come soon....
Hodakaguy
_________________
My Syncro Build: http://www.thesamba.com/vw/forum/viewtopic.php?t=517384
My Unimog Build: https://advrider.com/f/threads/meet-the-trotn-turtle-unimog-u1300l-build.1143869/
My Tacoma Builds: https://advrider.com/f/threads/hodakaguys-overland-tacoma-builds-on-to-new-adventures.1274770/
My 4wd Sprinter Build here:https://www.thesamba.com/vw/forum/viewtopic.php?p=9334401#9334401 |
|
| Back to top |
|
|
madspaniard
Samba Member

Joined: August 18, 2008
Posts: 3795
Location: Alameda, CA
|
| Posted: Fri Jun 27, 2014 8:00 pm Post subject: |
|
|
I noticed you don't have poptop shocks. Do you plan to install them? That is going to be one heavy poptop to lift without the help of shocks.
_________________
1991 Westy auto w/ Peloquin TBD
"The only difference between me and a madman is that I'm not mad - Salvador Dali |
|
| Back to top |
|
|
Hodakaguy
Samba Member
Joined: April 25, 2012
Posts: 661
Location: Eastern WA
|
| Posted: Fri Jun 27, 2014 8:06 pm Post subject: |
|
|
| madspaniard wrote: |
| I noticed you don't have poptop shocks. Do you plan to install them? That is going to be one heavy poptop to lift without the help of struts or shocks. Also, not sure if the holes you drilled for the rearmost brackets will interfere with the location of Jackbombay's strut hole. Probably not. |
It's not to bad to lift up and down with the assy up there but pop top shocks are going to be installed and will make it a lot nicer. The entire setup is really pretty light, eventually I'm going to add racks to carry a couple sea kayaks and then they will defiantly be needed. Not sure yet how the shocks will play with my new brackets, but I will modify them as needed to make them work
Hodakaguy
_________________
My Syncro Build: http://www.thesamba.com/vw/forum/viewtopic.php?t=517384
My Unimog Build: https://advrider.com/f/threads/meet-the-trotn-turtle-unimog-u1300l-build.1143869/
My Tacoma Builds: https://advrider.com/f/threads/hodakaguys-overland-tacoma-builds-on-to-new-adventures.1274770/
My 4wd Sprinter Build here:https://www.thesamba.com/vw/forum/viewtopic.php?p=9334401#9334401 |
|
| Back to top |
|
|
Hodakaguy
Samba Member
Joined: April 25, 2012
Posts: 661
Location: Eastern WA
|
| Posted: Sat Jun 28, 2014 8:45 pm Post subject: |
|
|
Not a ton of progress today but did manage to get a bit done.
First up on my list was to tackle the problem of the panels wanting to flex up and down a bit in the middle of the span. I was concerned that if left unchecked the constant flexing would eventually damage the solar panels.
To fix this problem I decided to use rubber stoppers placed under the center of each span, each with about 1/8" of tension on the stopper. This is enough tension to keep the panel nice and firm without placing excess stress on the fiberglass top.
First up trim down the stoppers to the correct height to allow 1/8" preload on the stopper.
Next slightly lift the panel and slide the stopper into position. I now drilled the holes and counter sunk them for the screws that will hold the stoppers in position.
And screw in place.
With the rubber stoppers in place the span in now nice and solid.
Test fitting the panels and marking the locations to drill the mounting holes. (Note that the forward panel still has its protective film in place in this pic, that's why it looks like it's De-laminating).
Once the locations were marked it's time to remove the top span once again to drill the mounting locations for the panels. Here you can see the stoppers from the bottom side.
Starting to mount the panels. As you can see in the photo above there is a small cutout on the end of each large cooling cutout in the top panel. This area is meant to leave clearance for the electrical junction box that exits the bottom of the panel leaving a completely clean look from the top. I was able to purchase a few panels at a considerable discount but they have the electrical connections on the top side of the panel (viewed in the pic below) so my wiring will be a tad different on this build. I went ahead and had the area for the bottom junction box cut out anyways to allow for future panel changes if I decide to go that route.
For now I have a rough idea in my head how I will route the wiring, I'll also fabricate some aluminum guards that will mount in place and cover the junction boxes for a clean look and added protection.
More to come....
Hodakaguy
_________________
My Syncro Build: http://www.thesamba.com/vw/forum/viewtopic.php?t=517384
My Unimog Build: https://advrider.com/f/threads/meet-the-trotn-turtle-unimog-u1300l-build.1143869/
My Tacoma Builds: https://advrider.com/f/threads/hodakaguys-overland-tacoma-builds-on-to-new-adventures.1274770/
My 4wd Sprinter Build here:https://www.thesamba.com/vw/forum/viewtopic.php?p=9334401#9334401 |
|
| Back to top |
|
|
Hodakaguy
Samba Member
Joined: April 25, 2012
Posts: 661
Location: Eastern WA
|
| Posted: Wed Jul 02, 2014 7:04 pm Post subject: |
|
|
Back to work on the project tonight. The solar panels I'm using have the electrical junction boxes on the tops of the panels, the units with the boxes on the bottom of the panels would make a nice clean setup but I have to deal with what I have soooooo......
I decided to wrap the wiring from the junction boxes under the panel and then complete the rest of the wiring out of sight to keep everything as clean as possible. I snap tied the wiring onto the side of the panel to keep any stress from working on the junction box itself, I also added some small pieces of plastic wire loom to keep the sun off the cables. I then added some more sealant to the box itself to assure that it's completely water tight.
Next up I fabricated some aluminum guards to protect the junction boxes from any tree limbs etc that might come in contact with them, this also keeps the sun off the boxes as well.
Here you can see the routing of the wiring under the panel.
The aluminum guards.
And mounted up.
More to come shortly.
Hodakaguy
_________________
My Syncro Build: http://www.thesamba.com/vw/forum/viewtopic.php?t=517384
My Unimog Build: https://advrider.com/f/threads/meet-the-trotn-turtle-unimog-u1300l-build.1143869/
My Tacoma Builds: https://advrider.com/f/threads/hodakaguys-overland-tacoma-builds-on-to-new-adventures.1274770/
My 4wd Sprinter Build here:https://www.thesamba.com/vw/forum/viewtopic.php?p=9334401#9334401 |
|
| Back to top |
|
|
outwesty
Samba Member

Joined: June 06, 2006
Posts: 1074
Location: Tahoe City
|
| Posted: Wed Jul 02, 2014 8:53 pm Post subject: |
|
|
| Much respect for your clean work. What type of battery set up are you going to run ? That is a ton of power ! |
|
| Back to top |
|
|
Hodakaguy
Samba Member
Joined: April 25, 2012
Posts: 661
Location: Eastern WA
|
|
| Back to top |
|
|
Hodakaguy
Samba Member
Joined: April 25, 2012
Posts: 661
Location: Eastern WA
|
| Posted: Thu Jul 03, 2014 7:40 pm Post subject: |
|
|
Lot's of work wiring today...but it's now making power! :clap
Started by laying out the spot for the controller, the controller for my Propex heater is in the way and needs to be moved down some.
Propex thermostat.
Thermostat removed and locations marked to cut the hole for the solar controller.
Solar controller installed and thermostat relocated.
At this point we mounted the panels to the roof and installed the pop top shocks so lifting the top will be easier than before the solar panel was mounted.
I used pre-tinned marine 8awg power cable to run from the panel to the controller. I have a plan to use a custom 90 deg fitting to pass the two cables through the top of the bus but the needed fitting hasn't arrived yet. For a temporary solution I cut the hole and then sealed it with tape and electrical duct seal. I'll be removing this soon and installing the permanent connection.
Back inside to wire the controller. I ran 6awg pre-tinned marine wire from the controller to the battery bank. I also installed the thermocouple wire from the controller to the battery post so the controller can utilize temperature compensation in case the battery starts getting to hot.
I installed a mega fuse holder on both the incoming power from the panel and the output to the batts. This will add safety as well as giving me a place to disconnect the panels if I need to work on anything.
Controller wired up.
Fuses installed and making power! The sun was low in the sky at this point and completely behind clouds, plus the bus was sitting 90 deg to the sun.....still putting out 1.9amps. Not to bad.
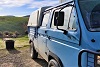
And a couple shots of the panel on the bus.
I'm going to run the fridge tonight and then see what the panel will put out tomorrow in bright sunlight. :clap
More to come.
Hodakaguy
_________________
My Syncro Build: http://www.thesamba.com/vw/forum/viewtopic.php?t=517384
My Unimog Build: https://advrider.com/f/threads/meet-the-trotn-turtle-unimog-u1300l-build.1143869/
My Tacoma Builds: https://advrider.com/f/threads/hodakaguys-overland-tacoma-builds-on-to-new-adventures.1274770/
My 4wd Sprinter Build here:https://www.thesamba.com/vw/forum/viewtopic.php?p=9334401#9334401 |
|
| Back to top |
|
|
madspaniard
Samba Member
Joined: August 18, 2008
Posts: 3795
Location: Alameda, CA
|
| Posted: Thu Jul 03, 2014 8:36 pm Post subject: |
|
|
Making progress! Where did you locate the batteries? Also, how did you run the wires from the poptop to the controller?
_________________
1991 Westy auto w/ Peloquin TBD
"The only difference between me and a madman is that I'm not mad - Salvador Dali |
|
| Back to top |
|
|
|


