| Author |
Message |
carl4x4
Samba Member
Joined: March 20, 2012
Posts: 679
Location: United Kingdom

|
 Posted: Thu Nov 15, 2012 10:55 am Post subject: Posted: Thu Nov 15, 2012 10:55 am Post subject: |
 |
|
| bunkington wrote: |
| How did you get the Fuchs center cap over the rear axle nut? I am trying to figure that out now. |
I checked today and the cap supplied doesn't clear (great!) so I'm in the same boat as you. You can get these http://www.machine7.com/product.php?xProd=1418&xSec=1786
but they look a bit out of place, especially as it looks like it only needs about 8mm or so. I was wondering if I could design something to turn down on a lathe so that you can use the original caps... |
|
| Back to top |
|
 |
ghi66
Samba Member
Joined: October 21, 2010
Posts: 69
Location: Caldey Island
|
| Posted: Sat Nov 17, 2012 6:42 am Post subject: |
|
|
| carl4x4 wrote: |
| ghi66 wrote: |
haha yeah it's me  , i'll get them ordered, thanks for the tips that will really help. Just bought a Vintage Speed exhaust, 17" American Eagle chrome 5 spokes to try and boost my enthusiasm...bumpers next haha. Those fuchs look , i'll get them ordered, thanks for the tips that will really help. Just bought a Vintage Speed exhaust, 17" American Eagle chrome 5 spokes to try and boost my enthusiasm...bumpers next haha. Those fuchs look  , glad you went for those over the Empis as they look way better. , glad you went for those over the Empis as they look way better. |
Crikey buying that lot in one go must have made a dent in the budget ! Interested to see the 17" wheels on the car
(One last tip on the bumpers is to add a small washer on the nut side of the captive bolts that hold the bumper sections together so they nip up tight enough.) |
Thanks for the tips, i'll be ordering them soon, Exhaust and wheels are secondhand although the exhaust was never used I won't be fitting those wheels till all painting is finished(or started..haha). |
|
| Back to top |
|
|
carl4x4
Samba Member
Joined: March 20, 2012
Posts: 679
Location: United Kingdom
|
| Posted: Sun Nov 25, 2012 4:35 pm Post subject: |
|
|
Today's Ghia time was spent trying to fix the problem of a poor turning circle. It became quickly apparent when I took a look under the car at full lock, the high offset of the fuch replicas meant that the inner edge of the rims was catching on the steering rods 
I trial fitted a 9mm 5x130 alloy spacer to the hub and this seemed to do the trick, although it means I now have to buy some longer wheel bolts  Must make a note to try this on both sides (I'm learning to never 'assume' with this car!) Must make a note to try this on both sides (I'm learning to never 'assume' with this car!)
|
|
| Back to top |
|
|
Basketcase
Samba Member

Joined: August 10, 2011
Posts: 636
Location: Ohio
|
| Posted: Sun Nov 25, 2012 5:13 pm Post subject: |
|
|
old car owner rule #1...never assume! 
_________________
'72 Karmann Ghia Coupe (the Boss's) |
|
| Back to top |
|
|
carl4x4
Samba Member
Joined: March 20, 2012
Posts: 679
Location: United Kingdom
|
| Posted: Sun Dec 16, 2012 9:24 am Post subject: |
|
|
Today I think I managed to take one step forward and four steps back..
- Fitted new longer wheel studs with the alloy spacers onto the front Hubs - OK
- Tried to fit the new wheel studs to the back - find out that they are too short and don't go all the way through the drums - despite the fact that this is the second set that have been sent to me !
- Looked at the light switch and Hazard switch, there doesn't seem to be any correlation between the numbers on the switch and the ones on the diagram, give up after 30 mins of scratching head
- Fitted a NOS wiper arm to the drivers side spindle ok, then tried to fit the passenger side and found the spindle is so worn it just wobbles around in the breeze, so I need a new wiper spindle
- Cleaned up main power cable from battery to starter solenoid, routed it through from under the back seat then tried to undo the nut on the solenoid and it sheered clear off along with a good size chunk of the solenoid, so now I need a new starter
|
|
| Back to top |
|
|
Basketcase
Samba Member
Joined: August 10, 2011
Posts: 636
Location: Ohio
|
| Posted: Sun Dec 16, 2012 1:08 pm Post subject: |
|
|
better to have the problems in the garage then along the road. 
_________________
'72 Karmann Ghia Coupe (the Boss's) |
|
| Back to top |
|
|
Ian Godfrey
Samba Member
Joined: September 25, 2006
Posts: 1137
Location: Melbourne Australia
|
| Posted: Sun Dec 16, 2012 2:33 pm Post subject: |
|
|
| If its just the shaft worn down by the screw, i have removed the shaft, leaving all the wiper assembly in the car, built it up with silver solder, filed and replaced. Lasting well. |
|
| Back to top |
|
|
rickpereira
Samba Member

Joined: May 25, 2010
Posts: 330
Location: Sydney, AUstralia
|
| Posted: Mon Dec 17, 2012 3:28 am Post subject: |
|
|
ahh wiring, my favourite part.. not!
great work on the car. its coming along nicelly.. wierd to see a RHD. great work |
|
| Back to top |
|
|
carl4x4
Samba Member
Joined: March 20, 2012
Posts: 679
Location: United Kingdom
|
| Posted: Sun Jan 27, 2013 2:46 pm Post subject: |
|
|
This weekend seems to have been the first for ages that the temp crept above freezing so I got a couple of hours on the car straightening out the old tinware and re painting it. Not much but at least it got me back in the garage!
|
|
| Back to top |
|
|
copyright03
Samba Member
Joined: January 18, 2013
Posts: 36
|
| Posted: Sun Jan 27, 2013 2:52 pm Post subject: |
|
|
It's lookin great  |
|
| Back to top |
|
|
carl4x4
Samba Member
Joined: March 20, 2012
Posts: 679
Location: United Kingdom
|
| Posted: Wed Jan 30, 2013 8:46 am Post subject: |
|
|
I was missing the 'Hoover bit' for the oil cooler, decided to make one from some plans I found on another site. Good job I didn't bother buying a repro one as the Scat fan housing meant it needed some alterations to the original design to fit.
In fact the Scat fan housing has needed quite a lot of trimming where it sits on the block to fit properly. Good job I had an old original fanhousing to compare it to! |
|
| Back to top |
|
|
c21darrel
Samba Member
Joined: January 22, 2009
Posts: 8211
Location: San Dimas
|
| Posted: Wed Jan 30, 2013 11:20 am Post subject: |
|
|
| nice fab work. Agree the aftermarket tins are never as good as the german ones. |
|
| Back to top |
|
|
ghi66
Samba Member
Joined: October 21, 2010
Posts: 69
Location: Caldey Island
|
| Posted: Wed Jan 30, 2013 3:31 pm Post subject: |
|
|
| Great work as ever Carl, so far ahead of me it hurts.. |
|
| Back to top |
|
|
carl4x4
Samba Member
Joined: March 20, 2012
Posts: 679
Location: United Kingdom
|
| Posted: Wed Jan 30, 2013 4:52 pm Post subject: |
|
|
| ghi66 wrote: |
| Great work as ever Carl, so far ahead of me it hurts.. |
Yes but you've gone back to bare metal and split the body from the pan, my resto is minor compared to what you've done so far! Keep up the good work  |
|
| Back to top |
|
|
carl4x4
Samba Member
Joined: March 20, 2012
Posts: 679
Location: United Kingdom
|
| Posted: Thu Apr 11, 2013 2:18 pm Post subject: |
|
|
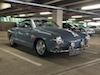
Been a while since I've had some time on the Ghia but I treated myself to a day off and my Uncle helped me out today so we got a decent amount done
First off I made a makeshift shelter as it was due to rain
Then we went from this...
To this:
Also installed an remote oil filter and cooler, the feed pipes still need to be finished off, but we got a long way today and quite pleased with the progress
_________________
1969 UK Karmann Ghia build http://www.thesamba.com/vw/forum/viewtopic.php?t=518789&highlight= |
|
| Back to top |
|
|
Basketcase
Samba Member
Joined: August 10, 2011
Posts: 636
Location: Ohio
|
| Posted: Thu Apr 11, 2013 7:54 pm Post subject: |
|
|
beautiful Ghia!
_________________
'72 Karmann Ghia Coupe (the Boss's) |
|
| Back to top |
|
|
cseay1
Samba Member

Joined: March 22, 2012
Posts: 1341
Location: Elkwood VA
|
| Posted: Thu Apr 11, 2013 8:11 pm Post subject: |
|
|
Nice progress!
What's that exhaust you are running? |
|
| Back to top |
|
|
carl4x4
Samba Member
Joined: March 20, 2012
Posts: 679
Location: United Kingdom
|
|
| Back to top |
|
|
cseay1
Samba Member
Joined: March 22, 2012
Posts: 1341
Location: Elkwood VA
|
| Posted: Fri Apr 12, 2013 4:03 am Post subject: |
|
|
| carl4x4 wrote: |
| cseay1 wrote: |
Nice progress!
What's that exhaust you are running? |
It's a Vintagespeed one |
Is that the Sport or Superflow version? |
|
| Back to top |
|
|
carl4x4
Samba Member
Joined: March 20, 2012
Posts: 679
Location: United Kingdom
|
|
| Back to top |
|
|
|


