| Author |
Message |
flyboat
Samba Member
Joined: April 21, 2010
Posts: 2752
Location: Bath NC

|
 Posted: Thu Aug 02, 2012 6:54 pm Post subject: Wrecked 62 rag, new build Posted: Thu Aug 02, 2012 6:54 pm Post subject: Wrecked 62 rag, new build |
 |
|
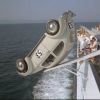
I just finished a 79 vert. I thought I would take the rest of the summer off. Bordom set in so I decided to start the next project. This is a very nice 62 minus one major flaw. It was hit fairly hard on the passenger front. It bent the front beam and teaked the beam support on the passenger side and destroyed the front sheetmetal. I have a donor car with a good front clip and frame head. And another one with a good ragtop. So while I'm clipping the front, I'm gonna clip in the 62 rag as well. All three cars are 62's.
This car is going to be black with standard chrome and a tan rag and dark tan interior. 2387 engine with twin 48 IDF's
_________________
79 super Vert
62 Ragtop Bug
66 tintop Westy
Porsche 914
09 Z06 Vette track car |
|
| Back to top |
|
 |
eggman95
Samba Member

Joined: October 05, 2004
Posts: 268
Location: Jersey City, NJ
|
| Posted: Thu Aug 02, 2012 7:42 pm Post subject: |
|
|
Looks like you have some work ahead of you. Keep us posted as you go along!
_________________
Henry |
|
| Back to top |
|
|
jzjames
Samba Member
Joined: September 27, 2007
Posts: 1921
Location: Windy Point, WA
|
| Posted: Thu Aug 02, 2012 8:14 pm Post subject: |
|
|
| Looks like this is going to be a nice car. You have a nice operation there. |
|
| Back to top |
|
|
flyboat
Samba Member
Joined: April 21, 2010
Posts: 2752
Location: Bath NC
|
| Posted: Fri Aug 03, 2012 6:55 am Post subject: |
|
|
| jzjames wrote: |
| Looks like this is going to be a nice car. You have a nice operation there. |
Its my home away from home. Better yet, it is great Therapy. This fun stuff gets my mind off this bad economy.
_________________
79 super Vert
62 Ragtop Bug
66 tintop Westy
Porsche 914
09 Z06 Vette track car |
|
| Back to top |
|
|
flyboat
Samba Member
Joined: April 21, 2010
Posts: 2752
Location: Bath NC
|
| Posted: Thu Aug 09, 2012 6:43 pm Post subject: |
|
|
Got the frame head from the donor car and cleaned it up for the project car. Here are a few pics of the removal/install process.
here is the donor frame head
The car it came from
The donor part cleaned and ready to install
Now that is fits good, I'll sand blast it in preparation for installation
I removed the donor front clip from the donor car tonight. I'll post pics of that process later
_________________
79 super Vert
62 Ragtop Bug
66 tintop Westy
Porsche 914
09 Z06 Vette track car |
|
| Back to top |
|
|
dubjeep
Samba Member
Joined: December 24, 2011
Posts: 354
Location: Rhode Island
|
|
| Back to top |
|
|
Fifty-Eight Rag
Samba Member

Joined: September 07, 2011
Posts: 936
Location: St. Louis, MO
|
|
| Back to top |
|
|
flyboat
Samba Member
Joined: April 21, 2010
Posts: 2752
Location: Bath NC
|
| Posted: Sat Aug 18, 2012 6:29 pm Post subject: |
|
|
Time to remove the front clip from the donor car. This is how I go about it.
Start by making a pattern of the windshield opening. A piece of cardboard will do, but something more rigid would be better. I am using a piece of stiff foam.
There are two reasons for this pattern. One is to help weld the donor piece to the receiving car and end up with the correct windshield opening. the rigid pattern will allow you to put it in place to keep the car part and the clip part the right distance apart. Now your windshield will fit properly when the job is complete.
The second reason for this pattern is to give you marks or locations as to where the first part (donor part) was cut.
When you move the pattern to the good car, it will show you where to cut it in preparation of it receiving the clip.
Now that we have the pattern, Lets cut the donor clip from the donor car. On this application, I chose a location about middle way of the windshield post. I measured the location of one side and transferred it to the other side. This is not critical. If it is off even as much as an inch, it is ok, as long as the receiving car is the exact same. In this pic you can see where the cutis and how I marked it with masking tape. When this was cut, the pattern was in place so the saw would cut into the foam and provide me a mark for use on the good car. This was done on both sides through the windshield posts into the foam about an inch.
Now lets move to the bottom. There are several ways to do this. My donor piece is rusty at the bottom of the A pillar on both sides. My good car is in good shape in these areas. So, I chose to cut around the bad area to eliminate the rust spots. I will diplicate this cut pattern on the good car at a later time. I chose to cut straight thru the heater channels because they were in good shape and I wanted to save as much of the factory spot welds as I could for a factory look. Here are the cut patterns
When I cut thru the A pillar like this, it slices thru the reinforcement plate that is used to support the hinges. So when I reweld thes parts back together, I will slice a small window in the a pillar that will allow me to weld the support plate back together. I don't want the hinges to be separate entities of each other. This will make the upper plate from the donor car one with the remaining plate of the good car. Then I will weld up the small window with the piece I cut out. Pictures of this to follow. But it will be some time before I get to that
_________________
79 super Vert
62 Ragtop Bug
66 tintop Westy
Porsche 914
09 Z06 Vette track car |
|
| Back to top |
|
|
flyboat
Samba Member
Joined: April 21, 2010
Posts: 2752
Location: Bath NC
|
| Posted: Mon Aug 20, 2012 6:46 pm Post subject: |
|
|
The donor clip completely removed. I will be replacing the spare tire tray and the front apron. And I will rework the lower front edge of both inner fenders before I install the new metal. Pictures of this later. It is hard to tell from the pic, but the tire tray and apron have been removed.
_________________
79 super Vert
62 Ragtop Bug
66 tintop Westy
Porsche 914
09 Z06 Vette track car |
|
| Back to top |
|
|
flyboat
Samba Member
Joined: April 21, 2010
Posts: 2752
Location: Bath NC
|
| Posted: Sat Aug 25, 2012 11:00 am Post subject: |
|
|
Front inner fender rrepair. I'm going to attempt to replace bad metal with good metal. Some of it has several compound shapes. We'll see how it turns out. This pic shows the rust in the left side and the backside of the repair to the right side. I still need to grind the weld to clean it The right side was worse than the left side
Here is the right side after repair
I'll do the other side tomorrow
_________________
79 super Vert
62 Ragtop Bug
66 tintop Westy
Porsche 914
09 Z06 Vette track car |
|
| Back to top |
|
|
TequilaSunSet
Samba Member

Joined: May 30, 2012
Posts: 2109
Location: Philippines
|
| Posted: Sat Aug 25, 2012 2:24 pm Post subject: |
|
|
Love the tutorial... great thread looking forward to see more!
_________________
Don't harsh my mellow...
1985 Hightower Vanagon 1.8T- Gone
1972 Panel Bus- Gone
1967 Bug- Gone
1964 Euro Sunroof Bug- Gone
1969/72/63 Sunroof Bug- Gone
1975 Brazilian Bug in the Philippines 🇵🇭- New to me |
|
| Back to top |
|
|
eggman95
Samba Member
Joined: October 05, 2004
Posts: 268
Location: Jersey City, NJ
|
| Posted: Sat Aug 25, 2012 4:55 pm Post subject: |
|
|
i love this thread 
_________________
Henry |
|
| Back to top |
|
|
jzjames
Samba Member
Joined: September 27, 2007
Posts: 1921
Location: Windy Point, WA
|
| Posted: Sat Aug 25, 2012 6:48 pm Post subject: |
|
|
| flyboat wrote: |
Front inner fender rrepair.
|
I think youre going to see more of this; sheetmetal workers who know what they are doing - restoring these bug bodies. |
|
| Back to top |
|
|
flyboat
Samba Member
Joined: April 21, 2010
Posts: 2752
Location: Bath NC
|
| Posted: Sat Aug 25, 2012 8:24 pm Post subject: |
|
|
Yeah, if we're going to help the culture survive, this is our only way. You can see three different cars in my shop. so there is a sacrifice of some cars for the betterment of other cars. Of these three cars, one is being restored resto mod style. And another one will be another resto mod. So that means we loose one car to save two. Not a bad average. The first one, which is the one I am working on now will be a resto mod, but a mod that can go back to original if a future owner wants that. It is a number matching car including engine and tranny. I will save both the tranny and engine in moth balls for the future. This will make this car valuable to a discerning buyer in the future if I choose to sell it. The point is, let's save as many of these cars as we can for our children and grand children.
_________________
79 super Vert
62 Ragtop Bug
66 tintop Westy
Porsche 914
09 Z06 Vette track car |
|
| Back to top |
|
|
esde
Samba Member

Joined: October 20, 2007
Posts: 5969
Location: central rust belt
|
| Posted: Sun Aug 26, 2012 7:22 am Post subject: |
|
|
| Nice work dude! Just an FYI about your foam template though, Urethane foam can shrink and warp over time, so that windshield pattern might not stay true to the opening and cuts. With the speed you seem to work at it won't likely be an issue, but wanted to mention it for the next guy that follows in your steps. I use heavy card stock or masonite for most templates, it stays pretty true to it's original cut. |
|
| Back to top |
|
|
flyboat
Samba Member
Joined: April 21, 2010
Posts: 2752
Location: Bath NC
|
| Posted: Sun Aug 26, 2012 9:33 am Post subject: |
|
|
Very good observation about the foam. that's why I did not use urethane foam. This is a cross linked pvc foam. It is very stable. We use it in our yacht construction. It was developed initially for the aero space industry.
_________________
79 super Vert
62 Ragtop Bug
66 tintop Westy
Porsche 914
09 Z06 Vette track car |
|
| Back to top |
|
|
flyboat
Samba Member
Joined: April 21, 2010
Posts: 2752
Location: Bath NC
|
| Posted: Wed Oct 31, 2012 5:28 pm Post subject: |
|
|
Finally got a chance to get back on the 62 today. I finished most of the rust repair to the front area. I was able to fit the spare tire tray and the front apron. I got the tire tray welded in. I'll do some cleaning and grinding before I install the apron. It'll be much easier that way.
_________________
79 super Vert
62 Ragtop Bug
66 tintop Westy
Porsche 914
09 Z06 Vette track car |
|
| Back to top |
|
|
silvertonguedevil
Samba Member

Joined: September 26, 2010
Posts: 1692
Location: Vale, OR
|
| Posted: Sat Nov 03, 2012 7:15 am Post subject: |
|
|
Some nice work going on. Great job. And a "hear, hear" to your bit about saving these cars. It's sad how many people look at them like there are still 20 million of them out there running around. The well will eventually run dry on these so we need to save as many of them as possible. It's nice to see someone with a love for the car. Please keep it going!
_________________
-Greg |
|
| Back to top |
|
|
flyboat
Samba Member
Joined: April 21, 2010
Posts: 2752
Location: Bath NC
|
| Posted: Sat Nov 17, 2012 6:32 pm Post subject: |
|
|
Been a bit busy on the wife's 79 vert lately, leaving little time for this 62 project. I had a chance to work on it today. I sandblasted most of the new front clip. I want to do the light body work in the tire well before I weld on the apron. The body work and priming will be much easier that way.
But, since I have this front end all to pieces, I decided to design a new A-arm suspension for the car. It isn't much different from all the others, Medeola, Eyeball Engineering, and Red9design. mine is a bolt on system theat will replace the beam with a wishbone suspension. the design will incorperate the beetle spindle, in this case, the ghia spindle with the disc brake set up. It will maintain some of the standard set up but provide much more suspension geometry set up for autocross or track days. I have designed the system in A-cad. I made some patterns of the new front works from plywood just to get a start at it. All is good except one thing. I need to narrow up the bulkheads by 1 13/16 per side. This will make the A-arms longer which is a good thing. Water jetting of the parts will be complete in about 10 days. The a-arms are 1" chromoly with Energy Suspension urethane bushings. I am looking forward to its completion. Her's a few pics of the front suspension patterns.
If it looks crooked, its an optical illusion. The front bulkhead of the car is pushed back and up about 5" from the accident.
_________________
79 super Vert
62 Ragtop Bug
66 tintop Westy
Porsche 914
09 Z06 Vette track car |
|
| Back to top |
|
|
flyboat
Samba Member
Joined: April 21, 2010
Posts: 2752
Location: Bath NC
|
| Posted: Wed Dec 05, 2012 4:58 pm Post subject: |
|
|
Got parts of the A-arm suspension subframe from the waterjet today. I started welding up the various parts. these pics show the subframe and one mount for one a-arm. I welded all the a-arm mounting points but I didn't get pics.
Main subframe just tacked up
Subframe sitting in place showing one a-arm mount
The a-arms are being fabbed at a local machine shop. It is set up to use standard ball joint front end spindles and ball joints One all the a-arm parts are in place I will complete the design of the steering using a rack and pinion from Flaming River
_________________
79 super Vert
62 Ragtop Bug
66 tintop Westy
Porsche 914
09 Z06 Vette track car |
|
| Back to top |
|
|
|


