| Author |
Message |
climberjohn
Samba Member

Joined: January 11, 2005
Posts: 1840
Location: Portland Orygun

|
 Posted: Wed Aug 29, 2012 3:51 pm Post subject: Gold to Green (lots of photos) Posted: Wed Aug 29, 2012 3:51 pm Post subject: Gold to Green (lots of photos) |
 |
|
My van, (formerly known as Goldy Han), is now pretty dialed in mechanically. This was the year for the outside to start looking as good as the inside.
First off, thanks to a few Samba friends for encouragement with this project. Tristar Eric has a beautiful syncro truck in original Escorial green, which where I first saw this color for real. Plummerdesign is the one other Westy I know of in Portland with this green and white paint scheme. Although I've yet to see it in person, his many gallery photos inspired me. And Kopasz showed me his schweeeet van right after it was back from paint and body work from the same guy, and his excellent work helped nudge me into action.
Details on the fine guy who did the work, Mike, are below.
Onto the Van . . .
26+ years of back roads and camping had taken a minor toll. There were no huge gaping caverns or rust issues to deal with, more of an assortment of small dingers and a few holes to fill.
I opted to go with completely new paint color. I wanted something fairly eye-catching yet low-key, ideally VW stock, and nonmetallic. Escorial Green was a color apparently used on some vanagons in the early 1980s, but is still pretty unusual to see, at least in the Pacific NW. Combining this green with a gloss white painted top I thought looked pretty sweet. As mentioned above, Samba member Plummerdesign has this exact scheme, and as imitation is the best form of flattery, I copied it directly. (Thanks Plummer-D!)
Before I brought the van to Mike, I prepped and put a primer coat on the Westy top. (Mike would've been happy to do this, but I thought I'd save a few bucks and do the easy prep bit myself.) Mike ended up spraying the final coat.
I used the one stage polyurethane gloss white Marine paint that many Sambanistas have used, with good results. I used 1 quart of Interlux Pre-Kote, and 1 quart of Interlux Brightside. My main suggestion for anyone doing this is to wait for proper weather, ideally low humidity and around 70°F. I tried painting in weather closer to 85°F, and the paint was drying a tad too quickly. Other than that, I was very happy with these products and the outcome. (Do a Samba search for < Interlux > to read more detailed threads about this product on the pop top.)
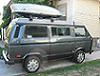
Here are a few photos of pop top painting, including one from halfway through to show the difference:
Here's the driver side, with the red arrows showing a few spots that needed some love.
Here's the passenger side, showing the same. The red arrows along the top are some holes where a heavy Dometic awning was mounted with some homemade metal brackets that I inherited from the PO.
I opted to remove the factory antenna entirely, as it was loose in its housing and was a source for rain getting into the van. (I installed a powered antenna directly to the stereo, which looks like a box of gum and attaches to the windshield with double-sided sticky tape.) Also, I had the typical rust spots at the lower corners on each side of the windshield.
Note driver-side windshield rust, and butt ugly silicone goop used to seal around the leaky antenna.
prep of the same spot, with fiberglass patch
after
Since I removed my refrigerator and never plan on reinstalling it, I chose to fill the fridge vent hole in the body, to remove another possible source of water intrusion.
prep work on the fridge vent hole, to be filled with some fiberglass
after - fridge vent hole is gone
The single biggest area of nasty rust was this silver dollar sized crusty at the top left of the rear hatch, yuck!
After
The biggest dent was in the rear right passenger corner.
Mike did a lot of work in this area with a spot welder and slide hammer to work out the dent. I had never seen these amazing tools in action before, and it was pretty cool to watch a master at work. This is a surprisingly delicate and painstaking process, and I'm happy with the result.
Mike using slide hammer
YouTube video of spot welder and slide hammer
Link
lower rear right corner after, view 1
lower rear right corner after, view 2
masking and painting the door jams
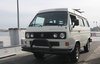
rear hatch after. Yes, I chose to remove the VW badges. I do not plan to add new Westfalia stickers either. (I feel that our world is over-branded with corporate identities everywhere we look, and this is one small way to Fight the Power.)
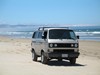
driver-side after (The next two photos are after a 1,500 mile road trip, more than a few dirt roads, and no wash, so it's actually kind of dirty.)
passenger side after
And, since I know everyone's going to ask, the total cost was around $2300 and took two weeks. This included a new windshield and windshield seal, all bodywork, three stage paint job (2 types of primer, color, and clear coat) including door jams, and an additional 3-4 hours of prepping and spraying the final coat of white on the Westy roof. Only the windshield was removed. I now get daily complements from random strangers whenever I drive the van, which I have to say feels pretty damn good.
The guy I worked with is named Mike Fucciolo, who has a shop at SE 102nd and Foster in Portland. I highly recommend Mike. He is low key, friendly, approachable, and dedicated to getting you the outcome that you want. Prices are quite reasonable, and he kept me well informed throughout the whole process via regular texts and photos.
I would suggest to anyone who works with Mike that they not be in any big rush to get the job done. He is a craftsman who works a sometimes unusual schedule, and it's best to let him go at his own pace. This is not the Maaco in and out in three days kind of shop by any means. I would suggest with a van in similar condition to expect at least three weeks for the full job, and to be pleasantly surprised if it's faster than that.
Mike also encourages his customers to drop by, hang out, ask questions, keep him company, and pitch in and help when appropriate. If you want to learn a lot about how bodywork is done, this is a chance to do it. I knew nothing about body and paint, and it was a great learning experience the few times I did drop by.
If you want contact info for Mike, please send me a PM and I will provide it.
As it looks like I can't call her Goldy Han anymore, the new name, chosen by my 7 yo daughter, is Esmeralda.
_________________
'86 Westy, 2.5 Subaru power
Know your limits. Exceed them often. |
|
| Back to top |
|
 |
GWTWTLW
Samba Member

Joined: April 22, 2008
Posts: 2174
Location: Portland, OR
|
| Posted: Wed Aug 29, 2012 4:23 pm Post subject: |
|
|
Holy Cr@p Batman! That looks awesome. I have been putting off a badly needed paint job because I thought I would be spending $8K + for something decent. $2300 is completely reasonable. I will be visiting Mike for sure.
Thx for sharing JGo...
I guess you won't be listening to the radio anymore either...
_________________
89 Syncro Westy - GW 2.5, now with a double knob job
@gwtwtlw |
|
| Back to top |
|
|
markz2004
Samba Member
Joined: November 13, 2007
Posts: 944
Location: Portland, OR
|
| Posted: Wed Aug 29, 2012 4:30 pm Post subject: |
|
|

Fantastic write-up and paint job.
_________________
87 Westy, 250k GW 2.4 - 2.0  , 16" wheels , 16" wheels |
|
| Back to top |
|
|
silversync
Samba Member
Joined: September 01, 2005
Posts: 185
Location: San Pasqual Valley, CA
|
| Posted: Wed Aug 29, 2012 4:44 pm Post subject: |
|
|
Beautiful, nice color choice.
_________________
Roland: '89 Syncro, '02 911 C4S, '10 Audi A4 Avant |
|
| Back to top |
|
|
climberjohn
Samba Member
Joined: January 11, 2005
Posts: 1840
Location: Portland Orygun
|
| Posted: Wed Aug 29, 2012 4:45 pm Post subject: |
|
|
| GWTWTLW wrote: |
I guess you won't be listening to the radio anymore either... |
Read my post again, Pete.
I got a tiny powered "hidden antenna" that's the size of a large pack of gum. It sticks to the inside of the windshield down low on the passenger side in an unobtrusive spot; works like a charm and it's only about $20. (The tools at Cartoys wanted like $80 for this; I laughed in their face and walked out!)
Sort of like this:
http://www.amazon.com/Hidden-Antenna-Motorcycle-Applications-Windshield/dp/B001QYSXAS
_________________
'86 Westy, 2.5 Subaru power
Know your limits. Exceed them often. |
|
| Back to top |
|
|
Jim Richards
Samba Member
Joined: January 03, 2006
Posts: 19
Location: DC/SoCal
|
| Posted: Wed Aug 29, 2012 4:59 pm Post subject: |
|
|
That looks fantastic! And kudos to your daughter for picking a great new name for your van!
_________________
Jim |
|
| Back to top |
|
|
RCB
Samba Member
Joined: September 05, 2005
Posts: 4143
Location: San Francisco-Bay Area
|
| Posted: Wed Aug 29, 2012 5:05 pm Post subject: |
|
|
| Beeeeeeeutiful, thats my second favorite color. |
|
| Back to top |
|
|
whynotvw
Samba Member
Joined: May 04, 2004
Posts: 1322
|
| Posted: Wed Aug 29, 2012 5:08 pm Post subject: |
|
|
Did you remove all the windows before the paint job? Looks wonderful by the way.  |
|
| Back to top |
|
|
Escorial Syncro
Samba Member
Joined: May 02, 2004
Posts: 437
Location: Manitou Springs, CO
|
| Posted: Wed Aug 29, 2012 5:30 pm Post subject: |
|
|
Love the color! Well done, looks great.
_________________
Joel Lane
1985 Vanagon converted to syncro, ALH TDI, Reimo Primus top with Westy interior
2002 Toyota Tundra 4x4
1974 Honda CL360 Scrambler (for sale!) |
|
| Back to top |
|
|
climberjohn
Samba Member
Joined: January 11, 2005
Posts: 1840
Location: Portland Orygun
|
| Posted: Wed Aug 29, 2012 5:42 pm Post subject: |
|
|
| whynotvw wrote: |
| Did you remove all the windows before the paint job? Looks wonderful by the way. |
All windows stayed in except the front windshield.
(Removal of all windows would prolly have added added about $1,000 to the final price.)
_________________
'86 Westy, 2.5 Subaru power
Know your limits. Exceed them often. |
|
| Back to top |
|
|
childofthewind
Samba Member

Joined: October 19, 2010
Posts: 763
Location: Eastern Sierra
|
| Posted: Wed Aug 29, 2012 6:00 pm Post subject: |
|
|
WOWZERS!
Best green ever.
_________________
1987.5 wolfsburg hardtop; 2.1
As for me, I am tormented with an everlasting itch for things remote." - Melville |
|
| Back to top |
|
|
childofthewind
Samba Member
Joined: October 19, 2010
Posts: 763
Location: Eastern Sierra
|
| Posted: Wed Aug 29, 2012 6:00 pm Post subject: |
|
|
WOWZERS!
Best green ever.
_________________
1987.5 wolfsburg hardtop; 2.1
As for me, I am tormented with an everlasting itch for things remote." - Melville |
|
| Back to top |
|
|
Mulcheese
Samba Member

Joined: September 19, 2004
Posts: 548
Location: Maple Grove, Mn
|
| Posted: Wed Aug 29, 2012 6:57 pm Post subject: |
|
|
Awesome! I love the color. This is what my wife wants to do within the next year. We now have white and she wants to go green, maybe even that color. I have told here that we dont want to change the color because of the inside color.
Can you show a pic with the doors open showing the inside and the door jams? Id like to know where the break is.
I may be contacting you in the future for more detailed info on the color.
Good choice!!
Pat
_________________
82 Westy: Air is cool! |
|
| Back to top |
|
|
debbiej
Samba Member
Joined: December 14, 2008
Posts: 1556
Location: las cruces, nm
|
| Posted: Wed Aug 29, 2012 7:05 pm Post subject: |
|
|
| beautiful job!! love the color! |
|
| Back to top |
|
|
IdahoDoug
Samba Member

Joined: June 12, 2010
Posts: 10250
Location: N. Idaho
|
| Posted: Wed Aug 29, 2012 7:26 pm Post subject: |
|
|
Wow, that is a really great green. I suspect you will have to accept constant enthusiastic comments from random folks as part of the Van's personality from now on. I painted a white Triumph Spitfire a factory Triumph kelly green similar to your green and nobody missed it wherever I drove.
Well done!
Doug
_________________
1987 2WD Wolfsburg Vanagon Weekender "Mango", two fully locked 80 Series LandCruisers. 2017 Subaru Outback boxer. 1990 Audi 90 Quattro 20V with rear locking differential, 1990 burgundy parts Vanagon. 1984 Porsche 944, 1988 Toyota Supra 5 speed targa, 2002 BMW 325iX, 1982 Toyota Sunrader |
|
| Back to top |
|
|
Jake de Villiers
Samba Member

Joined: October 24, 2007
Posts: 5911
Location: Tsawwassen, BC
|
|
| Back to top |
|
|
climberjohn
Samba Member
Joined: January 11, 2005
Posts: 1840
Location: Portland Orygun
|
| Posted: Wed Aug 29, 2012 7:34 pm Post subject: |
|
|
| IdahoDoug wrote: |
Wow, that is a really great green. I suspect you will have to accept constant enthusiastic comments from random folks as part of the Van's personality from now on. I painted a white Triumph Spitfire a factory Triumph kelly green similar to your green and nobody missed it wherever I drove.
Well done!
Doug |
One week ago British guy (who was a Triumph and Mini owner) in an nearby Yosemite campsite walked by an called it "British rally racing green".
On the other hand, the color bears a striking resemblance to the Waste Management garbage cans here in Portlandia, see garbage cans at the rear of the van!
_________________
'86 Westy, 2.5 Subaru power
Know your limits. Exceed them often. |
|
| Back to top |
|
|
climberjohn
Samba Member
Joined: January 11, 2005
Posts: 1840
Location: Portland Orygun
|
|
| Back to top |
|
|
FNGRUVN
Samba Member
Joined: October 27, 2007
Posts: 2237
Location: Fort Collins, CO
|
| Posted: Wed Aug 29, 2012 7:42 pm Post subject: |
|
|
John Deere green. I love it. I think you need to finish it off with yellow rims. Nice job!
_________________
"Democracy is two wolves and a lamb voting on what to have for lunch. Liberty is a well-armed lamb contesting the vote." - Benjamin Franklin |
|
| Back to top |
|
|
K58
Samba Member
Joined: July 01, 2006
Posts: 1173
Location: Santa Barbara
|
| Posted: Wed Aug 29, 2012 9:03 pm Post subject: |
|
|
Wow, inspiring to say the least!
and leave the cheezy mud flaps off...looks much better imo
_________________
Westy HID Projector Retrofit |
|
| Back to top |
|
|
|


