| Author |
Message |
mariusstrom
Samba Member

Joined: March 29, 2010
Posts: 745

|
 Posted: Thu Dec 13, 2012 4:23 pm Post subject: Posted: Thu Dec 13, 2012 4:23 pm Post subject: |
 |
|
Love it.. Otto the Vanagon is currently undergoing a Syncro conversion as well. Looks like many of us have been good and will be getting an additional two drive wheels for the holidays. 
_________________
Marius Strom Otto: 1988 Vanagon Syncro Westy Camper
[SOLD] Felix: 1967 Deluxe Beetle |
|
| Back to top |
|
 |
jebiga41
Samba Member
Joined: January 12, 2011
Posts: 46
Location: Ireland
|
| Posted: Tue Dec 18, 2012 6:32 pm Post subject: |
|
|
| Farfrumwork wrote: |
Good luck Jahbah!
I'll be towing a donor syncro shell to my house Dec 22nd... Looks like a run on 2wd -> syncro conversions.
Thanks for the lists.
I'll be a busy boy over xmas break as well.  |
look familiar ? 
|
|
| Back to top |
|
|
jebiga41
Samba Member
Joined: January 12, 2011
Posts: 46
Location: Ireland
|
| Posted: Tue Dec 18, 2012 6:37 pm Post subject: |
|
|
One I've done before aka "The Horse"
|
|
| Back to top |
|
|
Phishman068
Samba Member

Joined: February 19, 2007
Posts: 1867
Location: Pittsburgh PA (ish)
|
| Posted: Tue Dec 18, 2012 6:50 pm Post subject: |
|
|
I'm curious how easily it rolled over like that?
I've parted quite a few vans and have always thought this would be logical but never tried it. How did you do it? How will you get it back up?
Thanks! |
|
| Back to top |
|
|
EL31415
Samba Member

Joined: December 13, 2009
Posts: 192
Location: Los Angeles
|
| Posted: Tue Dec 18, 2012 7:53 pm Post subject: |
|
|
My understanding is that
- Stripper top is easier than Stripper bottom.
_________________
~~~~~~~~~~~~~~~~~~~~
1985 Westy |
|
| Back to top |
|
|
ZimZam
Samba Member

Joined: July 21, 2005
Posts: 562
Location: Talkeetna, AK
|
| Posted: Tue Dec 18, 2012 7:55 pm Post subject: |
|
|
| carterzest wrote: |
| carterzest wrote: |
| carterzest wrote: |
| Rocky Mountain Westy wrote: |
| Wellington wrote: |
| many years ago I dated a very experienced stripper, just like a synco, I found out I couldn't afford her. |
Dang, That is pretty funny |
sh!t.
Another thread to follow. |
where is ZimZam? |
confused |
Hey! Thanks for asking. I've been lost for a couple years. It's good to be back.
_________________
'85 Cabriolet (Margo)
'87 Westy (Heidi)
'75 Porsche 911S Targa
"Nobody trusts anyone, or why did they put tilt on a pinball machine.
- Steve McQueen
"It's just metal, when rusted and dented , anything you will do will be better. Stop being afraid. What they (VW) did many year ago is not better then what you will do now." -Ben |
|
| Back to top |
|
|
carterzest
Samba Member

Joined: January 22, 2008
Posts: 3842
Location: Eagle, ID/Sun Valley, ID
|
| Posted: Thu Dec 20, 2012 5:51 pm Post subject: |
|
|
Update from our beloved Christmas Syncro Destroyer, Jahbah~D.
| jahbah~D wrote: |
| I cut that bitch |
Link
I am begging for more. i can't stop laughing my sides hurt 
B U E Ñ O
_________________
Happiness=Portland, Oregon in the rearview mirror!
Last edited by carterzest on Fri Dec 21, 2012 1:14 am; edited 1 time in total |
|
| Back to top |
|
|
jebiga41
Samba Member
Joined: January 12, 2011
Posts: 46
Location: Ireland
|
| Posted: Thu Dec 20, 2012 6:55 pm Post subject: |
|
|
| Phishman068 wrote: |
I'm curious how easily it rolled over like that?
I've parted quite a few vans and have always thought this would be logical but never tried it. How did you do it? How will you get it back up?
Thanks! |
Hi lift jack and just kept propping it up till we just pushed her over (had to brace the jack foot to stop it slipping) also placed some old tyres on the floor to stop damaging the side panels. Would thoroughly recommend it for breaking vans so much easier to remove stuff. Before we rolled her I dropped all th subframe in one go and lifted the body off it (had help from a forklift but was doable with a few jacks. |
|
| Back to top |
|
|
Jahbah
Samba Member

Joined: July 27, 2011
Posts: 299
Location: McMenaminville, Oregon
|
| Posted: Fri Dec 21, 2012 7:34 am Post subject: |
|
|
Hey kids!
Thanks for the info and humorous chimings-in.....
Mr zest thanks for posting earlier and for the earlier verbal-diareeeha, and course your help.
Zimzam- glad your back i have followed your threads in the past fighting rust and such.
Jebiga it's always funny to see what crazy stuff our mates across the pond get in to. Great idea, I looked at that and then spent three days on the ground with a grinder three inches from my face. I have read up on the horse great work.
Mariusstrom- I followed your tencent build, I hope you cure your van addiction soon. Otto must be ridiculous. You otta drive down to a PDX gtg and have a beer at the lab.
Anyway- the build!
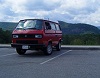
It was dropped off on Sunday, it was much more beat up, rusty and stripped than the owner had told me. He was kind of shifty and did not look me in the eye much. There was some bad rust on a couple of the suspension parts and gas tank bracket, straps. The locker boss was missing and the only parts on this junker was the syncro parts(no extras as promised). The first day was a bummer, snookered by a guy that seemed really nice. Here is a photo of the donor and one of the donor sitting next to my sisters westy I was using as comparison.
From the donor:
Some under sides, sad state of affairs hopefully only a few parts need to be replaced. I'll wait to see after a good sandblast..
Here is a shot of the sub frame coming out after the front suspension was removed. Balanced on a floor jack!
The triple bubble from the middle of the underside....
I cut the gas filler out way too big to help make a template once back in the beautiful PNW.
I also cut out the whole line and associated sheet metal.
The gas tank straps were toast and the gas tank came out without a problem.
Last for now is a picture of the shifter assembly out with my sisters help.
So far so good, I'm going to give it a last once over and bring this poor old girl to the scrapper. Man this one was rusted up pretty bad in some spots.
Thanks for all the help from everyone out there. It will be huge to get these parts safely back home! I'll shoot up more later on thisweek!
Cheers for more Beers!
_________________
'87 Westfalia Weekender + '86 Syncro Tintop +'02 Impreza 2.5RS
= '86.5 SuperWestySyncroSubyWeekendermobileagon =
Bueno.
Jahbah~D |
|
| Back to top |
|
|
carterzest
Samba Member
Joined: January 22, 2008
Posts: 3842
Location: Eagle, ID/Sun Valley, ID
|
| Posted: Fri Dec 21, 2012 12:07 pm Post subject: |
|
|
Awesome Dustin. That sucks about the misrepresent.
This video is pretty darn humorous. You crack me up.
Link
B U E Ñ O
_________________
Happiness=Portland, Oregon in the rearview mirror! |
|
| Back to top |
|
|
Otmar
Samba Member

Joined: May 06, 2006
Posts: 71
Location: Corvallis, Oregon, USA
|
| Posted: Mon Dec 24, 2012 12:54 am Post subject: |
|
|
Fun Stuff!
Did you damage your main fuel filler tube also? If so, this is what my notes say I used to replace mine on the Stretch a few years ago: "19" length of Napa marked 041907 SAEJ30R6 EPB 78CN50 1-1/4" ID?" The OEM VW part was very expensive and not likely to hold up to biodiesel either. (Oh wait, I just looked it up and they suggest not using this for Bio, oh well, I blew it once again!)
I'm looking forward to following the progress of your conversion. I also have a Syncro front end (minus that steering shaft, but the rack may have to move forward more to fit my front motor anyway) waiting to go in my DOKA, but the front Syncro gear is all I'll need to swap since the rest is going to be two electric drive systems with no driveshaft, VC or fuel stuff. I'll have plenty of work with batteries and fast charging though...
_________________
-Otmar
Tesfalia: https://twitter.com/tesfalia
The '87 Westie for the mean time,
& Dad's old 1965 Transporter. |
|
| Back to top |
|
|
edgood1
Samba Member
Joined: September 30, 2004
Posts: 2049
Location: Plymouth, MA
|
| Posted: Thu Dec 27, 2012 6:58 pm Post subject: Re: Westy-->Syncro Build. Help from expirenced strippers |
|
|
| Jahbah wrote: |
the front subframe and everything attached, including
upper and lower control arms with ball joints
front diff with mounts
front axles with CV's
steering knuckles with bearings
front brakes
radius rod arms
shocks and springs
prop shaft
skid plate and rails
front exhaust header
muffler brackets
gas tank with vent lines
the gas filler neck and associated parts
transmission with mounts
shifter assembly and linkage
engine carrier bar (important not to forget this)
power steering rack with the metal it attaches to.
speedometer, cables and the little black box in between
if a rear locker you'll need the vacuum tank, all the lines and the controls on the dash.

-Anything missing from this list?
|
I put that list together a while back. One important thing missing from that list is the front mount for the fuel tank. On syncros there is an extra metal bracket that is welded in the gas tank well. Its not hard to fabricate your own and you may have to as this part is usually rusted to hell.
_________________
1987 Syncro Westfalia powered by Subaru
1963 Panel to Deluxe Bus project :::: (photo album)
'65 Westfalia |
|
| Back to top |
|
|
[email protected]
Samba Member
Joined: May 30, 2002
Posts: 12
|
| Posted: Fri Dec 28, 2012 6:37 pm Post subject: |
|
|
I have this issue too.
I found a syncro with a good engine, new tranny and new clutch for 6100.00. It has major cancer issues though with salt damage from being near the beach for 5 years.
I have the same year westfalia, mint, no rust.
Can I transfer the syncro parts to the 2 wheel drive westy to make it a 4 wheel drive syncro?
If so, am not that mechanical and would have to pay a mechanic to do most of the dirty work.
Would this be worth buying and transferring to make a nice syncro westy?
I could also sell all the extra parts and stuff if need be that I did not use to bring down some of the costs.
What do you all think? |
|
| Back to top |
|
|
edgood1
Samba Member
Joined: September 30, 2004
Posts: 2049
Location: Plymouth, MA
|
| Posted: Fri Dec 28, 2012 8:07 pm Post subject: |
|
|
| [email protected] wrote: |
Would this be worth buying and transferring to make a nice syncro westy?
I could also sell all the extra parts and stuff if need be that I did not use to bring down some of the costs.
What do you all think? |
to pay someone to do all that work would be very expensive. Kirk Meeks charges $5100 to do this job plus the cost of donor parts and refurbishment of above-said donor parts.
http://kirkmeeks.com/services/syncro_conversions
I wouldn't even talk to any mechanic who hasn't done this exact conversion in the past, or at the very least owns and works on syncros on a regular basis. I would expect the donor parts need at least $1000 in repairs and replacements.
I guess it comes down to how bad you need/want a syncro and how much you have to spend.
after you take all the syncro parts, the remaining donor parts wouldn't be worth that much. a few hundred at best.
_________________
1987 Syncro Westfalia powered by Subaru
1963 Panel to Deluxe Bus project :::: (photo album)
'65 Westfalia |
|
| Back to top |
|
|
Jahbah
Samba Member
Joined: July 27, 2011
Posts: 299
Location: McMenaminville, Oregon
|
| Posted: Sun Jan 20, 2013 2:41 pm Post subject: |
|
|
It's been awhile since I've checked in, mostly because progress has been slow. I have been getting quite carried away with the whole scope of the project, doing tons of reading and research. Most of my progress has been sitting up in the middle of the night with my wheels spinning. Couple of weeks into the new year I've finally got my feet back on the ground and I been trying to put the whole front end of this conversion out of my mind. This picture says a zillion words.....
I packed all of the Syncro specific parts and a few random parts onto a 48"x48" pallet. The height landed just under 40" and it weighted in total a whopping 1090lbs. I was thinking that it would be no more than 800lbs. I maybe used 100 pounds of newspaper and cardboard too, I decided to build a full box with plywood walls instead of cardboard which added to my weight. I used freightquote.com as a shipping broker, although they were pretty obnoxious to deal with as a onetime customer with a hair brained scheme. They came in pretty cheap at 450 bucks with 4500 bucks of insurance, for a full coast to coast shipment.
After unloading the contense of the pallet all over my garage, I've set to work on the rear end. I have worked pretty hard to not get carried away with proflex vs rubber bushings, rattle can vs powder coating, and speedo problems yet! That time will come.
My first step was to strip down the transmission and give it a full wire brush clean up. This sucker was dirty! I spent the better part of six hours scrubbing away on it. I wanted to make it as clean as possible to help out the rebuilding process. Living just outside of Portland there is no shortage of syncros and Syncro folks close by. I have had some excellent support from some local blokes. My new buddy Tom Lengyel agreed to run through my transmission and get it back into good working order. Depending on the how bad it is I might look at putting in a taller 4th gear to help keep my suby 2.5's rpms down. I can't wait to hear back from him, and get this project on the road!
In the mean time I have begun working on my Syncro fuel tank. I am not sure if I want to run the front fuel tank or the Syncro fuel tank for the few months I have the 2wd suspension in the front. Maybe both? I could fuel up once and drive half way across the country with 30 some odd gallons of gas!
My gaskets, check valves, fuel lines, insulation, straps and sender were all toasted, on the upside the plastic tank has no rust! Got all the rebuilding parts in the mail and have set to rebuilding the tank while I wait for the transmission.
I am currently scrubing down the tank and preparing it for new insulation. am going to use thermo guard insulation from my flaps and 3m spray adhesive. I hope to install my new fuel sender lines and gaskets and hoses on the tank thisweek. Depending on the state of the tranny I might land on dropping the 2wd trans next weekend.
Questions on the fuel tank! the bently doesnt show the sender side in the diagram. I have a small hole in the tank to the right of the sender any leads on where the hose is to be routed would be sweet. I assume it will be obvious when I get there but I have not found an answer yet.
Otmar- we have crossed paths, I followed you to the showing of the van movie in portland. We cruized to the roof top.... if your in mcminnville give me a shout. I'll look you up when I head down your way.
mloan- if you happen back to this thread I would tell you to be very careful. the cost of your donor is high and the leg work to sell all those parts? It seems to me that the labor for this job is huge! its a labor of love or a very expensive check to write. I would only trust people who have done this project before to chop up your mint westy. Mine is a well polished turd pulled out of the woods so I don't feel too bad doing it.
_________________
'87 Westfalia Weekender + '86 Syncro Tintop +'02 Impreza 2.5RS
= '86.5 SuperWestySyncroSubyWeekendermobileagon =
Bueno.
Jahbah~D |
|
| Back to top |
|
|
Jahbah
Samba Member
Joined: July 27, 2011
Posts: 299
Location: McMenaminville, Oregon
|
| Posted: Sun Feb 10, 2013 4:27 pm Post subject: |
|
|
It continues on.......
I have amassed far too many Vanagon parts in my garage. Between the engine conversion and this on going driveline conversion I have at least one of each of everything but the frame.
This project have been moving very slowly, but finally is beginning to heat up! The transmission has be completed, nothing totally major was broken but many little things that seemed to add up quickly. Tom Lengyel appeared to do a great job and was very awesome at explaining what he did and why. He sent me away with Synotec gear lube and a rattle can of special tranny rust inhibitor and a blown (3/4) slider and a input shaft bearing that will be cool on my desk at work.
I have begun working on the fuel filler and gas tank assembly hoping to put the transmission in the van next weekend. First off was pulling apart the gas cap, I cleaned it all up and shaved down the tumbler lock mechanism as to work with my van key instead of the old one. Then I greased it back up and slapped it back together.
It runs super smoothly now I removed the 25 years of ick out.
I have to weld in the syncro gas tank mount, this is where tank is strapped to. Here is mine.... On the right
The mount was rusted out pretty badly, so I decided to replace it now so I don't have to think about it again. The local fab shop wanted 135 bucks to press the 16 ga steel into a replica. It seemed a bit steep so I bought the steel for two-fiifty and bent it with the forklift at work. Not quite as pretty but ill save the 132 bucks for bushings for the suspension.
The other piece I completed was the filler assembly. I cut out the sheet metal off on my donor Syncro to use as a template as to where the filler should go, but the location of the tail light was way off! I got the correct measurements from a buddy and away I went. Masking tape is suppose to help protect the paint, so the area was covered.
It was really hard to actually cut my van, but after 100 measurements the dremmel did the trick, I worked slowly moving from place to place to avoid heating the metal too much. Hole cut!
I used pop rivets instead of welding. I have done some painting and I wanted to avoid painting the body as much as possible. I used some undercoating to sandwich the filler box to the inside of the sheetmetal. I also found that the box and the down pipe that runs into the wheel well need to come apart to fit the box in behind the panel.
And done!
Cutting out the sheet metal for filler box didn't help line up the box for me, but cutting out the wheel well area was a big help. The filler down tube runs through the wheel well and that sheet metal has channels that make a great template to cut the hole in the right spot.
I have run into a bit of a problem maybe someone could chime in. There is a steel tube that connects the filler to the tank. It is attached to the frame with a sheet metal screw. I was brushing mine up for paint and found a pin hole. This tube holds gas and I assume when the tank is full has standing fuel in it. Is there harm in buying a longer rubber hose that could run from the filler box all the way to the tank? It could be well coated with undercoating and the current configuration leaves the filler hose in harms was right behind the tire.
Any ideas would be great! I could buy a new steel pipe and bend it into place, but the Oem has a special flange on it.
I'm also still stumped on the small hole I have next to the gas tank sender. It had a hose running to it but I'm not sure where it goes. The Bentley photo is quite ambiguous and short on words.
Thanks fur reading!
Cheers
Jahbah-D
_________________
'87 Westfalia Weekender + '86 Syncro Tintop +'02 Impreza 2.5RS
= '86.5 SuperWestySyncroSubyWeekendermobileagon =
Bueno.
Jahbah~D |
|
| Back to top |
|
|
Farfrumwork
Samba Member

Joined: October 10, 2008
Posts: 692
Location: Mile High
|
| Posted: Tue Feb 12, 2013 5:05 pm Post subject: |
|
|
Sweet man! nice progress!
Question:
"I also found that the box and the down pipe that runs into the wheel well need to come apart to fit the box in behind the panel"
Did you just cut the weld to release the tube from the box? and then how did you re-connect them? or is it just held in place between the wheel well weld and the riveted box? I've been wondering how to fit the box/tube into my van through a small hole (smaller than the box demensions anyway..)
I'm going to rivet mine as well. This week I hope (if I can sneek away from work for an afternoon)
_________________
sold  -> '85 Wolfsburg Syncro / 'Built' DOHC EJ25 (a great machine!) -> '85 Wolfsburg Syncro / 'Built' DOHC EJ25 (a great machine!)
'07 Legacy spec.B, road tuned stgII
'17 4x4 Sprinter, stone grey, SMB pop-top, on 33"s
"Blood stains, speed kills - Fast cars, cheap thrills - Rich girls, fine wine - I've lost my sense, I've lost control, I've lost my mind" |
|
| Back to top |
|
|
Jahbah
Samba Member
Joined: July 27, 2011
Posts: 299
Location: McMenaminville, Oregon
|
| Posted: Wed Feb 13, 2013 3:57 pm Post subject: |
|
|
Hey thanks for the encouragement.
I've been trapped in a bottle neck, trying to figuring out the gas tank support. I don't have a welder at home and the transmission needs to be removed to weld in that support. So I'm my have to call in a welding service to make a house call.
As for your question: I just ground the spot welds down flat and drilled them out. You cannot fit the filler box into that spot without removing the elbow pipe. I bet you could get away with tacking only the elbow to the wheel well, but I welded the elbow back on to the box too.
Take care with your cutting you can scorch that paint easily and the plastic cover barely gives you space for the rivets( let alone scorched paint). I cut the hole big enough for the plastic cover to fit in, not the size of the filler box. If that makes sense to you. You can always cut it bigger! Good luck!
_________________
'87 Westfalia Weekender + '86 Syncro Tintop +'02 Impreza 2.5RS
= '86.5 SuperWestySyncroSubyWeekendermobileagon =
Bueno.
Jahbah~D |
|
| Back to top |
|
|
Farfrumwork
Samba Member
Joined: October 10, 2008
Posts: 692
Location: Mile High
|
| Posted: Wed Feb 13, 2013 4:36 pm Post subject: |
|
|
^ that makes sense. Yes, I was going to cut MY van close to the perimeter inner opening of the metal box, so the plastic cover just fits in the hole.
In my research I found others (frankensyncrosuby and syncroghia) just mounted small angle "L"s to the crossmember for the tank support. Short sections (2-3" wide) on each side, enough for a nut on the top side to screw the tank straps onto. At least fankensyncro.... did not use any of the big 'support' that the stock syncro came with welded to the body.
Still debating what to do there - but frankensyncro... drives the hell out of his, and if isn't a problem for him it most definitely won't be for me. that tank is really jammed in there and held tight to the upper rail.
I do like your formed support  - I could make one at work pretty easily if I feel the need when I get there. - I could make one at work pretty easily if I feel the need when I get there.
_________________
sold -> '85 Wolfsburg Syncro / 'Built' DOHC EJ25 (a great machine!)
'07 Legacy spec.B, road tuned stgII
'17 4x4 Sprinter, stone grey, SMB pop-top, on 33"s
"Blood stains, speed kills - Fast cars, cheap thrills - Rich girls, fine wine - I've lost my sense, I've lost control, I've lost my mind" |
|
| Back to top |
|
|
jsmitch11
Samba Member
Joined: July 02, 2011
Posts: 337
Location: Seattle, WA
|
| Posted: Wed Feb 13, 2013 5:15 pm Post subject: |
|
|
| Jahbah wrote: |
Hey thanks for the encouragement.
I've been trapped in a bottle neck, trying to figuring out the gas tank support. I don't have a welder at home and the transmission needs to be removed to weld in that support. So I'm my have to call in a welding service to make a house call.
As for your question: I just ground the spot welds down flat and drilled them out. You cannot fit the filler box into that spot without removing the elbow pipe. I bet you could get away with tacking only the elbow to the wheel well, but I welded the elbow back on to the box too.
Take care with your cutting you can scorch that paint easily and the plastic cover barely gives you space for the rivets( let alone scorched paint). I cut the hole big enough for the plastic cover to fit in, not the size of the filler box. If that makes sense to you. You can always cut it bigger! Good luck! |
On my syncro conversion I was able to fit the filler box with the elbow attached. I never cut the elbow off of the filler box...it just took some finessing to get it in.
I was just looking at pics of mine and I cut the whole larger then you did and welded in the whole factory whole(with the lip). I am guessing the bigger hole is what allowed me to put the filler box and elbow in as one piece.
_________________
1984 Vanagon Westfalia Syncro Hightop
1986 Vanagon Syncro(RIP)
1989 Vanagon Wolfsburg Whitestar Edition(RIP)
My Van syncro conversion/restoration
http://www.thesamba.com/vw/forum/viewtopic.php?t=535730&highlight=black+diamond |
|
| Back to top |
|
|
|


