| Author |
Message |
stever70
Samba Member

Joined: October 30, 2009
Posts: 302
Location: california

|
|
| Back to top |
|
 |
ernie norley
Samba Member
Joined: September 27, 2009
Posts: 170
Location: nambour australia
|
 Posted: Mon Aug 17, 2015 2:34 pm Post subject: Posted: Mon Aug 17, 2015 2:34 pm Post subject: |
 |
|
| G'day all. Been a bit slow over here. I have been doing home renovations. The engineer built the left side drive shaft out of the outer rodeo spline section & the diff flange spline from the commodore diff. It is spigoted using 20 mm long by 13 mm spigot into the commodore section. Will post a pic soon [/img] |
|
| Back to top |
|
|
Tcash
Samba Member

Joined: July 20, 2011
Posts: 12844
Location: San Jose, California, USA
|
| Posted: Mon Aug 17, 2015 6:23 pm Post subject: |
|
|
Nice to hear from you. Get er done.
Good Luck
Tcash |
|
| Back to top |
|
|
ernie norley
Samba Member
Joined: September 27, 2009
Posts: 170
Location: nambour australia
|
| Posted: Wed Sep 30, 2015 4:04 am Post subject: |
|
|
G'day all. been a bit slow on build. A bathroom renovation & pool repairs have been taking up time. here's a pic of the left front drive shaft
I have changed the steering rack over to Audi centre steer type
These are the Daewoo steering arms with the rubber bush cut off & & threaded to take Astra outer tie rod ends. the arms were 3inches to short with the long tierod ends it is now long enough
|
|
| Back to top |
|
|
ernie norley
Samba Member
Joined: September 27, 2009
Posts: 170
Location: nambour australia
|
| Posted: Sun Jan 10, 2016 1:19 am Post subject: Re: aussie project 4x4 bay |
|
|
Gday all. bit of an update. picked up this curved tube to use for the E30 BMW manual pedal assembly. Our right hand drives have a connecting rod that goes acroos the inside the firewall from the pedal to the booster mounted on the left side.
|
|
| Back to top |
|
|
stever70
Samba Member
Joined: October 30, 2009
Posts: 302
Location: california
|
| Posted: Wed Feb 03, 2016 4:41 pm Post subject: Re: aussie project 4x4 bay |
|
|
Nice to see that you are still working on it 
_________________
my build log
http://offroadvwbus.blogspot.com/ |
|
| Back to top |
|
|
jokgel
Samba Member
Joined: October 10, 2015
Posts: 47
Location: North-Germany
|
| Posted: Thu Feb 04, 2016 2:49 pm Post subject: Re: aussie project 4x4 bay |
|
|
great work !! I found a few pictures from my car
on your website images  . . |
|
| Back to top |
|
|
ernie norley
Samba Member
Joined: September 27, 2009
Posts: 170
Location: nambour australia
|
| Posted: Sun Feb 21, 2016 2:44 am Post subject: Re: aussie project 4x4 bay |
|
|
G'day jokgel & followers. I have been catching up after working on the home. So here's where I'm up to I have the front diff sitting on the beam & have built the rear mounting crossmember. It will bolt through the chassis rails & on to the top of the housing. I plan on lifting the engine & transmissions up 2 inches to get some clearance under the transfer case.
Axle shafts line up nice with hubs
|
|
| Back to top |
|
|
jokgel
Samba Member
Joined: October 10, 2015
Posts: 47
Location: North-Germany
|
|
| Back to top |
|
|
ernie norley
Samba Member
Joined: September 27, 2009
Posts: 170
Location: nambour australia
|
| Posted: Sun Feb 21, 2016 4:06 pm Post subject: Re: aussie project 4x4 bay |
|
|
| G'day Jokgel Thankyou for the video. did you have a problem with flexing on the steering rods to require the rod for support. I have decided to use Audi A4 steering rack as it's a lot smaller. |
|
| Back to top |
|
|
ernie norley
Samba Member
Joined: September 27, 2009
Posts: 170
Location: nambour australia
|
| Posted: Sun Feb 21, 2016 10:57 pm Post subject: Re: aussie project 4x4 bay |
|
|
Can you tell me the size of your wheels & tyres please maybe a photo |
|
| Back to top |
|
|
jokgel
Samba Member
Joined: October 10, 2015
Posts: 47
Location: North-Germany
|
| Posted: Mon Feb 22, 2016 1:29 am Post subject: Re: aussie project 4x4 bay |
|
|
Hi ernie norley , Yes I can , rims are 6 x 15 ET 30 and the tires 195 /80/ 15
ET ,,, I 'm not sure... exactly 60 mm from the front edge of the rim to initially screw flange . |
|
| Back to top |
|
|
ernie norley
Samba Member
Joined: September 27, 2009
Posts: 170
Location: nambour australia
|
| Posted: Tue Feb 23, 2016 1:30 am Post subject: Re: aussie project 4x4 bay |
|
|
| jokgel wrote: |
Hi ernie norley , Yes I can , rims are 6 x 15 ET 30 and the tires 195 /80/ 15
ET ,,, I 'm not sure... exactly 60 mm from the front edge of the rim to initially screw flange . |
thankyou for the information. Very nice tyre rim combination. |
|
| Back to top |
|
|
ernie norley
Samba Member
Joined: September 27, 2009
Posts: 170
Location: nambour australia
|
| Posted: Sat Apr 30, 2016 6:24 pm Post subject: Re: aussie project 4x4 bay |
|
|
G'day all. bit of an update. I have cut the Range Rover alloy tank to allow it to sit in the original tank space this will allow me to run the radiator in the rear of the engine compartment. I have the Audi steering bracket sorted. this will weld to the right hand side of the frame to support the end along with an angle 1 for the left side support
these are the street tyres & rims the rims were $2 each & the powder coating a swap for a rat roof rack & seat slides for the floor
I have just about finished the wiring harness for the engine just waiting for an OBD 1 plug for tune. I'm looking at fitting a OBD11 plug as well to run the HUD system
This is the combination ECU fuse box location. It's mounted to the side of the engine box
I tried to get the transmission tunnel & front engine box cover folded no companies were interested what they called a complicated set of folds & curves. Armed with a couple of G clamps a rubber mallet grinder & the trailer frame I set about making it. there's a taper of 9 cm front down to 7cm on the sides. I started with the tyre under the front wheel between 2 pieces of 4x3 & let the jack down on it to start the curve process. I then placed it on a rim & tyre & pulled it down with a strap. & the mallet. once I achieved a basic curve I the folded the corners to form the sides of the tunnel.
Now for the front engine cover this was a little more complicated 1st make 2 cuts then fold in such a way as to form an angle between the floor & the top of the housing tapering towards he engine at the top.
Now to fold the taper for the top & retain the same curved corner
This is the shape I was hoping for. I have to trim the flat flanges back after it's welded on the cuts. Note how it follows the taper of the wall behind the seats
[/img]
I'm rotating the throttle body housing 180deg to allow the air inlet to face to the right side of the engine box to allow for fresh air inlet & Air filter pod to be housed in a box as required by our laws. I/m contemplating placing a air scoop on the side of the body to create flow.
|
|
| Back to top |
|
|
ernie norley
Samba Member
Joined: September 27, 2009
Posts: 170
Location: nambour australia
|
| Posted: Mon Jul 04, 2016 5:05 am Post subject: Re: aussie project 4x4 bay |
|
|
G'day all. small update. Over here in Australia we have to apply to a certified Engineer to have our modifications inspected as we proceed through the build. I had an inspection all good to continue to build. I sent the fuel tank in to have it welded up after having new inlet pipe fittings made & a swirl tank made out of a bit of junkyard stuff. The person who built the tank originally had the pickup pipe 2 inches from the bottom of the tank no filter on it & no swirlpot.
This is the shape it will be when finished. It will slide into the shelf the original tank sat in giving me room for the radiator & leave the batteries where they are
[/list]
A bit of off topic I started to set up the Watts linkage & frame work to support it on my 2nd project a rover v8 powered trike
|
|
| Back to top |
|
|
ernie norley
Samba Member
Joined: September 27, 2009
Posts: 170
Location: nambour australia
|
| Posted: Wed Aug 24, 2016 3:49 am Post subject: Re: aussie project 4x4 bay |
|
|
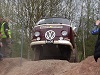
G'day all. I have been updating the front suspension to coilovers off a 2016 Ford Ranger. the owner had them replaced with heavy duty parts. I was lucky to get them from local tip recycle shop for $10. for the 2 front & Gas rear dampers. Pics will explain the set up & why I have decided to use them. With the adjusters turned all the way down to load up the angles on the Ball joints when I let the jack down this was how far the torsion bar front beam sagged. Note the tyre contact.
coilovers fitted
This was the original plan to mount straight onto bottom damper stud. But some of the well known VW people Questioned the idea as far strength of the bottom stud into the arm.
|
|
| Back to top |
|
|
DenverB
Samba Member

Joined: July 23, 2012
Posts: 704
Location: Denver, Colorado
|
| Posted: Wed Aug 24, 2016 8:16 am Post subject: Re: aussie project 4x4 bay |
|
|
god bless Australia.
_________________
-------
'77 Transporter/camper (Bussy - Reef Blue/Pastel White)
'67 bug (Santos - VW Blue)
'84 Vanagon Westfalia (Pink Flamingo - Pastel White/Pink)
'88 Vanagon GL Westfalia (Frankie Says - Wolfram Gray)
'02 Eurovan Weekender (Green Apple)
'95-'03 Eurovan full campers and weekenders (rental fleet)
'84 -'91 Vanagon full campers and weekenders (rental fleet)
'72 Porsche 914 (Greta - RIP)
www.RockyMountainCampervans.com |
|
| Back to top |
|
|
ernie norley
Samba Member
Joined: September 27, 2009
Posts: 170
Location: nambour australia
|
| Posted: Thu Aug 25, 2016 3:31 am Post subject: Re: aussie project 4x4 bay |
|
|
| G'day all. Thanks for the blessing DenverB. I need all the help I can get. |
|
| Back to top |
|
|
kombicol
Samba Member
Joined: January 11, 2008
Posts: 212
Location: Perth Australia - Now in Texas y'all
|
| Posted: Tue Sep 20, 2016 7:54 pm Post subject: Re: aussie project 4x4 bay |
|
|
Ernie,
Good to see your still pluggin away at this. Who is your engineer??
RE clearance, more than one way to skin that cat...
Have you considered dropping the beam in the body either by boxing the frame like John Alder used to do?
Perhaps simpler just dropping the tubes relative to the 4 bolt holes the end plates you had made. Could move them forward too a bit whilst your going?
Do you really need that front jack point anyway??? If you need to lift it, it is probably not gonna be from there. Put a couple of slots for a Wallaby jack on your front and rear bumpers and just cut em off. |
|
| Back to top |
|
|
williamM
Samba Member
Joined: August 07, 2008
Posts: 4333
Location: southwest Arizona
|
| Posted: Wed Sep 21, 2016 8:17 am Post subject: Re: aussie project 4x4 bay |
|
|
 Glad to see your still on it- can we get a current body shot- Thanks Bill. Glad to see your still on it- can we get a current body shot- Thanks Bill.
_________________
some days I get up and just sit and think. Some days I just sit.
opinion untempered by fact is ignorance.
Don't step in any! |
|
| Back to top |
|
|
|


