| Author |
Message |
ajbsd
Samba Member

Joined: May 08, 2004
Posts: 168

|
 Posted: Sat May 11, 2013 10:45 pm Post subject: Wind wing Rubber Install Posted: Sat May 11, 2013 10:45 pm Post subject: Wind wing Rubber Install |
 |
|
| I'm in the process of installing a new windwing on my split. Is there a trick to intalling the new rubber weather strip here? I've been struggling for about two hours now and have gotten nowhere! Anyone have any tips for this? Thank you in advance for your help. |
|
| Back to top |
|
 |
joe cool
Samba Member

Joined: August 20, 2006
Posts: 1259
Location: Yolo County CA
|
| Posted: Sat May 11, 2013 11:40 pm Post subject: |
|
|
| I think you need to borrow or build a plywood form and some clamps to reassemble this. There are some useful threads on samba that discuss it. Do some searching. |
|
| Back to top |
|
|
Campy
Samba Member
Joined: January 10, 2005
Posts: 4933
Location: Chico, CA
|
| Posted: Sun May 12, 2013 3:08 am Post subject: |
|
|
It was not easy to do but I used a somewhat thicker crochet needle to install the seals while I was on my bed.
_________________
Don't worry; be happy. (Baba) |
|
| Back to top |
|
|
Krustybus
Samba Member
Joined: February 16, 2004
Posts: 442
Location: SE Michigan
|
|
| Back to top |
|
|
ajbsd
Samba Member
Joined: May 08, 2004
Posts: 168
|
| Posted: Sun May 12, 2013 6:59 pm Post subject: |
|
|
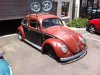
This is the sucker! Any suggestions? |
|
| Back to top |
|
|
1967VWbus
Samba Member
Joined: December 29, 2012
Posts: 42
Location: Iowa
|
| Posted: Sun May 12, 2013 7:05 pm Post subject: |
|
|
| Installing those seals is a sucky job! It took me hours to get them in. I found that heating the seals in hot water makes them more pliable and easier to install but I am not a professional and am only speaking from my own experience. |
|
| Back to top |
|
|
Braukuche
Samba Member
Joined: September 03, 2004
Posts: 10999
|
| Posted: Sun May 12, 2013 8:41 pm Post subject: |
|
|
| 1967VWbus wrote: |
| Installing those seals is a sucky job! It took me hours to get them in. I found that heating the seals in hot water makes them more pliable and easier to install but I am not a professional and am only speaking from my own experience. |
I use silicone spray and a dull flat screw driver. Give th seal a liberal coating with the spray, angle one side in the channel and then pry the other side in.
_________________
Go Reds! Smash state!
Retirement is here!
1956 Ghia
1959 SO-23 Westfalia
1960 double cab
1960 Baja Bug
1963 stretched double cab
1962 Golde sunroof Ghia
1963 356 B coupe
1963 Notchback
1967 21 window less rusty now |
|
| Back to top |
|
|
zozo
Samba Member

Joined: October 15, 2005
Posts: 5217
Location: South of Ol' San Antonio
|
| Posted: Sun May 12, 2013 8:47 pm Post subject: |
|
|
| I used Popsicle sticks and silicone spray. |
|
| Back to top |
|
|
ajbsd
Samba Member
Joined: May 08, 2004
Posts: 168
|
| Posted: Sun May 12, 2013 9:45 pm Post subject: |
|
|
| Thanks guys! I'll give the silicone spray a go. I put a little bit of white grease in the frame channel but thats not helping, its just making a mess and getting everywhere. Got the dull flat head screw driver and popsicle sticks on the job as well. Bottom part is seated, now I'm at the bottom corner and nothing is moving so its off to Ace Hardware for a can of silicone spray! |
|
| Back to top |
|
|
Campy
Samba Member
Joined: January 10, 2005
Posts: 4933
Location: Chico, CA
|
| Posted: Sun May 12, 2013 9:54 pm Post subject: |
|
|
All I know is that a crochet needle did it for me. Get out your knitting bag and try it
_________________
Don't worry; be happy. (Baba) |
|
| Back to top |
|
|
splitpile
Samba's Worst Speller
Joined: May 03, 2000
Posts: 5927
Location: back to living where hell meets the suface
|
| Posted: Mon May 13, 2013 12:01 am Post subject: |
|
|
| ajbsd wrote: |
This is the sucker! Any suggestions? |
There are tricks and areas that need to be trimmed with a razor blade before install. You can call bustoration.com and I'll give you the 5 minute rundown on what and where to cut, after 10 am az time
_________________
Stocking distributor of "The Funky Green Panels"
www.BUSTORATION.com metal and more for your bus
"no more hacking my sig line" |
|
| Back to top |
|
|
porscheforu
Samba Member
Joined: November 02, 2009
Posts: 35
Location: Sun Valley, ID
|
| Posted: Mon May 13, 2013 1:54 pm Post subject: |
|
|
I just went through this also. It took a few hours per side, but I found the best method was to not lube it, set the frame upright on a bench with it supported under your armpit, a flat dull screwdriver, and lots of pushing with your fingers. I had sore fingers for several days after, but it takes a superhuman effort at pushing the rubber in one side, then the other. You can see the slot that the rubber has to go in to, so go after it.
Good luck.
Ned |
|
| Back to top |
|
|
ajbsd
Samba Member
Joined: May 08, 2004
Posts: 168
|
| Posted: Mon May 13, 2013 3:15 pm Post subject: |
|
|
| OK, I tried the silicone spray lube and it makes it more dificult to stay put once its in place! It just slips right back out of the groove and I'm back to the begining! What a piece of work this frickin project turned out to be! I'm about ready to blow a gasket here!!! |
|
| Back to top |
|
|
hitest
Samba Member

Joined: September 30, 2008
Posts: 10296
Location: Prime Meridian, ID
|
| Posted: Mon May 13, 2013 4:06 pm Post subject: |
|
|
Did you read Ronnie's post? I thought I got all the extra flashing off my 2nd seal install, but didn't (remember that stuff you had to trim to get your plastic model parts off their trees as a kid?). Wow was it hard. What sucked was pulling it loose to start over when I only had an inch of stubbornness to deal with.
That molding flashing is the only thing in the way. Work side to side- not lengthwise on the seal, ie: push an inch along the inside, inch along the opposite outside section, etc. It will take a hard press in the center to get it seated in the inner channel.
_________________
| EverettB wrote: |
I wonder what the nut looks like.
|
'62 L390 151, '62 L469 117, '63 L380 113, '64 L87 311, '65 L512 265, '65 L31 SO-42, '66 L360 251, '68 L30k 141, '71 L12 113, '74 ORG 181
FU#5 |
|
| Back to top |
|
|
OvalinAz
Samba Mini Tech
Joined: June 09, 2009
Posts: 1076
Location: AZ
|
|
| Back to top |
|
|
M183kombi
Samba Member

Joined: February 01, 2008
Posts: 288
Location: Kearns, UT
|
| Posted: Mon May 13, 2013 6:14 pm Post subject: |
|
|
Once I had areas in I wrapped black tape around them to keep them in place while I worked on the next area...the vent wing window seal goes in at an angle...put the bottom in first and push the top in second...
_________________
1960 L31 M183 kombi |
|
| Back to top |
|
|
1967VWbus
Samba Member
Joined: December 29, 2012
Posts: 42
Location: Iowa
|
| Posted: Mon May 13, 2013 7:15 pm Post subject: |
|
|
| Using tape sounds like a good idea! I wrestled with it for quite some time and finally heated a big pot of water and set them in the hot water. They became Rey pliable and with a little persuasion they finally went in. Maybe some mixture of all of the above might be best. |
|
| Back to top |
|
|
ajbsd
Samba Member
Joined: May 08, 2004
Posts: 168
|
| Posted: Mon May 13, 2013 7:48 pm Post subject: |
|
|
| OK, got it in!!! I spoke to Ronnie today and his tips worked. Thank you Ronnie, it only took me an hour compared to your 15 minutes but I went over to the local Safelite shop, the guy there was cool as ice and gave me two glazing tools. After trimming as instructed I tried installing it using dish soap for lube but couldn't keep the bottom part in as it went around the corner so took it out, cleaned it, dried it and went for it again and after a few cuss words and a lot of poking, prodding and pinching it was in! Thanks again for everyones comments and I hope this lession can be helpful for the next guy. Time for a beer. Cheers! |
|
| Back to top |
|
|
Braukuche
Samba Member
Joined: September 03, 2004
Posts: 10999
|
| Posted: Mon May 13, 2013 9:44 pm Post subject: |
|
|
| ajbsd wrote: |
| OK, got it in!!! I spoke to Ronnie today and his tips worked. Thank you Ronnie, it only took me an hour compared to your 15 minutes but I went over to the local Safelite shop, the guy there was cool as ice and gave me two glazing tools. After trimming as instructed I tried installing it using dish soap for lube but couldn't keep the bottom part in as it went around the corner so took it out, cleaned it, dried it and went for it again and after a few cuss words and a lot of poking, prodding and pinching it was in! Thanks again for everyones comments and I hope this lession can be helpful for the next guy. Time for a beer. Cheers! |
So what did you have to do to install it? Inquiring minds want to know.
_________________
Go Reds! Smash state!
Retirement is here!
1956 Ghia
1959 SO-23 Westfalia
1960 double cab
1960 Baja Bug
1963 stretched double cab
1962 Golde sunroof Ghia
1963 356 B coupe
1963 Notchback
1967 21 window less rusty now |
|
| Back to top |
|
|
splitpile
Samba's Worst Speller
Joined: May 03, 2000
Posts: 5927
Location: back to living where hell meets the suface
|
| Posted: Mon May 13, 2013 11:37 pm Post subject: |
|
|
| Braukuche wrote: |
| ajbsd wrote: |
| OK, got it in!!! I spoke to Ronnie today and his tips worked. Thank you Ronnie, it only took me an hour compared to your 15 minutes but I went over to the local Safelite shop, the guy there was cool as ice and gave me two glazing tools. After trimming as instructed I tried installing it using dish soap for lube but couldn't keep the bottom part in as it went around the corner so took it out, cleaned it, dried it and went for it again and after a few cuss words and a lot of poking, prodding and pinching it was in! Thanks again for everyones comments and I hope this lession can be helpful for the next guy. Time for a beer. Cheers! |
So what did you have to do to install it? Inquiring minds want to know. |
I will make a go pro video next time I do one (in the month or so) and post it somewhere. I guess maybe I should put up all the vids I've made on instalation processes. I do them right or wrong whatever way I do things seem to work and I hope they will help people and the haters just stay away.
_________________
Stocking distributor of "The Funky Green Panels"
www.BUSTORATION.com metal and more for your bus
"no more hacking my sig line" |
|
| Back to top |
|
|
|

