| Author |
Message |
RASTAVAN
Samba Member

Joined: June 23, 2013
Posts: 165
Location: NEW SMYRNA BEACH, FL

|
 Posted: Thu Dec 05, 2013 5:23 pm Post subject: the windsheild rust repair continues..........picts Posted: Thu Dec 05, 2013 5:23 pm Post subject: the windsheild rust repair continues..........picts |
 |
|
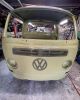
what a pain my patooty! i had nooo idea that id have to cut apart my funky green repair panel to make it fit! i thought it was a direct replacement, no muss, no fuss! i was at least a 1/4" off the window post when i line the windshield wiper holes up eitherside. then once i got the holes lined up the post area on the repair panel wouldnt line up without twisting the round front out of position. so i cut that off and put it where it needed to be. made sure my body lines lined up and there ya have it. i gotta weld on those ears that wrap around the sill and nose. any suggestions on how to "wrap" them?
|
|
| Back to top |
|
 |
airschooled
Air-Schooled

Joined: April 04, 2012
Posts: 12728
Location: on a bike ride somewhere
|
| Posted: Thu Dec 05, 2013 5:37 pm Post subject: |
|
|
I have no idea how to comment on bodywork, but I will ask:
Will the wiper holes line up with the wiper mechanism after you've moved the front holes around?
_________________
Learn how your vintage VW works. And why it doesn't!
One-on-one tech help for your Volkswagen:
www.airschooled.com |
|
| Back to top |
|
|
RASTAVAN
Samba Member
Joined: June 23, 2013
Posts: 165
Location: NEW SMYRNA BEACH, FL
|
| Posted: Thu Dec 05, 2013 6:19 pm Post subject: |
|
|
| asiab3 wrote: |
I have no idea how to comment on bodywork, but I will ask:
Will the wiper holes line up with the wiper mechanism after you've moved the front holes around? |
the only constant was the w/w holes. i made sure that the mechanism did line up. |
|
| Back to top |
|
|
notchboy
Samba Member

Joined: April 27, 2002
Posts: 22463
Location: Escondido CA
|
| Posted: Thu Dec 05, 2013 7:14 pm Post subject: |
|
|
I feel your pain - sort of. I had my bus recently pained. The painter also fixed my front windshield as you did with the same problems. Shitty part was he cut the section out of the bus the size of the green panel only to be let down as you are. He had used other green panels in the past with no problems - so he thought Gerson had this right as well. But unfortunately he didnt.
So my painter had to re do the whole thing spending twice- three times the effort to get it right - back tracking on his work.
In the end I got a good job - but the painter had to eat some hours fabbing that shit to fit.
_________________
| t3kg wrote: |
OK, this thread is over. You win. |
Jason "notchboy" Weigel
1964 1500 S
1964 T34 S Convertible
1977 Westfalia Camper pop-top |
|
| Back to top |
|
|
RASTAVAN
Samba Member
Joined: June 23, 2013
Posts: 165
Location: NEW SMYRNA BEACH, FL
|
| Posted: Thu Dec 05, 2013 7:43 pm Post subject: i think i made a booboo........ |
|
|
looking at picts of other buses and then looking at my repair, i think i lost the "bubble" bodyline on the very front of the bus! crap!   |
|
| Back to top |
|
|
Joey
Samba Member

Joined: August 12, 2005
Posts: 5366
Location: Nova Scotia - Canada
|
| Posted: Thu Dec 05, 2013 7:49 pm Post subject: |
|
|
I don't understand why you had to cut the piece up so much. The only place I cut mine was the at top of the pillar ends.
_________________
Joey
60 Kombi - '74 Bus - '79 Panel - '65 Beetle |
|
| Back to top |
|
|
Joey
Samba Member
Joined: August 12, 2005
Posts: 5366
Location: Nova Scotia - Canada
|
| Posted: Thu Dec 05, 2013 7:56 pm Post subject: Re: i think i made a booboo........ |
|
|
| RASTAVAN wrote: |
| looking at picts of other buses and then looking at my repair, i think i lost the "bubble" bodyline on the very front of the bus! crap! |
I welded mine in on the body line as well. I wasn't worried about the look of the finished product though... I just needed it fixed!
This is how I'll be welding it in the next time I do it...
_________________
Joey
60 Kombi - '74 Bus - '79 Panel - '65 Beetle |
|
| Back to top |
|
|
skills@eurocarsplus
Samba Peckerhead

Joined: January 01, 2007
Posts: 16883
Location: sticksville, ct.
|
| Posted: Thu Dec 05, 2013 8:31 pm Post subject: |
|
|
i used the panel, with no real problems.
here are a few tips for those of you who care to listen
NEVER ASSUME any panel is correct...ever
always cut the old area out on the small side. this will allow you to trim the body away to match the panel
NEVER cut body lines away...ever. as you will find out, the door gap is going to look like shit. also, try to leave the belt line up about 1/4 inch so you don't disturb the factory line
so, now that you have had a taste of what can happen, paying a pro looks like a good deal, don't it? (except for notchboy's guy. shame on him for jumping in head first. fitting panels takes a shit ton of time)
this is how you should do it (bottom of this post)
http://www.thesamba.com/vw/forum/viewtopic.php?t=5...p;start=80
_________________
| gprudenciop wrote: |
my reason for switching to subaru is my german car was turning chinese so i said fuck it and went japanese....... |
| Jake Raby wrote: |
| Thanks for the correction. I used to be a nice guy, then I ruined it by exposing myself to the public. |
| Brian wrote: |
| Also the fact that people are agreeing with Skills, it's a turn of events for samba history |
|
|
| Back to top |
|
|
germansupplyscott
Samba Member

Joined: May 22, 2004
Posts: 7094
Location: toronto
|
| Posted: Thu Dec 05, 2013 9:14 pm Post subject: |
|
|
i've used the klassicfab lower windshield panel several times and it has fit perfectly each time. i don't understand why there are two 10mm gaps in the green panel.
one thing skills says above, and i will reiterate, is that you usually don't need to use the whole repair panel when doing this lower windshield job. you can section the green metal into the bus seamlessly and end up with a better repair due to maintaining most, if not all of the original body lines.
_________________
SL |
|
| Back to top |
|
|
notchboy
Samba Member
Joined: April 27, 2002
Posts: 22463
Location: Escondido CA
|
| Posted: Thu Dec 05, 2013 11:03 pm Post subject: |
|
|
Mine had to be widened by at least a half inch. And yes my body guy was pissed because he knew better. He was going off of other gerson fitments. It was an ill fitting part. Bad batch?
_________________
| t3kg wrote: |
OK, this thread is over. You win. |
Jason "notchboy" Weigel
1964 1500 S
1964 T34 S Convertible
1977 Westfalia Camper pop-top |
|
| Back to top |
|
|
notchboy
Samba Member
Joined: April 27, 2002
Posts: 22463
Location: Escondido CA
|
|
| Back to top |
|
|
RASTAVAN
Samba Member
Joined: June 23, 2013
Posts: 165
Location: NEW SMYRNA BEACH, FL
|
| Posted: Fri Dec 06, 2013 5:01 am Post subject: |
|
|
| Joey wrote: |
I don't understand why you had to cut the piece up so much. The only place I cut mine was the at top of the pillar ends.
|
me either! |
|
| Back to top |
|
|
RASTAVAN
Samba Member
Joined: June 23, 2013
Posts: 165
Location: NEW SMYRNA BEACH, FL
|
| Posted: Fri Dec 06, 2013 5:11 am Post subject: |
|
|
| skills@eurocarsplus wrote: |
i used the panel, with no real problems.
here are a few tips for those of you who care to listen
NEVER ASSUME any panel is correct...ever
always cut the old area out on the small side. this will allow you to trim the body away to match the panel
NEVER cut body lines away...ever. as you will find out, the door gap is going to look like shit. also, try to leave the belt line up about 1/4 inch so you don't disturb the factory line
so, now that you have had a taste of what can happen, paying a pro looks like a good deal, don't it? (except for notchboy's guy. shame on him for jumping in head first. fitting panels takes a shit ton of time)
this is how you should do it (bottom of this post)
http://www.thesamba.com/vw/forum/viewtopic.php?t=5...p;start=80 |
i cant afford a bodyshop to do the work and from what ive read that most shops have no more skills than i have. and youre right, never assume anything, prepare for the worst, but pray for the best. if you had looked at the before picts i posted earlier you would understand why i had to cut the whole thing away. thank you for the link though. |
|
| Back to top |
|
|
RASTAVAN
Samba Member
Joined: June 23, 2013
Posts: 165
Location: NEW SMYRNA BEACH, FL
|
| Posted: Fri Dec 06, 2013 5:23 am Post subject: |
|
|
| germansupplyscott wrote: |
i've used the klassicfab lower windshield panel several times and it has fit perfectly each time. i don't understand why there are two 10mm gaps in the green panel.
one thing skills says above, and i will reiterate, is that you usually don't need to use the whole repair panel when doing this lower windshield job. you can section the green metal into the bus seamlessly and end up with a better repair due to maintaining most, if not all of the original body lines. |
absolootly right. i know now that the peice was not meant to be a direct replacement part. live and learn, and hindsight is 20/20. if anyone would like to rescue this champagne from me now is the time to do it. |
|
| Back to top |
|
|
Gerson
Samba Member
Joined: January 23, 2004
Posts: 1828
Location: Jupiter Fl
|
| Posted: Fri Dec 06, 2013 6:18 am Post subject: |
|
|
that lower windshield repair section is stamped on a die, ALL of the the windshield repair sections that have been sold, ever, have come from the same die from day one.....we have sold over 300 of those repair sections in the last 2 years.........we made that panel larger than it had to be, you are not really supposed to remove and replace the whole panel, specially from top to bottom...the lower part of that curve is really not an ideal place to splice that panel in....the ideal place would be in the middle of the hump/curve.......as far as the panel being short, well, we used a perfect donor pieces as a template to make the die...I can see it being short 1mm o2mm, but an inch, no way.....I am sorry that you had these problems with the piece....
_________________
that's not patina, that's fucking rust man!!!!
we (klassicfab) make the funky green panels........... |
|
| Back to top |
|
|
RASTAVAN
Samba Member
Joined: June 23, 2013
Posts: 165
Location: NEW SMYRNA BEACH, FL
|
| Posted: Sat Dec 07, 2013 6:33 pm Post subject: |
|
|
| Gerson wrote: |
| that lower windshield repair section is stamped on a die, ALL of the the windshield repair sections that have been sold, ever, have come from the same die from day one.....we have sold over 300 of those repair sections in the last 2 years.........we made that panel larger than it had to be, you are not really supposed to remove and replace the whole panel, specially from top to bottom...the lower part of that curve is really not an ideal place to splice that panel in....the ideal place would be in the middle of the hump/curve.......as far as the panel being short, well, we used a perfect donor pieces as a template to make the die...I can see it being short 1mm o2mm, but an inch, no way.....I am sorry that you had these problems with the piece.... |
thank you for the explanation and the apology, i wish i couldve just used pieces and not cut at the body line like i did(see picts above). foolish me. do you sell a whole face piece? or do you know anyone one here in the florida area that has a decent donor? |
|
| Back to top |
|
|
Bradgt74
Samba Member

Joined: May 04, 2009
Posts: 251
Location: Minneapolis
|
|
| Back to top |
|
|
BUSBOSS
Samba Member

Joined: January 21, 2009
Posts: 2161
Location: Northern California
|
| Posted: Sat Dec 07, 2013 8:58 pm Post subject: |
|
|
| Bradgt74 wrote: |
| From the pics, it looks like you can go a head and slowly tack it in. |
Except that the bubble line is gone; it will look pushed in like a pug's face. You'll be throwing good money and time after bad. I would start over with a new nose skin and new panel. If you are putting in the time now might as well do it right once.
_________________
All the redemption I can offer, girl, is beneath this dirty hood
1976 Westfalia
1970 Karmann Ghia Convertible (sold - but not forgotten) |
|
| Back to top |
|
|
airkooledchris
Samba Member
Joined: January 25, 2005
Posts: 2713
|
| Posted: Sat Dec 07, 2013 9:07 pm Post subject: |
|
|
| BUSBOSS wrote: |
| Bradgt74 wrote: |
| From the pics, it looks like you can go a head and slowly tack it in. |
Except that the bubble line is gone; it will look pushed in like a pug's face. You'll be throwing good money and time after bad. I would start over with a new nose skin and new panel. If you are putting in the time now might as well do it right once. |
unfortunately, that's how it is now. lesson learned. get a donor nose skin or one of those replacements with the spot for the Brazilian emblem on it. |
|
| Back to top |
|
|
babysnakes
Samba Member
Joined: August 19, 2008
Posts: 7107
|
| Posted: Sun Dec 08, 2013 4:10 am Post subject: |
|
|
| The PO of my SC cut at the belt line welded in a Klokker piece. My body guy is pretty good and after much debate I bought the Gerson lower windshield and bought some donor metal. Orange bus Bob found me a belt line piece from door to door. We plan on cutting the piece 1" above and 1" below the the belt line. So Gerson green on top,donor on the middle and bus on the bottom.If all goes well we should retain the proper contours. |
|
| Back to top |
|
|
|


