| Author |
Message |
Hikelite
Samba Member

Joined: August 31, 2012
Posts: 557
Location: Colville, WA

|
 Posted: Fri Mar 09, 2018 1:19 pm Post subject: Re: My First VW, It's a 69 Bay Window Deluxe Posted: Fri Mar 09, 2018 1:19 pm Post subject: Re: My First VW, It's a 69 Bay Window Deluxe |
 |
|
how are you applying the primer? gun or rattle can?
I've struggled with that exact same aspect of paint and bodywork.
It sounds like I should just plan to primer everything that gets taken down to bare metal as I go.
The father of a high school friend is a retired car painter and has a booth. I'm hoping he will mentor me through it.
Thanks for sharing your build. I'm learning from you.
_________________
~Kevin
My 1968 Campmobile |
|
| Back to top |
|
 |
scrivyscriv
Samba Electrician

Joined: October 04, 2011
Posts: 2922
Location: Memphis
|
|
| Back to top |
|
|
Jack_O_Trades
Samba Member
Joined: August 14, 2014
Posts: 188
Location: Bay Area CA
|
| Posted: Sun Mar 18, 2018 9:54 pm Post subject: |
|
|
| scrivyscriv wrote: |
Love the marker 'tattoo!'  |
Yeah, That was almost four years ago when my eight year old was only four. If I remember correctly, he drew hair on his arms so he could be a monster.
| Hikelite wrote: |
how are you applying the primer? gun or rattle can?
I've struggled with that exact same aspect of paint and bodywork.
It sounds like I should just plan to primer everything that gets taken down to bare metal as I go.
The father of a high school friend is a retired car painter and has a booth. I'm hoping he will mentor me through it.
Thanks for sharing your build. I'm learning from you. |
Thanks for checking it out.
I am spraying with a gun. A booth would be nice to have access to. Having just gone through the process, It's definitely less of a headache to get it into epoxy primer before you do the body work to seal off the metal. When your done with the body work you will need to scuff it up (if it's been more than a week) But this really isn't big deal. I can scuff up the entire bus in about two hours (outside, and door jambs, no doors).
I decided to stop procrastinating and hammerd through the body work and got the bus into some paint. I think I was able to get the body pretty straight but it's nothing to write home about. Getting it into paint was a huge milestone for me. The color was supposed to be L-610 Delta Green. It's significantly darker than the original green. I think I was able to spray all the visible surfaces though so it shouldn't be and issue.
I have a lot of wet sanding to do to try and smooth it out and a couple of touch up spots. I also need to tackle the doors and other removable body panels.
|
|
| Back to top |
|
|
Abscate
Samba Member
Joined: October 05, 2014
Posts: 22668
Location: NYC/Upstate/ROW
|
| Posted: Mon Mar 19, 2018 3:32 am Post subject: Re: My First VW, It's a 69 Bay Window Deluxe |
|
|
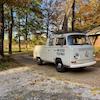
Classy, classy look...that white on dark green. Now, THAT'S patina.
_________________
.ssS! |
|
| Back to top |
|
|
metz
Samba Member

Joined: March 31, 2005
Posts: 279
Location: Norway
|
| Posted: Mon Mar 19, 2018 4:21 am Post subject: Re: My First VW, It's a 69 Bay Window Deluxe |
|
|
Making great progress here. Very impressive!
_________________
68 panel
64 ghia coupe |
|
| Back to top |
|
|
Jack_O_Trades
Samba Member
Joined: August 14, 2014
Posts: 188
Location: Bay Area CA
|
| Posted: Sun Jan 20, 2019 12:48 am Post subject: Re: My First VW, It's a 69 Bay Window Deluxe |
|
|
I have been on seven-month hiatus with this project but was able to dig back into it the beginning of the year. My goal is to get it driving again by the end of May. If I can get in a couple of hours each day, I should be able to achieve this. I have a tendency to get distracted with details and mini-projects that pull me away from the end goal of getting the bus running. Last year I was inspired by a bunch of great build threads, especially Bill's thread.
https://www.thesamba.com/vw/forum/viewtopic.php?t=598191
I was inspired to make my engine as close to 71 original as possible. This meant getting rid of the alternator, Chinese carb, Chinese fuel pump, and Mexican distributor. I have since picked up the necessary hardware but got distracted with rebuilding original German 34 Pict-3 carbs. I now have ten of these carbs in various states of repair. The initial one that will end up on this bus is one rebuilt by VolkzBitz. I picked up the correct distributor and fuel pump from Bill.
But I'm getting ahead of myself. I would like to try to maintain the temporal continuity of this project by presenting my work in the order it was done. After painting the body of the bus, I put my efforts into the doors, hatches, and misc bits and bobs.
Here everything is prepped for paint
There are a bunch of screws on the bus that are painted so I made a fixture to hold the screws so I could paint the heads
Everything in primer. Just as I did with the bus, I painted everything in my garage without a booth. I got lazy about the booth and just wanted to bang this part of the project out. I was able to keep everything pretty clean but as a result, everything in my garage is green now from overspray. Over the past seven months, I have been slowly cleaning things as I come across them, but %95 of the surfaces are still covered with overspray.
And finally, everything in paint. I did the front doors and sliding doors in a separate batch but must have forgotten to take photos. The paint on the bus came out dry and I will have to go back and do a lot of wet sanding to fix it. For the doors and stuff, I reduced the paint and the parts came out great. I did have a couple of runs and I will eventually have to fix these.
I am fairly limited on storage and didn't want a bunch of parts standing around with the potential to get damaged. So the big items like the front doors, sliding door and tailgate got temporarily installed and I threw my new bus cover on to help protect everything.
At this point in the project, I started to play around with things that would distract me from getting the bus rolling. My philosophy to get the bus running is to do what is needed to be able to drive it around legally and safely. This basically means all of the exterior, engine, and dash work. Part of my philosophy was to try and not get hung up on things that could be revisited later on with minimal effort. However, for work that would require significant effort to revisit, I would complete to the level of my expectations. I guess this is how I would define a rolling restoration. My outline for the work is as follows
To drive I need a dash, engine, functioning lights, functioning doors and windows.
I am currently focused on getting the windows and doors done.
To install windows I need to first install the vinyl trim around the windows and the headliner.
To do the headliner, I need to finish my interior bodywork on the roof and around the windows and install the vinyl around the windows. So that is the plan for the next month.
After finishing the bodywork, I got into the carb rebuilds and also decided to rebuild all of my locks. My key once key that I had was worn out and I had a hodgepodge of lock cylinders. So, I picked up a bunch of locks cylinders to get the actual tumblers so I could rebuild the locks to a new key set. In doing this and the carb work I developed a cleaning process for myself that works great for small parts and getting 50 years of gunk off them.
The process is as follows:
1. Acetone dip in an ultrasonic cleaner: initial degrease for wet grease
2. Berrymans Carb Cleaner dip in an ultrasonic cleaner: degrease for dry grease
3. Denatured alcohol dip in an ultrasonic cleaner: clean the Berrymans off the parts
4. Tumble with stainless media: polish the parts
5. Rinse with water: clean tumbling solution from parts
6. Spray with WD40: to prevent flash rusting
The process sounds tedious but it's not so bad because you can process a lot of parts at once.
You can take parts that looks like this
And make them look like this in a couple of hours and most of that time is free-time
|
|
| Back to top |
|
|
Jack_O_Trades
Samba Member
Joined: August 14, 2014
Posts: 188
Location: Bay Area CA
|
| Posted: Sun Jan 20, 2019 1:26 am Post subject: Re: My First VW, It's a 69 Bay Window Deluxe |
|
|
After the bodywork, I also started playing around with some of the exterior lights and reflectors that I have been sitting on for a while. It's kind of a love-hate relationship with putting new parts on. I have resorted to buying the best that I can for new parts and sometimes looking for original parts if possible. Even with the best money can buy, it's still a crap shoot if they will work.
I first started the side marker reflectors. These parts are great but they are about $40 a pop, if I recall, for the good ones. I also wanted to play around with wet sanding the paint to see if I could get a good sheen.
Front Reflector
My helper for the day
Rear Reflector
I was also playing around with the rear taillights but ran into problems. I have many of these tail light lenses. These were manufactured by SWF, same as the original. I purchased two sets from two reputable vendors. The new lenses look identical to my original lenses until you try to mount them up. They are actually smaller and will not bolt up without some modifications.
Here is the original, measuring center to center. The reason I bought new lenses is that I only have one good one as shown.
Here is the original with the trim ring.
Here the new one, they are just over 2 mm smaller.
And the new one with the original trim ring. It just goes to show that even the "best quality" parts from the original manufactures have issues. I plan on using the new lenses but will have to elongate the holes to make them work.
With the front doors installed, I wanted to refurbish the check straps to prevent the doors from getting damaged by swinging them open too far. I took them apart, cleaned the parts, replaced the rubber, lubed, reassembled, and installed. One of the check strap frames was bent and cracked. This was probably due to someone swinging the door open too vigorously.
Here the check strap is disassembled
Here you can just make out the cracks in the frame piece where the notches are
I went ahead and TIG welded up the cracks
And ready to install
After that, I decided to play around with the tailgate. I wanted to get the window installed with the deluxe trim. This was kind of a practice of methods. Breaking the process down into methodical steps, I found it quite simple and rewarding to install the trim.
The first step is to get the rubber on the window. Make sure to get the seem for the rubber somewhere near the middle of the top edge of the window. This might minimize the risk of leaks and it looks better if it's centered. Then place once trim half approximately where it's going to go. I then started on one end, peeling back the outside of the rubber to the trim started into the groove. For lubricant, I was using Windex.
Once the trim is initially started in the groove, along the full length of the trim, I then went back along the inside edge of the trim to open up the groove and push the trim in to fully seat it. I used a fancy trim tool that I picked up from somewhere just for this job. It's basically a pick tool with a ball tip so it doesn't tear up the rubber. I also used a plastic panel tool to initially open up the groove form my trim too.
With the trim installed and seated, Now you install the center clips that cover the gaps between the two trim pieces
With the trim work finished the next step is to install the window using the classic rope method. I like to feed the rope through the body of a pen and insert the tip of the pen into the groove on the rubber seal. You basically drag the pen around the perimeter of the seal and it deposits the rope into the groove.
And here is the window installed, with a little help from my wife.
I also took the opportunity to install the script bit which has been missing since before I took possession of the bus.
And that about wraps up 2018. I finished this work in May and just got back into the beginning of this month. |
|
| Back to top |
|
|
wcfvw69 
Samba Purist

Joined: June 10, 2004
Posts: 13389
Location: Arizona
|
| Posted: Sun Jan 20, 2019 6:45 am Post subject: Re: My First VW, It's a 69 Bay Window Deluxe |
|
|
Wow, I'm exhausted seeing all the work you've knocked out year to date! Your bus is looking great!
I know when I got bogged down doing a full restoration on my 69 bug almost 20 years ago, I TOLD myself to just go out there and work on it for x amount of time each day. Before I knew it, I was driving it down the road enjoying the fruits of my labor.
You'll be driving this beautiful bus again before you know it!
_________________
Contact me at [email protected]
Follow me on instagram @sparxwerksllc
Decades of VW and VW parts restoration experience.
The Samba member since 2004.
**Now rebuilding throttle bodies for VW's and Porsche's**
**Restored German Bosch distributors for sale or I can restore yours**
**Restored German Pierburg fuel pumps for sale or I can restore yours**
**Restored Porsche fuel pumps or I can restore yours**
**Restored Porsche distributors or I can restore yours** |
|
| Back to top |
|
|
bayguy
Samba Member
Joined: April 06, 2016
Posts: 88
Location: northern california
|
| Posted: Sun Jan 20, 2019 8:16 am Post subject: Re: My First VW, It's a 69 Bay Window Deluxe |
|
|
Looks great, nice progress. Paint looks real good. Did you paint body and doors at different times? Any color variation, ss or 2 stage.
Ive got a 68 bay been working on for awhile. |
|
| Back to top |
|
|
SamboSamba22
Samba Member
Joined: August 06, 2015
Posts: 2772
Location: Benton, Arkansas
|
|
| Back to top |
|
|
Jack_O_Trades
Samba Member
Joined: August 14, 2014
Posts: 188
Location: Bay Area CA
|
| Posted: Sun Jan 20, 2019 7:02 pm Post subject: Re: My First VW, It's a 69 Bay Window Deluxe |
|
|
| bayguy wrote: |
Looks great, nice progress. Paint looks real good. Did you paint body and doors at different times? Any color variation, ss or 2 stage.
Ive got a 68 bay been working on for awhile. |
I did do the bus and doors about a month apart. I also bought two batches of paint about two years apart. I tried to mix the two batches of paint to minimize the possible variations in color. I'm partially color blind but doors seem to match the body pretty well.
This is all SS paint. |
|
| Back to top |
|
|
Jack_O_Trades
Samba Member
Joined: August 14, 2014
Posts: 188
Location: Bay Area CA
|
| Posted: Sun Jan 20, 2019 7:15 pm Post subject: Re: My First VW, It's a 69 Bay Window Deluxe |
|
|
| wcfvw69 wrote: |
Wow, I'm exhausted seeing all the work you've knocked out year to date! Your bus is looking great!
I know when I got bogged down doing a full restoration on my 69 bug almost 20 years ago, I TOLD myself to just go out there and work on it for x amount of time each day. Before I knew it, I was driving it down the road enjoying the fruits of my labor.
You'll be driving this beautiful bus again before you know it! |
Thanks,
For me when I get burnt out I like to look at other peoples projects and this gets me excited again. But you're right and not the first to say it. Regardless of what you're doing on the bus try to put in at least an hour in each day. Today I didn't do much on the bus but I organized the shop and prepared for some sanding and prep work to get the interior painted.
I was originally going to brush/roll some Rustoleum that matches the delta green pretty good but it goes down like crap it's either too thick and runs or too thin and doesn't coat well. I'm not a painter but I would guess that it should probably be thinned and would probably spray well. Ad to be honest none of this paint will ever be seen so I was OK with this.
However, I have to do some touch-ups on the interior door jambs. I didn't pay enough attention to what surface would be visible with the interior installed and would end up with bare exposed surfaces. Since I have to spray again anyways and do the work of masking and prepping, I might as well do the whole interior and not mess around with Rustoleum. I'm still using Rustoleum on the roof as this is basically done but everything below the headliner will get sprayed. |
|
| Back to top |
|
|
Jack_O_Trades
Samba Member
Joined: August 14, 2014
Posts: 188
Location: Bay Area CA
|
| Posted: Sun Jan 20, 2019 7:17 pm Post subject: Re: My First VW, It's a 69 Bay Window Deluxe |
|
|
| SamboSamba22 wrote: |
What props to you sir! That bus is looking amazing, keep up the phenomenal work. I can't wait to see that thing in the sun, can't imagine what it's going to be like in the driver seat  |
Thanks,
It does look nice in the sun but it also makes the small dings that I failed to catch pop. We're our own worst critic and most people probably wouldn't notice but it's still irritating. |
|
| Back to top |
|
|
Jack_O_Trades
Samba Member
Joined: August 14, 2014
Posts: 188
Location: Bay Area CA
|
| Posted: Sun Jan 20, 2019 9:13 pm Post subject: Re: My First VW, It's a 69 Bay Window Deluxe |
|
|
Starting this year, I got back into getting the bus back on the road. With that philosophy, I need to get the roof finished so I could get the headliner in.
I left the drip pan last spring partially welded in. I spent a week welding all the spot welds that I had drilled out I then spent a week grinding down the welds. I didn't want them showing through the headliner, just in case. And, the welds weren't pretty. I would hate for someone to find them 50 years from now.
Here, everything is back in place and the welds are ground down
With the welding and grinding finished I needed to address the charred paint on the opposite side fo the drip pan.
I strapped a wire brush to a pole and scraped out the dead paint, and strapped a paintbrush and roller to a pole and got a coat of primer down
I also primered the underside
With that finished, I wanted to address the drain drip tubes. A while ago, I had resolved to use POR-15 to seal them up and hopefully fill any pinholes that may have developed. I was able to run a snake through the rear four without any clogs or debris. The front two are virtually impossible to get a snake through (I tried all the known tricks) so I ran a snake from the bottom as far as I could and used compressed air from the top. Clog-free.
I then found a piece of tubing that would fit into the drip tubes and filled up an 18" section with POR-15 and pinched off one end. I then inserted the charged tube into the drip tube and removed the clamp. The POR-15 would then drain down the drip tube coating it in the process.
Here is the setup ready to pour down the rear driver side drip tube
Here the POR-15 is draining into a catch pan. This process worked for all six drain tubes without fail. I also used compressed air to kind of spray the POR-15 around the entire inside of the drip tube vs letting it just drip down one side.
With that done. I needed to come up with a replacement for the plastic tubes that connect the drip pan to the drip tubes. I have all six of the originals but they are pretty crusty.
The idea was to start with 1/2" vinyl tubing available from your LHS and flaring the end to slip over the drip outlets from the drip pan. To flare the tubing, I made a mandrel to the correct shape. I then used a heat gun to soften up the tubing and slip it over the mandrel. I applied more heat to the tubing on the mandrel to help it take shape and minimize shrinkage once removed from the mandrel. I then cooled the tubing in an ice bath before removing the mandrel.
Here is the custom mandrel
Here is an original part on the mandrel to check for the correct shape
Stretching the tubing over the mandrel
Cooling the formed tubing in an ice bath
And the final part compared to the original
Here is the new part test fitted to the drip tube and drip pan
|
|
| Back to top |
|
|
Jack_O_Trades
Samba Member
Joined: August 14, 2014
Posts: 188
Location: Bay Area CA
|
| Posted: Sun Jan 20, 2019 11:39 pm Post subject: Re: My First VW, It's a 69 Bay Window Deluxe |
|
|
Part of bringing my 71 engine back to original was to "upgrade" my alternator to a 38 amp generator. Last year I found a great deal on an original complete kit including the pulley, fan, fan-hub, shims, and tin pieces.
While focusing on my big picture goals, I am also tackling smaller side projects in parallel. Rebuilding my new/used 38 amp generator was one of those side projects.
I found a very good blog post about rebuilding a Bosch generator for a Moto Guzzi. It's not the same generator as used on the bus but it's close enough to be helpful.
http://www.thisoldtractor.com/moto_guzzi_loopframe_generator_repair_-_bosch.html
I didn't take very many before pictures of my greasy mess of a generator but you can all imagine the grime build-up that we have come to expect from engine bay parts.
Most of these photos I took so I could remember how to put everything back together.
All the small parts I processed through my ultrasonic/tumbler process. The larger parts I scrubbed with dish soap and water then put them through the blast cabinet.
I wanted to completely tear down the generator which involved removing the coils. These would have to be rewrapped as well. However, I could not get the pole shoe screws to budge. I ended up having to destroy the screws using a screw extractor. These screws are NLA. They are slotted flat head screws M10 x 17mm. The only thing I could find was 20mm long screws from McMaster. I picked them up and made a fixture to hold them in the lathe. I had to shorten them up and turn down the heads. The holes for these screws on the body of the generator are counterbored-countersunk. A standard flat head screw will not fit.
That being said, in this photo you can see one of the pole shoe screws that has been drilled out
I cleaned up the body, blasted it, and painted it with zinc paint. The endcaps I cleaned, blasted, and painted with satin black. However, I found the paint was not very durable so I stripped it again and powder coated the two pieces being careful to mask off the bores for the bearings and the brush assembly.
An interesting thing to note is that the original bearings do not have grease shields. There are grease shield pieces integrated into the design of the generator. The replacement bearings are shielded. The shielding bits that go in the stack of spacers and whatnot are probably redundant at this point.
Here are the coils rewrapped with 3M electrical fiberglass tape
I lost one of the paper insulators for the studs coming through the body so I made a couple from Delrin.
I cleaned up the armature on the lathe. and turned the commutator. I then made a half-assed attempt to remove the burrs between each of the poles on the commutator as a result of turning it. I guess I didn't do a good enough job because when I went to test it, no-go. I went back and paid a little more attention to this. "If you don't have time to do it right, when will you have time to do it over?" comes to mind.
Here's everything ready for assembly.
Getting there. I didn't realize how close the coils and pole shoes are to the armature. when I rewrapped the coils things shifted slightly as the nature of the work is. To get the pole shoes to seat properly and the coils to get back into shape, I used a muffler pipe expander to force everything into place. Otherwise, there would be no way to pull the pole shoes into place with just the pole shoe screws.
Brushes installed. I picked up a couple sets of Bosch brushes but the slot for the retention spring seems to be on the wrong side of the brush such that the spring would not really engage the brush properly. So out comes the Dremel to remedy this. It's amazing to me how soft brushes are. Also, I was unsure how the terminal tab is supposed to be oriented. In the photos, the wire to the brush looks a little crowded. However, If I rotate the tab 90 deg to give more room for the wire, the tab is almost in contact with the body of the generator.
Ready for testing. I bench tested it such that you spin the generator with a 12-volt source. But I wanted to make sure I was making power so I put it on the lathe and spun it up. One thing I noticed is that the brushes need some time to break in. Does anyone know how long it takes to break-in new brushes?
|
|
| Back to top |
|
|
Jack_O_Trades
Samba Member
Joined: August 14, 2014
Posts: 188
Location: Bay Area CA
|
| Posted: Wed Jan 23, 2019 11:11 pm Post subject: Re: My First VW, It's a 69 Bay Window Deluxe |
|
|
Spending the week sanding and trying to get ready for spraying the interior. Im not too concerned with having a perfect finish since 99% of these surfaces will be covered but I do want to get down to primer, remove years of heavy scratches in the paint and sand out any surface rust (very little) for the areas that made it through to the metal.
I did get the roof painted, It's OK but I already expressed my opinions on this paint. At least it seems to bond well to the primer and is difficult to sand off. I added hardener to the paint which seems to improve its durability.
I don't think you can have too much light when working on the bus. Especially when sanding and cleaning off grime. I found these cute little LED lights on Amazon they are $13 for small ones and $15 for the large ones. They have a rechargeable battery, the head swivels, they have a magnetic base, and they put out a lot of light. The magnet is strong enough to mount on the roof or the side panels. Definitely worth the money.
https://www.amazon.com/gp/product/B07BNBXP31/ref=oh_aui_search_asin_title?ie=UTF8&psc=1
|
|
| Back to top |
|
|
airschooled
Air-Schooled

Joined: April 04, 2012
Posts: 12722
Location: on a bike ride somewhere
|
| Posted: Thu Jan 24, 2019 12:24 am Post subject: Re: My First VW, It's a 69 Bay Window Deluxe |
|
|
GREAT progress!! 
It takes a few doze miles or so for my brushes to break in and stop arcing as much. I have the curse of a worn commutator though, so I chamfer my brushes
What did you cut your comm down to? I have a 38a that's .020" past the wear limit, but a lathe might do the trick there
Where did you get the side reflectors? My paint shop deleted them in 2010-ish, and I want them more and more as I daily my bus
Robbie
_________________
Learn how your vintage VW works. And why it doesn't!
One-on-one tech help for your Volkswagen:
www.airschooled.com |
|
| Back to top |
|
|
TomWesty
Samba Member
Joined: November 23, 2007
Posts: 3482
Location: Wyoming,USA
|
| Posted: Thu Jan 24, 2019 12:48 am Post subject: Re: My First VW, It's a 69 Bay Window Deluxe |
|
|
| asiab3 wrote: |
GREAT progress!!
It takes a few doze miles or so for my brushes to break in and stop arcing as much. I have the curse of a worn commutator though, so I chamfer my brushes
What did you cut your comm down to? I have a 38a that's .020" past the wear limit, but a lathe might do the trick there
Where did you get the side reflectors? My paint shop deleted them in 2010-ish, and I want them more and more as I daily my bus
Robbie |
Doesnt Wolfsburg West have them?
_________________
If you haven't bled on them, you haven't worked on them.
Visit: www.tomcoryell.com and check out my music! |
|
| Back to top |
|
|
airschooled
Air-Schooled
Joined: April 04, 2012
Posts: 12722
Location: on a bike ride somewhere
|
| Posted: Thu Jan 24, 2019 12:52 am Post subject: Re: My First VW, It's a 69 Bay Window Deluxe |
|
|
| TomWesty wrote: |
| asiab3 wrote: |
Where did you get the side reflectors? |
Doesnt Wolfsburg West have them? |
I didn't see them on the WW site until you mentioned it. But they're out of stock 
There is a dude in San Diego selling them, but I am unsure of the quality, and $180 plus shipping and drilling holes in my bus is a lot to gamble on
(Yeah the paint shop welded my reflector holes shut, so I won't be drilling new holes without a REALLY good reproduction
)
RobbieOrangePeelMobile
_________________
Learn how your vintage VW works. And why it doesn't!
One-on-one tech help for your Volkswagen:
www.airschooled.com |
|
| Back to top |
|
|
wcfvw69
Samba Purist
Joined: June 10, 2004
Posts: 13389
Location: Arizona
|
| Posted: Thu Jan 24, 2019 4:44 am Post subject: Re: My First VW, It's a 69 Bay Window Deluxe |
|
|
| asiab3 wrote: |
| TomWesty wrote: |
| asiab3 wrote: |
Where did you get the side reflectors? |
Doesnt Wolfsburg West have them? |
I didn't see them on the WW site until you mentioned it. But they're out of stock
There is a dude in San Diego selling them, but I am unsure of the quality, and $180 plus shipping and drilling holes in my bus is a lot to gamble on
(Yeah the paint shop welded my reflector holes shut, so I won't be drilling new holes without a REALLY good reproduction
)
RobbieOrangePeelMobile
|
I wouldn't drill holes personally. I'd used the 3M super strong double sided tape that's thin. I bought a roll when Busdaddy recommended it. Many auto manufactures now use it to apply moldings, etc. You could simply cut the screw threads off and use a dab of epoxy to hold the screw in place so it looks screwed in.
_________________
Contact me at [email protected]
Follow me on instagram @sparxwerksllc
Decades of VW and VW parts restoration experience.
The Samba member since 2004.
**Now rebuilding throttle bodies for VW's and Porsche's**
**Restored German Bosch distributors for sale or I can restore yours**
**Restored German Pierburg fuel pumps for sale or I can restore yours**
**Restored Porsche fuel pumps or I can restore yours**
**Restored Porsche distributors or I can restore yours** |
|
| Back to top |
|
|
|


