| Author |
Message |
DAV!D
Samba Member
Joined: September 10, 2013
Posts: 979
Location: EL CAMINO

|
 Posted: Thu Apr 02, 2015 5:43 pm Post subject: Posted: Thu Apr 02, 2015 5:43 pm Post subject: |
 |
|
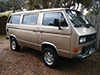
Today my van became a Westy! Well it's much closer than it was at my last update.. lol
After cutting the donor roof off and realizing how much of a problem it was in the rear area, I opted to go with the over lap method. I used 3M body adhesive to glue the top to my existing roof then I welded in all the spot welds around the inside of the roof.
I also used some of the extra sheet metal and welded it to the westy hinge mounting points then glued/tac welded that to the under side of the original tin top roof for my hinge mounting points.
It's very solid feeling and I have no concerns of having any issues as I'm betting it will last as long as the van lasts.
This was my initial cut of my roof. There was lots and lots of trimming to do even after this picture..
Here is a picture of the cut down roof section being glued into place. I used the aluminum pieces which hold the canvas into place as my clamping method to hold everything in place while the adhesive dried.
Finally lots of welding and grinding..
I still have to fit the front cargo rack as well as the pop top latch, but the hard parts are behind me at this point.
_________________
86 Syncro Build - Ecotec Motor Swap - Pop Top Conversion - Camper Build & Syncro Conversion |
|
| Back to top |
|
 |
kybishop
Samba Member

Joined: July 29, 2013
Posts: 58
Location: Where the wind is blowing, the mountains calling, and the adventure waiting
|
| Posted: Thu Apr 02, 2015 8:02 pm Post subject: |
|
|
Awesome work! I'm psyched to see what comes next  |
|
| Back to top |
|
|
DAV!D
Samba Member
Joined: September 10, 2013
Posts: 979
Location: EL CAMINO
|
| Posted: Fri Apr 03, 2015 3:42 pm Post subject: |
|
|
| kybishop wrote: |
| Awesome work! I'm psyched to see what comes next |
Thanks.. It's a lot of work more than I really wanted to do. I just want to hit the road again.. 
Anyway, I installed the cargo box today. I still haven't install the canvas and all the weather seals but the top is up there and it works. I'm thinking about installing a Fantasic vent with the electric van rather than replace the stock (broken) roof vent.
I always think the Westy top makes a Vanagon look like a completely different animal.
_________________
86 Syncro Build - Ecotec Motor Swap - Pop Top Conversion - Camper Build & Syncro Conversion |
|
| Back to top |
|
|
DAV!D
Samba Member
Joined: September 10, 2013
Posts: 979
Location: EL CAMINO
|
| Posted: Sat May 09, 2015 12:03 pm Post subject: |
|
|
It's been awhile since I've updated my build topic but doesn't mean I haven't done anything. Before I get into the update I figured I'd say the motor has still been running flawlessly but I had a 2nd starter go out. It appears to be a total fluke as the housing of the solenoid busted at the nose cone allowing the sprig to push out. I've never seen anything like that happen before and can only assume it was a manufacturing issue.
Getting into the camper interior build. I first built my rear closet which is actually my bike garage. In this picture you can see my build process. I like to make pre-fabs of the cabinets and pieces with cardboard so I can get an idea how everything looks before I start cutting wood.
A picture of the bike folded up and stowed away. It's awesome having my bike this handy as now everyday I do a 5 mile ride at a local park.
This is the start of my cabinets as I sorted everything out with the fridge in it's spot, which will eventually slide out on rollers for ease of access. This is the first time I've ever built complete cabinets like this so it's a lot of learning as I go.
I now have the cabinets a bit further along and I've added the doors. The sliders are pretty hard to get right as if you cut too much they fall out and if you don't cut enough they are too tight to get into the groves. The sliding doors under the sink are just temporary place holders hence the reason the wood grain is mis-matched.
You can also see the seat has now been added. It's about 2 inches narrower than a Westy seat and started out as a full width seat. I had to cut it down and will reupholster it once everything is done inside.
I'm kinda proud of these.. I'm not much of a wood worker and this is the first time I've used a table saw. I couldn't find any pre-made slider tracks local so I made my own out of wood on the table saw.
I've also mounted my water tank and put some Hankook ATM tires on the van but no pictures of that yet. In other good news my solar panels showed up yesterday so I'll now have 360 watts of flexible panels which will go on the roof soon. My goal is to wrap up everything that will be done this year and be on the road in 2.5 to 3 weeks.(it's long past time for me to go hit the road and make some money rather than spend it). It's getting down to crunch time!
_________________
86 Syncro Build - Ecotec Motor Swap - Pop Top Conversion - Camper Build & Syncro Conversion |
|
| Back to top |
|
|
vanagonjr
Samba Member

Joined: October 07, 2010
Posts: 3430
Location: Dartmouth, Mass.
|
| Posted: Sat May 09, 2015 4:36 pm Post subject: |
|
|
| DAV!D wrote: |
A picture of the bike folded up and stowed away. It's awesome having my bike this handy as now everyday I do a 5 mile ride at a local park.
|
The bike and hideaway is just awesome! If I ever the road for an extended period of time, I will have to do this! And great job on cabinet design and build BTW!
EDIT - slider note
| DAV!D wrote: |
I I couldn't find any pre-made slider tracks local so I made my own out of wood on the table saw.
|
I used C-channel aluminum from Home Depot.
_________________
John - 86 Wolfsburg Westfalia "Weekender"
Flint reversed 1.8T W/Passat 5-Speed
LiMBO (late model bus club) www.limbobus.org
LiMBO is on Facebook too! https://www.facebook.com/groups/
FAQ thread: http://www.thesamba.com/vw/forum/viewtopic.php?t=525798 |
|
| Back to top |
|
|
DAV!D
Samba Member
Joined: September 10, 2013
Posts: 979
Location: EL CAMINO
|
| Posted: Sun May 10, 2015 3:19 pm Post subject: |
|
|
Being in nearing the completion of my build for this year (4wd and body work to be done next year) I decided to add up my costs so far. I don't think I've ever seen anyone publish their build costs before but I think it's important to show, that if you don't buy every premade easy bolt on option you can actually build a van "relatively" cheap if you are savvy with your shopping.
Keep in mind, this is a rough estimate and I added extra money for misc parts and items. Any way by doing my own engine swap from scratch with only the adaptor being bought aftermarket and doing everything myself except the harness/Ecu I've managed to build this entire van for the cost of many people's engine swap.
Van build cost to date.
syncro $3,500
2wd $2,500
Westy. 300
Rims. 300
Tires. 150
Hardware. 75
Ecotec. 600
Ecu/harness. 500
Adaptor. 540
Clutch. 75
Starter. 100
Alt 175
Misc parts. 500
Solar panels. 690
Rack. 80
Charger. 150
Misc. 100
Batteries. 150
Interior. 500
Fridge. 640
Camper top related. 500
Misc parts. 1000
$12,525
Sold. (I still have lots of parts to sell)
2.1 engine/trans. 800
2x icu sensors. 150
-950.
_________________
86 Syncro Build - Ecotec Motor Swap - Pop Top Conversion - Camper Build & Syncro Conversion |
|
| Back to top |
|
|
Volkska
Samba Member

Joined: October 07, 2013
Posts: 106
Location: Central Jersey
|
| Posted: Wed May 27, 2015 9:53 am Post subject: |
|
|
Excellent build so far! It is interesting seeing someone do exactly what I have planned for one day. I like the layout for the interior. Out of curiosity, what do you do for work when you go on these adventures?
_________________
2011 VW GTi 6MT (The Daily)
2003 Golf 2.Sl0w (The Flaming Turd)
1997 VR6 motor awaiting some love and a Vanagon
1986 Honda Elitee 150 awaiting a title |
|
| Back to top |
|
|
davevickery
Samba Member
Joined: July 16, 2005
Posts: 2887
Location: Fort Collins, CO
|
| Posted: Wed May 27, 2015 12:26 pm Post subject: |
|
|
| Hey nice job David on your conversion. This is the first time I noticed it. It is rewarding doing things custom eh? I did that on my first syncro. There are always things you (me anyway) would redo, but when you come up with something more useable, it feels great. I put my bed in the middle and a thinner cabinet on each side, I loved that cabinet by the sliding door. I bet that extra storage space you have by the windows will come in handy. |
|
| Back to top |
|
|
DAV!D
Samba Member
Joined: September 10, 2013
Posts: 979
Location: EL CAMINO
|
| Posted: Wed May 27, 2015 12:44 pm Post subject: |
|
|
| Volkska wrote: |
| Excellent build so far! It is interesting seeing someone do exactly what I have planned for one day. I like the layout for the interior. Out of curiosity, what do you do for work when you go on these adventures? |
Thanks, for work.. I've had pretty good luck picking up temp jobs doing warehouse related work. I can usually get decent pay walking in the door due to experance and those kind of jobs French have a lot of over time.
I just bust ass for a few months and save my money.. I also flip stuff on the side, but Im trying to sort out a better solution and build a steady online income.
_________________
86 Syncro Build - Ecotec Motor Swap - Pop Top Conversion - Camper Build & Syncro Conversion |
|
| Back to top |
|
|
DAV!D
Samba Member
Joined: September 10, 2013
Posts: 979
Location: EL CAMINO
|
| Posted: Wed May 27, 2015 12:50 pm Post subject: |
|
|
| davevickery wrote: |
| Hey nice job David on your conversion. This is the first time I noticed it. It is rewarding doing things custom eh? I did that on my first syncro. There are always things you (me anyway) would redo, but when you come up with something more useable, it feels great. I put my bed in the middle and a thinner cabinet on each side, I loved that cabinet by the sliding door. I bet that extra storage space you have by the windows will come in handy. |
Yea it's nice to do everything custom but also seems to never end..lol
I thought about the split cabinet idea with the bed in the middle but I decided it would be better if I had a Westy size bench/bed as I know I'll probably sell this van down the road. I'm tailoring it to me needs but I don't want to over do it and make it undesirable for resale.
As for the build, I've done a lot more work and I'll likely post some new pictures tonight. I really wanted to get on the road by the 1st of next month, but I've opted to set my goal for sometime in the first week.. LoL
_________________
86 Syncro Build - Ecotec Motor Swap - Pop Top Conversion - Camper Build & Syncro Conversion |
|
| Back to top |
|
|
Volkska
Samba Member
Joined: October 07, 2013
Posts: 106
Location: Central Jersey
|
| Posted: Wed May 27, 2015 3:39 pm Post subject: |
|
|
My friend, keep up the awesome work. This thing is going to be a monster when it's finished! You are a huge inspiration to a person still saving for his van.  The custom interior, the detail and the work, it's awesome to see someone building a van to their own specifications. The custom interior, the detail and the work, it's awesome to see someone building a van to their own specifications.
Cannot wait to see how the 4WD swap goes!
_________________
2011 VW GTi 6MT (The Daily)
2003 Golf 2.Sl0w (The Flaming Turd)
1997 VR6 motor awaiting some love and a Vanagon
1986 Honda Elitee 150 awaiting a title |
|
| Back to top |
|
|
DAV!D
Samba Member
Joined: September 10, 2013
Posts: 979
Location: EL CAMINO
|
| Posted: Wed May 27, 2015 6:51 pm Post subject: |
|
|
Guess it's time for an update. I've been working pretty hard trying to get the van road trip ready. I'm trying to leave sometime next week and still have lots to do..
Getting back to the cabinet build. I filled in the rest of the structure (sides shelves ect) to the cabinets and tried to set things up so my stuff wont move around too much.
I also added a mini closet behind the passenger seat. It's not finished yet but gives me a place to hang a few shirts and a little more shelf space for small items.
I'm still not done, but I'm very happy with the way the cabinets have turned out. Originally, I had planed to paint them a similar color to the stock westy's but after getting all the doors in place I decided I wanted to stain them.
I did screw up on 2 of the doors and they are much darker than the rest. I'm hoping to get a chance to sand then back down to re-stain them, but my time budget is getting small so I may just have to live with them.
You can also see I've re-upholstered the bench seat.. I did that today.
A look from the back to give a better feel for the set up. I still plan to build a cabinet above the window hence the reason that area looks a bit sloppy at the moment.
I'm also planning to build a counter top with will be hinged. The recessed area on the top of the cabinets will be a hidden storage area. As I say still lots to do over the next week & a half.. or so..
_________________
86 Syncro Build - Ecotec Motor Swap - Pop Top Conversion - Camper Build & Syncro Conversion
Last edited by DAV!D on Wed May 27, 2015 7:02 pm; edited 1 time in total |
|
| Back to top |
|
|
DAV!D
Samba Member
Joined: September 10, 2013
Posts: 979
Location: EL CAMINO
|
| Posted: Wed May 27, 2015 6:59 pm Post subject: |
|
|
part 2 of today's update..
The van is pretty much free of any serious rust, but to keep it that way I really needed to redo all my body seams.
This was likely the worst spot on all my body seams.. I ended up grinding/scraping all the old seam sealer then treated any potential rust with a rust converter.
I then went over all the seams with the left over 3M body panel adhesive which I previously used while doing my pop top conversion.
Because I won't be painting anytime soon, I found some rattle can touch up paint which was a very close match to my van's paint (some Toyota color) and went to town repainting all the seams to seal them up.
If you get close to the van you will probably notice the difference in the paint, but from 10ft away it's a pretty solid match. It's good enough for me till I finish off the body work and paint it sometime next year.
_________________
86 Syncro Build - Ecotec Motor Swap - Pop Top Conversion - Camper Build & Syncro Conversion |
|
| Back to top |
|
|
Volkska
Samba Member
Joined: October 07, 2013
Posts: 106
Location: Central Jersey
|
| Posted: Tue Jun 02, 2015 8:38 am Post subject: |
|
|
Question, if you had the choice, would you have preferred to start with a tin top Syncro? I've been scraping my pennies together saving for a Syncro 7 passenger in the 10K-14K with minimal to 0 rust, but I have come across many cheap base 7 passengers in mint condition.
Your build is shedding light on how building one may actually be cheaper then saving up for one.
_________________
2011 VW GTi 6MT (The Daily)
2003 Golf 2.Sl0w (The Flaming Turd)
1997 VR6 motor awaiting some love and a Vanagon
1986 Honda Elitee 150 awaiting a title |
|
| Back to top |
|
|
DAV!D
Samba Member
Joined: September 10, 2013
Posts: 979
Location: EL CAMINO
|
| Posted: Wed Jun 03, 2015 2:41 pm Post subject: |
|
|
| Volkska wrote: |
Question, if you had the choice, would you have preferred to start with a tin top Syncro? I've been scraping my pennies together saving for a Syncro 7 passenger in the 10K-14K with minimal to 0 rust, but I have come across many cheap base 7 passengers in mint condition.
Your build is shedding light on how building one may actually be cheaper then saving up for one. |
You need a syncro to start with for all the parts. I started with a tin top syncro, but it was filled with rust so I opted to do the conversion to a clean van rather than try to fight a loosing battle with rust.
All in all I would have much rather started and built on the syncro body if it was rust free as that would of saved a lot of time & money.
Keep in mind I paid $3,500 for the Syncro & $2,500 for the 2wd tin top. That's 6k in vanagons to make one whole 4wd one. If I were starting fresh I would have tried my best to find a sold body Syncro even if it didn't run.
However life is lemons and I'm making lemonade as when I bought the Syncro I only had a $4k budget to buy something so buying at 3,5k was good at the time.
I will say that I will do my best to kick myself in the head if I ever try another build like this with out having a ton of money and a nice shop.
_________________
86 Syncro Build - Ecotec Motor Swap - Pop Top Conversion - Camper Build & Syncro Conversion |
|
| Back to top |
|
|
snwbrdr435
Samba Member
Joined: August 10, 2013
Posts: 337
Location: North Of Boston
|
| Posted: Tue May 24, 2016 10:06 am Post subject: Re: Ecotec swap, 2wd to Syncro conversion & camper build |
|
|
Any updates on this?
Wondering if the OP ever got around to swaping the subframe in. |
|
| Back to top |
|
|
DAV!D
Samba Member
Joined: September 10, 2013
Posts: 979
Location: EL CAMINO
|
| Posted: Wed May 25, 2016 8:51 pm Post subject: Re: Ecotec swap, 2wd to Syncro conversion & camper build |
|
|
| snwbrdr435 wrote: |
Any updates on this?
Wondering if the OP ever got around to swaping the subframe in. |
Not yet, I've been on the road with the van since last June. Haven't headed back to FL to finish it up yet. I drive it daily and have put a ton of miles on the build so far. Overall it's been very solid, with the exception of a broken front wheel hub my 1st month out and my original junk yard fuel pump died about 4 weeks ago.
I'm planning to head back to FL, sometime near the end of summer or fall, to finish up the 4wd swap. I will likely be gutting the interior and rebuilding it with some new ideas as well.
_________________
86 Syncro Build - Ecotec Motor Swap - Pop Top Conversion - Camper Build & Syncro Conversion |
|
| Back to top |
|
|
livethevanlife
Samba Member

Joined: May 18, 2015
Posts: 188
Location: La Paz, Baja California Sur
|
| Posted: Mon Jul 20, 2020 9:39 am Post subject: Re: Ecotec swap, 2wd to Syncro conversion & camper build |
|
|
Hi, realize this is an old thread but any updates on how the ecotec motor has held up?
_________________
www.LiveTheVanLife.com
www.VentureLibre.com
https://www.PeaceVans.com/baja
1991 Syncro Triple Knob Westfalia "Miki" 2.2WBX
1992 Syncro Triple Knob Tintop "Schnitzel" 1.9AAZ
1990 Syncro Rear Locker Doka Subi 2.2
1974 VW Thing 1835cc
1989 VW Carat |
|
| Back to top |
|
|
DAV!D
Samba Member
Joined: September 10, 2013
Posts: 979
Location: EL CAMINO
|
| Posted: Thu Oct 22, 2020 8:57 am Post subject: Re: Ecotec swap, 2wd to Syncro conversion & camper build |
|
|
| livethevanlife wrote: |
| Hi, realize this is an old thread but any updates on how the ecotec motor has held up? |
Hey sorry, I kinda fell off the face of the earth doing other stuff. (went OTR trucking for a year then started my own trucking company that I've been running for a year now.
The engine was flawless never had a single problem with it other than it ran a bit rich and I never had the ability at the time to get it on a computer to see why.
The only issue I had motor wise was just the OEM Ford fuel pump I used. It went out and caused my some headaches on the road because the aftermarket company changed the design so it no longer had proper input fittings to use the AN fittings. Due to this I had to scavenge another used one from a junkyard.
I did have "Vanagon" problems over the 2 years on the road with it though. Broke a front wheel hub and then had a rear axle sheer off which caused the rear wheel to come off the van. That was pretty scary but luckily wasn't anything too bad happened.
Anyway, the van has been sitting about 2 years or so now due to my trucking venture but I'm hoping to tear it all down and start a full "real" rebuild on it sometime this winter.
I really need to get on the paint and body because it's just been sitting and it's looking pretty bad. I figured if I do that I was gonna gut the entire van and completely paint all the under chassis and finish up the Syncro conversion.
My budget will be a little better this next go-around so it should become a much nicer build this next go at it. I'm also looking to clean up the engine install and build a better motor mount set up. The funky mounts I built this go around actually work well with no problems but it really should have some protection on the oil pan.
_________________
86 Syncro Build - Ecotec Motor Swap - Pop Top Conversion - Camper Build & Syncro Conversion |
|
| Back to top |
|
|
|


