| Author |
Message |
greebly
Samba Member

Joined: August 27, 2009
Posts: 966
Location: Here and now

|
 Posted: Tue Jan 20, 2015 3:47 pm Post subject: My Van Bandit Posted: Tue Jan 20, 2015 3:47 pm Post subject: My Van Bandit |
 |
|
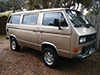
Bandit is my 5th VW van and hopefully the last. Bandit is a 91 Tintop. I have owned a 72 transporter, a 78 Westy Camper, an 85 Tin top and an 85 Weekender. Here's a teaser of Bandit before putting all the parts on. I chose the name Bandit because He has a mask and he robs me on a regular basis for whatever I have in my bank account.
Last edited by greebly on Tue Jan 20, 2015 4:27 pm; edited 1 time in total |
|
| Back to top |
|
 |
djkeev
Samba Moderator

Joined: September 30, 2007
Posts: 32576
Location: Reading Pennsylvania
|
|
| Back to top |
|
|
greebly
Samba Member
Joined: August 27, 2009
Posts: 966
Location: Here and now
|
| Posted: Tue Jan 20, 2015 3:51 pm Post subject: |
|
|
| The paint used was 3 part White Pearl Crystal with VW Platinum metallic for the accents around the windows and the front and rear apron. It wraps around, Basically all of the flats of the bodywork. the small line above the rocker panels as well. |
|
| Back to top |
|
|
scottbott
Samba Member
Joined: June 02, 2010
Posts: 83
Location: essex,uk
|
| Posted: Tue Jan 20, 2015 3:56 pm Post subject: |
|
|
| I think it makes the van look longer,looks good |
|
| Back to top |
|
|
DAV!D
Samba Member
Joined: September 10, 2013
Posts: 979
Location: EL CAMINO
|
|
| Back to top |
|
|
tarandusVDub
Samba Member
Joined: August 27, 2010
Posts: 1649
Location: Between Here and There
|
| Posted: Tue Jan 20, 2015 4:17 pm Post subject: |
|
|
Das Mule! It's crazy, really. http://www.dasmule.com/pages/about-us/our-syncro.html
_________________
1990 Syncro 16" DoppleKabine 2.1 DJ 112i
________________________
Sold: 1972 Bay Campmobile; 1984 Westy, base model, 2WD. |
|
| Back to top |
|
|
greebly
Samba Member
Joined: August 27, 2009
Posts: 966
Location: Here and now
|
| Posted: Tue Jan 20, 2015 4:23 pm Post subject: |
|
|
| Thanks for the encouragement. It looks better with the new seals and grey tinted glass installed, I'll try to get a picture tomorrow. I had the new windshield and the back glass installed at the paint shop so that I could drive it home. |
|
| Back to top |
|
|
joetiger 
Samba Member

Joined: January 27, 2005
Posts: 5076
Location: denver
|
| Posted: Tue Jan 20, 2015 4:38 pm Post subject: |
|
|
Good-looking Vanagon! I like the dark accents a lot.
I initially thought it was named Bandit after Bandit the Dog from Johnny Quest. Similar color scheme.
_________________
Joe T.
'86 NAHT Vanagon GL Syncro/ supercharged ABA 2.0 "Pigpen"
'04 GTI 1.8T
'04 Golf R32
"get metaphysical with it. if it's simply a means to get to and from places, it will let you down. if it becomes your zen, it can't fail you." -dabaron
"Still, it's good to be afield."--VWagabond
Available Now! Vanagon to Louisiana--A Two-Lane Reckoning Through Past and Present
www.josephtrussell.com |
|
| Back to top |
|
|
greebly
Samba Member
Joined: August 27, 2009
Posts: 966
Location: Here and now
|
| Posted: Tue Jan 20, 2015 6:47 pm Post subject: |
|
|
| joetiger wrote: |
Good-looking Vanagon! I like the dark accents a lot.
I initially thought it was named Bandit after Bandit the Dog from Johnny Quest. Similar color scheme.
|
That had come to mind Joe, EBAY had a Bandit figurine going for over $50.00 so I decided to stick to my hula girl as a dashboard companion.
|
|
| Back to top |
|
|
luVWagn
Samba Member
Joined: February 21, 2008
Posts: 1340
Location: Snoqualmie (WA)
|
|
| Back to top |
|
|
greebly
Samba Member
Joined: August 27, 2009
Posts: 966
Location: Here and now
|
| Posted: Wed Jan 21, 2015 12:25 pm Post subject: |
|
|
1st bath, Just rinsed him off. Wanted to make sure that none of the seals are leaking.
Notice the VW logo on the back hatch. I painted it grey and installed a reflector behind it to increase visibility.
Last edited by greebly on Wed Jan 21, 2015 1:58 pm; edited 1 time in total |
|
| Back to top |
|
|
greebly
Samba Member
Joined: August 27, 2009
Posts: 966
Location: Here and now
|
| Posted: Wed Jan 21, 2015 1:15 pm Post subject: |
|
|
I ditched the fiberglass cladding, the antenna, the bumpers, spoiler and the stock square headlights. I Had the holes for the rear bumper attachment on the sides at the back , the holes for the cladding and antenna welded up. Bandit's antenna is adhered to the inside right corner of the windshield. The side markers , front lenses and H4 round headlights, the gas filler plastic trim piece, lens hardware, screws and speed nuts ,wiper arms, wipers and wiper hardware , washer nozzles, Rein wheels, and tires are all new. All of the window seals, door handle seals, door seals, sliding door cover seal, are new, hell Bandit even demanded new gasket seals behind the side marker lenses. New Delron sleeve / Grommet on sliding door handle ( really firms up the action of the handle), All new bearings on the sliding door mounts, and Door Check rod seals, as well as new front window felt and window scrapers. I tinted all of the glass with a 50% grey tint. That about covers the exterior. Interior pictures coming when I get mostly finished with it. I am planning on doing a custom front grill when I get the chance. Oh, still have to put on the Vanagon GL logo on the rear, I had my wife repaint the silver on it and was going to make a custom gasket for it before installing it.
Bandit is not just a looker, he's going to be a doer. The Automatic has been completely rebuilt and a 1.8T chipped engine is installed.
Last edited by greebly on Wed Jan 21, 2015 2:01 pm; edited 1 time in total |
|
| Back to top |
|
|
luVWagn
Samba Member
Joined: February 21, 2008
Posts: 1340
Location: Snoqualmie (WA)
|
|
| Back to top |
|
|
RainierSyncro
Samba Member

Joined: February 26, 2013
Posts: 806
Location: Seattle
|
| Posted: Thu Jan 22, 2015 12:46 pm Post subject: |
|
|
| Painting the window pillars gives the van an updated look. I wonder if it will work with other color combos. |
|
| Back to top |
|
|
Honuak
Samba Member

Joined: April 21, 2009
Posts: 521
Location: AK
|
| Posted: Thu Jan 22, 2015 1:13 pm Post subject: |
|
|
| djkeev wrote: |
Looks good!
I find the black band along the windows very unusual. I've never seen that treatment before.
Dave |
|
|
| Back to top |
|
|
greebly
Samba Member
Joined: August 27, 2009
Posts: 966
Location: Here and now
|
| Posted: Sat Jan 31, 2015 2:52 pm Post subject: |
|
|
Interior is coming along , added butyl soundproofing.
This week it was warm enough to spray all the seams from the inside with fluid film, spray some cavity wax at the bottom of the panels and seal them up.
This picture is some red vinyl that I cut to put into the top of the battery tray cover to insulate it and add a little mass.
Sound deadner on panel. The Protecto wrap is some home sealer I had kicking around. I tapped the panel to determine how much was desired.
The seat pedestals seem to me to be major transmitters of noise from the front wheels so I used a butyl product in the interior areas that were not going to be sealed up.
The grey mat is closed cell dense 1/4" thick foam.
Added a grommet to the seat belt warning light harness.
More angles of the sound deadening applied , I did not install any on the inside and outer side of the compartment that will have carpet on it anyway.
The cork had some cracking on the rubberized backing which we ( son and I ) repaired with Silicone and with rubberized coating from loctite.
I am using the cork padding because It fits nicely, the mass surely adds to the sound deadening properties and it will make a nice under-layment for the new carpet in the front as well as the wood laminate floor I am installing in the back.
I reviewed Sewfine"s installation of the carpet set and noticed some nice plastic caps used on the studs located in the upper front foot-wells. Anyone have any idea where they can be obtained and/or the apart number?
Last edited by greebly on Sat Jan 31, 2015 7:05 pm; edited 3 times in total |
|
| Back to top |
|
|
greebly
Samba Member
Joined: August 27, 2009
Posts: 966
Location: Here and now
|
| Posted: Sat Jan 31, 2015 3:03 pm Post subject: |
|
|
Here is a picture of Sewfine's installation, what I want to acquire is the black plastic post caps in the picture.
|
|
| Back to top |
|
|
greebly
Samba Member
Joined: August 27, 2009
Posts: 966
Location: Here and now
|
| Posted: Sat Jan 31, 2015 3:17 pm Post subject: |
|
|
Cork installed, The cork is almost historical, recording every spill and rear heater leak that ever occurred in the van.  But due to our efforts with the silicone and the rubberized coating it is waterproof. I will install some 1/4' high density foam to cover the area where the middle seat rails were. After removing the rails I sealed the holes with silicone to prevent water intrusion from underneath. I replaced the rear heater core with a new one to eliminate further leaks. But due to our efforts with the silicone and the rubberized coating it is waterproof. I will install some 1/4' high density foam to cover the area where the middle seat rails were. After removing the rails I sealed the holes with silicone to prevent water intrusion from underneath. I replaced the rear heater core with a new one to eliminate further leaks.
Last edited by greebly on Sat Jan 31, 2015 4:00 pm; edited 1 time in total |
|
| Back to top |
|
|
IdahoDoug
Samba Member

Joined: June 12, 2010
Posts: 10248
Location: N. Idaho
|
| Posted: Sat Jan 31, 2015 3:40 pm Post subject: |
|
|
Nice! Like the attention to details. I also like the blacked out window surrounds and prefer how you ended the bottom edge versus taking the black down to the body character line like the other vehicle above. The rear hatch black treatment on the horizontal stamping is nice also.
I like the black and white motif - what color was the van before?
_________________
1987 2WD Wolfsburg Vanagon Weekender "Mango", two fully locked 80 Series LandCruisers. 2017 Subaru Outback boxer. 1990 Audi 90 Quattro 20V with rear locking differential, 1990 burgundy parts Vanagon. 1984 Porsche 944, 1988 Toyota Supra 5 speed targa, 2002 BMW 325iX, 1982 Toyota Sunrader |
|
| Back to top |
|
|
greebly
Samba Member
Joined: August 27, 2009
Posts: 966
Location: Here and now
|
| Posted: Sat Jan 31, 2015 3:58 pm Post subject: |
|
|
| Thanks Mr. Doug the van was originally solid white with the grey fiberglass cladding and grey fiberglass bumpers. I think VW referenced it as pastel white? |
|
| Back to top |
|
|
|


