| Author |
Message |
markz2004
Samba Member

Joined: November 13, 2007
Posts: 944
Location: Portland, OR

|
 Posted: Sun Apr 19, 2015 10:41 pm Post subject: Portland Westy Gets Painted Posted: Sun Apr 19, 2015 10:41 pm Post subject: Portland Westy Gets Painted |
 |
|
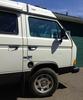
Our vans body was in good shape by most standards. We were lucky enough to be the third owner of the van that had been in the PNW for most of its life. Basically no winter salt. When we first bought the van seven years ago, the nose was heavily pitted from road rocks. I had the nose and two other panels painted.
After seven years, I found some new rust in a few spots near and under a couple window seals and the rear and front windows had small leaks. The leaks were not properly stopped with silicone near the seal. We had also acquired a couple of new rock chips in the nose, a scrape in the slider and the front window was due for replacement. In short, the seals were at the end of usefulness and I knew rust was slowly working.
I thought by being a bit proactive, I could minimize the actual amount of rust needing remediation. With a target budget and expectations in mind I took the van to about three shops. Definitely learned a bit about each approach and cost. However in each discussion, the van still had the windows in and the extent of rust was really unknown. So I did the logical thing I stripped the van of everything I could so I could see what I was dealing with and then have some specifics to discuss with a painter. This made the decision process easier and allowed me to come to terms with a painter pretty easily and hit my target budget of $2,500.
I would also have to say that ClimberJohn as well as ClimberJohns paint project is a bit of inspiration: http://www.thesamba.com/vw/forum/viewtopic.php?t=526074&start=0
General Shape of Van:
Window seals rear side windows.
A quick grinder revealed
Above front window: I considered myself very lucky to not find any rust in the bottom of the front window, a couple of small holes under this rust.
A little welding
& grinding
Rear window: This was really the worst spot for the project.
Slider door: 
In progress:
Results so far.
Finished Walk around:
https://youtu.be/kzChMpjnbKY
Link
Next up:
new tent, RMW bumpers, and put it all back together...  |
|
| Back to top |
|
 |
PDXWesty
Samba Member

Joined: April 11, 2006
Posts: 6243
Location: Portland OR
|
| Posted: Sun Apr 19, 2015 10:50 pm Post subject: |
|
|
Looks awesome!!! 
Can't wait to see it in person.
_________________
89 Westy 2.1 Auto |
|
| Back to top |
|
|
childofthewind
Samba Member

Joined: October 19, 2010
Posts: 763
Location: Eastern Sierra
|
| Posted: Mon Apr 20, 2015 5:09 am Post subject: |
|
|
Very nice!!
_________________
1987.5 wolfsburg hardtop; 2.1
As for me, I am tormented with an everlasting itch for things remote." - Melville |
|
| Back to top |
|
|
rmcd
Samba Member
Joined: October 29, 2010
Posts: 1348
Location: PNW - its a dry rain.
|
|
| Back to top |
|
|
Schlappette
Samba Member

Joined: October 14, 2011
Posts: 119
Location: PDX
|
| Posted: Mon Apr 20, 2015 8:23 am Post subject: |
|
|
This could be my van, living an alternate timeline. Same color, condition, dings, and almost the same location for door panel scrapes. I'm expecting to go this same route in maybe a year's time. I'm interested to hear where you had the work done as well.
_________________
I'm pullin' into town on the interstate, I got a steel train in the rain.
And the wind bites my cheek through the wing, and it's these late nights, this freeway flyin', always makes me sing.
-=-=-
'87 Wolfram Grey Westy -=Ollie=-
2.2L Vanistan :: RMW WBXhaustSS |
|
| Back to top |
|
|
climberjohn
Samba Member

Joined: January 11, 2005
Posts: 1840
Location: Portland Orygun
|
| Posted: Mon Apr 20, 2015 8:39 am Post subject: |
|
|
Mark,
That looks 5 star, can't wait to see it in person!
John
_________________
'86 Westy, 2.5 Subaru power
Know your limits. Exceed them often. |
|
| Back to top |
|
|
1621
Samba Member
Joined: May 15, 2006
Posts: 2174
|
| Posted: Mon Apr 20, 2015 1:37 pm Post subject: |
|
|
Looking good Mark!
_________________
'85 Westy |
|
| Back to top |
|
|
madspaniard
Samba Member

Joined: August 18, 2008
Posts: 3795
Location: Alameda, CA
|
| Posted: Mon Apr 20, 2015 1:53 pm Post subject: |
|
|
really really nice!
now you are going to lose sleep everytime you park your van on the street or parking lots...
_________________
1991 Westy auto w/ Peloquin TBD
"The only difference between me and a madman is that I'm not mad - Salvador Dali |
|
| Back to top |
|
|
markz2004
Samba Member
Joined: November 13, 2007
Posts: 944
Location: Portland, OR
|
| Posted: Mon Apr 20, 2015 3:07 pm Post subject: |
|
|
Thanks All!
The paint was a simple base coat and then a clear coat. The painter is a guy named Rick who has his own shop out in Scappoose (PM me for his number). Trailering the van to and from was all just part of the project.
I also chose not to delete the vent for the refrigerator. It seems like a couple of other vans have developed cracks there due to the fiberglass and bondo when a delete was tried. Welding a panel into place would work, but it would have added to the cost. In the walk around video, you can see the aluminum tape (now painted over) I have been using to close the vent. I've had the tape covering the vent ever since I put in the truckfridge two years ago. I simply just put the vent cover back on.
_________________
87 Westy, 250k GW 2.4 - 2.0  , 16" wheels , 16" wheels |
|
| Back to top |
|
|
|


