| Author |
Message |
Multi69s
Samba Member
Joined: January 24, 2006
Posts: 5363
Location: Lefty, CA

|
 Posted: Tue Jun 16, 2015 11:14 pm Post subject: Dual 40 DCNFs on my T4 powered Squareback (long) Posted: Tue Jun 16, 2015 11:14 pm Post subject: Dual 40 DCNFs on my T4 powered Squareback (long) |
 |
|
Well I finally got some time to install my 40 DCNFs onto my Squareback, and it runs pretty good (more on that later). Just a few engine specs. The motor itself is pretty mild. It is a 2L, with a Scat C25 cam, ported and polished 1700 heads with 8:1, 0.045 deck. Balanced stock rods (end to end & total) 914 P&C, Solid spacer 1700 rocker arms with swivel adjusters. 72-74 heater boxes with thunderbird header and Suzuki Hayabusa muffler. Previously I was running dual ICT Webers, with a 028 dizzy and an automatic transaxle. It took quite a little work, because I had to do it on the cheap. If my SB was my only toy, I would have purchased some of the stuff like linkage, but I also have two Type 1s, 4 dirt bikes, a mini buggy and a quad. So I tend to have more time than money to spread around.
The first thing that I did was to polish the manifolds and port match them to the heads. I then used the cast iron top of my table saw and fine sandpaper to true up both ends of the manifolds. I had read some posts that these Webers do not like excess heat, so I went with the phenolic spacers between the manifolds and the heads. However due to the added thickness of the spacers, I had to get longer mounting studs, (that was a couple of hours on the phone). Then I bolted everything up so I could start on the linkage. Basically what I got when I bought the carbs were the manifolds, the linkage supports and the pull rods. Also note that the manifold supports were designed for the OLD round cross bar linkage like below (stolen from Samba).
Luckily, I had two of the round style Type 1 cross bars that I could steal pieces from. However, I ran into a design problem. The DCNFs butterflies open when the linkage arms are pulled upwards, unlike the IDFs and ITCs that move downwards. At first I was contemplating making a wheel to hook the throttle cable to, but then I thought what if I turn the carbs around? When you turn the carbs around, you can then use the standard pull lever, because now the pulling action will cause the carb arms to lift. So now was the time to start building the linkage. First I had to make the cross bar itself, because, the Type 1 style wouldnt work. So it was off to the metal yard, where I picked up some 1/4" tubing. However, the tubing was a little too large to go into the heim of the support, so I had to turn the ends down in the lathe to get a nice snug fit in the heims.
If you have ever worked with the older round cross bar linkage, you know that it is a royal pain to setup. All of the levers are just stamped straight pieces like below.
With this type of linkage you end up with angles from hell, and syncing the carbs is really time consuming. Not only do you have the pull rods angled left to right, but also front to back. I wanted to have the straightest pull that I could, so back to the lathe I went to make some standoffs.
The standoffs would eliminate the front to back angles, so now I had to get rid of the left to right angles. So I took the stamped, flat levers, and I welded a 90 degree extension to them, then I boxed them in for strength. They arent pretty, but I am more into go then show.
If you have setup a dual carb setup, you know that there are two rules that need to be followed when syncing them. First, both carbs need to start to open at the exact same time. Then they must continue to open at the same rate, and be wide open at the same time. So I had to do some shimming of the pull rod balls to get this to happen. So once I got the linkage right, I had to face my next hurdle, providing a vacuum signal for the automatic transaxle.
Luckily the version of Webers that I had, had vacuum ports (some dont). These ports are below the butterflies, so they produce manifold vacuum.
So I went to my FLAPS and picked up some 3/16 and 1/4" brake lines. I then fish mouthed the 3/16 line with a 1/4 dremel, made a little holding jig and welded them up.
I then drilled through the 3/16 line into the 1/4" line to create the vacuum passages. To get rid of any burs, I then drilled through each end of the 1/4 line. Once I was sure that there were no burs in the tubing, I then welded a screw into one end to seal off the units. These F units were then connected to the balance tube, and the automatic transmission.
The last bit of fabrication was to make the kick down switch holder. For this I just put some slots in a piece of 1/8 steel and welded it on to the air cleaner platform, and bolted a contact switch to it.
Once I got everything working right, I pulled the carbs off, cleaned them, and threw in a rebuild kit. During the rebuild process, it was a little difficult to set the float level with my calipers. I had a caliper that wasnt very accurate, so I turned it into a dedicated float measurer. So now I use one of my good calipers to set the height, and float adjustment is now an easier process.
I then made a breather in one air cleaner, drilled holes in the air cleaner wing nuts for safety wire and reassembled everything.
So how does it run? Even though the Scat C25 is a very mild cam, I still had a lopey idle when running the dual ICTs. Now it idles as smooth as a babys bottom, and the idle is even more improved when sitting at a stop light while in gear. Top end is improved as well. When the kick down switch is activated on my transmission, it shifts into 3rd gear at about 55mph. With the ICTs, I could row the shifter, and it would lose steam at about 60mph. However now I can carry 2nd gear up to 70mph. However, the mid-range is lacking a little bit, so I have some different jets and emulsion tubes coming in. Also heat doesnt seem to be an issue. Today I did a 40 mile run at between 75 and 80mph, with the temperature here being over 100 degrees. The oil temp stayed where I like it (220 degrees indicated). At the end of the run, it did not diesel when shutoff, it took of great from a stop, and it started back up easily.
However, I did have some shifting issues when I first got it assembled. It would shift from 1st to 2nd fine, but it didnt want to shift into 3rd gear until 45 mph unless I lifted the throttle. At first I tried different configurations of vacuum reservoirs. I tried different sizes, and even tried using a reservoir with a check valve, but didnt see much improvement. Then it dawned on me to check the primary throttle pressure of the transmission  . Hooked up my gauges, adjusted the pressure to as close to the specs as I could, and it vastly improved the shifting. Now it shifts through all gears at normal traffic speed. However, if I am in cruise mode and just want to ooze down the road, I still have to lift my foot ever so slightly to get it to shift into 3rd at around 30mph. . Hooked up my gauges, adjusted the pressure to as close to the specs as I could, and it vastly improved the shifting. Now it shifts through all gears at normal traffic speed. However, if I am in cruise mode and just want to ooze down the road, I still have to lift my foot ever so slightly to get it to shift into 3rd at around 30mph.
It was a lot of work, but I believe that it was worth it. Cant wait to get my jets in and tune even further. I also need to fix my odometer so I can do a fuel mileage check. With the ICTs I was getting about 18mpg city and 24mpg freeway (70mph). Hopefully I can get not only better performance, but also better mileage as well (if I can keep my foot out of it)  . .
_________________
69 road Bug 2110
73 Squareback - 2L, T4, Automatic W/ AC
Gone, but many fond memories 69 Baja Bug 2010 - 5 Rib Bus Transaxle
Gone but not forgotten 72 Baja Bug 2010
My builds
T4 into Squareback http://www.thesamba.com/vw/forum/viewtopic.php?t=458944&highlight=
Auto Trans Rebuild http://www.thesamba.com/vw/forum/viewtopic.php?t=516066&highlight=
AC in Squareback https://www.thesamba.com/vw/forum/viewtopic.php?t=...highlight= |
|
| Back to top |
|
 |
Nate M.
Samba Member

Joined: August 11, 2003
Posts: 1306
Location: Anacortes, WA U.S.A.
|
| Posted: Wed Jun 17, 2015 6:14 am Post subject: |
|
|
Nice write-up; thanks for sharing your experience in getting it all to fit. Custom work is time consuming, but so much fun and so sweet when you get all the kinks worked out along the way.
I have a couple sets of these carbs with one set complete for a type4. I'm hoping to put my set to good use in the near future.
_________________
Regards,
Nate M.
Squarsche build
Heavy Metal Affliction feature
For heaven's sake, put a type4 and a Porsche 5-speed in there. . . It's the right thing to do!! |
|
| Back to top |
|
|
Clatter
Samba Member

Joined: September 24, 2003
Posts: 7537
Location: Santa Cruz
|
| Posted: Wed Jun 17, 2015 7:22 am Post subject: |
|
|
Yeah!
DCNFs are going to take some doing to get right for sure.
Thanks for sharing and all.
Sweet how you got the kickdown to work and everything.
Keep us posted...
_________________
Bus Motor Build
Whats That Noise?!? |
|
| Back to top |
|
|
Multi69s
Samba Member
Joined: January 24, 2006
Posts: 5363
Location: Lefty, CA
|
| Posted: Wed Jun 17, 2015 11:37 am Post subject: |
|
|
Thanks for the replies.
In actuality, most of what I did would be applicable for someone that is running a Type 3 engine. What most people don't realize, is that jetting is far more critical when you have an automatic transmission versus a manual. If you are at a stop sign and need to cross or merge into traffic that doesn't stop, you need your power now. With a manual transmission, if the engine burps, farts, or sneezes you can throw in the clutch, clear it and keep on going. However, with an automatic, if it does that, you may be sitting dead in oncoming traffic. At least I have that part of the jetting working fine.
_________________
69 road Bug 2110
73 Squareback - 2L, T4, Automatic W/ AC
Gone, but many fond memories 69 Baja Bug 2010 - 5 Rib Bus Transaxle
Gone but not forgotten 72 Baja Bug 2010
My builds
T4 into Squareback http://www.thesamba.com/vw/forum/viewtopic.php?t=458944&highlight=
Auto Trans Rebuild http://www.thesamba.com/vw/forum/viewtopic.php?t=516066&highlight=
AC in Squareback https://www.thesamba.com/vw/forum/viewtopic.php?t=...highlight= |
|
| Back to top |
|
|
sharkskinman
Lateral Lunatic
Joined: April 26, 2006
Posts: 4030
Location: Deep In My Own Psyche
|
| Posted: Thu Jun 18, 2015 9:22 pm Post subject: |
|
|
I thought of a set of those for the 1700 engine I just put in
_________________
74 Mexi Swamp Thing. 70 square volksrod (Swamp Rat)..65 C10
| Me of Course wrote: |
| Extremity is relative to how far your willing to jump |
| Ward Cleaver wrote: |
| You ever try a pink golf ball, Wally? Why, the wind shear alone on a pink golf ball can take the head off a 90-pound midget at over 300 yards |
PS4 "NKOGNEATO" |
|
| Back to top |
|
|
Multi69s
Samba Member
Joined: January 24, 2006
Posts: 5363
Location: Lefty, CA
|
| Posted: Wed Nov 04, 2015 3:35 am Post subject: |
|
|
Shortly after I installed these carbs I dropped a valve seat. So in the process of getting the heads rebuilt, some of the engine parameters were changed. I went with bigger valves in the heads, and a higher compression ratio. Once everything was reassembled, the jetting was semi close (drivable), but not near where I wanted it. One of the issues that I discovered was that at certain RPMs, I had a tremendous amount of inversion, or standoff out of the carbs. However, the family was itching for a road trip, so we took a day trip to Santa Cruz, which was about 400 miles round trip. A couple of days later, I pulled off the air cleaners to do some jetting, and I discovered that there were holes in the filter elements. What I surmise was that the elements were made out of paper, and the inversion had soaked them with gas. Then since they could no longer flow air well, the engine vacuum pulled pieces out of the elements. So the first order of business was to eliminate the standoff.
One thing that I have learned in this experience is that are many different versions of the Weber 40 DCNF. In the simplest of terms, you have the carbs that are sold as kits today. They come with straight velocity stacks made into the tops of the carbs.
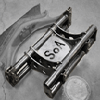
However, the carbs that I have appear to be the OEM style that came on Ferraris, and other exotic cars. These carbs have a totally flat top. Also when you look down the carb throats, there is a step in the throats (see arrow).
I knew that this step would cause some form of turbulence to the air flow, so I started to look for OEM air cleaner setups for the Ferraris to see how they were setup. What I found was that they had small bolt on velocity stacks that had protrusions that mated to this step.
My wallet isnt thick enough to purchase these stacks, so after some searching, I found that Bergs had bolt on stacks for the 42 DCNF.
But on these stands, the protrusions were too long for the forties, plus the overall height was longer than advertised. If I could have found 3 elements (my max height), I could have trimmed a little off of the bottom, but the closest elements I could find were 2-1/2 (closer to 2-3/4 though). So that meant I would have to shorten the Berg stacks by about 0.400, which entailed cutting off the mounting tabs. This meant that I would have to make a jig to relocate the mounting tabs, after I had shortened the stacks. So grabbing the Calipers, and taking a bunch of measurements, I was able to use AutoCAD to make a template.
I used an ice pick to mark the center point for each stack, then I used a Forstner bit to bore the stack holes.
I slipped the unmolested stacks in the jigs, then drilled though the mounting tab holes, so I would have the ability to relocate the tabs and weld them into place.
Once the jigs were made (one for each stack set), I removed the mounting tabs and scribed a line on the bottom of the stacks to remove the 0.400 of material. I then used a Metal cutoff disc in my angle grinder and cut the stacks just shy of the scribed line. Next I used my jigs and a square (not shown) and trued up the bottom of the stacks on my belt sander.
I then placed the stacks on the carbs so I could get the correct spacing for reinstalling the mounting tabs. After that I placed the stacks in the jigs to the correct depth, and bolted the mounting tabs to their respective positions, so they could be welded into place.
Using an oxy-acetylene torch, the tabs were then welded to the stacks. This process destroyed the jigs, so that is why two jigs were used. The stacks were then cleaned and sprayed with a galvanized coating to prevent rust. Heres before and after.
I then installed the stacks on the carbs, and the inversion disappeared. Now the real fun began jetting. Even though the 40 DCNFs used to be a popular carb, trying to find jetting specs proved next to impossible. So after dropping some $$$ on brass, and working with Pierce Manifolds, I started to get very close. However, the one problem that I kept having was throttle response. When cracking the throttle from an idle to almost WO, the engine had a major bog, (not good for an automatic transmission). I had picked up F24, and F25 emulsion tubes (most common for VWs), plus different accelerator jets as well as idles and mains. I was getting close, but no cigar. The one item that is no longer available for the DCNFs is the accelerator cams. You can adjust the AC pivot arm point, but you can no longer get cams with different lift characteristics.
After a lot of frustration, I went back to the Ferraris emulsion tubes (F36) and bam, I am 99% there. The engine now runs great, with excellent throttle response, and new found power. In fact we just got in some badly needed rain, and I had to be careful when taking off from a start. It will actually spin the tires if you arent careful with your foot. Once the jetting was done (for now), I had to modify the air cleaner housings to go to a larger element. In the end, I braised on 3 x 1/4 bolts to allow for the taller elements. Here are pics of the process I used to keep everything square and true, and the finished product.
So now is the time to get everything tuned for both performance and economy. I will be running fuel mileage checks as well as watching engine temps to finalize my jetting. One thing I do know is that the powerband of the engine has now changed. It is no longer the low end stump puller that it used to be. Before the powerband of the engine matched the shift points of the transmission fairly closely, however, now the engine pulls 13-17 MPH past the transmissions shift points. So unless I am rowing the shifter, I am leaving a lot of power / acceleration on the table. After a lot of research, I believe that I have found some fairly easy modifications that can be done to the 003 automatic to allow it to be a better match for a performance engine. So after I come up for air, that will be my next undertaking stay tuned.
_________________
69 road Bug 2110
73 Squareback - 2L, T4, Automatic W/ AC
Gone, but many fond memories 69 Baja Bug 2010 - 5 Rib Bus Transaxle
Gone but not forgotten 72 Baja Bug 2010
My builds
T4 into Squareback http://www.thesamba.com/vw/forum/viewtopic.php?t=458944&highlight=
Auto Trans Rebuild http://www.thesamba.com/vw/forum/viewtopic.php?t=516066&highlight=
AC in Squareback https://www.thesamba.com/vw/forum/viewtopic.php?t=...highlight= |
|
| Back to top |
|
|
Nate M.
Samba Member
Joined: August 11, 2003
Posts: 1306
Location: Anacortes, WA U.S.A.
|
| Posted: Wed Nov 04, 2015 7:53 am Post subject: |
|
|
Super great report! Congrats on the excellent progress and cool custom touches.
When the time comes for installing my set, I may have to steal your modified Berg velocity stack trick. That turned out awesome!!
_________________
Regards,
Nate M.
Squarsche build
Heavy Metal Affliction feature
For heaven's sake, put a type4 and a Porsche 5-speed in there. . . It's the right thing to do!! |
|
| Back to top |
|
|
Multi69s
Samba Member
Joined: January 24, 2006
Posts: 5363
Location: Lefty, CA
|
|
| Back to top |
|
|
|


