| Author |
Message |
mpl
Samba Member
Joined: December 07, 2015
Posts: 97

|
 Posted: Mon Jan 04, 2016 4:22 pm Post subject: My Bostig RG6 build Posted: Mon Jan 04, 2016 4:22 pm Post subject: My Bostig RG6 build |
 |
|
Im starting this thread to document my work on converting my Westy from its stock waterboxer (WBX) engine to a Zetec engine using Bostigs conversion kit (RG6 release). While this is primarily for my future reference, I hope it helps others as well!
My Westy is a 1984 2WD Vanagon with a 4-speed manual transmission. It started with a 1.9l WBX engine. It does not have power steering or air conditioning.
Table of Contents
Last edited by mpl on Tue Jan 26, 2016 1:53 pm; edited 8 times in total |
|
| Back to top |
|
 |
mpl
Samba Member
Joined: December 07, 2015
Posts: 97
|
| Posted: Mon Jan 04, 2016 4:39 pm Post subject: Re: My Bostig RG6 build |
|
|
Baseline and Background [October 2015]
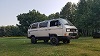
Heres my Westy, right when I purchased it, and before the Bostig conversion.
Hes named Fred, after my friend who died of cancer very unexpectedly and very young (in his early 30s). My friend Fred worked very hard in Wall Street jobs, but also always interspersed this work with long travel breaks. Fred would take six months to a year at a time away from work, taking trips like cycling across the United States or traveling around the world. It was during one of these trips while he was in northern Africa that Fred was not feeling well and came home for medical attention. It was only then that he first learned that he had very advanced cancer, with not much longer to live. Fred passed away soon thereafter. Fred always taught me both during and after his life that while work is necessary and can be meaningful, we also shouldnt postpone life enjoyment for too long, because we never know how long well have on this Earth. It seemed only fitting to name the Westy after Fred.
Fred the Westy, upon purchase, was pretty much a stock 1984 2WD manual Westy. While the two prior owners had taken good care of him even though Fred was in the Northeast his whole life, the body was in great shape overall with only some minor seam rust in a few spots his engine was anemic. Not only did the engine sound like it was on the verge of dying, but it also ran very gassy, with the exhaust rich with fuel. The transmission also needed attention, as everything was original over 170K miles (even the clutch).
I chose the Bostig kit for two reasons: reliability, and walk-through instructions/videos. I appreciated Bostigs philosophy that most Vanagon owners just want to enjoy trips, and as a result whatever offered stronger reliability appealed to me. While I am a seasoned bicycle mechanic, I have no prior auto wrenching experience pre-Westy. So, I needed to ride the coattails of someone elses learning to do the conversion, and simultaneously using the conversion as an opportunity to better learn the van appealed to me.
Last edited by mpl on Mon Jan 04, 2016 6:24 pm; edited 2 times in total |
|
| Back to top |
|
|
MsTaboo
Samba Member

Joined: June 02, 2006
Posts: 4087
Location: East Kootenay, British Columbia
|
| Posted: Mon Jan 04, 2016 5:35 pm Post subject: Re: My Bostig RG6 build |
|
|
Nice van! You're gonna love the Zetec.
Doing the conversion yourself will give you an in-depth tutorial into your van. Take your time, clean up the engine bay as you go, and have fun!
Long live Fred the van, nice tribute to your friend. 
_________________
Currently:
'90 Syncro Westy 3 knob w/Zetec
The information age has morphed into the age of disinformation and willful ignorance. Agnotology!
Help the fight against Truth Decay.
Defend democracy, support Ukraine. |
|
| Back to top |
|
|
mpl
Samba Member
Joined: December 07, 2015
Posts: 97
|
| Posted: Mon Jan 04, 2016 6:22 pm Post subject: Re: My Bostig RG6 build |
|
|
Buying a Zetec Engine [December 2015]
I started by sourcing a Zetec engine using the instructions in the Bostig factory manual (Engine Call Sheet, pages 115-117). A key detail not mentioned in the manual is that engines can be purchased either from manual transmission or automatic transmission Focus donors.
I searched car-part.com using Bostigs instructions and found more than 20 Zetecs with less than 50,000 miles on them within driving distance of my house, all priced between $350 and $500.
The first candidate I considered was from a 2001 Focus (photo below). Though it only had 29,000 miles on it, it had the wrong kind of injector harness (black plug instead of purple plug), and the selling yard seemed a bit dicey. So, I passed on it.
My second candidate which I ended up purchasing was from a 2004 Focus ZX3. I liked that it came from a newer car and the mileage was still low (45,000 miles). Price was $425 including tax. The selling yard was very helpful, honest, and responsive - I purchased from J.C. Recycling in Meriden, CT, and would recommend them to others.
I picked up the engine rather than paying to have it shipped. Here are photos of the engine at the time of purchase. I inspected it using the Engine Inspection and Preparation checklist in Bostigs factory manual (pages 8-10) and their engine prep video.
The galleys looked pretty good...
No cracks or breaks on the intake manifold. The coveted purple plug is also there. At the time, I didnt notice that the throttle body is cracked; I kicked myself later when I realized Id need to buy a replacement throttle body.
Heres the exhaust side of the engine...
On the front of the engine, the EGR was bashed in, but that wont be reused, so thats okay. The power steering pump line was also bashed, but Fred doesnt have power steering, so this is fine for my purposes. This engine is also missing an A/C bracket, but Fred doesnt have air conditioning, so this is fine.
Ill post follow-up photos once Ive cleaned up and prepped the engine. |
|
| Back to top |
|
|
mpl
Samba Member
Joined: December 07, 2015
Posts: 97
|
| Posted: Mon Jan 04, 2016 7:26 pm Post subject: Re: My Bostig RG6 build |
|
|
Removing the Waterboxer [December 22-27, 2015]
Jim at Bostig set a target delivery date for RG6 for sometime in January 2016. I had some vacation time around the holidays, so figured Id make some advance headway on the conversion by removing the old WBX.
Heres a before photo of my engine bay with the stock 1.9l WBX.
I started by buying a used engine hoist from Craigslist. It turned out to be a huge help, but is very heavy; if you decide to purchase one, be sure to have two or three strong friends to help you move it!
I then made sure that I had all of the tools that are itemized in the Tool and Workspace Preparation part of the Bostig factory manual (page 7). I had to pick up a few missing tools at Sears and some additional supplies at the FLAPS.
I then set to work disassembling the WBX, following Bostigs disassembly video instructions and JudoJeffs WBX removal notes.
I kept a detailed log of my WBX disassembly, which builds on JudoJeffs WBX removal notes. Heres my commented version of the WBX disassembly instructions, in case its helpful to others:
https://docs.google.com/spreadsheets/d/1XenQhjxh7ZkaUJ9uzc8EMpH9N68HZ-EYrajZIANdai0
Most of the WBX disassembly was pretty straightforward using the above resources. I ran into two major challenges:- Removing the inner CV bolts. My CV bolts were rusted tight, and were 6mm Allen, so offered less grip than the M8 triple square bolts on later Vanagons. It took me two days of persistent soaking with PB Blaster and working on the bolts to free them.
- Disconnecting the clutch slave cylinder. I found it very difficult to free the clutch slave cylinder from the transaxle. First, the 13mm bolts connecting the clutch slave cylinder to the mounting bracket are very difficult to access. I accomplished this by sliding a thin 13mm box wrench through the bracket to hold one side of the nut/bolt combo, then using a 13mm ratchet with a long extension lying underneath the van to free the nut/bolt. (See photo below: red circle shows the area where these 13mm bolts are removed.)
Once those bolts are removed, my clutch slave cylinder still would not free from the mounting bracket. In the photo below, you can see a hard line in the green circle that kept the clutch slave cylinder fixed in the red circle.
I had to remove one more bolt connecting the mounting bracket to the transaxle in order to free the hydraulic line (see red arrow in photo below); this then allowed me to pull the clutch slave cylinder up and away from the transaxle.
Once I sorted out those issues, the rest of the WBX disassembly was pretty straightforward. Here are the engine and transaxle, disconnected from the van, held from above by an engine hoist and from below by a floor jack.


After slowly and carefully lowering the WBX and transaxle, ensuring that all wiring and hoses were disconnected, I was able to pull the assembly out from under the van.

Heres the after photo of my engine bay without the WBX. You can see the CVs below, wrapped up in plastic bags to keep them clean for now.
 |
|
| Back to top |
|
|
JudoJeff
Samba Member
Joined: May 24, 2013
Posts: 1179
Location: Near Springfield, MA
|
| Posted: Tue Jan 05, 2016 7:03 am Post subject: Re: My Bostig RG6 build |
|
|
Mike,
Great job!
Did you ship the transmission out for rebuild?
Jeff
_________________
________________________________________
1989 Vanagon GL Westfalia Camper, Burned up on 7/31/16.
1987 Vanagon GL Westfalia Camper, Bostig & Rebuilt, sold
1986 Vanagon GL Westfalia Camper, Bostig Sold May 10, 2021
1999 Ford GTRV Westfalia camper (30% bigger Westy layout) |
|
| Back to top |
|
|
Wasted youth
Samba Member

Joined: July 06, 2012
Posts: 5134
Location: California's Hot and Smoggy Central Valley
|
| Posted: Tue Jan 05, 2016 10:55 am Post subject: Re: My Bostig RG6 build |
|
|
| I will be following this thread. Looks like your project and this thread are off to a great start! Keep it rolling! |
|
| Back to top |
|
|
Atadloco
Samba Member
Joined: July 13, 2012
Posts: 254
Location: New Hampshire
|
| Posted: Tue Jan 05, 2016 1:20 pm Post subject: Re: My Bostig RG6 build |
|
|
| Great job! Another resource I can use when I do mine, RG7 group. |
|
| Back to top |
|
|
mpl
Samba Member
Joined: December 07, 2015
Posts: 97
|
| Posted: Tue Jan 05, 2016 3:16 pm Post subject: Re: My Bostig RG6 build |
|
|
| JudoJeff wrote: |
Mike,
Great job!
Did you ship the transmission out for rebuild?
Jeff |
Yep! I did, indeed. The rebuilt transaxle just arrived this week. Cant wait for the SK-A kit to arrive so that I can put it together with the Zetec! |
|
| Back to top |
|
|
mpl
Samba Member
Joined: December 07, 2015
Posts: 97
|
| Posted: Wed Jan 06, 2016 7:06 am Post subject: Re: My Bostig RG6 build |
|
|
Buying Required Parts [December 2015]
Before proceeding with the conversion, I hoped to source all of the items that Id need in one fell swoop. I hope to avoid a scenario where my conversion work will be delayed for hours or days at a time because Im waiting for a part that I need at that particular point.
I found that I needed to work through four categories of items: (1) Bostigs Required Parts from their factory manual; (2) items to repair my Zetec; (3) my transaxle; and (4) a few small upgrades.- Bostigs Required Parts. Armed with the Bostig factory manual, I set out to source all of the items that they list in their Required Parts (page 6). It took several reads through the manual and some internet research for a newbie like me to decipher some of the necessary parts, but with time, reading, and some questions to Jim at Bostig, I was able to figure it out.
Ive read Jims previous comments that while one should be able to source many of the parts for the Bostig conversion from salvage yards, one shouldnt need to set foot on a salvage yard to get them instead, one can use car-part.com to find parts and order by phone. For my experience, I only used car-part.com to buy my Zetec engine and alternator; I did this for the engine to get an actual look at the engine and avoid paying shipping costs, and for the alternator because theres a salvage yard 10 minutes away from my house that had one. For some of the other key parts, I found eBay to be just a little more expensive than car-part.com, but a whole lot more convenient I could click and order online rather than calling around to different salvage yards.
Heres a summary of where I sourced the materials on Bostigs Required Parts list, in the order that they appear on page 6 of the Bostig manual:- car-part.com
- Zetec engine (see Engine Call Sheet on pages 115-117 of Bostig manual)
- If my van had power steering, I would have sourced the power steering pump from here (see Power Steering Pump Call Sheet on pages 118-119 of Bostig manual)
- Alternator
- eBay
- Electronic control unit (ECU) (see ECU Call Sheet on 120-123 of Bostig manual)
- Mass air flow (MAF) meter
- Air box
- A Ford dealership with online sales (I purchased from AutoNation Ford White Bear Lake)
- RockAuto
- Cooling system gaskets
- All of the items in Bostigs RockAuto Order list on pages 112-114 of their manual
- Bus Depot
- Clutch replacement kit (OE Sachs kit, not LuK kit, as recommended by Bostig and others on TheSamba)
- FLAPS
- Serpentine belt
- High pressure fuel line
- Items to repair my Zetec. After walking through Bostigs Zetec engine prep video, I needed to pick up a few parts that were either missing or damaged on my salvage engine. Your situation may differ depending on the condition of the Zetec that you purchase. I purchased all of these parts from eBay:
- Heat shield (I got the stock one that comes with the Zetec, not Bostigs upgraded heat shield.)
- Ignition coil (Searching for the Motorcraft part number printed on the top of the ignition coil (e.g., 988F-12029-AC) will help find the right one quickly.)
- Tensioner pulley
- Throttle body (Be careful that this matches the particular style on your Zetec engine. Jim advised that if youre searching for these on car-part.com, then search for an automatic transmission Focus, even if your Zetec engine was from a manual transmission Focus.) [Edited 01/26/2016 to correct myself
]
- My transaxle. Unrelated to Bostigs Required Parts list and completely specific to my situation, I knew that Id need my 4-speed manual transaxle to be rebuilt, as shifting felt very fragile on my stock transaxle with 170K+ miles, with first gear being particularly difficult to access. Given rave reviews from TheSamba and Bostig, Id hoped to work with AA Transaxle, but AAs stellar reputation meant that their work calendar was booked out for months. After calling around a bit more, I went with German Transaxle given their strong reputation and availability on their work calendar.
- A few small upgrades.
- Bostigs billet thermostat housing
- Hose drains. I found it time-consuming and annoying to drain my cooling system, and didnt want to rely in the future on having a Shop Vac to simplify draining. I picked up two billet aluminum hose drains that Ill install at the lowest point of my coolant lines (one on the send line, one on the return line) to simplify future coolant draining.
- Metal tees for coolant system. Signalocity and insyncro recommend upgrading the plastic tees in the coolant system to metal tees (see this thread). I followed their advice, ordering aluminum tees from Jaguars That Run.
Last edited by mpl on Tue Jan 26, 2016 12:56 pm; edited 1 time in total |
|
| Back to top |
|
|
CampWesty
Samba Member
Joined: September 05, 2012
Posts: 70
Location: North Carolina
|
| Posted: Wed Jan 06, 2016 8:33 am Post subject: Re: My Bostig RG6 build |
|
|
One thing that's not listed in the parts list that you'll need for your 84 is a 2-inch hole saw for the wiring harness. Check out SK-W and you'll see what I mean. Also, drilling in metal really does require a metal punch. A "step" bit is money well spent too. I first tried without either of these and it was near disaster; I couldn't get an accurate hole started due to the bit wandering.
I used this step bit and punch/awl from Lowe's for all of the sheet metal holes, except for the 2-incher mentioned above. Looks like I could have saved a couple of dollars ordering it ahead of time from Amazon:
Irwin Tools Unibit #1 1/8-Inch to 1/2-Inch Step-Drill Bit
Bostitch 2-5/8-in Awl
I was in a similar boat as you being totally new to DIY car repair. I found it a little overwhelming at times wading through the parts list, tool list, call sheets, and doc updates on Bostig's website. You will have invariably forgot or overlooked something. It will be frustrating for sure when you realize your "mistake", but there is always something else you can work on while you wait for parts/tools to show up. I made numerous trips to the store, mostly for tools. If you have a full set of tools already you'll be one step ahead of me.
If you're looking for something to do until Bostig's kit starts showing up you could:
1. Cut the hole for the wiring harness. 2. Swap the cooling hoses up front by the radiator. 3. Replace the rear heater core, valve, and hoses. - Not part of the conversion, but no better time to do it. If your's isn't leaking yet it probably will be soon. (Assuming it's original.)
_________________
Eric
1985 Wolfsburg Westy Weekender, Bostig RG5
Bostig Facebook Group
Vanagon Nation Facebook Group
Instrument Cluster Foil Repair Kits - Fix your faulty blue foil for good! |
|
| Back to top |
|
|
insyncro
Banned

Joined: March 07, 2002
Posts: 15086
Location: New York
|
| Posted: Wed Jan 06, 2016 9:14 am Post subject: Re: My Bostig RG6 build |
|
|
mpl,
Beautifully done thus far.
Keep it up.
You will have a fantastic van once completed. |
|
| Back to top |
|
|
mpl
Samba Member
Joined: December 07, 2015
Posts: 97
|
| Posted: Wed Jan 06, 2016 11:25 am Post subject: Re: My Bostig RG6 build |
|
|
insyncro, thanks for your positive feedback! Given your deep experience with Vanagons generally and the Bostig conversion specifically, your thumbs-up is really encouraging for me to know that Im on the right track.
Wasted youth and atadloco, welcome!
CampWesty, thanks for your tip. Ive got the bits and punch/awl that you suggested, so thats good, but I appreciate you warning me of this! Good suggestion as well regarding the rear heater core. Im currently thinking of just stripping out my rear heater while I do the Bostig conversion, as I never use it and this can remove a leaky point of failure. Assuming I do strip out my rear heater, then Id hope to reuse/widen one of the existing heater hose holes to accommodate the new wiring run (rather than drilling an entirely new hole in the sheet metal). Havent decided yet one way or another; well see how it goes! |
|
| Back to top |
|
|
buildyourown
Samba Member

Joined: March 01, 2009
Posts: 1668
Location: Seattle
|
| Posted: Wed Jan 06, 2016 8:50 pm Post subject: Re: My Bostig RG6 build |
|
|
I have a use throttle body from an '02 Ill give you.
I bought it and it doesn't fit my '01. Different TPS switch mount.
Pay the shipping and its yours. Pretty sure it fits |
|
| Back to top |
|
|
dobryan
Samba Member

Joined: March 24, 2006
Posts: 16503
Location: Brookeville, MD
|
|
| Back to top |
|
|
Bassyaks
Samba Member
Joined: October 06, 2010
Posts: 1137
Location: S.E. Connetitcut
|
| Posted: Thu Jan 07, 2016 1:00 pm Post subject: Re: My Bostig RG6 build |
|
|
| Quote: |
| ◦Throttle body (Be careful that this matches the model on the particular year of your Zetec engine. Jim advised that if youre searching for these on car-part.com, then search for an automatic transmission Focus, even if your Zetec engine was from a manual transmission Focus.) |
this is a very old statement (I believe)
Be Careful the throttle bodies are NOT the same, because of the TPS and will cause drivability problems.
Down the road if you need a TPS
The automatic TPS are almost impossible to find and if you do you may have to purchase the complete throttle body for $300
15 years ago they were easy to find, Only the first few years are interchangeable.
There's more info on it here: http://www.focusfanatics.com/forum/zetec-performan...works.html
Maybe ask Jim before you start looking for the throttle body.
Great write up |
|
| Back to top |
|
|
mpl
Samba Member
Joined: December 07, 2015
Posts: 97
|
| Posted: Fri Jan 08, 2016 5:54 am Post subject: Re: My Bostig RG6 build |
|
|
Thanks, buildyourown, dobryan, and Bassyaks for weighing in.
buildyourown, thanks for offering your extra throttle body! I picked one up from eBay, so I will check to see if that one fits correctly and does the trick. If it doesnt work, then I may come ask for yours.  Thanks for offering! Thanks for offering!
dobryan, thats the exact debate that Im running through in my head. Well see where I land
Bassyaks, thanks for the tip. To clarify, I didnt purchase a new replacement throttle body; I found a salvage/used one on eBay for $60, luckily from an automatic transmission. I think that both of us may have some of the fit details correct and some of the fit details incorrect.  Ill check fit once my replacement part comes in and will report back. If I ordered wrong, then Ill check with Jim and report back on this thread. Ill check fit once my replacement part comes in and will report back. If I ordered wrong, then Ill check with Jim and report back on this thread. |
|
| Back to top |
|
|
Bassyaks
Samba Member
Joined: October 06, 2010
Posts: 1137
Location: S.E. Connetitcut
|
| Posted: Fri Jan 08, 2016 12:10 pm Post subject: Re: My Bostig RG6 build |
|
|
The problem will be in replacing the TPS if needed down the road.
The Throttle Position Sensor for the Automatic throttle body is extinct
For others :
The Automatic throttle body is different and has different TPS connectors
If your motor came without a throttle body , look to purchase one for a early 2000-2003 manual tranny car.
Jim does NOT suggest to run the automatic throttle body if you don't have to .
By all means try to get the Manuel transmission throttle body
Continue On---- great job |
|
| Back to top |
|
|
bostig
Samba Member
Joined: February 01, 2006
Posts: 235
|
| Posted: Mon Jan 11, 2016 10:42 am Post subject: Re: My Bostig RG6 build |
|
|
The TPS styles are different between auto and manual yes, they are not extinct, they are just not listed in some of the most common places for some odd reason... perhaps fighting between mfg reps or other distro nonsense.
Delphi still makes them, walker buys/sell them as well as Standard motor products.
they are under $30.
Here is the link to a standard motor products TH185 closeout at rockauto for $13, regular price $22. This is for the AUTO... the manuals are also readily available.
https://www.rockauto.com/catalog/raframecatalog.ph...plate=true
Very few people on the samba post correct information most of the time, nobody in the world does all the time. |
|
| Back to top |
|
|
bostig
Samba Member
Joined: February 01, 2006
Posts: 235
|
| Posted: Mon Jan 11, 2016 10:47 am Post subject: Re: My Bostig RG6 build |
|
|
| Also it should be noted, I don't recommend salvage alternators. Seen bad ones almost every time someone went that route. Alternators should come from local branches of national chains, bad rebuilds off the shelf are more and more common from every rebuilder, so being able to swap initially... and then having a warranty around the country is a good thing. |
|
| Back to top |
|
|
|


