| Author |
Message |
Trashman
Samba Member

Joined: May 18, 2016
Posts: 280
Location: Santa Cruz, CA

|
 Posted: Tue Dec 20, 2016 7:53 pm Post subject: Re: 1968 Deluxe Build Posted: Tue Dec 20, 2016 7:53 pm Post subject: Re: 1968 Deluxe Build |
 |
|
Got it running tonight! I already soaked the carb and blew out the idle circuit when I cleaned the carb, so I knew there wasn't any crud in there. I did check the idle jet again and all the larger 4 holes on the outside of the jet were clear but the small one on the end looked to be a little suspect. I jammed a needle in there to clear out anything that could have been in there. I also noticed that when the jet was in the carb, the holes in the jet and the carb could be lined up a little better if the jet was really snugged up. Put it at the baseline 2.5 and 2 screws out and she fired right up and didn't die when warmed up. Spent some time getting the idle dialed in as perfectly as I could without a tach. Purrs like a kitten now. Thanks Bill for the advice. On the bright side of this, I now have almost all new ignition parts, a real clean carb, and some new gaskets and o-rings. Solved a lot of potential problems down the road while figuring this idle problem out.
_________________
Bagged 1968 Neptune Blue "Deluxe" |
|
| Back to top |
|
 |
wcfvw69 
Samba Purist

Joined: June 10, 2004
Posts: 13389
Location: Arizona
|
| Posted: Tue Dec 20, 2016 9:38 pm Post subject: Re: 1968 Deluxe Build |
|
|
| 68Transporter wrote: |
| Got it running tonight! I already soaked the carb and blew out the idle circuit when I cleaned the carb, so I knew there wasn't any crud in there. I did check the idle jet again and all the larger 4 holes on the outside of the jet were clear but the small one on the end looked to be a little suspect. I jammed a needle in there to clear out anything that could have been in there. I also noticed that when the jet was in the carb, the holes in the jet and the carb could be lined up a little better if the jet was really snugged up. Put it at the baseline 2.5 and 2 screws out and she fired right up and didn't die when warmed up. Spent some time getting the idle dialed in as perfectly as I could without a tach. Purrs like a kitten now. Thanks Bill for the advice. On the bright side of this, I now have almost all new ignition parts, a real clean carb, and some new gaskets and o-rings. Solved a lot of potential problems down the road while figuring this idle problem out. |
Glad you got er dialed in! Now, all the parts that were ok that you replaced can go into your spares box to keep in the bus! 
_________________
Contact me at [email protected]
Follow me on instagram @sparxwerksllc
Decades of VW and VW parts restoration experience.
The Samba member since 2004.
**Now rebuilding throttle bodies for VW's and Porsche's**
**Restored German Bosch distributors for sale or I can restore yours**
**Restored German Pierburg fuel pumps for sale or I can restore yours**
**Restored Porsche fuel pumps or I can restore yours**
**Restored Porsche distributors or I can restore yours** |
|
| Back to top |
|
|
Trashman
Samba Member
Joined: May 18, 2016
Posts: 280
Location: Santa Cruz, CA
|
| Posted: Wed Dec 28, 2016 10:12 am Post subject: Re: 1968 Deluxe Build |
|
|
Quick little update on some of the Christmas presents for the bay. In back it now has a old dealer plate frame from Mezzetti VW in Fremont, which is where I grew up.
Up front we now have some real nice aircooled accessories headlight grilles. They look so good. I've been toying with the idea of doing yellow tinted lenses but I just am not sure. Maybe even just the bottom third tinted. Let me know what you all think.
I also finally got around to doing that frame notch for the axles in the back and dropped it down one more spline to try and make the thing sit level. Well... now its sitting on the swing arms so I have two more notches to do. Until then, the suspension in the rear is whatever give the tires have. Luckily I'm not planning on taking any long trips soon hahaha.
Should have another little Christmas update with in the next few days. I'm really excited about his one. 
_________________
Bagged 1968 Neptune Blue "Deluxe" |
|
| Back to top |
|
|
Trashman
Samba Member
Joined: May 18, 2016
Posts: 280
Location: Santa Cruz, CA
|
| Posted: Sun Jan 01, 2017 10:12 pm Post subject: Re: 1968 Deluxe Build |
|
|
Got the next thing in my bus finished today. I put in a custom autosound usa-230 stereo with a dual voice coil speaker (for stereo sound with only one speaker) under the dash. I also added a JL audio MBT-RX rca to bluetooth adapter that hides under the dash and powers on with the head unit.
I mounted the speaker pointing up under the dash so that it was right under all of the little holes in the center. I made my own custom mount for the speaker so that I didn't have to drill any holes or have any visible fasteners. On one side it slips under two tabs for the dash pad. On the other side it is attached by two of the screws that extend under the dash from the defrost vents. It is held in there SOLID and you can't even see it from outside unless you look really hard, and you still can't see much.
The head unit installs in the stock location without any cutting. I ran a rear support for it to a bolt protruding from the back of the ash tray. I also affixed that bluetooth adaptor to the bottom of the head unit with the 3M tape that comes on it. The bluetooth is so great. There are no visible wires this way so I think it make everything look a lot more stock. It also connects automatically to whenever I get is the car so I don't have to reconnect every time.
The whole setup sounds really good, especially for the fact that everything is hidden and looks stock. The sound bounces off the windshield well and even sounds pretty good while driving. I can't wait to get the interior in this thing so that there will be less resonance in the cabin. The hardest part about this whole install was making the speaker mount. I'm glad that I really took my time on getting it right because the fit is perfect and it's not going anywhere.
_________________
Bagged 1968 Neptune Blue "Deluxe" |
|
| Back to top |
|
|
Trashman
Samba Member
Joined: May 18, 2016
Posts: 280
Location: Santa Cruz, CA
|
| Posted: Sun Jan 01, 2017 10:32 pm Post subject: Re: 1968 Deluxe Build |
|
|
Also just realized that I had never posted this. A few months ago I was sick of seeing my windshield wiper switch without the center part with the logo. All it had was a big hole. I wanted to fill it but wanted to do something other than just a wiper logo. I decided I wanted to put an old coin there and it turns out that a penny fits perfectly. So I threw in the oldest penny I had, a 1893 indian head. I think it looks pretty damn cool.
_________________
Bagged 1968 Neptune Blue "Deluxe" |
|
| Back to top |
|
|
Trashman
Samba Member
Joined: May 18, 2016
Posts: 280
Location: Santa Cruz, CA
|
| Posted: Tue Jan 10, 2017 1:45 pm Post subject: Re: 1968 Deluxe Build |
|
|
I wanted to cover up all of the shiny fatmat in the trunk area so I decided to put a rubber floor mat there since that was what I was doing for the rest of the floor in the bus. I couldn't find any rubber floor mat for this area, only for the cargo floor, front, and walkthrough sections. I ended up finding some outdoor, grooved rubber mat on amazon for $35 for a 3'x6' section. They had different width of grooves so I chose the one that I thought closest to what the other bus mats would be. The only complaint I have about it is that the groves are going in the wrong direction but it doesn't really bother me that much. I made a paper template and then transferred it on to the rubber mat and cut it out. It has a nice, tight fit and doesn't move around at all. Should quiet things down inside a bit more too. I think that it turned out really nice and it's making me excited about putting in the rest of the floor mats once I get them.
_________________
Bagged 1968 Neptune Blue "Deluxe" |
|
| Back to top |
|
|
Trashman
Samba Member
Joined: May 18, 2016
Posts: 280
Location: Santa Cruz, CA
|
| Posted: Sat Jan 14, 2017 3:19 pm Post subject: Re: 1968 Deluxe Build |
|
|
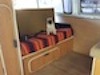
With all the rain we've been having recently, I thought I would check under the rear seat to see if there was any standing water or rust as I haven't ever checked under there since I got the bus. I wasn't expecting there to be much of anything but I wasn't going to be surprised if there was since the wood sits right on top of the floor. Seems like a recipe for rust if you ask me. When I got the seat off I found nothing but a little surface rust under all the years of trash and dirt that was back there. I'm glad I cleaned it all up since everything was still damp and it hasn't rained for a few days now. I treated the rust spots with some POR15 and topcoated that. I then put on some more fatmat behind the seat and on the one wheel well. Should be quieter but haven't tested it out yet. No big progress but now I have some peace of mind that there isn't any crazy cancerous rust hiding where I can't see.
_________________
Bagged 1968 Neptune Blue "Deluxe" |
|
| Back to top |
|
|
Trashman
Samba Member
Joined: May 18, 2016
Posts: 280
Location: Santa Cruz, CA
|
| Posted: Thu Jan 26, 2017 2:18 pm Post subject: Re: 1968 Deluxe Build |
|
|
For some reason I decided to drop some cash on the bus this week, or at least a lot more cash than usual.
First, I ordered some jailbars since I've been dying to have a set for the rear window so I just bit the bullet and ordered a a set from bus depot. At first I was planning on getting a set from AAC but I realized really quick that it was going to cost an arm and a leg for shipping them. The bus depot ones look good when installed but I must admit that they just felt cheaper than I had expected. I guess thats what you get for getting repop parts. I didn't use the screw that came with them though. I ended up getting some nice quality hardware for it. I got flathead screw for them for two reasons; reason one being for the more old school look, and two so it reminds me to use a screw driver and not to zap them in with a drill and strip out the holes too big if I ever need to take them off and on.
Next purchase was what really hit the wallet but boy was it worth it. I got a full set of rubber floor mats from WW. It makes the inside of the bus look like it is starting to get tied together and look less, well, crappy hahaha. They are also just one more thing quieting it down in there. Still pretty loud considering the sound is still bouncing off the roof and walls. Soon enough I'll get on all of that.
I also got some little rivets from WW that are special for the front vent wing pivots. They have a nice flat top and come with new fiber washers. When I put the new vent window seals in, I had to remove the old rivets and put in some regular old pop rivets in their place. Now I can remove those and put in the right ones.
Right before I got all of that stuff the thing wouldn't start on me. At least it was at my house so I wasn't stranded anywhere. The charging system wasn't working and I went through everything finding that the problem was the wire going to the generator warning light. The wire was only hanging on by one of the strands. I reconnected the wire to the connector and then the thing was charging perfectly. Easy fix and I'm glad that I'm slowly going through the electrical fixing any problems.
_________________
Bagged 1968 Neptune Blue "Deluxe" |
|
| Back to top |
|
|
khalimadeath
Samba Member
Joined: June 24, 2014
Posts: 768
Location: Reno, NV
|
| Posted: Fri Jan 27, 2017 8:52 am Post subject: Re: 1968 Deluxe Build |
|
|
If, and when you replace the windshield seal, take the top of your dash off and spend some time in there. Go through all the wiring, refresh your wiper arms all that. It was very much worth the extra time for me.
_________________
The United States Constitution
(c) 1787. All Rights Reserved
1970 Bus Westfalia
1964 Kombi |
|
| Back to top |
|
|
chabanais
Samba Member

Joined: July 27, 2002
Posts: 4866
|
| Posted: Fri Jan 27, 2017 3:57 pm Post subject: Re: 1968 Deluxe Build |
|
|
| khalimadeath wrote: |
| If, and when you replace the windshield seal, take the top of your dash off and spend some time in there. Go through all the wiring, refresh your wiper arms all that. It was very much worth the extra time for me. |
Definitely. Really makes it much easier at that time.
I like the color of your Bus it looks like it's coming together nicely.
I removed my carpet and am just back to the rubber mats. I may add carpet to the front just so my toes don't get so cold!
_________________
"I spud therefore I yam." |
|
| Back to top |
|
|
Trashman
Samba Member
Joined: May 18, 2016
Posts: 280
Location: Santa Cruz, CA
|
| Posted: Fri Jan 27, 2017 6:00 pm Post subject: Re: 1968 Deluxe Build |
|
|
| khalimadeath wrote: |
| If, and when you replace the windshield seal, take the top of your dash off and spend some time in there. Go through all the wiring, refresh your wiper arms all that. It was very much worth the extra time for me. |
Yes I definitely plan on doing that. Just have to wait on a chance to weld up the rust under the seal 
| chabanais wrote: |
I like the color of your Bus it looks like it's coming together nicely.
I removed my carpet and am just back to the rubber mats. I may add carpet to the front just so my toes don't get so cold! |
Thanks! And do you drive barefoot or something? A good pair of boots always does the job for me. A good thing for the rubber is that it doesn't hold water like carpet does if you have a leak. I also like how easy they are to clean and how a shitty old rubber mat looks wayyy better than shitty old carpet.
_________________
Bagged 1968 Neptune Blue "Deluxe" |
|
| Back to top |
|
|
chabanais
Samba Member
Joined: July 27, 2002
Posts: 4866
|
| Posted: Fri Jan 27, 2017 11:24 pm Post subject: Re: 1968 Deluxe Build |
|
|
The cold goes through the soles of my shoes eventually.
I had carpet for 20 years never had any problems with water retention... just dirt.
_________________
"I spud therefore I yam." |
|
| Back to top |
|
|
Trashman
Samba Member
Joined: May 18, 2016
Posts: 280
Location: Santa Cruz, CA
|
| Posted: Sun Jan 29, 2017 6:41 pm Post subject: Re: 1968 Deluxe Build |
|
|
I got my new registration from the DMV for the YOM plates. They even remembered to send me the little dog ear metal tags that I'm not going to use. Seems like they cleared mine a lot quicker than most people. Only took them about a month and a half. Seems like it takes most people about 3 months on average to hear back. Anyways, I'm super happy to have the crackhead temporary registration paper in my window gone. Bus looks a little less sketchy now hahaha.
_________________
Bagged 1968 Neptune Blue "Deluxe" |
|
| Back to top |
|
|
Trashman
Samba Member
Joined: May 18, 2016
Posts: 280
Location: Santa Cruz, CA
|
| Posted: Sun Feb 12, 2017 5:51 pm Post subject: Re: 1968 Deluxe Build |
|
|
Little update. Managed to get a couple more little pieces that I was missing on the bus. First, I was missing the passenger side interior door grab handles and the drivers side one was not the correct one, so I got a set of the right ones with the chrome ends off the classifieds.
I have also been missing all but one of the heater/ fresh air control levels so I got a set of the fresh air levers so I only need to pick up one heater control lever. Just glad I don't have to keep switching around the one lever to control all of them. They are quite faded in color but I like them a lot, especially compared to some new bright blue ones.
Earlier today I was looking around at a local antique fair and a Porsche 100000 km pin caught my eye and I picked it up for $5. I might incorporate it into the bus somehow or it might just go into my collection of memorabilia. Anyways, does anyone know the era of the pin? I did some poking around and I found a few for sale online but nowhere posted the year of the pin.
_________________
Bagged 1968 Neptune Blue "Deluxe" |
|
| Back to top |
|
|
smalltime_hillbilly
Samba Member
Joined: February 21, 2017
Posts: 73
Location: UK
|
| Posted: Tue Feb 21, 2017 12:29 pm Post subject: Re: 1968 Deluxe Build |
|
|
Just sat an read this from the beginning, amazing turn around! just bought a 68 myself across the pond so i feel your pain finding parts..
interested to know about the front beam, did you just narrow and add the adjusters to get it sitting like it does? no drop spindles or anything? |
|
| Back to top |
|
|
Trashman
Samba Member
Joined: May 18, 2016
Posts: 280
Location: Santa Cruz, CA
|
| Posted: Tue Feb 21, 2017 7:04 pm Post subject: Re: 1968 Deluxe Build |
|
|
| smalltime_hillbilly wrote: |
Just sat an read this from the beginning, amazing turn around! just bought a 68 myself across the pond so i feel your pain finding parts..
interested to know about the front beam, did you just narrow and add the adjusters to get it sitting like it does? no drop spindles or anything? |
Thanks! I lowered the front with a 5" beam narrow with adjusters and drop spindles from wagenswest. The back is lowered with 3" drop spring plates with two splines down and frame notches for the axles. Still need to do notches for the trailing arms. Front tubs are also in the future. A lot of the 68 only parts I have ended up frankensteining together with 69 parts. Good luck with yours!
_________________
Bagged 1968 Neptune Blue "Deluxe" |
|
| Back to top |
|
|
Trashman
Samba Member
Joined: May 18, 2016
Posts: 280
Location: Santa Cruz, CA
|
| Posted: Sat Feb 25, 2017 2:40 pm Post subject: Re: 1968 Deluxe Build |
|
|
Tried something that I've been wanting to try for a while today. Until now I've been preserving the rusty spots on the exterior with a standard car wax and then with some quick deatailer spray wax every few weeks of so. It's been working but it could do better. So many people use boiled linseed oil that thats what I decided to try this time around. So far I think it is loads better. I did all the rusty bits and the rear quarter panel on the drivers side to see how it holds up comparing it to the other panels. If it holds up it will be my go-to from now on. The only downside I can see is it attracting grime really fast but I'm really not too concerned about keeping it all too clean being that it looks a bit crusty to begin with. I'll keep you all updated how it holds up and how often I have to re-apply.
Some pics:
Rust hit with very fine steel wool without oil
Rust after the linseed oil and excess wiped off
Comparison of rear quarter (oiled) and rest of bus (not oiled)
_________________
Bagged 1968 Neptune Blue "Deluxe" |
|
| Back to top |
|
|
Trashman
Samba Member
Joined: May 18, 2016
Posts: 280
Location: Santa Cruz, CA
|
| Posted: Sun Feb 26, 2017 2:35 pm Post subject: Re: 1968 Deluxe Build |
|
|
Go another thing done that has been on the list for a while now. I had a problem a few weeks ago with my stereo powering on because of a poor connection between the fuse and the fuse panel. I cleaned up that one connection real quick just to fix the problem. Now I figured I would do a thorough clean of the whole thing to prevent any further issues. I removed the fuse panel from the bus and wired brushed all the loose crap off of it and then soaked it in CLR for a good while. Then I rinsed it off with water and polished all the contacts.
Fuse panel removed with all the wires marked.
State of fuse panel before cleaning
After soaking in CLR
All polished up
And back in the bus
_________________
Bagged 1968 Neptune Blue "Deluxe" |
|
| Back to top |
|
|
chabanais
Samba Member
Joined: July 27, 2002
Posts: 4866
|
| Posted: Sun Feb 26, 2017 2:59 pm Post subject: Re: 1968 Deluxe Build |
|
|
Those mesh headlight covers are illegal in Kalifornia.
_________________
"I spud therefore I yam." |
|
| Back to top |
|
|
wcfvw69
Samba Purist
Joined: June 10, 2004
Posts: 13389
Location: Arizona
|
| Posted: Sun Feb 26, 2017 3:03 pm Post subject: Re: 1968 Deluxe Build |
|
|
Nice work on the fuse block. It turned out great!
_________________
Contact me at [email protected]
Follow me on instagram @sparxwerksllc
Decades of VW and VW parts restoration experience.
The Samba member since 2004.
**Now rebuilding throttle bodies for VW's and Porsche's**
**Restored German Bosch distributors for sale or I can restore yours**
**Restored German Pierburg fuel pumps for sale or I can restore yours**
**Restored Porsche fuel pumps or I can restore yours**
**Restored Porsche distributors or I can restore yours** |
|
| Back to top |
|
|
|


