| Author |
Message |
Steve M.
Samba Member

Joined: July 30, 2013
Posts: 6829
Location: Fort Lauderdale, Fl.

|
 Posted: Fri Oct 08, 2021 7:41 am Post subject: Re: My "KASTEN 16" Posted: Fri Oct 08, 2021 7:41 am Post subject: Re: My "KASTEN 16" |
 |
|
So it turns out it was only the exhaust valve lifter on #4 cylinder that was missing the circlip.
I think if it wasn't installed with it then I'll find down in the oil sump perhaps with the other missing circlips from #1 & #2 cyl.  Not too happy about that thought, but hopefully they will stay out of the way Not too happy about that thought, but hopefully they will stay out of the way 
I replaced all 4 of the lifters with new ones that do not have the circlip. It's a mystery because I can think of no reason for the circlips to come out after they were installed. And the dam things show almost no wear on them!
As for making a mess with the coolant I only lost about an inch & a half of coolant from the reservoir tank. I used those hose clamps designed to squeeze a hose to stop it's flow on the hoses from the radiator @ the water tower clamped alongside the gearbox, coolant tank to pump, the coolant "T" connector( water tower), engine to the "T" connector, the bleed loop hoses and of course the hose from thermostat to the coolant pipe
Actually the hardest part of job or the part most frustrating was getting the coolant pipe reconnected to the water pump body. Hopefully the O-ring seal will still hold a seal after opening the pipe.
Having a collection of Harbor Freight hose clamps helps when you have a vehicle with 17 cooling hoses!
_________________
This free advice is worth exactly what you paid for it.
There are seven days in a week. Someday is not one of them. |
|
| Back to top |
|
 |
Steve M.
Samba Member
Joined: July 30, 2013
Posts: 6829
Location: Fort Lauderdale, Fl.
|
| Posted: Fri Oct 08, 2021 7:19 am Post subject: Re: My "KASTEN 16" |
|
|
| tarandusVDub wrote: |
This is a really fun thread ~ so great to see your syncro coming back to life and becoming your own. Carry on!  |
It's never really died on me. It only had a broken leg when I destroyed a CV while being stupid. 
I've been driving it since 2016.
_________________
This free advice is worth exactly what you paid for it.
There are seven days in a week. Someday is not one of them. |
|
| Back to top |
|
|
tarandusVDub
Samba Member
Joined: August 27, 2010
Posts: 1649
Location: Between Here and There
|
| Posted: Thu Oct 07, 2021 4:05 pm Post subject: Re: My "KASTEN 16" |
|
|
This is a really fun thread ~ so great to see your syncro coming back to life and becoming your own. Carry on!
_________________
1990 Syncro 16" DoppleKabine 2.1 DJ 112i
________________________
Sold: 1972 Bay Campmobile; 1984 Westy, base model, 2WD. |
|
| Back to top |
|
|
Steve M.
Samba Member
Joined: July 30, 2013
Posts: 6829
Location: Fort Lauderdale, Fl.
|
| Posted: Thu Oct 07, 2021 12:17 pm Post subject: Another WTF moment... |
|
|
So I went to remove the valve pushrods on Cyl. #3 & #4 and found I cannot remove them because the Coolant Pipe from the Thermostat to the Water Pump just happens to be in the way.
I do not remember this being a problem on my other wbx engines. Then again I do not remember wanting to remove the pushrods.
Wondering if anyone else has had this same problem? I actually knew this was a problem a few weeks ago because I tried then and couldn't do it.
I do not really want to drain the coolant and make a mess, but it looks like I'm going to have too.
If you recognize that you're probably having the same WTF moment I had!
I had a lifter clatter that would go away when as oil pressure built up, but it just didn't sound right.
If anyone remembers I posted a while back about finding a lifter without the retainer in it on Cylinder #1 I think.
The pushrod kept the plunger held in place on the lifter body, but you know... it just wasn't right!
So I changed the lifters on Cylinders 1 & 2.
I suspected I had the same problem on Cylinders 3 & 4, but since I could not get the pushrods out I wasn't 100% sure of it.
Now I'm sure of it! 
Looks like pizza delivery tonight!
_________________
This free advice is worth exactly what you paid for it.
There are seven days in a week. Someday is not one of them. |
|
| Back to top |
|
|
Steve M.
Samba Member
Joined: July 30, 2013
Posts: 6829
Location: Fort Lauderdale, Fl.
|
| Posted: Wed Jul 28, 2021 11:08 am Post subject: Re: My "KASTEN 16" |
|
|
So far I am suitably impressed with the solar panel and the Victron MPPT 75/15
_________________
This free advice is worth exactly what you paid for it.
There are seven days in a week. Someday is not one of them. |
|
| Back to top |
|
|
Jake de Villiers
Samba Member

Joined: October 24, 2007
Posts: 5911
Location: Tsawwassen, BC
|
|
| Back to top |
|
|
Steve M.
Samba Member
Joined: July 30, 2013
Posts: 6829
Location: Fort Lauderdale, Fl.
|
| Posted: Sat Jul 17, 2021 10:35 am Post subject: Re: My "KASTEN 16" |
|
|
| jimf909 wrote: |
Superb work.
The peanut gallery suggests color matched paint to tie it all together. Or, since it's so well insulated, paint it black like the rest of your rack and other bits on your very good looking van.
And these...
FWIW, YMMV. |
Yeah, that was my first question - the color! When I went to the boat store for paint the Rust-oleum "Topside" was the cheapest @ 20 bucks. They only had white.
I did not decide to do the full insulation until Halfway thru the project.
I also ordered new pluga all the way round.
And now I've gotten used to the white, but I agree with you about the black now that the insulation is in. It will not make a difference in temp.
However, I'm on to the next project now and white it is.
I have since seen the paint at Home Depot for $18.00 a quart...and in black! pfft!
_________________
This free advice is worth exactly what you paid for it.
There are seven days in a week. Someday is not one of them. |
|
| Back to top |
|
|
jimf909 
Samba Member

Joined: April 03, 2014
Posts: 7465
Location: WA/ID
|
| Posted: Sat Jul 17, 2021 9:35 am Post subject: Re: My "KASTEN 16" |
|
|
Superb work.
The peanut gallery suggests color matched paint to tie it all together. Or, since it's so well insulated, paint it black like the rest of your rack and other bits on your very good looking van.
And these...
FWIW, YMMV.
_________________
- Jim
| Abscate wrote: |
Do not get killed, do not kill others.
|
Current: 1990 Westy Camper - Bostig RG4, 2wd, manual trans w/Peloquin, NAHT high-top, 280 ah LFP battery, 160 watts solar, Flash Silver, seam rust, bondo, etc., etc.
Past: 1985 Westy Camper - 1.9 wbx, 2wd, manual trans, Merian Brown, (sold after 17 years to Northwesty who converted it to a Syncro). |
|
| Back to top |
|
|
Steve M.
Samba Member
Joined: July 30, 2013
Posts: 6829
Location: Fort Lauderdale, Fl.
|
| Posted: Sat Jul 17, 2021 8:53 am Post subject: Re: My "KASTEN 16" |
|
|
| Jake de Villiers wrote: |
| Nice work, Steve. I thought it might look awkward but it blends into your roof rack very smoothly. |
Thanks Jake. I've had this vision of it since I had this rack on my '86 Vanagon.
I also raised the Yakima A1 towers by 1-1/2" using aluminum extrusion to match the height of the Luggage Rack.
The extrusion was a lot cheaper then the Yakima 4" lift kit they sell and stronger.
The real benefit I was looking for was to use the"T" slots in the extrusion to mount brackets for my side lighting.
I'm going to have to get after that rust before seasons end!
_________________
This free advice is worth exactly what you paid for it.
There are seven days in a week. Someday is not one of them. |
|
| Back to top |
|
|
Jake de Villiers
Samba Member
Joined: October 24, 2007
Posts: 5911
Location: Tsawwassen, BC
|
|
| Back to top |
|
|
Steve M.
Samba Member
Joined: July 30, 2013
Posts: 6829
Location: Fort Lauderdale, Fl.
|
| Posted: Sat Jul 17, 2021 12:03 am Post subject: Re: My "KASTEN 16" |
|
|
WESTY Luggage rack Mod.
After 4-5 years of wanting to add a Westy Luggage rack to the top of my Syncro everything came together this summer to get it installed.
One of my first self imposed rules for my Syncro was not to put any new holes in it. So being the way the Westy Luggage rack is installed would have meant I had to drill holes in the roof for the mounts.
Vanagon Life created their Light Bar mounts and I saw that it might work to attach the Luggage rack.
My reasons for wanting the Luggage Rack are:
To cover the useless Sunroof installed by the P.O. It did not work. It leaked. I had to reseal it every year and even if it worked I could not use it because it was a slider and the roof rack stopped it from sliding back.
You can see all the air bubbles in the sealant from hot summer days. There were no bubbles when I applied the sealant and I always leave a window cracked open so there was no pressure on the seal.
The 2nd reason is that the roof rack by itself did not help the pristine aerodynamics of the Vanagon. No roof rack does. If I mounted the Luggage rack it would give back some better airflow.
The existing roof Rack un-aerodynamics
The 3rd reason was it would give a place to mount a solar panel.
--------
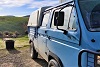
Checking to see the solar panel actually fits!
Test fitting the rack up under the awning
So If I was not going to use the original 2 front mounts that bolted to the roof I needed to know that the front edge of the Luggage Rack could lay down and not catch air along the front edge.
So I did some road testing holding it down with rachet straps. 80mph and not a single vibration or fluttering from air getting under the edge.
So time to get the old luggage rack cleaned up. 1st step sand bottom
To mount it using the VL mount I used fiberglass resin to attach wooden blocks to the inside. Because of the curvature of the rack I used a single layer of fiberglass cloth under the blocks to fill the gaps. I drilled bolt holes through the blocks and used threaded T nuts to screw the mounting bolts into. So when I glued the blocks to the base I was able to use the same bolts to hold the blocks in place. I took the precaution to buy taps that fit the M8 T nuts because I knew the epoxy resin would get in there on the threads and Id need to clean them out
Also, As others have done before me I modified the drains. I sealed the center drain and then using PEX tubing to have the rainwater drain out the sides and not underneath. Im sure rainwater will get under there just by going down the highway, but it is not going to flow in there and bring road debris and leaves down under the rack to sit there wet and start the rusting process.
Drain holes PEX tubes installed using underwater epoxy to hold them in place.
PEX tubes out the sides
Trimming the PEX tubes
Trimmed Pex tube When trying to sand it smooth to get a flush finish the PEX tubing was harder then the foberglass so never really accomplished the smooth look I wanted even after using JB Weld as bondo to fill in the edges.
The PEX tubing I got from Home Depot was straight so I did not need to use fiberglass to keep it straight. I was not sure if the underwater epoxy would hold the tube in pace if the sides of the rack were pulled. So I wrapped them in fiberglass so they would become part of the fiberglass rack.
There are 2 layers of glass cloth around the tube, but you can still read the lettering on the tube after the resin dries.
Now one thing when doing fiberglass work and laying the cloth onto the part is that you must get all the air out from under it. I really did not feel like wetting the cloth strip with resin and trying to wrap it around the tube.
So what I did was to pull strands of the glass out of the leftover fiberglass cloth. Now I could use if as a string to wrap tightly around the cloth on the PEX tubing. This would help keep the air voids to a minimum. It is a pain in the ass to tie a knot in though!
I tied it down dry and them applied the resin to it and it soaked up into the cloth easily enough to saturate it.
I used a Sharpie marker to put black dashes onto the string. You cannot see white string on white fiberglass cloth so this helps.
String tight without dashes does not help when tying it down!
One big problem when working with fiberglass cloth is that the resin will weep into every strand and working like this I cannot get all the cloth to lay down. When it dries they cloth will have surgically sharp needles of glass-No Bare Handed touching of them unless you like wrestling porcupines. You have to wear leather gloves after it dries.
You then sand off all the sharp edges. It was 90°+ when I was doing this so the fiberglass resin ran really well in the background there. It would run anyways, but the temp did not help!
It still looks like crap, but its on the inside and the judges at the car show will never see it.
After the bottom was done I could turn it over and sand the topside.
One major problem I had was all this week and the previous week was that it was raining. The paint can label says not to paint it over 80% humidity and it was 100% humidity. I thought I was going to have to wait until August to paint it. I woke up one morning after a rain front had gone over and it was 60% humidity and sunshine for 3 days. Man, I painted -sanded and painted -sanded again for 3 coats of paint. Did not think Id get it done because it requires 24hrs drying time between coats. I was painting inside my workshop in the shade so I did not see the thin spots until I put it outside to bake in the sun. So I had to do 3 coats.
Now the picture shows the mounting brackets in place for the solar panel to mount onto so this was the last time I baked it.
I also replaced the old rusty metal loops with new stainless ones I found on Amazon. I thought I would have to seal the bolt holes and drill new ones, but these were so close to original I did not have to-a big time saver.
These are called Footmans Loops on Amazon and the link to buy them is at the beginning of this. You can see how close they are to the original. I just got lucky to find them.
Djkeev had said he put a layer of Reflectex on the bottom of his when he restored his and it helped.
I had a lot of Reflectex leftover from another project so I went crazy and covered the entire bottom.
Then I got to thinking that Reflectex as designed needs to be installed so there is an air gap between it and the surface you want to insulate for it to work best. The way the luggage rack is made when you look at it upside down there is a trough like a moat all the way around it.
(You can see the power cables for off road lights that might be mounted. They go through the trough and out the rear of the drivers side.)
So I covered it over and made a sealed air chamber out of it.
What did this do for insulation? I measured the temp of the inside of the roof that was above the headliner and it was 120-125° on a sunny day.
After I had the Luggage rack mounted I measured again on a sunny day and it was 97-101° in the same spots I measured.
Success! Great since I do not have the AC installed yet!
(Note: underneath the plywood platform the temp difference between the naked roof and the shade under the plywood was about 15-20° cooler when I measured it last.)
The solar panel when one is installed in the Luggage rack acts as a cover for the opening. This I am hopeful will eliminate the airflow turbulence caused by the opening. This might help the gas mileage a bit.
Now to mount the solar panel I had these brackets of stainless steel that I found somewhere. I cut them to 2 inches wide the same width as a simple hinge. I test fitted the panel and mounts before I did anything else. I used 6 brackets two on the front edge and two on each end. I pushed out the hinge pin and replaced it with a hitch pin.
This will allow me to raise the panel to face the sun more directly when out camping.I still have to figure out a hold-open bar for it, but that is another problem to solve later. I just have to pullout the hitch pins on the end that will rise up to follow the sun. (and secure it from the wind!)
Now you might notice that I cut angles into the tabs on the hinges. This is to make it easier to raise and lower it back into the hinges, works fairly well.
I had to trim away some of the corner of the panel so the sharp edge did not scratch the new paint. I also added a piece of clear plastic glued to the wall to protect it.
So to hold the front side of the luggage rack down I used the Vanagon Life mounts. When drilling the bolt hole through the luggage rack I lined up the mount fully tightened down-marked the hole on the rack and then drilled it a bit higher in the rack then where I marked it.
This was so that when I did the final mounting on the roof and tightened down the VL mount it would pulled the luggage rack down tighter to the roof.
Now I added an extra bolt through the side of the VL mount to secure the luggage rack better.
VL and awning
Now I forgot to take a picture of running the power cables from the solar panel down through the bottom side of the luggage rack. I drilled 2 holes in the center of the rear vertical wall of the opening and used waterproof cable feed-throughs to run the power cables down into the trough and out the passenger side rear. This was a 10 foot length of power cables it runs along the passenger side and stops about 18 inches from the rear hatch. This was intentional so that there was a quick disconnect that would allow me to remove the Luggage Rack if I ever wanted or need to. I connected another 10 foot section of power cable and ran it down through the engine cooling air vent on the passenger side to route it through the engine compartment up to the batteries under the bench seat.
The Solar Panel power cables coming out the passenger side rear wall.
You can see the 90° angle bracket mounted to the bottom of the 4x8 sheet of plywood that I used to connect the rear side of the Luggage rack to hold down the rear of it. So far no problems with it, but I am going to put another bolt in it just to be safe.
One of my thoughts was to cut a opening along the front slope of the Luggage rack and put a light bar inside it. I would have covered it with a piece of clear Lexan to keep the flat surface for the air to flow over. However, not enough funds for it right now and also too lazy to do it!
I did however glue 2 pieces of wood over the original bolt holes that were used to hold down the front so I could maybe mount a pair of RIGID off road cube lights up there. Not going to do that right away and maybe not al all. The power cables for them I installed just to keep the option open.
Off road light power cables mounted on the drivers side.
The Aerodynamic Wonder.
Parts:
Waterproof cable feed-thoughs . https://www.amazon.com/dp/B01N7IT6NG?psc=1&ref=ppx_yo2_dt_b_product_details
Tie downs/FootMans Loops . https://www.amazon.com/dp/B07HJXFQ8J?psc=1&ref=ppx_yo2_dt_b_product_details
Rubber seal along the rear edge . https://www.amazon.com/dp/B07NDW35P1?psc=1&ref=ppx_yo2_dt_b_product_details
Solar panel that fits.
https://www.amazon.com/gp/product/B01G53TUIS/ref=ppx_yo_dt_b_asin_title_o01_s00?ie=UTF8&psc=1Edit: they changed the size of the panel to 20.4" wide so no longer going to fit. Aug.27th, 2021.[/b]
_________________
This free advice is worth exactly what you paid for it.
There are seven days in a week. Someday is not one of them.
Last edited by Steve M. on Fri Aug 27, 2021 9:30 am; edited 1 time in total |
|
| Back to top |
|
|
Steve M.
Samba Member
Joined: July 30, 2013
Posts: 6829
Location: Fort Lauderdale, Fl.
|
| Posted: Mon Jun 21, 2021 12:52 pm Post subject: Re: My "KASTEN 16" |
|
|
Okay. Inside the store I had basically 3 choices:
Awlgrip @ $114.82 a qt. white or black.
Interlux @ $41.22 a qt. white or black.
Topside @ $19.95 a qt. in white only.
So...it's going to be white! I don't have the AC installed yet so that had something to do with it keeping the roof over my head as cool as possible.
The "Topside" is a Rust-oleum marine paint and the only can that mentioned U.V. stability.
After checking reviews online through the smartphone "Topside" sounded good enough.
_________________
This free advice is worth exactly what you paid for it.
There are seven days in a week. Someday is not one of them. |
|
| Back to top |
|
|
Steve M.
Samba Member
Joined: July 30, 2013
Posts: 6829
Location: Fort Lauderdale, Fl.
|
| Posted: Mon Jun 21, 2021 9:10 am Post subject: Re: My "KASTEN 16" |
|
|
| dobryan wrote: |
| Because there is an air gap between that luggage piece and the actual top of the bus I believe there will not be that much difference in heat transmitted into the bus. I painted the center portion of my westy top white vs Titian Red and it made a substantial temp difference but the pop top of a westy is actually the ceiling so the heat transfer is direct, no air gap. |
I was thinking that too.
Also stuffing it full of bubble wrap to create a better air pocket!
I've kinda gotten used to the white though and I'm at the paint store now...one final look before I go into the store!
Black would help me find it in the snow!
_________________
This free advice is worth exactly what you paid for it.
There are seven days in a week. Someday is not one of them. |
|
| Back to top |
|
|
dobryan
Samba Member

Joined: March 24, 2006
Posts: 16501
Location: Brookeville, MD
|
| Posted: Mon Jun 21, 2021 8:48 am Post subject: Re: My "KASTEN 16" |
|
|
Because there is an air gap between that luggage piece and the actual top of the bus I believe there will not be that much difference in heat transmitted into the bus. I painted the center portion of my westy top white vs Titian Red and it made a substantial temp difference but the pop top of a westy is actually the ceiling so the heat transfer is direct, no air gap.
_________________
Dave O
'87 Westy w/ 2002 Subaru EJ25 and Peloquin TBD
"To travel hopefully is a better thing than to arrive." Robert Louis Stevenson
MD>Canada>AK>WA>OR>CA>AZ>UT>WY>SD
https://www.thesamba.com/vw/forum/viewtopic.php?t=620646
Building a bus for travel in Europe (euroBus)
https://www.thesamba.com/vw/forum/viewtopic.php?t=695371
The Western Syncro build
https://www.thesamba.com/vw/forum/viewtopic.php?t=746794 |
|
| Back to top |
|
|
Steve M.
Samba Member
Joined: July 30, 2013
Posts: 6829
Location: Fort Lauderdale, Fl.
|
| Posted: Mon Jun 21, 2021 8:31 am Post subject: Re: My "KASTEN 16" |
|
|
| Jake de Villiers wrote: |
| Steve, all you have to do is put your hand on a few cars in the supermarket parking lot. The white ones are always much cooler than the red or black ones. |
Yeah...it's just this wave of stupid shootings that stops me from doing that!
_________________
This free advice is worth exactly what you paid for it.
There are seven days in a week. Someday is not one of them.
Last edited by Steve M. on Mon Jun 21, 2021 11:41 am; edited 1 time in total |
|
| Back to top |
|
|
Jake de Villiers
Samba Member
Joined: October 24, 2007
Posts: 5911
Location: Tsawwassen, BC
|
| Posted: Mon Jun 21, 2021 7:13 am Post subject: Re: My "KASTEN 16" |
|
|
Steve, all you have to do is put your hand on a few cars in the supermarket parking lot. The white ones are always much cooler than the red or black ones.
_________________
'84 Vanagon GL 1.9 WBX
'86 Westy Weekender Poptop/2.5 Subaru/5 Speed Posi/Audi Front Brakes/16 x 7 Mercedes Wheels - answers to 'Dixie'
@jakedevilliersmusic1
http://sites.google.com/site/subyjake/mydixiedarlin%27
www.crescentbeachguitar.com
www.thebassspa.com |
|
| Back to top |
|
|
Steve M.
Samba Member
Joined: July 30, 2013
Posts: 6829
Location: Fort Lauderdale, Fl.
|
| Posted: Mon Jun 21, 2021 6:36 am Post subject: Westy Cargo Carrier - White or Black? |
|
|
I'm adding a Westy Luggage Rack to the top side and at the point where I need to decide what color to paint it.
White for less heat or Black ti match the black trim?
btw: Has anyone shown real proof the white color holds less heat in the sun?
To me hot is hot!
Edited to answer my own question:
"When we took one inky black car, and its a snow-white match, and let them heat up in the fiery Georgia sun. A couple of hours later, we took a gander at the temperature inside the car, and yep, the numbers dont lie: the cabin of the black car came in at a sweltering 130 degrees, while the white cars interior was a still hot (not skin-searing) 113 degrees."
AutoTrader did a test.
_________________
This free advice is worth exactly what you paid for it.
There are seven days in a week. Someday is not one of them. |
|
| Back to top |
|
|
Steve M.
Samba Member
Joined: July 30, 2013
Posts: 6829
Location: Fort Lauderdale, Fl.
|
| Posted: Tue Apr 20, 2021 10:16 pm Post subject: Re: My "KASTEN 16" |
|
|
| RainierSyncro wrote: |
This is from 5 years ago. No way I would go through this again.
|
I'm not quite ready to pull my dash again either! 😁
_________________
This free advice is worth exactly what you paid for it.
There are seven days in a week. Someday is not one of them. |
|
| Back to top |
|
|
RainierSyncro
Samba Member

Joined: February 26, 2013
Posts: 806
Location: Seattle
|
| Posted: Tue Apr 20, 2021 10:01 pm Post subject: Re: My "KASTEN 16" |
|
|
I had the same rust problem on my Syncro. The week before the shop discovered the rust, I visited a guy that parts out Vanagons and he was going to scrap a crusty Vanagon shell. Got back there just in time before it got loaded on the flatbed and he cut out the nose section for me. The shop then did a cut & paste while they had the dash out.
The green paint is from when it was a Munich police van.
This is from 5 years ago. No way I would go through this again.
|
|
| Back to top |
|
|
Steve M.
Samba Member
Joined: July 30, 2013
Posts: 6829
Location: Fort Lauderdale, Fl.
|
| Posted: Tue Apr 20, 2021 8:30 pm Post subject: Re: My "KASTEN 16" |
|
|
I've got some time between jobs to get some work done on my Syncro and today it was getting around to installing the Vanistan Fresh Air Recirc Kit I bought back in 2018.
As I was fitting the parts I noticed a big lump of sealant over in the passenger side corner of theFesh Air Inlet.
So my feline instincts got the better of me and I started to scratch it.
Suddenly I had a small pile of sandy dirt and metal on the bumper.
Somebody was hiding something in the corner.
The bottom side of the air inlet as it goes over the top of the air scoop is a U-shaped channel. The entire front of the corner was eaten away by the Vanagon nemesis.
No point is trying to save it so I cut some of it away to get better access to treat it.
I used a Dremel tool with both the large and small carbide tubes to trim the edges.
I saw this little tiny pinhole
As rusted metal goes it magically became a big hole.
The Dremel tool again to clean it up.
I used my DepsTech borescope to take a look over the top to see the inside.
I got enough of the rust hole to not leave much on the inside of it. However, there are signs of surface rust everywhere.
Also found the start of the same problem on the Drivers side on the top of the U-channel.
And surface rust along the top side of the inlet. Apparently it is not one piece, but a few pieces spot welded together-no surprise there!
I'll treat the rust overnight and get back on it tomorrow.
_________________
This free advice is worth exactly what you paid for it.
There are seven days in a week. Someday is not one of them. |
|
| Back to top |
|
|
|


