| Author |
Message |
Inchpincher61
Samba Member
Joined: February 05, 2016
Posts: 141
Location: Germany

|
 Posted: Sat Nov 19, 2016 12:33 am Post subject: 1962 - "San Bernardino" - Ghia Project Posted: Sat Nov 19, 2016 12:33 am Post subject: 1962 - "San Bernardino" - Ghia Project |
 |
|
Hello Ghia friends.
I have been thinking about starting a new thread here for a while but in fact that I haven´t done much to the car except of collecting parts I was just studying the existing topics here to get a bit more into the Ghia world. But now the Ghia has been moved out of its corner and I started to take a closer look to it.
Some words to me: Aircooled cars have accompanied me since my childhood. I grew up with beetles. There is no picture in the familiy albums without beetle toys, shirts or cars. My parents ever took me to numerous vw meetings and it was just a matter of time when I wanted to have an own vw. I finally bought my first 1961 Ragtop in 2005 (21st of November) so almost exact 11 years ago now (how time flys). For the resto of this car I had a lot of help from my dad. He is some kind of a metal magician and restoring beetles since more than 35 years. With the growing experience I startet an own body off project in 2011 (1962 Beetle) and I was now able to do almost everything on my own except of the welding but there were just a few little corners.
Whats next...?? That was a good question. I didn´t know if I should start something else because such projects aren´t cheap and take a lot of time and more cars need more space...BUT I wasn´t able to resist and wanted to try something else. I took some beers with my dad and we were just talking about past builds and then he just asked "What do you think about a Ghia as a last "Father-Son-Project". I thought why not and he just said: Listen, I can help you with the metal work again but you need to do the rest IF I can drive it from time to time  >> DEAL!!...or it was more like Cheers >> DEAL!!...or it was more like Cheers
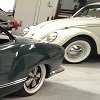
So I started checking out some cars here in Germany but I didnt find a payable project. I even flew to sweden to see a Ghia in Stockholm but at the end it was too rusty for its price so I continued to look around. Finally I found a car in the south of Germany. It was a 1962 Ghia which has been reimported from San Bernardino. Unfortunately it had a crash on the driver side but the seller still organized a good spare part so after a short visit I bought the car last year and just picked it up some weeks later.
Choclate side 
Some people told me they never would have bought a crashed Ghia but sometimes its better to have a car with obvious weaknesses compared with a hidden nightmare for a lot of money. The car is almost rust free and we think we can handle it...
I think this is enough introduction so far. I will keep you up to date
I hope my english understandable.
Cheers
Rob
P.S.: Maybe someone has seen the car before? Just let me know. The history would be very interessting to me.
Last edited by Inchpincher61 on Sat Nov 19, 2016 11:19 am; edited 1 time in total |
|
| Back to top |
|
 |
John Moxon 
Samba Moderator

Joined: March 07, 2004
Posts: 13952
Location: Southampton U.K.
|
| Posted: Sat Nov 19, 2016 1:07 am Post subject: Re: 1962 - "San Bernardino" - Ghia Project |
|
|
Well first of all Rob, welcome to The Samba.
Let's get this out of the way first...your written English is very close to perfect...better than many for whom English is their first language.
| Inchpincher61 wrote: |
| Some people told me they never would have bought a crashed Ghia but sometimes its better to have a car with obvious weaknesses compared with a hidden nightmare for a lot of money. The car is almost rust free and we think we can handle it... |
Yes we see many nightmares uncovered here on a daily basis...you're very wise to have waited for the right Ghia. Often people are seduced by a pretty face only to find out that the real character lies a little deeper.
Looking forward to watching you and your father's progress.
_________________
John.
Judson Supercharger Information on The Samba
My 1958 Shorrock Supercharged Karmann Ghia
Stop dead photo links! Post your photos to The Samba Gallery! |
|
| Back to top |
|
|
kgj
Samba Member
Joined: February 25, 2013
Posts: 418
Location: Uk, Cornwall
|
| Posted: Sat Nov 19, 2016 7:00 am Post subject: Re: 1962 - "San Bernardino" - Ghia Project |
|
|
Hi,
Looking forward to this one.
I must say the clip you have looks good for the repair.
Please post plenty of photos.
Your English is indeed fine.
_________________
1958 coupe |
|
| Back to top |
|
|
Inchpincher61
Samba Member
Joined: February 05, 2016
Posts: 141
Location: Germany
|
| Posted: Sat Nov 19, 2016 7:46 am Post subject: Re: 1962 - "San Bernardino" - Ghia Project |
|
|
Thank you guys!
By the way the factory color of the car was terra brown L571 with pearl white roof (580). The doors aswell as front and rear hood seem to be original according to the inside paint.
Unfortunately the driver door has been overstretched...maybe because of a torn door check strap. BUT I think the door can be rescued although somebody still tried to fix it "professionally".
Here I have some more pics I took last summer. I hope there will be no big suprises..
|
|
| Back to top |
|
|
Inchpincher61
Samba Member
Joined: February 05, 2016
Posts: 141
Location: Germany
|
| Posted: Wed Nov 23, 2016 1:18 pm Post subject: Re: 1962 - "San Bernardino" - Ghia Project |
|
|
Today I did the first cuts on the Ghia. I first removed the fender and just noticed that someone replaced this fender one time before. Fortnutately it was not welded in with many points so it was quite easy to put it off. I suppose the welder was drunk while doing the job...really bad done!
Here are some pics.."enjoy":
Just to get some XMAS atmosphere...
No worrys with the heater channels. Nothing bended and almost no rust...
Maybe I gong rescue the bumper mount metal....
|
|
| Back to top |
|
|
c21darrel
Samba Member
Joined: January 22, 2009
Posts: 8211
Location: San Dimas
|
|
| Back to top |
|
|
Inchpincher61
Samba Member
Joined: February 05, 2016
Posts: 141
Location: Germany
|
| Posted: Wed Nov 23, 2016 2:19 pm Post subject: Re: 1962 - "San Bernardino" - Ghia Project |
|
|
I still found a really good spare to replace the engine bay.
THANKS LOREN!!
|
|
| Back to top |
|
|
Karly
Samba Member
Joined: August 01, 2002
Posts: 641
Location: Australia
|
| Posted: Wed Nov 23, 2016 2:23 pm Post subject: Re: 1962 - "San Bernardino" - Ghia Project |
|
|
Nice solid looking car! Look forward to seeing your progress... haven't seen a terra brown car I had to google what it looks like.
_________________
1960 Beetle ''Heidi" daily driver
1964 Karmann Ghia project |
|
| Back to top |
|
|
Rome
Samba Member
Joined: June 02, 2004
Posts: 9641
Location: Pearl River, NY
|
| Posted: Thu Nov 24, 2016 2:13 pm Post subject: Re: 1962 - "San Bernardino" - Ghia Project |
|
|
Here's one with those colors, though it's a later 1964. Based in New Jersey, USA. I've seen it in person; the photo is from his driving on a Foliage Tour in the southern NY area a month ago-
Excellent work on the Ghia, Inch; and your English really is very good. What part of Germany do you live in? I worked in Wolfsburg 35 years ago and drove around the country alot on weekends. |
|
| Back to top |
|
|
sputnick60
Samba Moderator

Joined: July 22, 2007
Posts: 3916
Location: In Molinya Orbit
|
| Posted: Thu Nov 24, 2016 6:31 pm Post subject: Re: 1962 - "San Bernardino" - Ghia Project |
|
|
I agree. This is a solid car and well above average in regards to rust. The photos of the floor pan, foot well area and inner guards in original condition and not rusted are a delight! ... haven't we seen some very rusty lower 6 inches recently.
Her Inchpincher61, to just deal with collision damage is a viable strategy and one which certainly worked for me. Mine was damaged in the same area (have a look at the early part of my thread). I had to splice in a new guard and engine bay floor. Just like yours, my wheel tub was damaged. Also the bottom left corner of the firewall and the back left corner of the back seat area needed some hammer work because collision damaged carried that far. Maybe you have already checked for that.
A suggestion for this early stage, If you have access to the inner sills now is a good time to fill them up with cavity wax. Wurth are a good supplier for this.
I read your thread and visualise a man who knows the job ahead and already we see a carefully chosen example. I look forward to reading the progress here on the samba.
Nicholas
_________________
'66 Karmann Ghia Cabriolet...
'65 Porsche 356C Coupe...
2005 Mecedes Benz C180 Kompressor Estate
Stop dead photo links! Post your photos to The Samba Gallery! |
|
| Back to top |
|
|
Inchpincher61
Samba Member
Joined: February 05, 2016
Posts: 141
Location: Germany
|
| Posted: Sat Nov 26, 2016 1:11 am Post subject: Re: 1962 - "San Bernardino" - Ghia Project |
|
|
@Rome.. Thanks for the terra brown pic. I have been many times to the Wolfsburg beetle meetings which were really good. At the moment I live close to Dresden...just half an hour next to czech republic.
@sputnick60.. I have taken a look at your resto and its everytime helpful to see how other guys solved the same problem. I recognized the major deformations at the top if the fire wall, wheel shell and indeed some in the back seat area. I hope that these can be hammered out now that the finder and rear and is removed... of course I am going to preserve all areas which are accessible now
Here are some pics of the progress yesterday. I removed the engine bay and the outside of the wheel shell...
Bumper mount looks quite good..
Not sure if I keep the inner shell or not...I have to measure the differences to the passenger side first
I think can save the apron (middle section) incl.seal channel... so if somebody needs a spare just let me know
|
|
| Back to top |
|
|
Porschedave
Samba Member
Joined: July 01, 2004
Posts: 454
Location: Vancouver, Canada
|
| Posted: Mon Nov 28, 2016 5:50 pm Post subject: Re: 1962 - "San Bernardino" - Ghia Project |
|
|
Have you given any thought to how you are going to install the new engine tin, valence etc? It seems to me that everything kind of floats in there and it will be difficult to get the correct alignment of everything before you make the final welds. Maybe using the rear hood will give a reference position. I'll have to look at mine tomorrow.
Dave
_________________
1977 911S
1958 Karmann Ghia build thread here: http://www.thesamba.com/vw/forum/viewtopic.php?t=571683
1965 Sunroof Notch build thread here: http://www.thesamba.com/vw/forum/viewtopic.php?p=5600139&highlight=#5600139 |
|
| Back to top |
|
|
Rome
Samba Member
Joined: June 02, 2004
Posts: 9641
Location: Pearl River, NY
|
| Posted: Mon Nov 28, 2016 6:11 pm Post subject: Re: 1962 - "San Bernardino" - Ghia Project |
|
|
So Nikolaus won't bring you a sack of coals, but hopefully a spool of MIG welding wire!
|
|
| Back to top |
|
|
Mellow Yellow 74
Samba Member
Joined: October 14, 2014
Posts: 1615
Location: Sydney, Australia
|
| Posted: Mon Nov 28, 2016 8:00 pm Post subject: Re: 1962 - "San Bernardino" - Ghia Project |
|
|
| Porschedave wrote: |
| Have you given any thought to how you are going to install the new engine tin, valence etc? It seems to me that everything kind of floats in there and it will be difficult to get the correct alignment of everything before you make the final welds. Maybe using the rear hood will give a reference position. I'll have to look at mine tomorrow. |
I have just looked into this because I am in the difficult position that my rear hood has the lower skin and frame removed because I am replacing these sections, but the rear valance and right hand quarter panel is wonky from previous accident repair work and need replacing along with the battery trays.
So the rear quarter, battery trays, lock carrier panel and valance need to be replaced but I can't use the rear hood to trial fit the new parts or vice-versa. But the bumper mounting panels on each side are ok and these set the height of the battery trays, and these in turn set the height of the lock carrier panel and valance so as long as i get everything straight and level it should be ok.
Then I can trial fit the rear hood repair pieces against these to ensure the gaps are all ok. But if my rear hood was ok I would use this to check the gaps before welding in the panels on the body like you suggested.
I also have to replace the nose panel, headlight surrounds, spare wheel well panels, nostril vents and ducts. I think this will be more difficult to get everything fitted properly but at least I have a decent front trunk lid to trial fit against.
You guys are just ahead of where I am up to so I am following with interest. I am taking lots of photos but haven't got around to doing my own resto thread yet.
_________________
1962 Karmann Ghia
1974 Deluxe Microbus
1985 Caravelle (Vanagon)
Last edited by Mellow Yellow 74 on Tue Nov 29, 2016 3:39 am; edited 1 time in total |
|
| Back to top |
|
|
kman
Samba Member

Joined: November 04, 2005
Posts: 739
Location: Michigan
|
| Posted: Mon Nov 28, 2016 8:17 pm Post subject: Re: 1962 - "San Bernardino" - Ghia Project |
|
|
| Tis but a scratch. It looks to be in great shape otherwise. |
|
| Back to top |
|
|
sputnick60
Samba Moderator
Joined: July 22, 2007
Posts: 3916
Location: In Molinya Orbit
|
| Posted: Mon Nov 28, 2016 11:06 pm Post subject: Re: 1962 - "San Bernardino" - Ghia Project |
|
|
| Porschedave wrote: |
| Have you given any thought to how you are going to install the new engine tin, valence etc? |
That's a really good point.
Given I did an almost identical repair.... I omitted to properly check the fit of the engine tin before the replacement of the valance and "battery" panels. Luckily mine do fit but only just. If there was an extra 5mm at the rear and more particularly the side that was replaced then it would be an easier squeeze with the tin and the rubber seal.
Better too large than too small and given the seal itself has a "tongue" of some 40mm, it can cope with a bit of extra gap than no gap at all.
Nicholas
_________________
'66 Karmann Ghia Cabriolet...
'65 Porsche 356C Coupe...
2005 Mecedes Benz C180 Kompressor Estate
Stop dead photo links! Post your photos to The Samba Gallery! |
|
| Back to top |
|
|
Porschedave
Samba Member
Joined: July 01, 2004
Posts: 454
Location: Vancouver, Canada
|
| Posted: Tue Nov 29, 2016 9:04 am Post subject: Re: 1962 - "San Bernardino" - Ghia Project |
|
|
Hi
After reading these comments and looking at some of the other build threads I think I have a plan. The body below the level of the engine tin is mostly gone so my only reference line will be the level of the engine tin. It seems that this level is perpendicular to the firewall. I'll attach the tin and include the bumper brackets welded below. That should set the position for the bumper. Once this is in place I should be able to attach the rear valence and then begin the reconstruction of the rear light and lower fender area around the wheel wells. And I will use the rear hood as a visual reference line to make sure the whole thing looks balanced. We'll see how it goes.
Dave
_________________
1977 911S
1958 Karmann Ghia build thread here: http://www.thesamba.com/vw/forum/viewtopic.php?t=571683
1965 Sunroof Notch build thread here: http://www.thesamba.com/vw/forum/viewtopic.php?p=5600139&highlight=#5600139 |
|
| Back to top |
|
|
Inchpincher61
Samba Member
Joined: February 05, 2016
Posts: 141
Location: Germany
|
| Posted: Wed Nov 30, 2016 1:12 pm Post subject: Re: 1962 - "San Bernardino" - Ghia Project |
|
|
Dave / Nicholas...really good points...sounds like a really good plan.
My plan is the following... I am going to use/mount an engine block (just an empty case and some heads) with all necessary metal around it to have an orientation for the engine bay and seal. So I am going to leave the body on the pan. The original welding points at the wheel housing should have the almost correct position at least for the passenger side so there I could fix the spare with some screws first. For the hight of the rear valance I can check the gaps of the hood. The final step will be the bumper mount.
But this is just the theory. Of course I have to check everything several times before welding all the metal in...especially in Kombination with the new fender.
Dave..thanks for the hint with perpendicularity...I think this will help too. I am curious of your next results so keep us up to date in your thread! |
|
| Back to top |
|
|
Inchpincher61
Samba Member
Joined: February 05, 2016
Posts: 141
Location: Germany
|
| Posted: Sun Dec 04, 2016 7:18 am Post subject: Re: 1962 - "San Bernardino" - Ghia Project |
|
|
We started the first preparations for the fender replacement which is a straight door in the correct position. Fortunately my dad was able to rescue the original door with a little "metal-massage"...
I think with some lead/ pewter this will be a really good result at the end.
BUT I also discovered a bad thing....the front fender has been replaced in the past and the execution is more or less appropriate. Despite the upper area (next pic) I can live with the repair but I am going to replace this section because this is a mess....
Futhermore we have to correct the gap of the door becauce the guys who did this have ignored the line of the roof so the gap is opening at the top.
|
|
| Back to top |
|
|
Inchpincher61
Samba Member
Joined: February 05, 2016
Posts: 141
Location: Germany
|
| Posted: Sat Dec 31, 2016 9:33 am Post subject: Re: 1962 - "San Bernardino" - Ghia Project |
|
|
Hello Guys... I hope you had some nice days during christmas.
We had some time for the Ghia between family and eating and made a good progress in investigating of what had happened to the car and what the next steps will look like.
Step number one is still the right fit of the door. At the top the front fender seems to be about 3-4mm too far forward so we definitely need to correct the door gap later. BUT with the help of a really nice "new" door we have a good base for everything around.
Anyway we started to beautify the previous welding trial. The previous owner just overlapped the metal in this area and fixed it with some welding points. We just removed the excess material and connected the original and the "new" fender with a continuous weld.
Furthermore we removed the headlight bucket to smooth the metal in that section:
|
|
| Back to top |
|
|
|


