| Author |
Message |
MNChief
Samba Member
Joined: January 02, 2017
Posts: 36
Location: Minnesota

|
 Posted: Mon Jan 09, 2017 4:47 pm Post subject: Bradley GT redefining lines Posted: Mon Jan 09, 2017 4:47 pm Post subject: Bradley GT redefining lines |
 |
|
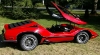
Hi guys, I'm new to the samba and the forum, but have really enjoyed what I have read and learned a lot from the posts and tech stuff. I Purchased a bradley basket case this fall (It really wasn't so bad, no side window/doors or back glass, broken windshield but otherwise complete) and my son and I are doing a build in the shop over the MN winter. As I read some posters opinions, they alluded to the Bradley GT as one of the ugliest kits ever formed, and I kinda agree. So we are redefining the lines of the Bradley to give it a more aggressive yet smoother look, and slightly updated.  I knew nothing about forming body panels from foam, but doing is learning. How does one go about transferring the shape from one side to another when on the Bradley there are no body lines to measure off? Other than that, I've made progress, moving the shifter to the rear 8 inches (short arms I guess) and the parking brake, filed the points, new electric fuel pump, and a condenser and it runs and drives good. It had wheel adapters for GM five bolt wheels, and about 20 coats of gray primer that lost its bond to the gel-coat, so lots of sanding. One of the big changes was the decision to build a roadster, removing the top completely. That changes the lines dramatically, and now its got an enclosed trunk. I formed the flares from spray foam in a can skinned in urethane body filler, and the panel shells are isocyanurate foam. I mocked up the shapes I wanted with the foam board, we have a commercial fiberglass company in town who will choppergun the panels when I have the final shapes. Saves me a lot of time and sticky I wanted to raise the side panel of the car and build a side impact bar encased in spray foam and fiberglass, that will tie into the roll bar loop and the front steel pillar. Im thinking of a loop just under the dash side to side to tie the cage together. Windshield supports are aluminum rod supports at an angle from a Sea Ray boat. Hope to post more as the project progresses I knew nothing about forming body panels from foam, but doing is learning. How does one go about transferring the shape from one side to another when on the Bradley there are no body lines to measure off? Other than that, I've made progress, moving the shifter to the rear 8 inches (short arms I guess) and the parking brake, filed the points, new electric fuel pump, and a condenser and it runs and drives good. It had wheel adapters for GM five bolt wheels, and about 20 coats of gray primer that lost its bond to the gel-coat, so lots of sanding. One of the big changes was the decision to build a roadster, removing the top completely. That changes the lines dramatically, and now its got an enclosed trunk. I formed the flares from spray foam in a can skinned in urethane body filler, and the panel shells are isocyanurate foam. I mocked up the shapes I wanted with the foam board, we have a commercial fiberglass company in town who will choppergun the panels when I have the final shapes. Saves me a lot of time and sticky I wanted to raise the side panel of the car and build a side impact bar encased in spray foam and fiberglass, that will tie into the roll bar loop and the front steel pillar. Im thinking of a loop just under the dash side to side to tie the cage together. Windshield supports are aluminum rod supports at an angle from a Sea Ray boat. Hope to post more as the project progresses
|
|
| Back to top |
|
 |
MNChief
Samba Member
Joined: January 02, 2017
Posts: 36
Location: Minnesota
|
| Posted: Mon Jan 09, 2017 5:58 pm Post subject: Re: Bradley GT redefining lines |
|
|
I saw this from another members post, was wondering how you formed the clear covers for the headlight buckets?
|
|
| Back to top |
|
|
BennHerr
Samba Member
Joined: December 26, 2015
Posts: 7
Location: Arizona
|
| Posted: Mon Jan 09, 2017 6:06 pm Post subject: Re: Bradley GT redefining lines |
|
|
The higher sides will make it much harder to get in and out (no door you see) but they do make it look much better.
One way you could make a panel/mold to fill in those areas would be to bend up some sheet metal that would lay where you want the new surface to be. Then take the sheet metal part and with it off the body, glass the inside of the "mold" you have made. You would have to take all the usual precautions - making sure that the surface is smooth and waxed etc. A couple of layers of glass, some bracing ridges, and when it's set up, pop it off of your temporary mold. Then you'll have something you can glass onto the body. It won't be perfect but it will be a place to start from.
Or you could just trim up some quarter inch plywood to fit just inside of the lines you want. Glass it over then get to sanding! It'll be a bit heavier but should be real easy to make strong enough to hold somebody while they're sitting on the body trying to get in.
Last edited by BennHerr on Mon Jan 09, 2017 8:07 pm; edited 1 time in total |
|
| Back to top |
|
|
MNChief
Samba Member
Joined: January 02, 2017
Posts: 36
Location: Minnesota
|
| Posted: Mon Jan 09, 2017 7:43 pm Post subject: Re: Bradley GT redefining lines |
|
|
| The fiberglass shop guy and I discussed the panel issue for the higher sides and felt that the foam board (1" thick) shell would glass real nicely if I can hold it in place. The spray foam in a can is so sticky that it bonds the foam panels to the glass body real well. The shell in these parts where I want alot of strength is 1/4" of choppered glass over the foam, then I am going to use a spray-foam gun to fill all the voids in that part of the body, essentially creating a crash helmet to ride around in. Along with the 1 1/2" steel cage I am hoping for a little safer vehicle. If the raised side panels are strong enough you will be able to sit on them and swing your legs in and out. With the roll bar loop to hold this should be not too bad. |
|
| Back to top |
|
|
MNChief
Samba Member
Joined: January 02, 2017
Posts: 36
Location: Minnesota
|
| Posted: Mon Jan 09, 2017 8:25 pm Post subject: Re: Bradley GT redefining lines |
|
|
A little bit of an update, all the panels are in their proper places, just need a light skin of urethane filler
|
|
| Back to top |
|
|
rubenski
Samba Member
Joined: December 03, 2014
Posts: 100
Location: belgium
|
| Posted: Mon Jan 09, 2017 8:31 pm Post subject: Re: Bradley GT redefining lines |
|
|
| fun project! |
|
| Back to top |
|
|
TC/TeamEvil
Samba Member
Joined: February 16, 2004
Posts: 1769
|
| Posted: Wed Jan 11, 2017 6:10 pm Post subject: Re: Bradley GT redefining lines |
|
|
Looking like a pretty good beginning, punch up "super Cars" in Google images and look at the shape of the wheel openings. Yours still have that 70's lit car look that especially plagued the Bradleys.
Hopefully this is just something that you haven't gotten around to changing as yet . . . |
|
| Back to top |
|
|
MNChief
Samba Member
Joined: January 02, 2017
Posts: 36
Location: Minnesota
|
| Posted: Thu Jan 12, 2017 8:42 am Post subject: Re: Bradley GT redefining lines |
|
|
Previously posted about moving shifter back, Well got that project done (sort of) The previous abuser/hack/builder/owner must have moved the shifter back originally. The preferred method at that time was to torch the mount and gimbal off the tunnel and torch another hole back 3 inches or so, and stick weld (gob together) the piece in its new location. Then pop rivet a piece of tin over the hole left in the tunnel. The shit rod was welded together a little crooked so the rod guide was bent over to match(WTH?)  There was no bushing in the shift rod guide but lots of room so I dug in my stuff and found a 3/4' CPVC coupler that fit the rod. I slid that onto a 3/4 piece of pipe (masking tape on pipe to make it fit tightly) then 3 jaw chucked the piece into the lathe. Cut a very nice little bushing but i wish I had made a little more clearance for the rod, shes a little stiff when mounted. So I then cut the tunnel section with the shifter mount in a nice square shape (thanks to the poster who had such nice pictures of how to do this) and a piece 5 1/4 inches to the rear pretty much the same shape and swapped them. Recut the rod and welded it straight (a short piece of GM tansmission fill tube fits inside the shift rod perfectly) and and began welding the whole works back together. I need to cut steel patches to fill in the gaping hole with a torched edge left behind by the aformentioned "previous builder" There was no bushing in the shift rod guide but lots of room so I dug in my stuff and found a 3/4' CPVC coupler that fit the rod. I slid that onto a 3/4 piece of pipe (masking tape on pipe to make it fit tightly) then 3 jaw chucked the piece into the lathe. Cut a very nice little bushing but i wish I had made a little more clearance for the rod, shes a little stiff when mounted. So I then cut the tunnel section with the shifter mount in a nice square shape (thanks to the poster who had such nice pictures of how to do this) and a piece 5 1/4 inches to the rear pretty much the same shape and swapped them. Recut the rod and welded it straight (a short piece of GM tansmission fill tube fits inside the shift rod perfectly) and and began welding the whole works back together. I need to cut steel patches to fill in the gaping hole with a torched edge left behind by the aformentioned "previous builder"  I also built a shifter from an old stlyle and a newer style by graftin the two together with the length and angle that I wanted. Then I slid a Big Bertha golf club grip over the shaft for a finishing touch. My son thought it was pretty cool. I also built a shifter from an old stlyle and a newer style by graftin the two together with the length and angle that I wanted. Then I slid a Big Bertha golf club grip over the shaft for a finishing touch. My son thought it was pretty cool. |
|
| Back to top |
|
|
MNChief
Samba Member
Joined: January 02, 2017
Posts: 36
Location: Minnesota
|
| Posted: Thu Jan 12, 2017 8:58 am Post subject: Re: Bradley GT redefining lines |
|
|
| There is a lot of welding to be done to make this look ok (more details in the forum) |
|
| Back to top |
|
|
JiI
Samba Member

Joined: February 18, 2006
Posts: 1845
Location: Michigan
|
| Posted: Sun Jan 15, 2017 1:08 pm Post subject: Re: Bradley GT redefining lines |
|
|
| MNChief wrote: |
| There is a lot of welding to be done to make this look ok (more details in the forum) |
I'm not the best welder, but damn, that's a mess! 
Jeff |
|
| Back to top |
|
|
Q-Dog
Samba Member

Joined: April 05, 2010
Posts: 8700
Location: Sunset, Louisiana
|
|
| Back to top |
|
|
JiI
Samba Member
Joined: February 18, 2006
Posts: 1845
Location: Michigan
|
| Posted: Sun Jan 15, 2017 3:57 pm Post subject: Re: Bradley GT redefining lines |
|
|
| Q-Dog wrote: |
| I think I would cut that entire mess off and fabricate a new piece. |
Most definitely. You could put in a Jamar box or something.
Jeff |
|
| Back to top |
|
|
MNChief
Samba Member
Joined: January 02, 2017
Posts: 36
Location: Minnesota
|
| Posted: Sun Jan 15, 2017 5:17 pm Post subject: Re: Bradley GT redefining lines |
|
|
| I could cut the pieces out of a donor bug but the shifter works so well I don't want to mess with it |
|
| Back to top |
|
|
MNChief
Samba Member
Joined: January 02, 2017
Posts: 36
Location: Minnesota
|
| Posted: Sun Jan 15, 2017 8:53 pm Post subject: Re: Bradley GT redefining lines |
|
|
| What is a jamar box? |
|
| Back to top |
|
|
MNChief
Samba Member
Joined: January 02, 2017
Posts: 36
Location: Minnesota
|
| Posted: Wed Feb 08, 2017 1:53 pm Post subject: Re: Bradley GT redefining lines |
|
|
Haven't posted for a while, but here is some progress on the Bradley. We finally decided upon a headlight style after much discussion by my Son, my wife and I. The headlights are rather Humble units from a Dodge NEON, They are projector headlights, and match the style of the car rather well. The hood scoop is a "hafta have" peice, as in "Dad, it has to have a hood scoop"
The had to be turned on an angle to get them aligned in the right directionThe headlight will actually sit a lot more flush in the final installation.
I foamed the fiberglass form around the headlight because they wouldn't sit flat with the break in the hood, this photo was taken as the foam was curing. Then cut it to shape and start sanding it to final shape.
I am also sewing a custom Black leather interior for the Bradley
The leather is from 10 black leather coats I found in a used store. I paid about an average of 5$ per coat, and that is a lot of leather. There were several that were new and exactly the same (?) and they are the seat and back pieces
The zippered front of the coats will be the back side of the seat back (with the pockets left in place for storing stuff) I haven't finished one yet but they look pretty good so far. Sewing glove leather is actually pretty easy, just a special needle and a longer stitch so the holes for the thread are farther apart. Pillowing the seat faces and seat back with foam is a little harder, but I just had to follow a stitch in the coat already there. As I posted before, Learning is doing and doing is learning. |
|
| Back to top |
|
|
andygere
Samba Member

Joined: January 31, 2014
Posts: 600
Location: Central Coast, CA
|
| Posted: Wed Feb 08, 2017 3:06 pm Post subject: Re: Bradley GT redefining lines |
|
|
| Nice work on the body mods, especially the headlight buckets. That will go a long way toward updating the looks (and functionality) of the car. The used leather coat for seat material is genius. |
|
| Back to top |
|
|
joescoolcustoms
Samba Member

Joined: August 08, 2006
Posts: 9054
Location: West By God Virginia
|
| Posted: Wed Feb 08, 2017 4:47 pm Post subject: Re: Bradley GT redefining lines |
|
|
| andygere wrote: |
| The used leather coat for seat material is genius. |
Yes!
Opens up some ideas.
_________________
Bad News Racing 2018 NORRA 1000 3rd in Class
Best Day Ever Racing 2022 NORRA 1000 2nd in Class and first All Female team to complete the race
Everyone is gifted. Some just do not open the package.
Looks like it was painted with a live chicken,polished with a brick and buffed with a pine cone |
|
| Back to top |
|
|
MNChief
Samba Member
Joined: January 02, 2017
Posts: 36
Location: Minnesota
|
| Posted: Fri Feb 10, 2017 7:56 am Post subject: Re: Bradley GT redefining lines |
|
|
Here is a shot of the The final shape of the headlights on our Bradley project. The Dodge NEON headlight turned at an angle gave me the correct angle and projection with a little fill on the back side. It wont be adjustable though, but its not the kind of car I would spend a lot of time on the road at night with in Minnesota. Also mounting HID driving lights in the front spoiler area, that will help with illumination. What kind of ideas are out there for turn signals? I want to insert a side marker in the wider part of the flare, but I would like something cool in the front for turn signal. Also thinking of changing the bumper style, but I want some protection for the corners. Any thoughts?
|
|
| Back to top |
|
|
heywebonya
Samba Member

Joined: July 08, 2010
Posts: 823
Location: Portage, MI
|
| Posted: Fri Feb 10, 2017 8:37 am Post subject: Re: Bradley GT redefining lines |
|
|
I would recommend button LED lights for turn signals.
Also, make the hood scoop much larger. Perhaps add intakes to the current hood bump
_________________
If I knew what I was doing; I wouldn't be building a buggy! |
|
| Back to top |
|
|
Letterman7
Samba Member
Joined: March 14, 2004
Posts: 3198
Location: Downingtown, PA
|
| Posted: Fri Feb 10, 2017 5:42 pm Post subject: Re: Bradley GT redefining lines |
|
|
| I concur with the scoop. It needs to be far larger (wider) but not necessarily taller. Maybe a pseudo NACA style like the late '80's Camaro's had. And not feeling the headlights, but that might be because they aren't faired in yet.. |
|
| Back to top |
|
|
|


