| Author |
Message |
Burlyhammer
Samba Member

Joined: March 07, 2002
Posts: 1693
Location: Great north woods Maine

|
 Posted: Mon Feb 27, 2017 11:03 am Post subject: Re: 1963 15 Window resurrection Posted: Mon Feb 27, 2017 11:03 am Post subject: Re: 1963 15 Window resurrection |
 |
|
BarryL,
I think It's worth looking in to. Thanks for the info.
Dave |
|
| Back to top |
|
 |
Burlyhammer
Samba Member
Joined: March 07, 2002
Posts: 1693
Location: Great north woods Maine
|
| Posted: Sun Mar 05, 2017 4:07 pm Post subject: Re: 1963 15 Window resurrection |
|
|
My door arrived from CA this week. I bought it last fall. The seller would not ship it, but agreed to deliver it to my father in law in Oakland. The door has been sitting in his shop until he shipped it to me last week. It is nicer than the rest of the bus. I will need to get the rest of the bus to match.
I still need to line everything up so the doors are square before I chop into the front. I have been stalling a little because I still am not sure exactly how I am going to repair the front frame. I considered replacing the entire front frame section with the other walk thru section I have, or cut pieces from the frame, etc, and patch, or buy the frame sections from Schofields. I think I am going to get the steel for bracing, and get everything square, and hopefully by then, I will have a plan. If anyone has any suggestions, it would be much appriciated.
I started cleaning up the spare walk thru seat base as I think I will need some of it at least. The one in the bus is missing alot.
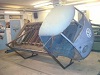
The weather has been all over the place up here the last few weeks. My road has been covered in ice, but finally managed to melt enough for us to go for a ride in the camper. We were wearing the same clothes driving, that we would wear sledding (haha) That is the river (frozen) in the background.
|
|
| Back to top |
|
|
Pinetops
Samba Member

Joined: March 24, 2007
Posts: 2987
|
| Posted: Sun Mar 05, 2017 4:53 pm Post subject: Re: 1963 15 Window resurrection |
|
|
The door is a great match.
_________________
"A rolling bus gathers no rust." |
|
| Back to top |
|
|
Burlyhammer
Samba Member
Joined: March 07, 2002
Posts: 1693
Location: Great north woods Maine
|
| Posted: Mon Mar 06, 2017 2:56 am Post subject: Re: 1963 15 Window resurrection |
|
|
I am hoping that once that once the bus gets cleaned up, everything will blend. The cargo doors are from a 65 but look like a match also.
Thanks |
|
| Back to top |
|
|
Burlyhammer
Samba Member
Joined: March 07, 2002
Posts: 1693
Location: Great north woods Maine
|
| Posted: Tue Mar 07, 2017 9:49 am Post subject: Re: 1963 15 Window resurrection |
|
|
I ordered the steel for bracing yesterday. I will pick it up this week. I got 1" square tubing 1/8" wall thickness. I'm hoping 48' will be enough.
I started to attempt to lign up the doors. There is some tweaking going on, and I do not want to brace it out of square.
The drivers side dogleg was bent out past the door opening, so I removed it. (It had to go anyway) Since I had the grinder out, I decided to remove some more metal.
It is much clearer how the frame is bent. I still am not sure what I am going to do to repair this.
The seat base is slightly buckled, as well as where the seat back connects to the B piller on the drivers side. It looks like the front is slightly tweaked to the left causing a tight gap on the drivers side door gap, and o much more open gap on the passenger side. While i contemplate, there is more metal to remove.
Break time (Time to go to work) |
|
| Back to top |
|
|
Pinetops
Samba Member
Joined: March 24, 2007
Posts: 2987
|
| Posted: Tue Mar 07, 2017 9:56 am Post subject: Re: 1963 15 Window resurrection |
|
|
Do you have enough frame on your donor front clip to cover what is bent? I know it needs patching but that's not the end of the world.
_________________
"A rolling bus gathers no rust." |
|
| Back to top |
|
|
Burlyhammer
Samba Member
Joined: March 07, 2002
Posts: 1693
Location: Great north woods Maine
|
| Posted: Tue Mar 07, 2017 11:39 am Post subject: Re: 1963 15 Window resurrection |
|
|
Pinetops,
I think that here is more than enough from the donor frame to fix the problem areas on the bus. That is probably the route I will go. I started taking it apart last weekend. I have enough pieces from other stuff sitting around to patch anything too bad on the donor frame before installing it on the bus. The drivers side scares me the most. I will more than likely have to replace the whole frame section from where the beam goes, to the first outrigger. I guess I should not be scared. It is already crooked.
Thanks,
Dave |
|
| Back to top |
|
|
Burlyhammer
Samba Member
Joined: March 07, 2002
Posts: 1693
Location: Great north woods Maine
|
| Posted: Wed Mar 08, 2017 1:38 pm Post subject: Re: 1963 15 Window resurrection |
|
|
I am trying to determine where exactly my frame as tweaked on the pass side. I cleaned up the frame on both sides where the front doglegs were and I will put a straight edge on, as well as checking my cross corner measurements. I do have the Haynes service manual with all of the dimensions as well as where to measure from. I think I may make a couple of relief cuts since I am going to have to repair/replace frame sections anyway. That way I can get all of my door seams straight, and then get the beam square to the rear torsion housing. When I first looked at the measurements, I converted all of the MM dimensions to inches. Then I felt like the inches were not going to be close/accurate. Then I remembered i have a metric tape measure. Nothing like time well spent. Now all I have to do is convert MM to CM Where's that conversion calculator???
I also got my square tubing for bracing. The steel company does not bend square tubing (hoops for a rotisserie?) They got me a quote to have it done. They said the steel bent into a 100" OD would be $1200 and they would have to cut the pieces for shipment from Chicago. Yep. That's not going to happen. I will work out another plan. If no one in the state of Maine can bend square tubing into a hoop, maybe someone should say something.
Hopefully I will get some more time to ponder/grind tonight. |
|
| Back to top |
|
|
glideking
Samba Member

Joined: February 02, 2013
Posts: 990
Location: California
|
|
| Back to top |
|
|
Burlyhammer
Samba Member
Joined: March 07, 2002
Posts: 1693
Location: Great north woods Maine
|
| Posted: Wed Mar 08, 2017 1:54 pm Post subject: Re: 1963 15 Window resurrection |
|
|
Kurt,
I actually used your info when calling around. I just checked Central Maine fab shops, and asked if they knew anyone, when they were unable. The only place that said no problem was the place that was going to have the work done in Chicago. I will broaden my search to further south. My work takes me all over the north east. I'm sure someone will be able to help with this.
Thanks,
Dave |
|
| Back to top |
|
|
Huetti_1989
Samba Member
Joined: February 13, 2011
Posts: 1134
Location: Austria
|
|
| Back to top |
|
|
Burlyhammer
Samba Member
Joined: March 07, 2002
Posts: 1693
Location: Great north woods Maine
|
| Posted: Thu Mar 09, 2017 6:39 pm Post subject: Re: 1963 15 Window resurrection |
|
|
It is amazing to see the amount of debris that is on the floor every time I work on the bus. Just tapping it with a hammer creates a pile. Not as much as when I first dug it up, but still it continues. If there is a nook or cranny, there is sediment.
I decided this morning that I was going to get in to where there is no turning back. I will be sleeping with one eye open tonight. I fear I may have disrupted the Bus Gods with my hackery.
Here you can see the buckeling:
Cut line:
I am glad I did this. There was alot of soft tissue. The bottom piece was super thin:
I have no idea how acorns got up this far in:
And sediment:
There is still a bunch more that needs to be cut out. I figure if I do tiny bits at a time I can drag this out for a while.
After cutting into it this far, I think I am going to buy the frame repair section from Schofields at least for the driver side. My donor walk thru section looks to be as bad in the same places as this one. I will probably cut the bad areas from the pass side before I actually order those pieces. I still have alot of grinding to do, as well as squaring and bracing. I am eager to start welding, but I have a ways to go first.
This is ridiculously fun. I have been waiting for this for a long time. My coffee pot is programmed to come on at 4:30 AM but since my garage has been closed in, it seems like I am up before it comes on. I think I will reprogram it now. |
|
| Back to top |
|
|
Pinetops
Samba Member
Joined: March 24, 2007
Posts: 2987
|
| Posted: Thu Mar 09, 2017 6:49 pm Post subject: Re: 1963 15 Window resurrection |
|
|
I have faith that you can get it done!
My question is:
Ok, so you will put a straight piece of frame in it, but how do you know when everything else is pulled back where it needs to be first?
Close measurements of the other side? Measurements from another bus? Door gaps?
Another thought:
Not that you are to this point yet but should you move the weld farther back from the "bend" in the frame for strength? It may not matter, I am not a metal work expert obviously. Also, thoughts on staggering the frame patch lower joint for strength? The top is kind of staggered already.
Something like this:
_________________
"A rolling bus gathers no rust." |
|
| Back to top |
|
|
Burlyhammer
Samba Member
Joined: March 07, 2002
Posts: 1693
Location: Great north woods Maine
|
| Posted: Thu Mar 09, 2017 7:04 pm Post subject: Re: 1963 15 Window resurrection |
|
|
Pinetops,
Thanks for the vote of confidence. I need as much positive reinforcement as I can get. I am by no means a metal wiz. I am winging it with this frame issue. I put a straight edge down the side of the frame in front of the seam below the cargo floor on both sides. The drivers side over laps the straight edge in the front, and on the passenger side there is a 1/2" gap in the front. I am planning on trying to see exactly where it is bent, and straighten/pull the front over until it is square and all of my gaps are correct. I was thinking i would put some strengtheners inside the frame and plug weld them in for strength. I thought I may be able to keep it from looking spliced if I had my seam behind the outrigger too. I have lots of concerns, but it seems with the more I remove, the clearer the picture is. I just need to make sure there is something left at the end.
Thanks,
Dave |
|
| Back to top |
|
|
Pinetops
Samba Member
Joined: March 24, 2007
Posts: 2987
|
| Posted: Thu Mar 09, 2017 7:16 pm Post subject: Re: 1963 15 Window resurrection |
|
|
Sounds like a plan to me. Overall, yeah it's tweaked but it could have been a lot worse really.
Final daunting frame repair thought: You built a house, you can definitely handle this!

_________________
"A rolling bus gathers no rust." |
|
| Back to top |
|
|
glideking
Samba Member
Joined: February 02, 2013
Posts: 990
Location: California
|
|
| Back to top |
|
|
Burlyhammer
Samba Member
Joined: March 07, 2002
Posts: 1693
Location: Great north woods Maine
|
| Posted: Fri Mar 10, 2017 5:41 pm Post subject: Re: 1963 15 Window resurrection |
|
|
Kurt,
When I saw the photos of your bus dismantled, it was shocking. It is crazy to think that you took it down that far, and brought it back to what it is now. Truly amazing. I am hoping that mine will not have to go that far, but every time i work on it, it seems like it may be headed in that direction.
This morning I finished cleaning up from where I removed the drivers seat base:
I also started removing the rest of the floor where it attaches to the headlight bucket support panel. You can see where the frame buckled. The line that is rusty on the side is where it was twisted. It must have sprung back when it happened. It is not bad.
I took a picture of the sticker stuck on my fresh air box cover. It looks like someone tried to remove it with a hammer:
If you look close at the bottom, it says copyright 1970.
This afternoon I removed the rest of the floor around the shifter and across the front.
It is a good thing I needed some water. When I came out of the garage this was waiting for me:
I thought it was still daytime.
You guys in CA are just getting ready for Friday afternoon traffic. I think I will stick to the forest. There's a lot to be said about living off the beaten path, like "hey pizza guy, I'll give you an extra 5 bucks if you will drive out as far as the boat landing."
Nope. |
|
| Back to top |
|
|
Burlyhammer
Samba Member
Joined: March 07, 2002
Posts: 1693
Location: Great north woods Maine
|
| Posted: Sat Mar 11, 2017 8:11 am Post subject: Re: 1963 15 Window resurrection |
|
|
This morning I decided to procrastinate with the frame issue again, so I swept the floor for a while, then I put tools away, moved stuff around, etc. I glanced at the frame several times, but it had not healed up yet. I still have the donor walk thru section on my bench. I stared at it for a while, then decided to make a template of the inside vertical sheet metal. I am not sure why just yet, but it seemed like a good idea.
Of course I used my handy old compass:
Got a piece of nice cardboard and clamped it into place:
Marked it 3 times:
Cut once:
I did a little more to my template, but decided since I was multitasking I would move on to the crusty door I found on the ground sitting next to the bus when we found it. It is very rough. I thought I would see what parts I could scavenge for my "new" door. It is not the original door that came off the bus. I think it was brought out to be put on, but that project was postponed, because the bus was too tweaked for the door to fit:
I removed all of the door handle and window latch pieces and put the door back outside. I have the matching passenger door from the same bus with the sweet floral door panel.
The bus gods did not strike me down yet for hacking into my frame. I think they must be ok with my project, because... I needed the lower drivers side hinge plate for my new door. I have been planning to remove the hinge from a later door I have but had been putting off. I got set up mechanically as well as mentally. I have never been successful removing a door hinge pin. I actually bought a drill bit sharpener when I removed the cargo door hinges. For some reason, the stars were aligned, and after some hammer persuasion:
I didn't damage the pin, or hurt the door I took the hinge from. I have never even seen a door hinge pin come out intact. (I did get this pair of late doors from the inside of a barn. They were super solid and really nice)The lower hinge area on the door was already tweaked))
Happy Saturday! |
|
| Back to top |
|
|
Burlyhammer
Samba Member
Joined: March 07, 2002
Posts: 1693
Location: Great north woods Maine
|
| Posted: Sat Mar 11, 2017 4:54 pm Post subject: Re: 1963 15 Window resurrection |
|
|
I continued to procrastinate this afternoon. Then I decided to start bracing. I decided that turnbuckles might be helpful since everything up front is so out of wack.
1/2" threaded rod and 1" square tubing.
8" long rod
1/2" spacer:
Ground round nuts:
one end:
Squared up freestyle:
Both ends welded:
Finished:
Oh I would like to mention the importance of safety glasses, and gloves. I was very lucky when my cutting wheel got bound up. In less than 1 second, the cutting wheel flew to every corner of my garage.
I started to make the second adjustable brace for the front and somehow blew a hole through my spacer. Break time. |
|
| Back to top |
|
|
Burlyhammer
Samba Member
Joined: March 07, 2002
Posts: 1693
Location: Great north woods Maine
|
| Posted: Sun Mar 12, 2017 3:49 pm Post subject: Re: 1963 15 Window resurrection |
|
|
I got back to it dark and early this morning. I decided not to spring forward until later today so I would have more time to work on the bus. I finished the second cab brace, and then made one for the b pillars. Here are the parts before welding them all together:
Here is the b pillar adjustable brace in place:
I put the adjuster in the middle, and tacked the square tube to the drver side seat base so it wouldn't bow:
I removed the rusty part(ha ha) of the walk thru floor:
I then put the straight edge on both sides of the frame once again (it is still bent). I hemmed and hawed and pondered and came up with a bunch of different tactics. I am still not 100% sure what I am going to do, but I am getting close.
I am trying to do something every day to keep going. I have been checking out a bunch of build threads and there is some incredible work being done. This has been a huge inspiration. This is so much fun. |
|
| Back to top |
|
|
|


