| Author |
Message |
ajdenette
Samba Member
Joined: February 15, 2009
Posts: 768
Location: Hope Valley RI

|
|
| Back to top |
|
 |
82westyrabbit
Samba Member
Joined: March 02, 2015
Posts: 969
Location: Ma
|
 Posted: Thu Nov 14, 2019 6:09 am Post subject: Re: Resurrecting the 1985 Westy Posted: Thu Nov 14, 2019 6:09 am Post subject: Re: Resurrecting the 1985 Westy |
 |
|
| Transporter fest is always a good show but it doesnt get much publicity here. I was there in the morning but I had to work in the afternoon. If one brake line blew out I would change all of them. Being able to stop is high on my priority list. I did that job to my van a few years ago. John |
|
| Back to top |
|
|
kaeferman
Samba Member
Joined: April 04, 2012
Posts: 115
Location: Sylva, NC
|
| Posted: Thu Dec 05, 2019 8:25 pm Post subject: Re: Resurrecting the 1985 Westy |
|
|
Wow nice work dude! I ve read a bunch of this thread. I m currently about to have one resurrected from a field slumber of several years. The van needed more than i expected at the start , but i m close to road worthy any weekend now.
Regarding the brakes sys on this 84 tin top i m doing right now, I got not a single hydraulic piece of the brake system to free up! they were all frozen, even the proportioning valve under the cab was stuck and with both rear bleeders freed up and open no fluid could be pumped out. i was able to save the rear wheel cyls tho. They still had good rubber seals, so i smoothed them up with a 3m pad and reassembled. They re working fine.
Thank fully tho my steel lines looked good and weren t that rusted, i m with 82westyrabbit tho, assume yours are all the same amount-close to gone and that leak was your warning. I m proud that your e brake worked, however. E brake cabels hate me, i never have much luck with them. I appr3ciated your photogaph skills too, i even had to steal some of your shots for my cabinet work i m sort of still in the middle of with my westy. I had a whole mouse family die in the kitchen wall of my camper last winter and i yanked out the cabinets during the body recovery phase.
Right now i m in the midst of a coolant puking issue. I had a local shop rebuild a 2.1 wbx long block and it runs great on the road but doesn t like to sit and idle. I should do a build thread too i guess and copy you. Its been a learning experience for sure. Enjoy the camper! Solid work
Heres a few pics of my efforts:
B
_________________
83 Westfalia wbx Idaho
84 Tintop Vanamos
formerly
71 Squareback sold
70 Westfalia lost to fire by new owner
71 Super Beetle rolled/scrapped |
|
| Back to top |
|
|
ajdenette
Samba Member
Joined: February 15, 2009
Posts: 768
Location: Hope Valley RI
|
| Posted: Fri Jun 26, 2020 9:53 am Post subject: Re: Resurrecting the 1985 Westy |
|
|
I decided it was time to upgrade the armrests on my 85 Westy with some from a 87, I started bu removing the early arm rests and their posts from the seat:
Next I took the pivots from the later seats and used some thread locker to keep the anchor screws from loosening up
After this I installed the arm rest and used then drove in the split pin to anchor them hard to photograph and install it but here is a comparison of the two arm rests:
I am glad I did this they are much more comfortable, I have been driving vans with these arm rests for a long time the 87 Westy and my 90 with the Carat interior has them so the shorter earlier arm rests have not been doing it for me.
_________________
1985 2wd Westy with 2000 Subaru 2.2 current driver
https://www.thesamba.com/vw/forum/viewtopic.php?t=685635
1986 Syncro Doka Project next in line
https://www.thesamba.com/vw/forum/viewtopic.php?t=732777
1990 Vanagon Syncro Base awaiting body work |
|
| Back to top |
|
|
ajdenette
Samba Member
Joined: February 15, 2009
Posts: 768
Location: Hope Valley RI
|
| Posted: Fri Jun 26, 2020 11:04 am Post subject: Re: Resurrecting the 1985 Westy |
|
|
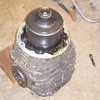
I was so glad to get the westy out of storage 2 weeks ago, I need to resolve a few issues I had at the end of last year I drove it a bit and gathered the parts to resolve it over the winter and just had to get the van back to my garage to do the work. After driving it home and to a fathers day Limbo Hang out it was time to address the leaking gear oil and the lack of down travel in the suspension. Because I am running Stock Syncro Springs in the rear I opted to run Syncro shocks to match in order to prevent CV issues I Opted to install 944 CV joints to finish the rear upgrade. I took some spare CV shafts and removed the stock joints on them and assembled the new 944 GNK Lobro CV joints purchased from Chris at T3 technique. I bought one Tube of the Neo CV joint grease but should have bought 2 I opted to grease one with the Neo grease and the other side with the Lobro grease bags, I also instelled new Rockford boots on them.
Learning from the off road VW guys in order to make sure I did not have issues running these joints at high angles I made sure they were properly assembled before going on the shafts and clocked them in relation to each other on the shaft as well.
I didn't get pictures as there was a lot of gear oil and on jack stands only so much room to work but it turned out that the drive flange cap popped loose and caused the gear oil to flood the CV, the joint was a little noisy and there was a good leak to the ground. I found the output flange loose with the cone washer backwards, when I pulled it off there were some deep groves in the flange as well so that all got replaced. On top of those issues while removing the drive flange seal the side adjuster moved very easily by hand so I snugged it up when installing the new seal, I also installed a spare output flange without grooves and installed the cone washer making sure the clip to hold everything tight was well seated. I covered this all up with a fresh drive flange cap to seal the system. I installed the prepped and greased CV axle and new Shock to check for no binding.
Here you can see the difference between the 2WD shock and the new Beilstein Syncro Shocks.
This was the suspension at max extension with the 2WD shocks:
Here is the suspension at max droop with the New Beilstein shocks:
Here is the ride Height this is after the new shocks were installed but they do not effect ride height turns out I had 1" of down travel after the new shocks I have 3" of down travel makes the ride much nicer for day to day driving and while it was on the stands with new shafts installed I made sure to rotate the wheels with the new shafts tightened up to verify there was no binding in the CV axles.
_________________
1985 2wd Westy with 2000 Subaru 2.2 current driver
https://www.thesamba.com/vw/forum/viewtopic.php?t=685635
1986 Syncro Doka Project next in line
https://www.thesamba.com/vw/forum/viewtopic.php?t=732777
1990 Vanagon Syncro Base awaiting body work |
|
| Back to top |
|
|
MrsMaamVan
Samba Member
Joined: June 27, 2020
Posts: 1
Location: Seattle
|
| Posted: Sat Jun 27, 2020 7:52 am Post subject: Re: Resurrecting the 1985 Westy |
|
|
| Great posts. Just bought an 85 Weekender that will need resto. Awesome to see others out there doing the same! |
|
| Back to top |
|
|
ajdenette
Samba Member
Joined: February 15, 2009
Posts: 768
Location: Hope Valley RI
|
| Posted: Sun Aug 23, 2020 12:08 pm Post subject: Re: Resurrecting the 1985 Westy |
|
|
So it was time to make the interior match a little better, I had just grabbed the gray base model jump seat I had around and tossed it in but was tired of the mismatch.
I will start with disassembling the jump seat I pulled the bottom cover off the bottom pan by removing the screw caps and screws to take a good look at the base pan on a Jump seat.
standard seat pan for reference with the rails removed
Here you can see I just took out the 2 bolts holding the back rest on the base and the two rivets in the seat back sit into 2 notches in the frame.
Here is a close up of the back rest of the GL seat I am using as a donor with the back adjuster I felt better hacking up the adjuster and leaving the factory rivet alone so it ends up identical to the factory jump seat just with armrests.
Here is a view of the donor seat where I started disassembly by removing the side bolts and then un bolting the seat rails from the bottom of the seat pan
For removing the seat bottoms flip them over so the seat pan is facing up, compress the cushion and you should be able to pull the cardboard lip out of the channel to free the upholstery. I used the foam and upholstery from a standard van seat, the jump seats use the same foam as a westy does with shorter foam and smaller bolsters. the seat does not flip up well, it can but I tend to use them down or pull them out and rarely flip them up.
I still need to install the arm rests but the plan is to move over the other adjustable arm rests to the passengers seat and move the shorter ones to the jump seat to clean it up a little bit and cover up the holes in the upholstery for the arm rests.
_________________
1985 2wd Westy with 2000 Subaru 2.2 current driver
https://www.thesamba.com/vw/forum/viewtopic.php?t=685635
1986 Syncro Doka Project next in line
https://www.thesamba.com/vw/forum/viewtopic.php?t=732777
1990 Vanagon Syncro Base awaiting body work |
|
| Back to top |
|
|
|


