| Author |
Message |
xclemjustinx
Samba Member
Joined: August 06, 2016
Posts: 198

|
 Posted: Tue Jan 01, 2019 7:38 pm Post subject: 1990 Vanagon GL Build. Progress with pics. Posted: Tue Jan 01, 2019 7:38 pm Post subject: 1990 Vanagon GL Build. Progress with pics. |
 |
|
Hi guys! Long time looker first time poster (sort of). My name is Justin and I live in Orange County, Ca. I bought my van in August of 2016 and then the tear down began. I wanted to share with you guys what I have done to the van so far and maybe from my post you might be able to learn some new things or vice versa (I know I have learned a lot from you guys). *gasp* Here it goes.
Van Build ( I probably have left some things out)
Led exterior bulbs
Led instrument panel bulbs
New instrument cluster circuit board
Upgraded cigarette lighter to USB charger
Led interior bulbs plus relay
LED headlights for SA grill from Transporter Werks
New brake pedal pad
New oem VW emblems front and rear
New carpet from Sewfine
New digital clock and screen
All new seals for windows
NewLT mirrors (highly recommend those)
New interior panels from Sewfine
New antenna
Remove rocker panels
New window tint
Big brake kit in front
New rear brake kit (everything was replaced)
Upgraded to SA grill
New lower grill
NEW RMW front and rear bumper
Fox 2.0 installed front and rear
Schwenk Coils in front and rear
Burley Motor Sports Upper Control arms for 2wd
T3 oversized sway bar
Burley Motor sports brake shield
All new upper and lower balls joint from Moog
Powerflex bushings for the entire van
New end links
New inner and outer air rods
New power steering rack
New power steering pump for EJ 2.2
New power steering lines
New power steering pulley
Lower control arm and spindle sandblasted, reinforced and power coated
All new suspension hardware from T3 and local hardware store (Denaults)
New Euro look 16" wheels to BFGoodrich K02 tires
All new fuel lines
All new seatbelts for front and rear
Center console from Vanagonlife (high recommend this)
Whole van has 2 layers of sound dampening, 2 layers of insulation (recycled jeans)
New carpet cushion for front and rear of van
New horn lever on steering wheel
Windshield wipers front and rear with new Bosch wipers
All new gas filler neck, rubber seal and gas cap for gas tank
New gas tank, seals and cross over tube
New vapor hose
New Bosch AL4300X alternator
Scan Gauge
RMW stainless steel coolant tank
New transmission
New transmission ground cable
New fuel pump and fuel filter
New positive (van cafe sells NOS gem cable) and negative battery cables
Optima starter and deep cycle battery
WOSP-101 starter
New start cables
New stainless steel coolant hoses
EJ22 motor installed
New automatic shifter column cover
New Neutral safety switch and striker
New hazard and driving light switch
New ignition with Key
New ignition switch (I keep like 5 of these on hand because they go out)
New turn signal lever and new wiper lever
German rubber floor matts
New aftermarket power windows switch installed
New OEM power window regulators
New OEM power window motors
Door grab handle
New glove box and lock and latch
Bullihutzen from T3 for rear vent (I riveted this and linexed it)
New fuel sender unit
New front and rear turn signal and brake lenses from Hella
Re-keyed all the locks
Linexed step pad for sliding door
Replaced upper steering column cover
New lower steering column cover from Go Westy
New rear Carpet over engine from Sewfine
New cushion cover from Sewfine
New Cv joints and axles and hardware
New VOW window from Vanagonlife
New rotoprx fuel and water jerry cans
New pro eagle jack (installed in rear under bench seat)
After I received the engine being installed I did the following
Engine build (might be some re-posts, I do apologize)
Ej22 engine block
RMW intake to K & N air filter ( I made the bracket to fit this huge filter)
New alternator
New power steering pump, pulley and lines
New timing belt
All new plugs and new wiring
Silicone hoses from Viper performance
New IAC valve
New Speed Sensor
New Knock and Cam shaft sensor plus wiring from Iwire in Lake Forest
New throttle cable
KEP engine bracket and exhaust
New Throttle position sensor
New silicone vacuum lines
New charcoal canister
New fuel lines wrapped in techflex
NEW RMW coolant tank and sensor
New overflow tank from Busdepot
New Spark plugs
New alternator wiring and wrapped in tech flex
NEW MAF sensor and wiring
New alternator support bolt
New spark wires from NGK
New Recaro Specialist M seats (have not installed these yet)
The reason for the long list is because maybe when someone reads it they might see what I installed and reminds them that they need this part as well. Thats what I do when I read the post and replies. I say to myself "Crap, I forgot to order that or maybe I should install it this way."
I have done all of the work on my van myself besides the engine install. I want to thank everyone on this forum for giving me the confidence and guidance to be able to build this van. We are all in this together and I have learned a lot from each and every one of you on this forum and in person as well. Thanks to Chris @ T3 Technique, Dave @ Vanagonlife, Gowesty, Vancafe, RMW, Busdepot and everyone that I have ordered from. If you have any questions about how I installed parts or how I routed things, please let me know. Thanks!
Last edited by xclemjustinx on Tue Jan 01, 2019 8:58 pm; edited 2 times in total |
|
| Back to top |
|
 |
xclemjustinx
Samba Member
Joined: August 06, 2016
Posts: 198
|
| Posted: Tue Jan 01, 2019 8:54 pm Post subject: Re: 1990 Vanagon GL Build. Progress with pics. |
|
|
Van when I first bought it.
Interior tear down
New carpet being installed with sound dampening and insulation
Front Interior
I built this piece to cover the screws on the shifter cover
Vanagonlife Center Console
Interior Panels from Sewfine
Sliding door kick plate (I linexed this)
RMW Coolant Tank
Rear Brake Overhaul
Original
New Rear Brakes
Front Brake (Big Brake Kit)
Bullihutzen (From T3)
Suspension
Powdercoat by Olympic in Costa Mesa
Powerflex and Endlinks from T3
Schwenk Springs
Burley Motor Sports 2WD Upper A Arms
Suspension So Far (Missing Picture of Fox 2.0)
Fuel Filter and Fuel Pump
Engine Before & After
Engine as of now. You will notice I did some tech flex wrap around the fuel lines alternator wire etc. I also cleaned it up with some shrink wrap as well. I also wrapped the sensor wire going into the coolant tank as well. Engines are always a process.
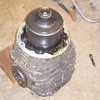
CV Joint Issue
When I was camping I broke a cv bolt. I used a temporary Allen bolt, but the bolt was about 2-3 mm too long. I installed the bolt and when I backed up, the bolt pushed into the transfer case adjustment ring and back it out as well. Luckily nothing was too damaged. I installed a new ring and new oil and was good too go. The drive home from the trip, was not so fun though. Please pay special attention to the cv joint bolts. I learned the hard way.
You can see where I crushed the washer from tightening down the Allen bolt for the cv joint.
This was the wrong tool btw.
Bushing Removal Tool I came up with
I'd say its about a 1 time use. Cost me around 10 bucks to make the tool for the rear trailing arm bushings.
Vanagonlife VOW
Very easy to install and it came with a new German seal already installed on the window. Took about 20 min to install with the help from my wife.
Transporter Werks LED Headlights
.
If you have any questions about any installs or any tips or tricks, please tell me! I wanna learn! Thanks! |
|
| Back to top |
|
|
andrewvwco
Samba Member
Joined: February 23, 2017
Posts: 298
Location: Estes Park colorado
|
| Posted: Tue Jan 01, 2019 11:14 pm Post subject: Re: 1990 Vanagon GL Build. Progress with pics. |
|
|
| I just wanna say wow! Love the new inside and powder coating. You still have the old engine? |
|
| Back to top |
|
|
T3messie
Samba Member
Joined: October 03, 2017
Posts: 209
Location: Germany
|
| Posted: Wed Jan 02, 2019 12:06 am Post subject: Re: 1990 Vanagon GL Build. Progress with pics. |
|
|
When I read your long list, it seems I forgot to order everything for my vanagons except the Bilsteins and the new transmission.
 |
|
| Back to top |
|
|
elizer 
Samba Member
Joined: May 02, 2016
Posts: 1462
Location: Northern Virginia
|
| Posted: Wed Jan 02, 2019 7:28 am Post subject: Re: 1990 Vanagon GL Build. Progress with pics. |
|
|
| What a great build. Looks like you went with eurovan seatbelt receivers. I did the same when I switched to eurovan seats. Way easier to clip in. |
|
| Back to top |
|
|
dobryan
Samba Member

Joined: March 24, 2006
Posts: 16503
Location: Brookeville, MD
|
|
| Back to top |
|
|
westydriver
Samba Member
Joined: July 08, 2017
Posts: 54
Location: Eastside of Nebraska
|
| Posted: Wed Jan 02, 2019 10:04 am Post subject: Re: 1990 Vanagon GL Build. Progress with pics. |
|
|
| Fantastic! |
|
| Back to top |
|
|
rmcd
Samba Member
Joined: October 29, 2010
Posts: 1348
Location: PNW - its a dry rain.
|
|
| Back to top |
|
|
xclemjustinx
Samba Member
Joined: August 06, 2016
Posts: 198
|
| Posted: Sun Jan 06, 2019 11:02 am Post subject: Re: 1990 Vanagon GL Build. Progress with pics. |
|
|
| andrew163980 wrote: |
| I just wanna say wow! Love the new inside and powder coating. You still have the old engine? |
I still have the old engine. There was a leak in the head gasket and I believe the head is cracked not sure. |
|
| Back to top |
|
|
xclemjustinx
Samba Member
Joined: August 06, 2016
Posts: 198
|
| Posted: Sun Jan 06, 2019 11:04 am Post subject: Re: 1990 Vanagon GL Build. Progress with pics. |
|
|
| dobryan wrote: |
Nice build. 
(Check the orientation of the rear brake hardware. I believe that the longer arm of the spreader bar goes behind the brake shoe.) |
I will. I reinstalled it according to the Bentley, but I might have it in the wrong orientation. Thanks for catching that!! |
|
| Back to top |
|
|
jvan
Samba Member
Joined: April 25, 2013
Posts: 162
Location: cascadia
|
| Posted: Sun Jan 06, 2019 4:52 pm Post subject: Re: 1990 Vanagon GL Build. Progress with pics. |
|
|
Looks awesome...how long did it take you to re-do your front end once you had all the parts?
Also, how is the ride now vs old suspension? Was there a noticeable change in clearance with the new springs?
_________________
tin top. |
|
| Back to top |
|
|
oldskewlsk8ter
Samba Member

Joined: June 13, 2004
Posts: 347
Location: Texas
|
| Posted: Sun Jan 06, 2019 5:10 pm Post subject: Re: 1990 Vanagon GL Build. Progress with pics. |
|
|
Do you have any pics of those inner LEDs on the SA grill during installation? Im trying to figure out how to mount some.
Btw, very nice job on the build!
_________________
1986 Hightop w/EJ25 DOHC & 4EAT auto
1965 Kombi project |
|
| Back to top |
|
|
xclemjustinx
Samba Member
Joined: August 06, 2016
Posts: 198
|
| Posted: Sun Jan 06, 2019 8:25 pm Post subject: Re: 1990 Vanagon GL Build. Progress with pics. |
|
|
| jvan wrote: |
Looks awesome...how long did it take you to re-do your front end once you had all the parts?
Also, how is the ride now vs old suspension? Was there a noticeable change in clearance with the new springs? |
Once I had all the parts for the front end, it took me 12 hours to do the install. That included removal of all the old front end and installing the new front end. Some bolts just didnt want to come off. I also installed a new power steering rack as well. Once installation was done, it was a night and day difference. The swaying on the freeeay was almost completely gone (the wind wants to take the van). Bumps, knocks and creaks from 30 year old bushings and ball joints were gone. I will say I love the Fox 2.0 shocks but the Bilsteins for street have a better compression. The Fox for off road is no comparison to the Bilsteins. I love how the Fox feel on the dirt. I might redo the shims in the Fox front shocks. |
|
| Back to top |
|
|
xclemjustinx
Samba Member
Joined: August 06, 2016
Posts: 198
|
| Posted: Sun Jan 06, 2019 8:26 pm Post subject: Re: 1990 Vanagon GL Build. Progress with pics. |
|
|
| oldskewlsk8ter wrote: |
Do you have any pics of those inner LEDs on the SA grill during installation? Im trying to figure out how to mount some.
Btw, very nice job on the build! |
What lights are you using? I have pics of the wiring and I can walk you through it as well. |
|
| Back to top |
|
|
oldskewlsk8ter
Samba Member
Joined: June 13, 2004
Posts: 347
Location: Texas
|
| Posted: Mon Jan 07, 2019 6:09 am Post subject: Re: 1990 Vanagon GL Build. Progress with pics. |
|
|
| xclemjustinx wrote: |
| oldskewlsk8ter wrote: |
Do you have any pics of those inner LEDs on the SA grill during installation? Im trying to figure out how to mount some.
Btw, very nice job on the build! |
What lights are you using? I have pics of the wiring and I can walk you through it as well. |
I just bought some random 5.75 round LED lights. My issue is mounting. I found a JW speaker mount that will work but theyre $80 each and Im cheap.
_________________
1986 Hightop w/EJ25 DOHC & 4EAT auto
1965 Kombi project |
|
| Back to top |
|
|
xclemjustinx
Samba Member
Joined: August 06, 2016
Posts: 198
|
| Posted: Sun Jan 13, 2019 8:18 pm Post subject: Re: 1990 Vanagon GL Build. Progress with pics. |
|
|
Installed new front turn signal bulb housing today. The old ones werent allowing me to have the turn signal working properly. These new ones were an easy install (with minor dremeling) and now my turn signals have a solid connection now.
Old housing
New housing
|
|
| Back to top |
|
|
ajdenette
Samba Member
Joined: February 15, 2009
Posts: 768
Location: Hope Valley RI
|
| Posted: Mon Jan 14, 2019 6:28 pm Post subject: Re: 1990 Vanagon GL Build. Progress with pics. |
|
|
just a suggestion but if you take the Y and flip it 180 degrees or just swap terminals the insulated blue terminal will protect the two bare terminals from connecting and shoring out your running lights.
_________________
1985 2wd Westy with 2000 Subaru 2.2 current driver
https://www.thesamba.com/vw/forum/viewtopic.php?t=685635
1986 Syncro Doka Project next in line
https://www.thesamba.com/vw/forum/viewtopic.php?t=732777
1990 Vanagon Syncro Base awaiting body work |
|
| Back to top |
|
|
xclemjustinx
Samba Member
Joined: August 06, 2016
Posts: 198
|
| Posted: Mon Jan 14, 2019 8:40 pm Post subject: Re: 1990 Vanagon GL Build. Progress with pics. |
|
|
| ajdenette wrote: |
| just a suggestion but if you take the Y and flip it 180 degrees or just swap terminals the insulated blue terminal will protect the two bare terminals from connecting and shoring out your running lights. |
I didnt even think of that!! Thanks for pointing that out. Doing it now! |
|
| Back to top |
|
|
xclemjustinx
Samba Member
Joined: August 06, 2016
Posts: 198
|
| Posted: Wed Jan 23, 2019 5:48 pm Post subject: Re: 1990 Vanagon GL Build. Progress with pics. |
|
|
I am installing new 930 Cv joints and heavy duty axles. Here is a picture of the axle with clips and boots installed. You will see 1 set of clips is installed on the inner shaft of the axle first.
Here is a closeup pic of the clip installed.
Here is the inner grove of the cv joint. This is installed facing the axle.
This is the outer grove of the cv joint. This faces the transmission or the wheel hub.
This is the axle and cv joints installed prior to grease packing. You will notice the axle shafts are different length. Make sure you do not mix up the lengths when installation.
|
|
| Back to top |
|
|
Vnyd Dog
Samba Member
Joined: August 25, 2015
Posts: 384
Location: Napa
|
| Posted: Thu Jan 31, 2019 3:09 pm Post subject: Re: 1990 Vanagon GL Build. Progress with pics. |
|
|
You got any more pics of the Transporter Werks LED headlights? Their site says the inners come with brackets and are PNP. True? Curious about the wiring etc. If you had any pics of them prior to install, could help my decision Their price is about 3x the Amazon crap. Worth?
_________________
'87 Westy 1.8T Conversion, Orignal Owner, European Delivery @ Westfalia factory in Weidenbrueck.
The Story:
https://www.thesamba.com/vw/forum/viewtopic.php?t=713391&highlight=life |
|
| Back to top |
|
|
|


