| Author |
Message |
Joshwa
Samba Member

Joined: November 18, 2015
Posts: 810
Location: North Seattle WA

|
 Posted: Mon Mar 25, 2019 8:45 am Post subject: Short nose Euro spec bumper install Posted: Mon Mar 25, 2019 8:45 am Post subject: Short nose Euro spec bumper install |
 |
|
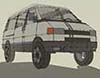
I met up with Rob a couple months back to pick up one of the Euro spec bumpers he was selling. He had originally mentioned them in this thread.
https://www.thesamba.com/vw/forum/viewtopic.php?t=709521
Here's my 93 weekender with his 92 Doka.
The bumper was brand new in the package, so I left it covered until I had time to coat it with Monstaliner to match the rest of the van. The weather has been mild lately, so I could now work on this project.
Here is the extra metal protruding from the front of the metal bumper I need to get to. The extra support for the extended original reinforced plastic bumper.
70+ spotwelds to drill out. I was impatient/lazy and didn't buy a a proper spot weld bit. So I drilled out the spots in steps with 4 sizes ending with 1/2", which was my largest bit. I wasn't very consistent at my drill depth and sometimes went all the way through the metal. After thought is that I should have drilled through on the topside with at least a small hole to keep water from puddling in the dishes where I didn't go all the way through. This can still be done later.
At 1/2", if there is still a little metal attached around the spot weld, it will pop with a little wedging. For the top, you can wedge the outer edges. The center area between the lights, can be popped with chisel/rod/long spike from underneath, through a few larger holes, seen below. The underside is clear to wedge along the length of the spotwelds. Once all the spots are broken. the extra metal comes off easily.
There are a couple places that I could not drill due to obstructions. Just on the topside. The last spotwelds at each end and the spotwelds under the fingers that support the radiator in the service position.
Upon revealing the original bumper, you'll find that there are no nuts welded to the backside of the bumper metal, to use to bolt the bumper on. I think a rivnut would be ideal. Or if you had the whole bumper off, you could weld some nuts on. I opted to fish some 5/16 x 3/4" bolts through in the reverse direction, holding them in place with some (star?) washers. I fished them through the larger holes on the face of the metal bumper. There wasn't any easier access from the bottom or backside. The length of the bolt worked out perfectly and was able to get the caps on, covering them easily. Also, there were already holes in place to accept the plastic bumper support.
The old bumper
The new Euro spec bumper in place.
_________________
93 Weekender TDI conversion (AHU)
93 MV TDI conversion (1Z)
Weekender rear cot
Late model cabin air filter on 93
Euro spec bumper install on 93 |
|
| Back to top |
|
 |
chrslws
Samba Member
Joined: April 02, 2018
Posts: 15
Location: Central Texas
|
| Posted: Mon Mar 25, 2019 12:06 pm Post subject: Re: Short nose Euro spec bumper install |
|
|
| Looks great! A little less like the front end of a fire truck. |
|
| Back to top |
|
|
Zeitgeist 13
Samba Member

Joined: March 05, 2009
Posts: 12115
Location: Port Manteau
|
| Posted: Mon Mar 25, 2019 12:51 pm Post subject: Re: Short nose Euro spec bumper install |
|
|
That's a very clean look. I'm not sure how I feel about removing crumple zone material, but I assume this treatment is only available on the short nose vans, so it's a moot point. My wife's accident two years ago collapsed both front and rear bumper supports, which no doubt was the difference between a relatively easy fix and a complete total.
_________________
Casey--
'89 Bluestar ALH w/12mm Waldo pump, PP764 and GT2052
'01 Weekender --> full camper
y u rune klassik? |
|
| Back to top |
|
|
wildenbeast
Samba Member
Joined: April 04, 2008
Posts: 680
Location: Colorado
|
| Posted: Mon Dec 09, 2019 10:02 am Post subject: Re: Short nose Euro spec bumper install |
|
|
One nice thing about this bumper that I didn't see mentioned is that you can now easily install the stock European fog lights. On the North American bumpers, it would require custom mounting to get the fog lights to fit properly (otherwise they are recessed behind the N.A. bumper too far to be an effective fog light). I had all the parts at one point but sold them when I figured this out. I remember it being less than $200 to source the lights, switch, and wiring harness.
_________________
- Bill, '93 Eurovan Syncro Weekender (2.5 manual ACU) |
|
| Back to top |
|
|
januwan
Samba Member
Joined: January 13, 2010
Posts: 6
Location: SF Bay Area
|
| Posted: Fri Jul 02, 2021 12:11 pm Post subject: Re: Short nose Euro spec bumper install |
|
|
I got the wrong bumper and would like to attempt this modification. How does it perform after two years? Is this just drilling out spot weldings or something more than that? How much time does it take to complete this modification?
Any advice will be greatly appreciated.
|
|
| Back to top |
|
|
Joshwa
Samba Member
Joined: November 18, 2015
Posts: 810
Location: North Seattle WA
|
|
| Back to top |
|
|
postjosh
Samba Member

Joined: November 20, 2017
Posts: 135
Location: NYC
|
| Posted: Sun Jul 04, 2021 2:00 pm Post subject: Re: Short nose Euro spec bumper install |
|
|
looks great! that's good to know about the fog lights. seem strange because there is a cutout for them on the north american bumper.
_________________
'93 EV Wkndr 5 cylinder 5 speed - 280k+ miles |
|
| Back to top |
|
|
|


