| Author |
Message |
jeremy.g
Samba Member

Joined: May 29, 2019
Posts: 400
Location: VA

|
 Posted: Wed Jul 03, 2019 9:03 am Post subject: Re: Jeremy.G's 1973 Super Beetle restoration Posted: Wed Jul 03, 2019 9:03 am Post subject: Re: Jeremy.G's 1973 Super Beetle restoration |
 |
|
I welded the seam joining the frame head bottom plates today. I also lined up the edges with a torch and tiny hammer.
I started with the MIG as usual, but decided to try gas-welding the other side.
Gas welds aren't nearly as 'hardened' as MIG welds, so are less likely to crack when monkeying with the weld area later. I'm a bit out of practice with gas-welding, but this came out pretty good. I probably won't even grind it; slap on a few coats of Epoxy Primer and call it done.
|
|
| Back to top |
|
 |
jeremy.g
Samba Member
Joined: May 29, 2019
Posts: 400
Location: VA
|
| Posted: Wed Jul 03, 2019 4:21 pm Post subject: Re: Jeremy.G's 1973 Super Beetle restoration |
|
|
Well.....bummer.
There were some small holes in the frame head's front corner (driver's side)
After sandblasting that area, I'm sure you can all guess that those tiny holes became much bigger holes. After cutting back to more solid metal here's what I ended up with:
Oh, well. I had plenty of 13g steel left so let's fit a patch:
. . and tack it:
I may gas weld this. Seems a good place to practice.
-JG |
|
| Back to top |
|
|
VW_Jimbo 
Samba Member

Joined: May 22, 2016
Posts: 9969
Location: Huntington Beach, CA
|
| Posted: Thu Jul 04, 2019 12:04 am Post subject: Re: Jeremy.G's 1973 Super Beetle restoration |
|
|
Checking in.
Are you using any weldable primer on the backside of the patches?
_________________
Jimbo
There is never enough time to do it right the first time, but all the time necessary the second time!
| TDCTDI wrote: |
| Basically, a whole bunch of fuckery to achieve a look. |
| 67rustavenger wrote: |
GFY's Xevin and VW_Jimbo!  |
|
|
| Back to top |
|
|
jeremy.g
Samba Member
Joined: May 29, 2019
Posts: 400
Location: VA
|
| Posted: Thu Jul 04, 2019 4:34 am Post subject: Re: Jeremy.G's 1973 Super Beetle restoration |
|
|
On the sections that get tightly clamped and plug welded, I'm using a weld-thru copper primer from U-Pol. This is my first time using this product and so far I really like it. WAY better than stuff I tried to use years ago. I can weld away with no spatter.
For interior sections that I can REALLY get clean with the sandblaster, I'm using PPG 2-part Epoxy primer.
For this last patch, I didn't use anything. My thinking was: I can't sandblast the inside of the frame head, so I plan to use that rust-converting 'internal frame coating' from Eastwood. I didn't want to put any paint on this section that might interfere with that coating doing it's rust conversion/encapsulation magic.
Seemed logical at the time. Looking back, I should have probably at least hit the patch itself with the weld-thru primer. Oh, well. Hopefully the frame coating will do it's job, and I won't lose sleep worrying about it. . .  |
|
| Back to top |
|
|
jeremy.g
Samba Member
Joined: May 29, 2019
Posts: 400
Location: VA
|
| Posted: Thu Jul 04, 2019 6:22 am Post subject: Re: Jeremy.G's 1973 Super Beetle restoration |
|
|
I got curious and checked Eastwood's Q&A and found this about their internal frame coating:
Q- Can I use this on top of Weld-Thru primer?
A- This Coating can not be applied over top of the primer in reference- they are not compatible.
. . . yet it CAN be used over Epoxy Primer, which is interesting. So I'm feeling pretty good about my method so far.
Happy Independence Day!
-JG |
|
| Back to top |
|
|
jeremy.g
Samba Member
Joined: May 29, 2019
Posts: 400
Location: VA
|
| Posted: Thu Jul 04, 2019 10:08 am Post subject: Re: Jeremy.G's 1973 Super Beetle restoration |
|
|
This morning I finished welding that frame head corner and sandblasted the entire frame head top.
Looks pretty good! Let's get some epoxy primer on there before it starts to rust again.
That's enough for today. It's nice being able to blast and paint one section at a time. But man, does that sandblasting make a mess. I'm coated in black grime. Time for a beer and a shower. . .
-JG |
|
| Back to top |
|
|
alienyouth33
Samba Member
Joined: March 28, 2012
Posts: 9
Location: Suffolk, VA
|
| Posted: Fri Jul 05, 2019 1:09 pm Post subject: Re: Jeremy.G's 1973 Super Beetle restoration |
|
|
Hey, am I posting too many pictures? I'm enjoying it, but perhaps I'm the only one. 
-Jeremy[/quote]
I love seeing all of the pictures of your work. Great job so far, I can't wait to see how it turns out!
_________________
(o\ ! /o) |
|
| Back to top |
|
|
jeremy.g
Samba Member
Joined: May 29, 2019
Posts: 400
Location: VA
|
| Posted: Fri Jul 05, 2019 1:14 pm Post subject: Re: Jeremy.G's 1973 Super Beetle restoration |
|
|
Today I flipped the chassis and sandblasted the bottom of the frame head. I also ground down all the plug welds.
A coat of epoxy primer and I think I can call the frame head done!
Next up:
- Weld in the tunnel repair panel.
- Sandblast and Paint the rest of the bottom
- Floor Pans! (looking forward to that)
-JG |
|
| Back to top |
|
|
jeremy.g
Samba Member
Joined: May 29, 2019
Posts: 400
Location: VA
|
| Posted: Fri Jul 05, 2019 1:23 pm Post subject: Re: Jeremy.G's 1973 Super Beetle restoration |
|
|
Thanks Alien.Y! I'll keep postin'. I can't wait to see how it turns out either.
I just ordered a bunch of suspension parts to rebuild the rear. I'm excited to get done with the chassis rust repair and start bolting on new parts.
I'm thinking forward to the body, which is a basket case. After dorking around with the ill-fitting repair panel on the frame head I'm looking at alternatives for the body panels. I just purchased a spare tire wheel well section chopped from a scrapped super beetle, and had it shipped to me. (mine is rusted out). I want to source more "original" sheet metal from parted-out supers if I can find them. The shipping from west coast (where rust isn't so bad) to East coast (where beetles are getting scarce!) is a bit painful but worth it.
...Anybody got nice rust-free original heater channels for a '73 Super Beetle lying around...? 
-JG |
|
| Back to top |
|
|
vamram
Samba Member

Joined: March 08, 2012
Posts: 7306
Location: NOVA
|
| Posted: Fri Jul 05, 2019 2:28 pm Post subject: Re: Jeremy.G's 1973 Super Beetle restoration |
|
|
Keep the pictures coming, they're great. Really enjoying seeing how you do things and how it's coming together.
_________________
Eventually, "we are what we pretend to be.
Give peace a chance - Stop Russian-Soviet Aggression!!
'74 Super 9/16 - present, in refurb process.
'73 Super - 6/18 - Present - Daily Driver!
'75 Super Le Grande...waiting it's turn in line behind '74.
Click to view image
Save the Supers!! |
|
| Back to top |
|
|
H2OSB
Samba Member
Joined: April 14, 2013
Posts: 1294
Location: Modesto, CA
|
| Posted: Fri Jul 05, 2019 4:24 pm Post subject: Re: Jeremy.G's 1973 Super Beetle restoration |
|
|
Dude, people never post enough pictures. It's very important for those following a thread to understand what the poster is talking about. That's the point of doing a build thread. You're doing an excellent job. Keep up the great work.
I've always wanted to do what you're doing to convert to rack and pinion steering. Sadly I don't have your skills.
H2OSB
_________________
(o\_i_/o) I'm not a vegetarian because I love animals, I'm a vegetarian because I hate plants. |
|
| Back to top |
|
|
jeremy.g
Samba Member
Joined: May 29, 2019
Posts: 400
Location: VA
|
| Posted: Sat Jul 06, 2019 2:14 pm Post subject: Re: Jeremy.G's 1973 Super Beetle restoration |
|
|
Thanks guys. I'll keep pluggin' away!
H20SB- I hear ya on that rack-and-pinion conversion. I looked into the process and it's a daunting task. Definitely more than I'd want to tackle right now.
I'm getting the tunnel bottom buttoned up today.
Here I'm plug welding a strip of steel at the seam.
Copper weld-through primer on all the edges.
Repair panel in place:
And now plug welded. Mig weld where it meets the frame head. I'll gas weld the bottom seam.
It's like 95 degrees today; not my favorite welding conditions.
Time to cool off with another beer. . .
-JG |
|
| Back to top |
|
|
VW_Jimbo
Samba Member
Joined: May 22, 2016
Posts: 9969
Location: Huntington Beach, CA
|
| Posted: Sat Jul 06, 2019 3:06 pm Post subject: Re: Jeremy.G's 1973 Super Beetle restoration |
|
|
Nice welds!
_________________
Jimbo
There is never enough time to do it right the first time, but all the time necessary the second time!
| TDCTDI wrote: |
| Basically, a whole bunch of fuckery to achieve a look. |
| 67rustavenger wrote: |
| GFY's Xevin and VW_Jimbo! |
|
|
| Back to top |
|
|
Dibaltic
Samba Member
Joined: May 06, 2007
Posts: 564
Location: Chambersburg, Pennsylvania
|
| Posted: Sun Jul 07, 2019 12:15 pm Post subject: Re: Jeremy.G's 1973 Super Beetle restoration |
|
|
| Nice work and good pictures appreciate the detail ! |
|
| Back to top |
|
|
jeremy.g
Samba Member
Joined: May 29, 2019
Posts: 400
Location: VA
|
| Posted: Mon Jul 08, 2019 8:25 am Post subject: Re: Jeremy.G's 1973 Super Beetle restoration |
|
|
Thanks guys!
Back in the 90's I welded in a 1/4 floor pan section on the passenger side rear. I'm cutting that out to replace with a complete floor panel.
Unfortunately back in the day I welded the entire floor pan edge continuously to the tunnel and rear support. (It seemed like a good idea at the time.) It's taking a lot of grinding to remove that weld bead, so that's what I'll be doing for the next few hours.
Hmm... Maybe I can convince my Elder Minion to take over on some of this. .?
My 4" angle grinder was very slow going. I switched to a die grinder with zirconium flap wheel which is going a bit faster but sounds way too much like a bad trip to the dentist.
-JG |
|
| Back to top |
|
|
VW_Jimbo
Samba Member
Joined: May 22, 2016
Posts: 9969
Location: Huntington Beach, CA
|
| Posted: Mon Jul 08, 2019 10:06 am Post subject: Re: Jeremy.G's 1973 Super Beetle restoration |
|
|
I use a carbide tapered cutting bit in my air tool, to go through welds. Makes easy work of it.
Like this one.
I remove as much of the welds as I can with this tool. Then I hit it with an air chisel. Pop!
_________________
Jimbo
There is never enough time to do it right the first time, but all the time necessary the second time!
| TDCTDI wrote: |
| Basically, a whole bunch of fuckery to achieve a look. |
| 67rustavenger wrote: |
| GFY's Xevin and VW_Jimbo! |
|
|
| Back to top |
|
|
jeremy.g
Samba Member
Joined: May 29, 2019
Posts: 400
Location: VA
|
| Posted: Mon Jul 08, 2019 11:23 am Post subject: Re: Jeremy.G's 1973 Super Beetle restoration |
|
|
Nice- I'll have to try that.
I tried something new a couple of hours ago. I stacked (2) cutoff wheels in my 4" air cutoff tool to create a sort of right-angle 'precision grinder'. It works pretty well.
I've done the same thing with the tiny cutoff wheels in a Dremel, but never thought to do it with a 4" cutoff tool.
-JG |
|
| Back to top |
|
|
chicagovw
Samba Member
Joined: January 06, 2007
Posts: 1424
Location: Chicago IL/CHandler AZ
|
| Posted: Mon Jul 08, 2019 1:29 pm Post subject: Re: Jeremy.G's 1973 Super Beetle restoration |
|
|
| Still enjoying this build-nice work! |
|
| Back to top |
|
|
Buggeee
Samba Member

Joined: December 22, 2016
Posts: 4421
Location: Stuck in Ohio
|
|
| Back to top |
|
|
jeremy.g
Samba Member
Joined: May 29, 2019
Posts: 400
Location: VA
|
| Posted: Tue Jul 09, 2019 10:25 am Post subject: Re: Jeremy.G's 1973 Super Beetle restoration |
|
|
Thanks, folks!
Buggeee- That MIG bead is definitely one of my best. Often my welds look like lumps of mashed potatoes I spread with my fingers. (. . . but I'm getting better!)
Today I finished prepping the passenger side lip for the floor pan.
Ground, sand blasted, and copper-primed:
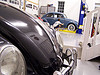
Also, my new front clip arrived! It's in great shape and should help a lot when I rebuild my front end. My apron is pretty good, but spare tire area and bumper mounts are totally rusted out.
Shipping cost for this was a little painful. But if I add up in my mind the cost of what crappy aftermarket repair panels would be for this section it hurts less. Here's a shot of the passenger side bumper mounts:
Making progress, one step at a time. . .
JG |
|
| Back to top |
|
|
|


