| Author |
Message |
VW_Jimbo 
Samba Member

Joined: May 22, 2016
Posts: 9966
Location: Huntington Beach, CA

|
 Posted: Wed Sep 25, 2019 8:43 pm Post subject: Re: Jeremy.G's 1973 Super Beetle restoration Posted: Wed Sep 25, 2019 8:43 pm Post subject: Re: Jeremy.G's 1973 Super Beetle restoration |
 |
|
So cool when stuff, especially custom made stuff, fits and works as designed!
So, I got out the Acetylene torch and heated up a chunk of black pipe. I do not have a cool hammer, like you do (yet), but I do have a really dull ax. I started hitting that steel, heating it and got it to change shape. What did not happen is, I did not control the shape! That is the skill! Thought you may get a kick out of me trying. I also forgot to snap a picture of that deformed piece of steel, or I may have posted it.
Anyways, thank you for handing me another avenue to try and master!
_________________
Jimbo
There is never enough time to do it right the first time, but all the time necessary the second time!
| TDCTDI wrote: |
| Basically, a whole bunch of fuckery to achieve a look. |
| 67rustavenger wrote: |
GFY's Xevin and VW_Jimbo!  |
|
|
| Back to top |
|
 |
kevin11
Samba Member

Joined: March 12, 2004
Posts: 828
Location: Arlington,Texas
|
| Posted: Thu Sep 26, 2019 6:18 am Post subject: Re: Jeremy.G's 1973 Super Beetle restoration |
|
|
| impressed!! good work! |
|
| Back to top |
|
|
Brian Foster
Samba Member
Joined: August 01, 2016
Posts: 1
Location: BARBADOS & MIAMI
|
| Posted: Thu Sep 26, 2019 2:31 pm Post subject: Re: Jeremy.G's 1973 Super Beetle restoration |
|
|
Hi Jeremy. Came across your build post last night. I live in Barbados and
I have a right hand drive 1973 1303S and doing some gently work to get it back on the road. Parts related to driver controls, are opposite, pedals, dash, steering, & brakes. Boy are these components scarce and expensive like X4 of the left hand drive. Something special about the SB though.
Cant wait to see your finished machine....I will be getting updates as I am now following your progress......GREAT STUFF GUY |
|
| Back to top |
|
|
jeremy.g
Samba Member

Joined: May 29, 2019
Posts: 400
Location: VA
|
| Posted: Thu Sep 26, 2019 6:25 pm Post subject: Re: Jeremy.G's 1973 Super Beetle restoration |
|
|
Thanks fellas!
Jimbo- Awesome! A few years back when I first tried 'blacksmithing' I used a carpenter's claw hammer. My anvil was a sledge head stuck in a hole in a stump. My fire was a MAPP torch. I was instantly hooked. It was then a short trip to multiple anvils, forges, and hammers. (glad I have a patient and understanding wife)
Brian- Welcome! I'm looking forward to seeing some pics of your own '73! Even if it is "wrong-handed" (haha!) 
I got another nice shipment from Topline today. My front-end parts! I love that feeling I get when the UPS guy pulls up. I'm sure it's how kids feel when they see Santa.
So, I started working on my track control arms. A few weeks ago I removed the old bushings and blasted/painted the arms. The outer metal sleeves of those bushings are pretty stubborn. I ended up scoring them with a hacksaw and then peeling them out with a pointed bar:
The new camber-adjusting bushings from Topline went in pretty easily with lots of grease. The metal bits got pressed in with a C-clamp.
Once bolted in I hung the sway bar just to see how it lined up. I'll paint the sway bar black to match. Here's a nice glimpse of that, with a pile of additional parts waiting to be installed:
I'm within striking distance of wheel installation. That's exciting.
-JG |
|
| Back to top |
|
|
jeremy.g
Samba Member
Joined: May 29, 2019
Posts: 400
Location: VA
|
| Posted: Fri Sep 27, 2019 3:22 pm Post subject: Re: Jeremy.G's 1973 Super Beetle restoration |
|
|
Some more front-end assembly today.
After painting the sway bar (and installing it right-side-up this time) it went in pretty easily. Except this little snag:
See that hole for the cotter pin? It doesn't exist on the other end:
So, looks like I'll be doing some drilling. The bar itself looks good in place though. Beefy!
I also got one of the lowered struts assembled. Hoorah! I'm still struggling with getting that top nut to the full 50-60 foot pound torque. I'm gripping the strut shaft with a rubber-padded vice grip but just can't quite keep it from slipping:
I got it to almost 40 ft/lbs. Maybe that will suffice.
Here's the new strut next to the one I haven't taken apart yet. It's set for a 2" drop- but the difference in strut length is a LOT more than 2".
I guess the body weight compresses the 'stock' strut a bit more? Anybody know? (I'm making this up as I go along. . .)
-JG |
|
| Back to top |
|
|
VW_Jimbo
Samba Member
Joined: May 22, 2016
Posts: 9966
Location: Huntington Beach, CA
|
| Posted: Fri Sep 27, 2019 3:45 pm Post subject: Re: Jeremy.G's 1973 Super Beetle restoration |
|
|
Maybe call who you purchased from and ask. That seems like more than a few inches of drop.
_________________
Jimbo
There is never enough time to do it right the first time, but all the time necessary the second time!
| TDCTDI wrote: |
| Basically, a whole bunch of fuckery to achieve a look. |
| 67rustavenger wrote: |
| GFY's Xevin and VW_Jimbo! |
|
|
| Back to top |
|
|
TK-CS
Samba Member

Joined: April 15, 2019
Posts: 279
Location: D - Deutschland
|
| Posted: Sat Sep 28, 2019 4:00 pm Post subject: Re: Jeremy.G's 1973 Super Beetle restoration |
|
|
The washers on the sway bar are mounted the wrong way.
Where is the rubber of the bushing?
Are you going to complain the sway bar or to drill the hole yourself?
You're already done with the pan. Looking forward to your work on the body.
What about your kids? Did they lose interest?
_________________
AC:
'71 1600LE (Type 3 Notchback FI/AT) Sunroof
'75 1303 (Super Beetle) 1600DP, Sunroof
WC:
'77 Audi NSU Ro80
'88 GTI 16V
'91 Corrado G60
Daily:
'04 Passat Wagon 2.0TDI
'13 Passat Wagon 2.0TSI |
|
| Back to top |
|
|
vamram
Samba Member

Joined: March 08, 2012
Posts: 7304
Location: NOVA
|
| Posted: Sat Sep 28, 2019 4:45 pm Post subject: Re: Jeremy.G's 1973 Super Beetle restoration |
|
|
| TK-CS wrote: |
The washers on the sway bar are mounted the wrong way.
|
Yep, the lip needs to be out, just flip them.
_________________
Eventually, "we are what we pretend to be.
Give peace a chance - Stop Russian-Soviet Aggression!!
'74 Super 9/16 - present, in refurb process.
'73 Super - 6/18 - Present - Daily Driver!
'75 Super Le Grande...waiting it's turn in line behind '74.
Click to view image
Save the Supers!! |
|
| Back to top |
|
|
Tim Donahoe
Samba Member

Joined: December 08, 2012
Posts: 11740
Location: Redding, CA
|
| Posted: Sat Sep 28, 2019 5:39 pm Post subject: Re: Jeremy.G's 1973 Super Beetle restoration |
|
|
Jeremy, its been a few years, but I dont remember having a problem with the stock strut rod spinning when I tightened the top nut. I cant remember why it didnt spin, though.
Hopefully, someone will chime in, because you shouldnt have to hold the rod.
Tim
_________________
Let's do the Time Warp again!
Richard O'Brien |
|
| Back to top |
|
|
jeremy.g
Samba Member
Joined: May 29, 2019
Posts: 400
Location: VA
|
| Posted: Sun Sep 29, 2019 7:18 am Post subject: Re: Jeremy.G's 1973 Super Beetle restoration |
|
|
TK and Victor- Backwards? Ack! Thanks for chiming in. I couldn't see any documentation on how the washers should be installed, so thanks for setting me straight! Oh, and I'm using those split urethane bushings instead of rubber.
Tim- Yeah, the strut rod just spins and spins if you try to tighten the top nut. Doctor Bentley recommends an offset wrench and allen key. Looks like I'm going tool shopping.
TK- I'm going to drill that hole in the stabilizer bar myself. Should be a pretty simple operation. I called Jon at Topline to inform him of the problem, and he's totally willing to ship me a new bar if the drilling doesn't work out. (Jon's been great to do business with)
The kids are still assisting. I need to get better about capturing photo evidence of their involvement.
And TK- yeah, I'm very much looking forward to working on the body! I'm talking to Ron Burgundy about purchasing a set of parted-out heater channels. They are from a Standard bug (not Super Beetle), but I'm pretty sure they will fit with a bit of modification to the front where they meet the firewall. I'd prefer a set from an actual Super Beetle, but haven't found any.
But first I gotta finish up this dang chassis. I want to get the wheels and tranny installed and then tip the whole thing sideways for storage to make room for the body work. Still waiting on that stupid axle nut I ordered 2 weeks ago. . .
-JG |
|
| Back to top |
|
|
vamram
Samba Member
Joined: March 08, 2012
Posts: 7304
Location: NOVA
|
| Posted: Sun Sep 29, 2019 7:59 am Post subject: Re: Jeremy.G's 1973 Super Beetle restoration |
|
|
| jeremy.g wrote: |
TK and Victor- Backwards? Ack! Thanks for chiming in. I couldn't see any documentation on how the washers should be installed, so thanks for setting me straight!
-JG |
You know what Jeremy...? I was thinking about it after reading your reply...and I honestly *don't* remember where I "learned" or decided that concave out is the correct way to set these washers...perhaps that's how I found my original Super's sway bar to be installed back in the mid-80s...who knows. That said...another call to Jon at TopLine might set the record straight.
_________________
Eventually, "we are what we pretend to be.
Give peace a chance - Stop Russian-Soviet Aggression!!
'74 Super 9/16 - present, in refurb process.
'73 Super - 6/18 - Present - Daily Driver!
'75 Super Le Grande...waiting it's turn in line behind '74.
Click to view image
Save the Supers!! |
|
| Back to top |
|
|
H2OSB
Samba Member
Joined: April 14, 2013
Posts: 1294
Location: Modesto, CA
|
| Posted: Sun Sep 29, 2019 8:26 am Post subject: Re: Jeremy.G's 1973 Super Beetle restoration |
|
|
You absolutely don't need this, but due to my frequency of disassembly of struts, I created this wrench to make getting that nut off easier
With the short socket I can fit an Allen head socket down through the top hole, into the hole on the top of the strut shaft. If you look at the handle of the tool in the pic, you can see the slight bend to it. That handle served it's former life as a 18 inch breaker bar, and the handle got bent when I put a cheater bar on the end to get a rear axle nut off. First it bent the bar, then destroyed the end that holds the socket on. That's when I bought a torque multiplier and have not looked back. With removal, I always try to zip it off first with an impact gun, then go to the wrench if the shaft spins, but I always use the wrench for installation.
I'm sure you'll be fine gripping the shaft so high with vice grips(what else can you do), but honestly I've never torqued that nut down. I just go firm hand tight(with the leverage of my tool). The only time that nut is doing any real work is when the suspension unloads and that nut has to hold the little hat on(or, in your case, hold the strut mount on since you have the early suspension).
H2OSB
_________________
(o\_i_/o) I'm not a vegetarian because I love animals, I'm a vegetarian because I hate plants. |
|
| Back to top |
|
|
jeremy.g
Samba Member
Joined: May 29, 2019
Posts: 400
Location: VA
|
| Posted: Sun Sep 29, 2019 5:12 pm Post subject: Re: Jeremy.G's 1973 Super Beetle restoration |
|
|
Nice tool! I thought about fabricating something similar- but just noticed that my local Harbor Freight has a set of offset wrenches that includes a 22mm that will probably work. They make crappy tools, but for $16 it will suffice.
We made some more progress today. I flipped those washers right-sides-out, torqued the nuts down, and drilled the cotter pin hole. I broke a drill bit but in the end got the job done.
I had Number One help me break in my new torque wrench on a rear axle nut. Here he is tapping in the cotter pin.
Then, on to a task I had been agonizing over a bit. I plan to lower the front end about 2". My kit came with these 'flip-it' bushings to put the steering tie rods underneath the arm instead of on top. I'm not sure if a 2" drop "requires" the tie rods to be flipped, but it seems like a good idea to be safe.
In order to install the bushings you need to drill out the tapered holes to 5/8". I did not relish the idea of drilling out my original spindles. I really didn't want to screw this up.
In the end I decided to (carefully) go for it. I clamped the spindle down to my trusty old Wilton press. I used a 1/2" bit to center the hole before clamping everything down.
I spun the bit by hand to see if I had it centered. The bit cut a nice line pretty much evenly around the hole, so I felt good about the placement.
Then I slowly drilled out with the 1/2" bit, then 9/16, then 5/8. I used lots of oil to keep things cool. Still likes to smoke which is fun:
The bushings are a TIGHT fit. I tried to squeeze them in with a C-Clamp, but ended up using the 20-ton press. (tool purchase justified!)
The first went in quite smoothly with some grease. The 2nd was a fight, with lots of galling all the way around. I had to press the bushing out partially, file away all the galled metal with a needle file, and then press it home. In the end they look pretty good:
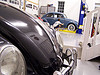
I'm not quite done with the chassis, but decided it was time to dip my toe into the bodywork. Let's start by disassembling my donor front clip, which will hopefully get me familiar with how the front end welds together. Here I'm drilling out the spot welds to separate the apron:
And here's a shot from the same perspective of where this new metal will be grafted in:
That's it for now! Thanks to all who have been chiming in with the helpful advice!
-JG |
|
| Back to top |
|
|
VW_Jimbo
Samba Member
Joined: May 22, 2016
Posts: 9966
Location: Huntington Beach, CA
|
| Posted: Sun Sep 29, 2019 5:24 pm Post subject: Re: Jeremy.G's 1973 Super Beetle restoration |
|
|
Love reading the progress. Keeps me going on my own projects!
Nice work, by the way!
_________________
Jimbo
There is never enough time to do it right the first time, but all the time necessary the second time!
| TDCTDI wrote: |
| Basically, a whole bunch of fuckery to achieve a look. |
| 67rustavenger wrote: |
| GFY's Xevin and VW_Jimbo! |
|
|
| Back to top |
|
|
jeremy.g
Samba Member
Joined: May 29, 2019
Posts: 400
Location: VA
|
| Posted: Sun Sep 29, 2019 5:53 pm Post subject: Re: Jeremy.G's 1973 Super Beetle restoration |
|
|
Thanks Jim! Right back at ya. I love seeing the progress on your '54.
Race you to the finish! We can meet for celebratory beers when we're both done. Looks like Oklahoma City is the midpoint. Only a 19 hour drive! 
-JG |
|
| Back to top |
|
|
Tim Donahoe
Samba Member
Joined: December 08, 2012
Posts: 11740
Location: Redding, CA
|
| Posted: Sun Sep 29, 2019 7:33 pm Post subject: Re: Jeremy.G's 1973 Super Beetle restoration |
|
|
Jeremy, yep, once I saw the photo from the Bentley, I remembered that I bought a 21/22 mm offset wrench. I think the 21 mm was the side I used For the nut.
I think the torque was only 43 ft. lbs., however.
Tim
_________________
Let's do the Time Warp again!
Richard O'Brien |
|
| Back to top |
|
|
catbox
Samba Member

Joined: May 16, 2007
Posts: 866
Location: Portland, Oregon
|
| Posted: Mon Sep 30, 2019 2:17 pm Post subject: Re: Jeremy.G's 1973 Super Beetle restoration |
|
|
I have my 73 Super lowered in the front quite a bit.
I too bought those flip bushings, but never installed them.
I don't have the ability at home to drill them out.
But I think you are good either way now.
Nice work sir.
_________________
"...these cars were preferred by the racers because the strut front suspension results in far superior handling than the regular torsion bar front end..." - Keith Seume. |
|
| Back to top |
|
|
jeremy.g
Samba Member
Joined: May 29, 2019
Posts: 400
Location: VA
|
| Posted: Mon Sep 30, 2019 3:04 pm Post subject: Re: Jeremy.G's 1973 Super Beetle restoration |
|
|
Good to hear, Catbox!
We snuck out and made a bit of progress this afternoon.
First: That axle nut finally arrived, so we got the other rear wheel installed. Feels like progress!
Number One also helped me drill out some apron welds:
About 50 holes later we had the apron free.
I feel better equipped to disassemble the actual vehicle now; but first I'll finish dismantling the donor section into it's component panels. My current plan of attack:
- Carefully remove the original apron
- remove the entire trunk bottom panel (spare wheel well)
- replace the bumper mount panels
- weld in the donor trunk bottom (whole panel)
- patch the wheel well panels
- patch and reinstall the existing apron
Plan may change a bit depending on how hard it is to squeeze that full trunk bottom panel in place. Looks like a tight fit. Also, might patch the strut towers while the trunk bottom is out and I have great access.
Excited to dig into it!
-JG |
|
| Back to top |
|
|
Dibaltic
Samba Member
Joined: May 06, 2007
Posts: 564
Location: Chambersburg, Pennsylvania
|
| Posted: Mon Sep 30, 2019 4:30 pm Post subject: Re: Jeremy.G's 1973 Super Beetle restoration |
|
|
| Awesome work ! What bit to you use for drilling out spot welds? |
|
| Back to top |
|
|
Tim Donahoe
Samba Member
Joined: December 08, 2012
Posts: 11740
Location: Redding, CA
|
| Posted: Mon Sep 30, 2019 6:34 pm Post subject: Re: Jeremy.G's 1973 Super Beetle restoration |
|
|
Tell me you dont call your second helper Number 2 .... 
Tim
_________________
Let's do the Time Warp again!
Richard O'Brien |
|
| Back to top |
|
|
|


