| Author |
Message |
EliasP
Samba Member
Joined: January 09, 2018
Posts: 55
Location: Sweden

|
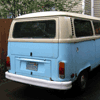
 Posted: Fri Jul 26, 2019 12:40 pm Post subject: Reefblue 1976 Kleinbus Posted: Fri Jul 26, 2019 12:40 pm Post subject: Reefblue 1976 Kleinbus |
 |
|
I am thinking of starting a project thread about my 76 bus. The bus is in pretty good condition, but of course there are some work with it.
I bought the bus about a month ago and it still works! Thisis my second bus, I bought an other one around a year ago, a 74, it had been standing on the same place since 1986, but it seemd to be in good condition in my eyes. We took it home and I started to digging in it, but after testing to weld a few times I understood that it was nor that easy, the bus would never be in nice condition, and I made a hard decision and decided to sell the bus and start searching for a better one  Picture of the old one: Picture of the old one:
The new bus had to driving, and should not have that much rust, and it should not be far to expensive, and a bus like that is veryhard to find in Sweden, but i did.
"My" bus had though broken cylinders in the engine, but we payed the previous owner to fix them, now the engine are really nice. And all the machanics are restored to top condition so the bus is good.
The first thing to do was removing the homemade, but functional camping interior and put the seats in:
Cleaning the interior:
Seats:
Then I removed the black paint on the front grille and get it bck to original paint.
Left to do is to refresh the whole bus, repaint the floors and lower areas, give new sesls to all windows, refresh the undercarriage + some more stuff.
_________________
Why have a good looking face? You can't even see your own face!
Last edited by EliasP on Wed Oct 09, 2019 7:07 am; edited 2 times in total |
|
| Back to top |
|
 |
The Pilch
Samba Member

Joined: December 04, 2013
Posts: 628
Location: Utah
|
| Posted: Fri Jul 26, 2019 2:28 pm Post subject: Re: Reefblue 1976 Kleinbus |
|
|
| I LOVE that spare tire holder! And the little sunroof! Awesome bus!! |
|
| Back to top |
|
|
FlowerPowered
Samba Member

Joined: December 22, 2005
Posts: 389
Location: Montana
|
| Posted: Fri Jul 26, 2019 2:43 pm Post subject: Re: Reefblue 1976 Kleinbus |
|
|
Those front bumper overriders are dope. Wish I could find those for sale in the US.
_________________
76 Westy  "Sunset" "Sunset" |
|
| Back to top |
|
|
EliasP
Samba Member
Joined: January 09, 2018
Posts: 55
Location: Sweden
|
| Posted: Sat Jul 27, 2019 12:15 am Post subject: Re: Reefblue 1976 Kleinbus |
|
|
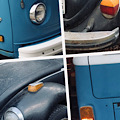
Thanks, yes the overriders are nice, it is actually headlight washers, it is a tank with liquid at the right side where the kick panel use to be.
There was a type of law in Sweden who said that all cars nedded headlight washers. I think both the spare tire mount and the headlight washers are stuff that just existed in Sweden, but I am not sure.
I don't know anything about the sunroof, probably not original, but I do still like it!
_________________
Why have a good looking face? You can't even see your own face! |
|
| Back to top |
|
|
jtauxe 
Samba Member

Joined: September 30, 2004
Posts: 5780
Location: Los Alamos, New Mexico
|
| Posted: Sun Jul 28, 2019 2:56 pm Post subject: Re: Reefblue 1976 Kleinbus |
|
|
That will be a great bus.
And Reef Blue is such a nice color!
I am happy for you. 
_________________
John
"Travelling in a fried-out Kombi, on a hippie trail, head full of zombie..." - Colin Hay and Ron Strykert
http://vw.tauxe.net
1969 Transporter, 1971 Westfalia, 1976, 1977, 1976, 1977, 1971, 1973, 1977 Westfalias,
1979 Champagne Sunroof, 1974 Westfalia Automatic, 1979 Transporter, 1972 Sportsmobile, 1973 Transporter Wild Westerner, 1974 Westfalia parts bus, 1975 Mexican single cab *FOR SALE*, 1978 Irish 4-door double cab RHD
|
|
| Back to top |
|
|
EliasP
Samba Member
Joined: January 09, 2018
Posts: 55
Location: Sweden
|
| Posted: Mon Jul 29, 2019 9:13 am Post subject: Re: Reefblue 1976 Kleinbus |
|
|
Some stuff has happened with the bus!
The front bumper was painted with a roller, and it was rusty behind the right overrider. I started to remove the rust but then did also some of the roller paint disappeared and nice original paint could be seen.
Hmmm... maybe I wants the whole bumper in original paint...
The bumper was grinded down befor roller paint, so it was looking very ugly now. I took a can of primer and primed the right side of it, as it was most bare metal there.
Then the rest of the bumper bacame really ugly, so I decided to repaint it all.
The bolt to the left overrider was sadly totally rusted, so it could not be removed, just the part right to the left overrider is painted.
Now I can see that the bumper is ugly bent also, but I can't fix it before i get home my new overriders (have to cut the old ones in pieces to remove them). I also got my bus cover that I have been waiting for about a month, it will be even more dry now, than just standing in the tent.
With the delivery I also got the emblem, the cover fo not fits with the spare tire in the front. I did like the spare tire better though. Another problem with not having the spare tire in the front is that you can see all the bad paint, rust and dirt in the lower part of the front and that looks really crappy, around 20 lower cm of the bus will be rapainted, just need to get my new (old) hedlight washers first as the old ones will be destroyed in the operation.
_________________
Why have a good looking face? You can't even see your own face! |
|
| Back to top |
|
|
notchboy
Samba Member

Joined: April 27, 2002
Posts: 22448
Location: Escondido CA
|
| Posted: Mon Jul 29, 2019 9:43 am Post subject: Re: Reefblue 1976 Kleinbus |
|
|
Make sure you save the jets/squirters on top of the old over riders. 
Yes its a Swedish law to have headlight washers. It should also have intermittent washers and electric windshield water pump. All one system and very cool if it works.
_________________
| t3kg wrote: |
OK, this thread is over. You win. |
Jason "notchboy" Weigel
1964 1500 S
1964 T34 S Convertible
1977 Westfalia Camper pop-top |
|
| Back to top |
|
|
BYeaton
Samba Member

Joined: November 27, 2007
Posts: 362
Location: El Segundo
|
| Posted: Mon Jul 29, 2019 1:14 pm Post subject: Re: Reefblue 1976 Kleinbus |
|
|
| Very cool bus! Going to be a fun project. What part of Sweden do you live in? |
|
| Back to top |
|
|
EliasP
Samba Member
Joined: January 09, 2018
Posts: 55
Location: Sweden
|
| Posted: Tue Jul 30, 2019 1:49 am Post subject: Re: Reefblue 1976 Kleinbus |
|
|
Notchboy, the headlight washers do not work, but the windscreen washers do. BYeaton I live around 15 km north of Stockholm.
_________________
Why have a good looking face? You can't even see your own face! |
|
| Back to top |
|
|
notchboy
Samba Member
Joined: April 27, 2002
Posts: 22448
Location: Escondido CA
|
| Posted: Tue Jul 30, 2019 10:38 am Post subject: Re: Reefblue 1976 Kleinbus |
|
|
| EliasP wrote: |
| Notchboy, the headlight washers do not work, but the windscreen washers do. BYeaton I live around 15 km north of Stockholm. |
The big water pump may be bad. Its usually installed behind the kick panel on the drivers side. After I installed mine, the pump died after a couple of uses. I have yet to pull it out and check it for sure. I have since purchased two smaller new inline pumps to replace it.
_________________
| t3kg wrote: |
OK, this thread is over. You win. |
Jason "notchboy" Weigel
1964 1500 S
1964 T34 S Convertible
1977 Westfalia Camper pop-top |
|
| Back to top |
|
|
EliasP
Samba Member
Joined: January 09, 2018
Posts: 55
Location: Sweden
|
| Posted: Mon Oct 07, 2019 1:04 pm Post subject: Re: Reefblue 1976 Kleinbus |
|
|
Time for an update! I have been working with some small stuff on the bus during the summer. The bus has also been driven some, but sadly it got some engine problems so it has been standing during the most time of the summer
The bus was really dirty when I bought it, it was looking as it had not been cleaned in 20 years, dirt everywhere, I dont think that the interior panels or headliner had ever been cleaned, when I put my finger to them it went grey of dirt.
This is a before and after picture of the walkthru mat wich I cleaned with steelwhool:
Also removed the doorcards to clean them and get them a little bit more straight. Those got washed with a hose to remove the worst dirt and then steelwhool, wich made them really clean. Also made the masonite very wet to get it moldable, then put som heavy stones to make them straight.
Disgusting fresh-air-cover
"Bang! And the dirt is gone!" As it stood on the pack.
Removed the surface rust on the cabfloor, then I discoverex some small holes, but I painted it with some spray paint just to protect the metal provisionally, it will be replaced... sometime... 
The big middle interior panel was ugly bent so I decided to make it a little bit nicer. First was the idea to make new interior panels everywhere and dress them with a bright gray textile, but then my original brain started to cry and saying that i should punch myself in the head for that in the future, so just removed the original upholesty, made a new masonite and sprayglued the old upholesty on the new masonite
Then I saw that you could see the masonite color thru the cracks in the upholesty:
Sprayed some black paint where the cracks should be:
Voila! As new!... almost. But better than new as it is original!
As I started to spray paint I could not stop, so I sanded down and painted these two stuffs too!
Some 80 grit sandpaper can make wonders...
After two months with deliveryproblems my packet finally arrived!
Started to remove the left rotted overrider. The bolt was totaly rusted so a wrench cold not be fastened to it, I had to drill around the nut.
Then I took a polygripe around the nut and tried to turned it, but of course this happened: 
Well, I have no welder yet so it was just to start drilling. After 3 hours and 4 broken drilles it was finally looking like this:
The result with the bumper and overriders on again:
And the old ones! 
_____________________
The bus has been driving to the recycling a lot of times this year.
Of course I wanted to test-sleeping in the bus! What do you do when you havn't any camping interior? Turn the middle seat, put some bo es in the gap between the seats and then some pads on top of that. It became a really short bed and I had to sleep on the diagonal but good enough for one night. Well... I didn't slept there the whole night, it went to cold (12 degrees) so I moved into the house instead 
Here the bus stood for two weeks when it followed us to the sommerhouse!
Also, the engine started to go bad, it is no problems up to 60 km/h, but then it lose all it's power and it will not go faster. We have had a real expert looking at the engine (the previous owner of the bus), the distributor, coil, both carburators, battery and some more stuff has been replaced, also a lot of stuff has been adjusted. Now there are nothing left to check in the engine, but he thought it could be some type of dirt in the fuel tank. How do I clean the fuel tank? I can't see if it is dirt in it, an inspection camera did not work.
_________________
Why have a good looking face? You can't even see your own face!
Last edited by EliasP on Wed Oct 09, 2019 6:55 am; edited 1 time in total |
|
| Back to top |
|
|
Daverham
Samba Member
Joined: August 27, 2009
Posts: 1397
Location: USA
|
| Posted: Mon Oct 07, 2019 2:12 pm Post subject: Re: Reefblue 1976 Kleinbus |
|
|
Great stuff!
Keep in mind that primer is not protective against rust. Not sure if that was just primer on the floor or probably just primer-colored paint.
I've seen a lot of people do quick & temporary cleanup work - which is great - I do it myself. Or repairs to be completed (painted) later. But often times they will just hit it with primer and leave it that way for the short term - maybe even a year or often longer - with the false belief that they have protected the steel from vulnerability to moisture and rust, but you need a top coat for that. Primer is very much permeable. Just sayin in case it hasn't been said enough.
That's all. Carry on and keep up the good work. |
|
| Back to top |
|
|
EliasP
Samba Member
Joined: January 09, 2018
Posts: 55
Location: Sweden
|
| Posted: Mon Oct 07, 2019 9:46 pm Post subject: Re: Reefblue 1976 Kleinbus |
|
|
| Daverham wrote: |
Great stuff!
Keep in mind that primer is not protective against rust. Not sure if that was just primer on the floor or probably just primer-colored paint.
I've seen a lot of people do quick & temporary cleanup work - which is great - I do it myself. Or repairs to be completed (painted) later. But often times they will just hit it with primer and leave it that way for the short term - maybe even a year or often longer - with the false belief that they have protected the steel from vulnerability to moisture and rust, but you need a top coat for that. Primer is very much permeable. Just sayin in case it hasn't been said enough.
That's all. Carry on and keep up the good work. |
The red paint is primer, but the brown paint is top coat. I sprayed the brown paint to protect it even more over the areas where I thought it was bare metal under.
I did not know that primer was very permeable, is the best thing to cover all that red paint with some top coat?
_________________
Why have a good looking face? You can't even see your own face! |
|
| Back to top |
|
|
EliasP
Samba Member
Joined: January 09, 2018
Posts: 55
Location: Sweden
|
| Posted: Mon Sep 21, 2020 12:10 pm Post subject: Re: Reefblue 1976 Kleinbus |
|
|
Long time ago, but time for a new update!
Cleaned off the nasty glue from the front wheelwells.
Then I thought the Eberspächer was pretty nasty, so I removed it and cleaned it from undersealer
I was first just thinking of keeping it that way, but of course, this happened...
Bought some new stuff...
Grinded the parts with wire wheel.
And tried some chemical rust eater.
Zinc primed.
Black painted the outsticking parts.
Some cleaning from undersealer.
Clean parts!
Reassembling
Done...
_________________
Why have a good looking face? You can't even see your own face! |
|
| Back to top |
|
|
EliasP
Samba Member
Joined: January 09, 2018
Posts: 55
Location: Sweden
|
| Posted: Mon Sep 21, 2020 12:26 pm Post subject: Re: Reefblue 1976 Kleinbus |
|
|
Got it on its regular car inspecting. The inspecting guy complained about the hole I had cut in the left sill te see how much new metal I had to buy. It was on the line to be fail the MOT, 50 cm long, wish is the limit, but the MOT guy said that it could go for this time.
Therewas a lot of loose undersealer on the bus, so I started to scrap it away.
It bacame a lot of that nasty shit!
Nine kilograms and five months later!
Looks pretty good now though. This will be sandblasted later.
Found some nasty thick layers of filler on the rear corner wich I grinded away.
Just in 1k primer now, will be proper done later. The whole bus will be repainted when I am done with the rust repairs. Gotan expensive pack from Alan Schofieln in UK,
Now some rust pictures!
Yhere was filler pressed in a rust hole in the cab door!
Bought a welder and started some cutting
Old vs new!
More cutting...
I can admit, that I am just 17 years old so my knowledges and resources are pretty limited, but this will went good though.
_________________
Why have a good looking face? You can't even see your own face! |
|
| Back to top |
|
|
busdaddy
Samba Member

Joined: February 12, 2004
Posts: 51124
Location: Surrey B.C. Canada, but thinking of Ukraine
|
| Posted: Mon Sep 21, 2020 12:51 pm Post subject: Re: Reefblue 1976 Kleinbus |
|
|
Looking good, there's nowhere to go but up now. 
_________________
Rust NEVER sleeps and stock never goes out of style.
Please don't PM technical questions, ask your problem in public so everyone can play along. If you think it's too stupid post it here
Stop dead photo links! Post your photos to The Samba Gallery!
Слава Україні! |
|
| Back to top |
|
|
EliasP
Samba Member
Joined: January 09, 2018
Posts: 55
Location: Sweden
|
| Posted: Mon Sep 21, 2020 12:54 pm Post subject: Re: Reefblue 1976 Kleinbus |
|
|
Did some more cutting
Epoxy primedsome parts.
Those first welds looks like shits, but holds together, but who will see them anyway?
Grinded some rust and epoxyprimed.
Tried to just grind the epoxy around the welds, bet endet with I was grinding the whole seam bare metal
Welded on.
Painted
Mede a new crossmember.
Fits pretty good.
Primed inside.
Welded.
Primed
Inner sill fitted and welded on.
Middle sill fitted and welded on. Is also welded on the underside, but I do not have any picture of that.
Primed
Weldet and primed the inside of the top hat too.
The c-pillar was totally gone so I made a new one. Became solid. Painted the inside with a weld thru primer.
All work is done outdoors so my van cover has been well used during the rains.
I had no previous weldimg experience, but this became good. More to follow..
_________________
Why have a good looking face? You can't even see your own face! |
|
| Back to top |
|
|
78BusGA
Samba Member
Joined: February 01, 2017
Posts: 315
Location: Buford, Georgia
|
| Posted: Mon Sep 21, 2020 1:50 pm Post subject: Re: Reefblue 1976 Kleinbus |
|
|
Very impressive! I will definitely save your thread as reference. I have a '78 reef blue that I will have to do similar work on too, so this is good work to see. And very impressive that you're 17, I should have learned to weld at your age too.
_________________
Few will understand the passion and majesty, among the nuts and grease.
Tom H.
My '74 Super 1303 thread - https://www.thesamba.com/vw/forum/viewtopic.php?t=764902&start=60
My '78 Kombi Bus thread - https://www.thesamba.com/vw/forum/viewtopic.php?t=769385&highlight=
'72 Superbeetle (retired), '78 Bus Kombi 2.0FI, '74 1303 Superbeetle |
|
| Back to top |
|
|
cmonSTART
Samba Member
Joined: July 15, 2014
Posts: 1915
Location: NH
|
| Posted: Mon Sep 21, 2020 4:24 pm Post subject: Re: Reefblue 1976 Kleinbus |
|
|
Nice job!
What welder are you using?
_________________
'78 Bus 2.0FI
de K1IGS |
|
| Back to top |
|
|
orwell84
Samba Member

Joined: May 14, 2007
Posts: 2536
Location: Plattsburgh, New York
|
| Posted: Mon Sep 21, 2020 7:37 pm Post subject: Re: Reefblue 1976 Kleinbus |
|
|
| Wow. You just dove right in. Nice work. Especially for a first timer. You may have to adjust your welder for lower power settings and higher wire speed when welding upside down. Practice on scrap while you dial it in. |
|
| Back to top |
|
|
|


