| Author |
Message |
Mastern
Samba Member

Joined: May 09, 2016
Posts: 38
Location: Carlsbad, CA

|
 Posted: Wed May 01, 2019 12:36 pm Post subject: Gumby Gets a Makeover then... Gets Totaled Posted: Wed May 01, 2019 12:36 pm Post subject: Gumby Gets a Makeover then... Gets Totaled |
 |
|
After a couple months I am finally getting around to starting this post. here is the story.
After backing into my father in law's truck, I busted out the rear window and dented up the rear passenger corner.
the PO was in an accident or something, had some really crumby body work and paint done and the back hatch never really closed correctly. I figured this little mishap would be a good opportunity to to find a whole new straight hatch that would OBVIOUSLY fit perfectly  , get it painted, and be on my way. little did I know what I was getting my self into. The first hurdle was getting the old hatch off. I ended up having to have a friend help me grind out the stubborn hinge screw without damaging the body and female threads , get it painted, and be on my way. little did I know what I was getting my self into. The first hurdle was getting the old hatch off. I ended up having to have a friend help me grind out the stubborn hinge screw without damaging the body and female threads
it was a chore but it was successful.
...however, upon getting a straight hatch and hinges off of a good body and getting it on my van, I realized I was in for a little more than I bargained for. it wasn't even close to lining up.
its laughable really. Long story short, I think the van may have found itself rolled on its side a past life or a PO backed into something with the hatch open and bent the hinge mounts on the body making everything all ccaddywhompus. I ratchet strapped the hatch from the inside and just drove it for a month or two while I contemplated burning the van that my wife and I adore so much (our van child as we call him).
Over the past few years I have probably read almost every single Vanagon topic on this website and it had always been my dream to have a windows out paint job and have all the body panels straightened out. I figured id take the hour drive down to taller los ponchos in Tijuana and see what Armando says.
after reading all the forums on this site and others, I had already kind of made up my mind that I wanted to use that shop as their work seems really good. In this moment I was thankful that I live in San Diego.
I decided to go for it. I wanted to remove the entire interior, carpet, pop-top, and bring them an empty drivable shell. I wanted to fix cracks/dent and paint the pop top and luggage rack myself and cut my own new ABS interior panels, get the black $200 sewfine carpet kit for the front and do new fake wood flooring and a new subfloor and do whatever else I felt like... I dove all in. I had a couple buddies come over and we made way quicker work of stripping the van than I anticipated. took a little over 4 hours. I want to have all the work done at home so the van is pretty much ready to reassemble upon return from Mexico.
I dropped off the van with Armando on Monday, April 8th and he quoted me 6 weeks to remove all of the old filler, take everything down to the bare metal and do the metal work to repair the van redo the seams etc. windows out, painting most of the interior. typical story, I provide all new window seals and door seals and stuff.
goodbye Gumby.
it was it this moment, driving away from my van in a taxi heading back to the border, my heart sank and the reality that I was leaving my trusty happy van in Mexico set in. Armando said he would send pictures of progress often. I couldn't help but feel uneasy...
meanwhile back home I got to work on the pop top.
I started with removing the canvas. whoever installed this really liked their staple gun.
then I washed the flocking with soap and 2 capfuls of bleach as per gowestys video. I was contemplating removing and reupholstering but after this I was pleased with how it came out.
the passenger side wood rail that the canvas staples too came unglued and would rattle when driving. I reattached this with gorilla glue. didn't realize how much it expanded so I spent the next hour standing there watching and wiping away the areas when the glue would expand. I wish I could have seen myself. probably was pretty amusing. then I taped off the flocking and sanded and painted the underside. I mostly wanted to do this to practice so I wouldn't mess up when I did the more visible top. turned out well. I used the Rustoleum Top-Side marine paint in Gloss White. 2 coats rolled on with a foam roller sanding between coats. turned out great. not perfect but my technique definitely improved during this process.
then I flipped the top
to fill the cracks I used Bondo Glass. A bolt pulled through the top so I filled it as the documentation says bonds glass can be drilled and stuff. we shall see if it holds.
other spots
Rustoleum Marine Primer in White 2 coats
3 coats of the paint
im really happy with it. all in all it took 2 weeks. Apr 14-Apr 26. It was an hour here and an hour there. I really wanted to give everything time to set before sanding and stuff. I still have to do the luggage rack.
in other news, One week after dropping the van off in Mexico Armando sent me some pictures on WhatsApp and I was very pleased with the progress. it definitely eased my nerves. When I dropped it off I told him it was very important that the van is done in six weeks as my wife and I have a 3 week trip planned on June 7th up to Seattle and back down the coast with some family. That gives me just over 3 weeks to put the van back together if he is on time. I really didn't want this to turn into a long drawn out project.
here are the week one photos in the morning Monday Apr 15th
afternoon
here is week 2 progress from last week
I just dropped off all of the seals yesterday morning and they have done even more work. Will post more updates. Planning on picking up the ABS plastic panels from ePlastics in San Diego tomorrow or Friday
This post ended up way longer than I thought. Let me know if there's anything I can do better when posting as this is only my second post and I am still a newb. Thank you for helping and giving me the confidence to tackle this and all the other things I have been able to do to the van. This is such a wonderful community and im grateful I finally have something that I can contribute.
Nate |
|
| Back to top |
|
 |
danfromsyr
Samba Member

Joined: March 01, 2004
Posts: 15144
Location: Syracuse, NY
|
| Posted: Wed May 01, 2019 12:42 pm Post subject: Re: Gumby Gets a Makeover - Another van gets new paint/body/interior |
|
|
No need to worry, keep up the updating posts 
_________________
| Abscate wrote: |
| These are the reasons we have words like wanker |
|
|
| Back to top |
|
|
vanis13
Samba Member

Joined: August 15, 2010
Posts: 3092
Location: ABQ NM USA.... Except when not
|
| Posted: Wed May 01, 2019 12:47 pm Post subject: Re: Gumby Gets a Makeover - Another van gets new paint/body/interior |
|
|
| Mastern wrote: |
| ...this is only my second post and I am still a newb..... |
Setting a new starding standard. Nice!
_________________
83.5 Westy with Subaru 2.5, 4 spd manual, center seat, COLD A/C on 134a!, Winter camp heated with an Espar B4 gasoline furnace
www.SuperVanagon.com - some stuff I make
Last edited by vanis13 on Wed May 01, 2019 2:10 pm; edited 1 time in total |
|
| Back to top |
|
|
newerwesty1987
Samba Member
Joined: April 06, 2010
Posts: 407
|
| Posted: Wed May 01, 2019 2:00 pm Post subject: Re: Gumby Gets a Makeover - Another van gets new paint/body/interior |
|
|
Thanks very curious about this.
What is he charging you?
What paint did you use as the final on the top? Careful with the canned stuff, it wont last super long compared to mixed paint. |
|
| Back to top |
|
|
Mastern
Samba Member
Joined: May 09, 2016
Posts: 38
Location: Carlsbad, CA
|
| Posted: Wed May 01, 2019 4:00 pm Post subject: Re: Gumby Gets a Makeover - Another van gets new paint/body/interior |
|
|
| newerwesty1987 wrote: |
Thanks very curious about this.
What is he charging you?
What paint did you use as the final on the top? Careful with the canned stuff, it wont last super long compared to mixed paint. |
He said 3500 to straighten everything out utilizing the existing filler and body work, and 4500 to take everything down to the bare metal and do the required metal work with minimal filler. They are doing the latter.
As for the paint on the pop-top I went with the Rustoleum Top-Side Marine paint. Its been mentioned in quite a few posts on here and the amazon reviews are pretty rad. I kind of figured if itll hold up for years of a boat sitting on salt water and years of people painting their showers with it then it should be ok for my mostly garaged westy |
|
| Back to top |
|
|
Mastern
Samba Member
Joined: May 09, 2016
Posts: 38
Location: Carlsbad, CA
|
| Posted: Wed May 01, 2019 4:02 pm Post subject: Re: Gumby Gets a Makeover - Another van gets new paint/body/interior |
|
|
| danfromsyr wrote: |
| No need to worry, keep up the updating posts |
Thanks will do. Now that Im over the hump of the big post I plan on updating everytime I do something small |
|
| Back to top |
|
|
Mastern
Samba Member
Joined: May 09, 2016
Posts: 38
Location: Carlsbad, CA
|
| Posted: Wed May 01, 2019 7:27 pm Post subject: Re: Gumby Gets a Makeover - Another van gets new paint/body/interior |
|
|
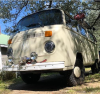
also... here are a couple before pictures of Gumby before all of this. Thats my biggest regret is that I didn't take more before pictures of all the things that bothered me. I am now religious about taking the before pictures during this process but yea... I digress.
only shot I have that shows the wiggly wavy sliding door that never lined up quite right
this might have to do with why it didn't line up.
|
|
| Back to top |
|
|
E1
Samba Member
Joined: January 21, 2013
Posts: 6530
Location: Westfalia, Earth
|
| Posted: Wed May 01, 2019 8:05 pm Post subject: Re: Gumby Gets a Makeover - Another van gets new paint/body/interior |
|
|
Epic entry, Welcome. 👍🏼👍🏼👍🏼
_________________
84 Westy, 2.1L with Digijet, 5.43 R+P, GT Gears
"Adding power makes you faster on the straights.
Subtracting weight makes you faster everywhere."
Colin Chapman |
|
| Back to top |
|
|
dobryan
Samba Member

Joined: March 24, 2006
Posts: 16501
Location: Brookeville, MD
|
|
| Back to top |
|
|
leecat
Samba Member

Joined: September 13, 2012
Posts: 773
Location: Regina
|
| Posted: Wed May 01, 2019 9:01 pm Post subject: Re: Gumby Gets a Makeover - Another van gets new paint/body/interior |
|
|
| Love it! Watching with interest, re-doing our top at present as well. |
|
| Back to top |
|
|
fleet_maintenance
Samba Member

Joined: November 01, 2013
Posts: 323
Location: Upstate NY
|
| Posted: Wed May 01, 2019 10:26 pm Post subject: Re: Gumby Gets a Makeover - Another van gets new paint/body/interior |
|
|
| Subscribed. This looks good. |
|
| Back to top |
|
|
jimf909 
Samba Member

Joined: April 03, 2014
Posts: 7465
Location: WA/ID
|
| Posted: Thu May 02, 2019 12:20 am Post subject: Re: Gumby Gets a Makeover - Another van gets new paint/body/interior |
|
|
Neato. Looking forward to more.
_________________
- Jim
| Abscate wrote: |
Do not get killed, do not kill others.
|
Current: 1990 Westy Camper - Bostig RG4, 2wd, manual trans w/Peloquin, NAHT high-top, 280 ah LFP battery, 160 watts solar, Flash Silver, seam rust, bondo, etc., etc.
Past: 1985 Westy Camper - 1.9 wbx, 2wd, manual trans, Merian Brown, (sold after 17 years to Northwesty who converted it to a Syncro). |
|
| Back to top |
|
|
Mastern
Samba Member
Joined: May 09, 2016
Posts: 38
Location: Carlsbad, CA
|
| Posted: Thu May 02, 2019 1:17 am Post subject: Re: Gumby Gets a Makeover - Another van gets new paint/body/interior |
|
|
| dobryan wrote: |
| Have fun on your up coming trip! |
Thanks!! Hopefully everything is done in time to actually make it on the trip... |
|
| Back to top |
|
|
metropoj
Samba Member
Joined: April 23, 2004
Posts: 1343
|
| Posted: Thu May 02, 2019 5:02 am Post subject: Re: Gumby Gets a Makeover - Another van gets new paint/body/interior |
|
|
Wow, great post !
Thanks for taking us on the journey. I think that price is very good. I'm also amazed at how well your van hid the underlying damaged before you started diving into it. Those before pics look pretty good !
_________________
John.
86 TiiCo powered Westy. |
|
| Back to top |
|
|
mcamp
Samba Member
Joined: January 17, 2017
Posts: 31
Location: Houston
|
| Posted: Thu May 02, 2019 7:04 am Post subject: Re: Gumby Gets a Makeover - Another van gets new paint/body/interior |
|
|
| $4,500 for bare metal and repaint? Or is painting extra? |
|
| Back to top |
|
|
Mastern
Samba Member
Joined: May 09, 2016
Posts: 38
Location: Carlsbad, CA
|
| Posted: Thu May 02, 2019 9:24 am Post subject: Re: Gumby Gets a Makeover - Another van gets new paint/body/interior |
|
|
| mcamp wrote: |
| $4,500 for bare metal and repaint? Or is painting extra? |
Includes repaint
| metropoj wrote: |
| I'm also amazed at how well your van hid the underlying damaged before you started diving into it. Those before pics look pretty good ! |
I agree! Thats why I bought the van in the first place. I thought it was a pretty good deal on a very clean van. After owning it for a while, I realized the paint was peeling in the door jams, theres overspray on all my window seals and door seals. In the right light you can tell there isnt really a straight panel on the van. The back hatch latch broke because of the poor alignment among a few other things. I really should have not been so naieve. However, mechanically I came to trust it and know it quite well. if it wasnt for backing into my father in law and the new straight hatch fitting SO poorly, I probably would have just kept on driving my van that looked really good from across the street. |
|
| Back to top |
|
|
Alaskaberrys
Samba Member

Joined: June 19, 2016
Posts: 1001
Location: SE Alaska
|
| Posted: Thu May 02, 2019 9:46 am Post subject: Re: Gumby Gets a Makeover - Another van gets new paint/body/interior |
|
|
Great post! I find long posts are really informative when well documented like yours. I learned a few things.
And looks like you made a good choice on shops - tricky enough here in the states much less across a border.
Looking forward to updates.
Mark
_________________
'91 Westfalia, Bordeaux Red Pearl 2.1L 2wd Auto
'91 T3 Syncro Doka, Escorial Green 1.9L TD AAZ Gremian (to provoke, irritate, exasperate, vex...) |
|
| Back to top |
|
|
ImAddicted
Samba Member
Joined: April 24, 2012
Posts: 1195
Location: Unorganized Territory, Maine
|
| Posted: Thu May 02, 2019 12:16 pm Post subject: Re: Gumby Gets a Makeover - Another van gets new paint/body/interior |
|
|
| Mastern wrote: |
| mcamp wrote: |
| $4,500 for bare metal and repaint? Or is painting extra? |
Includes repaint
|
Seriously??? Shit, just the paint supplies at most places around me would eclipse that price.
_________________
1979 Transporter (sold)
KC1MUR
| strfish7 wrote: |
| Original condition, which means something different on this forum than anywhere else! |
|
|
| Back to top |
|
|
MsTaboo
Samba Member

Joined: June 02, 2006
Posts: 4086
Location: East Kootenay, British Columbia
|
| Posted: Thu May 02, 2019 12:39 pm Post subject: Re: Gumby Gets a Makeover - Another van gets new paint/body/interior |
|
|
Nice job and good on you for saving a great old camper.
It's such a shame to when vans in better condition than that go to the junkyard.
Yours seems to have had a rough time, but at least the rust is minimal.
Lots of fun times ahead!
_________________
Currently:
'90 Syncro Westy 3 knob w/Zetec
The information age has morphed into the age of disinformation and willful ignorance. Agnotology!
Help the fight against Truth Decay.
Defend democracy, support Ukraine. |
|
| Back to top |
|
|
shagginwagon83
Samba Member

Joined: February 07, 2016
Posts: 3795
Location: VA/TN
|
| Posted: Thu May 02, 2019 1:03 pm Post subject: Re: Gumby Gets a Makeover - Another van gets new paint/body/interior |
|
|
Nice job man. Thanks for taking the time to post your great work!
How was fixing that rear corner? I just recently did the same exact thing to my dad's truck.
_________________
Brandon
"Jo Ann" - '83.5 Westfalia EJ22e w/Peloquin
Instagram @joannthevan
Last edited by shagginwagon83 on Thu May 02, 2019 1:03 pm; edited 2 times in total |
|
| Back to top |
|
|
|


