| Author |
Message |
bullibene
Samba Member

Joined: August 20, 2011
Posts: 70
Location: Munich, Germany

|
 Posted: Wed Jul 22, 2020 3:39 pm Post subject: California to Germany - 1971 Tintop Camper full restoration Posted: Wed Jul 22, 2020 3:39 pm Post subject: California to Germany - 1971 Tintop Camper full restoration |
 |
|
Hey all,
This is the story of my 1971 Tintop Camper.
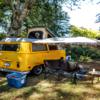
Since I was a kid I dreamed of cruising down PCH next to the ocean in an aircooled Volkswagen. In 2018 I had the possibility to spend half a year in Long Beach, California and make my dream come true. At that time I already could call 3 bugs my own back home in Germany, so I was keeping my eye out for a Type 2. My plan was to buy a good driving bus to use as my daily driver for my time in California and bring it home with me to Germany for a full restoration.
I was able to close a deal with the seller of a 71 deluxe that once was converted to Camper.
It got some rust issues, especially in the front. But in comparison to a bus that lived its life in cold and wet Germany you can consider it as almost rustfree 
After a quick inspection i could call it my own.
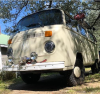
I am not a fan of the spare tires being mounted to the nose , so that one had to go right away 
I am attaching some random pictures i took during my time in California.
January 2019 it had become time for me to go back home again. So it has for the bus. Before taking on its journey back to the motherland I already bought some much needed parts for it, like the high quality front nose repair panel.
This is the last picture of it in California next to a late bay I bought for a friend.
To be continued
_________________
www.089garage.blogspot.com
Instagram: 089garage
Last edited by bullibene on Mon Aug 10, 2020 3:05 pm; edited 1 time in total |
|
| Back to top |
|
 |
Inside Line Competition
Samba Member
Joined: July 22, 2020
Posts: 15
Location: Victoria, British Columbia
|
| Posted: Wed Jul 22, 2020 4:27 pm Post subject: Re: California to Germany - 1971 Tintop Camper full restoration |
|
|
Nice find!
We recently picked one up, and I sent a picture to my buddy in Germany and he asked "Did you quit the company or win the lottery?"
PCH looks like her natural habitat!
_________________
Driving the only vehicle I have ever owned that gets cheered on for passing others up hill! |
|
| Back to top |
|
|
ImAddicted
Samba Member
Joined: April 24, 2012
Posts: 1195
Location: Unorganized Territory, Maine
|
| Posted: Wed Jul 22, 2020 4:33 pm Post subject: Re: California to Germany - 1971 Tintop Camper full restoration |
|
|
Blondes, beer, VW, pizza. Yup, you are doing it right
_________________
1979 Transporter (sold)
KC1MUR
| strfish7 wrote: |
| Original condition, which means something different on this forum than anywhere else! |
|
|
| Back to top |
|
|
old DKP driver
Samba Member
Joined: March 30, 2005
Posts: 4145
Location: Los Gatos,Ca.
|
| Posted: Wed Jul 22, 2020 8:52 pm Post subject: Re: California to Germany - 1971 Tintop Camper full restoration |
|
|
Oh, To be in Munich for October-Fest just one more time in my life.
The tables full of people and hanging out near the Houfbrau house
Singing Zicke Zacke Zicke Zacke Hoi Hoi Hoi !!!
1983 was a good time in Germany for me and my Girl 👧
Great memories thanks to my old Boss $$$......
_________________
V.W.owner since 1967 |
|
| Back to top |
|
|
Wasted youth
Samba Member

Joined: July 06, 2012
Posts: 5134
Location: California's Hot and Smoggy Central Valley
|
| Posted: Thu Jul 23, 2020 1:45 am Post subject: Re: California to Germany - 1971 Tintop Camper full restoration |
|
|
| You were doing fine until the Bud Light got in there. |
|
| Back to top |
|
|
bullibene
Samba Member
Joined: August 20, 2011
Posts: 70
Location: Munich, Germany
|
| Posted: Fri Aug 14, 2020 3:29 pm Post subject: Re: California to Germany - 1971 Tintop Camper full restoration |
|
|
6 weeks later the bus arrived in Europe. After it was custom cleared i got onto a flight to Rotterdam where i collected the bus in person.
As it still was regstered in California in my name, i was able to drive it legally for more 6 month with the Californian plates and registration here in Europe.
The weather was as bad as it could get.... super cold and super rainy.
Welcome to Europe   Without any heater quite a ride those 1000km /625 miles home. Without any heater quite a ride those 1000km /625 miles home.
_________________
www.089garage.blogspot.com
Instagram: 089garage |
|
| Back to top |
|
|
bullibene
Samba Member
Joined: August 20, 2011
Posts: 70
Location: Munich, Germany
|
| Posted: Fri Sep 25, 2020 3:28 pm Post subject: Re: California to Germany - 1971 Tintop Camper full restoration |
|
|
I started with the restoration in May 2020.
I originally didn't plan to do a full nut and bolt restoration... but one thing let to another...
All the interior was removed.
This gas bottle was installed below the Bus....hasnt been used for quite a while i guess haha
Somewhen in he past a camper window was patched very poorly in the back of the roof. They used glasfiber, bondo and cardboard... what a "repair"
Due to the rust in the window frame, the lower valance and also due to the warped metal due to the previously mounted spare tire i decided to replace the whole front panel with the really high quality nose wolfsburg west offers.
After some cutting the real extent of the rust in the lower valance was revealed and all rotted parts were cut out
I built a simple frame for the bus to be able to roll it around without the axles and also to be able to flip it to the side to be able to work on and blast & paint the undercarriage comfortably
The L-Profiles slide into the square steel pipe which i screwed to the frame.
_________________
www.089garage.blogspot.com
Instagram: 089garage
Last edited by bullibene on Fri Sep 25, 2020 3:36 pm; edited 1 time in total |
|
| Back to top |
|
|
busdaddy
Samba Member

Joined: February 12, 2004
Posts: 51145
Location: Surrey B.C. Canada, but thinking of Ukraine
|
| Posted: Fri Sep 25, 2020 3:33 pm Post subject: Re: California to Germany - 1971 Tintop Camper full restoration |
|
|
Dang, bummer about the rust and the botched roof fix, but none of that is really surprising on these, on the whole it's better than alot of them.
Looking good so far!
_________________
Rust NEVER sleeps and stock never goes out of style.
Please don't PM technical questions, ask your problem in public so everyone can play along. If you think it's too stupid post it here
Stop dead photo links! Post your photos to The Samba Gallery!
Слава Україні! |
|
| Back to top |
|
|
airschooled
Air-Schooled

Joined: April 04, 2012
Posts: 12722
Location: on a bike ride somewhere
|
| Posted: Sat Sep 26, 2020 8:21 am Post subject: Re: California to Germany - 1971 Tintop Camper full restoration |
|
|
Ha! Ive always wanted to tour my bus around Germany 
That may have to wait until after the new nose skin...
_________________
Learn how your vintage VW works. And why it doesn't!
One-on-one tech help for your Volkswagen:
www.airschooled.com |
|
| Back to top |
|
|
bullibene
Samba Member
Joined: August 20, 2011
Posts: 70
Location: Munich, Germany
|
| Posted: Sun Nov 29, 2020 5:49 am Post subject: Re: California to Germany - 1971 Tintop Camper full restoration |
|
|
After the Bus was all torn apartment i decided having it blasted to get all of the surface rust out of the metal. Escpecially the undercarriage and the cargofloor had quite some surface rust, that is now all gone
I removed the paint of the roof and the sides with paint remover to bare metal. Afterwards everything was primed.
_________________
www.089garage.blogspot.com
Instagram: 089garage |
|
| Back to top |
|
|
wcfvw69 
Samba Purist

Joined: June 10, 2004
Posts: 13389
Location: Arizona
|
| Posted: Sun Nov 29, 2020 7:16 am Post subject: Re: California to Germany - 1971 Tintop Camper full restoration |
|
|
Wow! It's nice seeing your old bay bus getting repaired so thoroughly and correctly! You're going to have a "like new" shell when it's completed and painted up!
I look forward to your updates!
_________________
Contact me at [email protected]
Follow me on instagram @sparxwerksllc
Decades of VW and VW parts restoration experience.
The Samba member since 2004.
**Now rebuilding throttle bodies for VW's and Porsche's**
**Restored German Bosch distributors for sale or I can restore yours**
**Restored German Pierburg fuel pumps for sale or I can restore yours**
**Restored Porsche fuel pumps or I can restore yours**
**Restored Porsche distributors or I can restore yours** |
|
| Back to top |
|
|
old DKP driver
Samba Member
Joined: March 30, 2005
Posts: 4145
Location: Los Gatos,Ca.
|
| Posted: Sun Nov 29, 2020 10:00 am Post subject: Re: California to Germany - 1971 Tintop Camper full restoration |
|
|
Wow! is correct as there are many here in the U.S. following your project
It has really come along way.Cheers
_________________
V.W.owner since 1967 |
|
| Back to top |
|
|
rugblaster
Samba Member
Joined: March 31, 2016
Posts: 1171
Location: San Angelo, Texas
|
| Posted: Sun Nov 29, 2020 3:29 pm Post subject: Re: California to Germany - 1971 Tintop Camper full restoration |
|
|
What a great post!!! I wish you had posted more pics of the girls, I mean the beer. What did you think of American beers? (You don't have to reply, I already know.) I was thinking of doing the same thing, except the trip would go the other way. My daughter has a year and a half left to do in law school and she wants to drive around Europe, especially Germany when she graduates. We went to Spain, France and Italy the last trip, but took trains. We might like to drive this time.
I was thinking about shipping my camper over there and just seliing it when we are done. Maybe 3 month visit. I could buy one there I guess, but I know the shape mine is in. (it will go anywhere reliably. I'm 63 years old and my wife and daughter don't really care about my bus, they like AC, heater and NAV. They don't care if I sell it.
IF you don't mind me asking, how much does it cost to ship a bus? Also, do you have any buddies that may like to purchase a Weatfalia camper?
Your bus is looking great, lots of work I know but worth it in the end, something to be proud of.
_________________
'69 Karmy, '69 Camper, Meyers clone, '65 drag bug, 10.78 @ 128 (sold it) '51 Dodge farm truck,
'09 MB E350 '18 MB E400, '65 Plymouth Valiant convertible and a '19 Ford F250 King Ranch (nicer, but dirty, farm truck)
VWoA factory trained line tech 75 till 90 or so
ASE Master Certification
VWoA Assoc. of Quality Technicians inductee (One of 25 in the five state southwest region)
La Confrerie des Chevaliers du Tastevin (San Angelo Chapter)
TCU ......GO FROGS!!!!!! |
|
| Back to top |
|
|
bullibene
Samba Member
Joined: August 20, 2011
Posts: 70
Location: Munich, Germany
|
| Posted: Mon Dec 28, 2020 4:46 pm Post subject: Re: California to Germany - 1971 Tintop Camper full restoration |
|
|
| Quote: |
| IF you don't mind me asking, how much does it cost to ship a bus? Also, do you have any buddies that may like to purchase a Weatfalia camper? |
Shipping from LA to Rotterdam was 1750 plus 6% import tax
After everything was sandblasted and primed i started to fit the first repair panels. Following panels already have been removed until this point:
- front nose skin
- front valance
- front valance support panel
- connecting panel valanve to A-pillar
All areas where panels are overlapping were primed prior joining them together with weld-thru primer.
Front valance positioned
I am using my spot welder wherever i can. It saves a lot of time and the result is just like from factory. Its definitly a tool i wouldn't want to miss.
After the valance was welded into place I continued welding in the connection panel between the valance and the A-pillar
After the valance and the connection panels to the A-pillar were welded back into place, next was the valance support panel. Its gonna create a hollow space when installed that will be only accessible through a small inspection hole in the valance.
For an optimum of rust prevention I painted the 2 panels from the inside where i won't have any access after welding them together. The overlapping areas were treated with weld-thru primer again.
The Wolfsburg West front nose skin comes without any headlight buckets. The old ones were drilled out and welded into the new nose skin.
Before the final fitment of the front nose skin i painted the area from the inside.
And finally the installation of the perfect fitting Wolfsburg West front
And TADA:
The fitment of all the panels were really great. I can just recommend them.
More metalwork coming
_________________
www.089garage.blogspot.com
Instagram: 089garage |
|
| Back to top |
|
|
wcfvw69
Samba Purist
Joined: June 10, 2004
Posts: 13389
Location: Arizona
|
| Posted: Mon Dec 28, 2020 5:50 pm Post subject: Re: California to Germany - 1971 Tintop Camper full restoration |
|
|

You're doing a great job! That spot welder is a nice tool to have and certainly saves tons of time vs. all the grinding with spot welds with a mig.
Keep up the great work!
_________________
Contact me at [email protected]
Follow me on instagram @sparxwerksllc
Decades of VW and VW parts restoration experience.
The Samba member since 2004.
**Now rebuilding throttle bodies for VW's and Porsche's**
**Restored German Bosch distributors for sale or I can restore yours**
**Restored German Pierburg fuel pumps for sale or I can restore yours**
**Restored Porsche fuel pumps or I can restore yours**
**Restored Porsche distributors or I can restore yours** |
|
| Back to top |
|
|
jeremyrockjock
Samba Towbar Builder

Joined: January 01, 2002
Posts: 5008
Location: Richmond, Verjinya
|
| Posted: Thu Mar 11, 2021 7:40 am Post subject: Re: California to Germany - 1971 Tintop Camper full restoration |
|
|
spectacular job!!
_________________
Why buy what you can build.
Step away from the fiberglass and no one gets hurt!! |
|
| Back to top |
|
|
bullibene
Samba Member
Joined: August 20, 2011
Posts: 70
Location: Munich, Germany
|
| Posted: Sun Apr 11, 2021 3:03 pm Post subject: Re: California to Germany - 1971 Tintop Camper full restoration |
|
|
Next was repairing the cabin floor on the driver and passenger side.
Due to the amount of rust on the driver side I used a repair panel. For the passenger side I was able to fabricate 2 small patches myself.
Again, I used my spot welder wherever i could.
I started out with the Driver side which was quite crusty
Old crusty floor was cut out to the size of the repair panel.
welded in and ground down the welds where i joined the new repair panel to the old floor. For the overlapping areas i used, just like in the factory, my spot welder.
The passenger side had only some little rust at the flange where the wheel housing joins the cabin floor. Due to the small size and the simplicity of the shape of the area that was to repair, i fabricated the needed patch panels myself.
After cleaning the area with a wirebrush the size of corroded area was visible
Only replacing whats acutally necessary. In the picture i made the first cut to the cabin floor
The corroded base of the wheelwell was cut as well and a self fabricated patch panel was tack welded to it
welded and ground down
Cabin floor: sheet metal welded in and ground down
And to finish things off: Some spot welder action
_________________
www.089garage.blogspot.com
Instagram: 089garage |
|
| Back to top |
|
|
orwell84
Samba Member

Joined: May 14, 2007
Posts: 2539
Location: Plattsburgh, New York
|
| Posted: Sun Apr 11, 2021 4:58 pm Post subject: Re: California to Germany - 1971 Tintop Camper full restoration |
|
|
| Its nice to see that level of restoration go into a bus. Excellent work. |
|
| Back to top |
|
|
Rhysos
Samba Member

Joined: March 17, 2010
Posts: 26
Location: Bristol, UK
|
| Posted: Wed Sep 08, 2021 1:39 pm Post subject: Re: California to Germany - 1971 Tintop Camper full restoration |
|
|
I was a big fan of your Gartenkäfer project and this new undertaking is just as compelling in a totally unique way. Really enjoy the story that underpins this particular restoration.
So, I have been catching up on your blog and seen that you recently got all the old nuts and bolts galvanised and the finish you achieved was outstanding! Did you outsource this to a specialist company or do it yourself? If the latter, then please could you do a post here about how you went about it?
Thanks for the inspiration and motivation - makes me realise that I just need to crack on
_________________
www.vwbeetlerestoration.blogspot.com |
|
| Back to top |
|
|
MikeyM73
Samba Member
Joined: December 06, 2016
Posts: 506
Location: Napa Valley, CA
|
| Posted: Wed Sep 08, 2021 6:46 pm Post subject: Re: California to Germany - 1971 Tintop Camper full restoration |
|
|
Doooode! Totally rad the effort and time you're putting into it. All hats off to you, man! If you ever ship it back to Cali, head up to Napa and we'll have a couple bottles of wine waiting to share in exchange for your download of all you did to it.
Cheers, brother. Excellent work.
Mikey
_________________
'73 Pop-top Westy, found sitting in a field for 10+ years, cleaned up, rebuilt furniture, reloved. Original 1.7 block/fully polished crank, 93mm 1.8L balanced AA pistons & cylinders, new 1.8L balanced rods, HAM 42/36 heads, Scat C25 cam & lubalobe lifters, Dual HPMX40s, R2C filters w/ Outerwears pre-filters, functioning thermostat & flaps, Pertronix Flamethrower III, 4-1 exhaust w/ Cherry Bomb 2" turbo muffler & OEM heater boxes, averages about 19-22ish on the highway. |
|
| Back to top |
|
|
|


