| Author |
Message |
brr42
Samba Member

Joined: January 17, 2006
Posts: 123

|
 Posted: Sat Nov 21, 2020 3:29 pm Post subject: 1957 Oval engine bay sound absorbers Posted: Sat Nov 21, 2020 3:29 pm Post subject: 1957 Oval engine bay sound absorbers |
 |
|
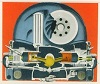
I am working on my 57 finally and starting with the engine and rear end. As the motor started first turn of the key after 35 years I opted to just clean it up and leave it as is. I found some loose bolts on the split case trany so decided to pull it also and clean it up. I am not going all out resto but just cleaning and replacing as needed. Hope to end up with a good grocery getter and chic magnet. My issue is with the engine bay sound boards and availability of authentic repos. I have the WW boards and they are nice but are definitely not "exact" replacement. They do not follow the contour of the front engine seal like the original. The original boards also appear to be a layered construction with a brown fiber material between two layers of tar board. I have not attempted to reproduce the dimpled area around where the wiring goes through the boards and am wondering if anyone has reproduced this look?
|
|
| Back to top |
|
 |
Rome
Samba Member
Joined: June 02, 2004
Posts: 9641
Location: Pearl River, NY
|
| Posted: Sat Nov 21, 2020 6:34 pm Post subject: Re: 1957 Oval engine bay sound absorbers |
|
|
Your original tar board looks savable. Here are some ideas. Take the board outdoors if you still have some warm days coming. Lay it either on the flat driveway or on a flat utility table and let it warm up by sunlight. Spray a MIST of SimpleGreen evenly onto the surface and let it sit about 2-3 minutes. Give the surface a light brush, not even a "scrub", but light strokes with a soft nylon kitchen dish brush. You don't want to saturate the surface material so that it can start to loosen from the moisture, just get the SG into the material pores. Tilt the table slightly and spray the cleaner off with a gentle MIST of water. Wipe the surface with an old shop towel, and let dry thoroughly.
Secure the split sections by turning the board over and gluing some aluminum flashing onto both sides of the split. Make the patch extend about 3" onto each side. Apply contact cement to the area and to the patch, then press the patch firmly onto the surface.
Once everything is dry and cured, buy some heavy black felt/paper roofing paper. Place the tar board onto the roofing paper and trace the edges. Cut out the paper and glue it to the tar board with contact cement. Press the paper fully onto the board on the entire surface; you can use a small roller to press firmly so that the glue fully contacts. Use a socket to press the paper into the depressions for the wire access holes. Cut the access holes with a razor knife.
The engine's immediate start after 35 years!  
Your photo of the WW panel placed on top of your original shows that the WW panel is cut for a later, fresh air heater engine compartment. The bottom edge of the firewall above the transmission is cut more like a uniform "C" on yours, and a shallow "D" on the WW one. Reason why the firewall received that raised bottom edge is so that the 40 hp engine with the heater boxes installed would clear the bottom of the firewall during engine removal at the dealer (finished bodies were set down vertically onto the completed pan during assembly). If you try to install an engine with the fresh air HB installed into a 36 hp engine compartment, and even an early 40 hp one that originally had the stale air HB, the tops of the fresh air HB will hit with firewall bottom edge and prevent the engine from being pushed forward.
The rear apron's inside paint looks excellent. Will you try to remove the dark blue paint from the body so that you end up with that light blue original color all over? There are numerous threads on doing this in the Body/Paint forum. |
|
| Back to top |
|
|
brr42
Samba Member
Joined: January 17, 2006
Posts: 123
|
| Posted: Sat Nov 21, 2020 8:13 pm Post subject: Re: 1957 Oval engine bay sound absorbers |
|
|
| Rome wrote: |
Your original tar board looks savable. Here are some ideas. Take the board outdoors if you still have some warm days coming. Lay it either on the flat driveway or on a flat utility table and let it warm up by sunlight. Spray a MIST of SimpleGreen evenly onto the surface and let it sit about 2-3 minutes. Give the surface a light brush, not even a "scrub", but light strokes with a soft nylon kitchen dish brush. You don't want to saturate the surface material so that it can start to loosen from the moisture, just get the SG into the material pores. Tilt the table slightly and spray the cleaner off with a gentle MIST of water. Wipe the surface with an old shop towel, and let dry thoroughly.
Secure the split sections by turning the board over and gluing some aluminum flashing onto both sides of the split. Make the patch extend about 3" onto each side. Apply contact cement to the area and to the patch, then press the patch firmly onto the surface.
Once everything is dry and cured, buy some heavy black felt/paper roofing paper. Place the tar board onto the roofing paper and trace the edges. Cut out the paper and glue it to the tar board with contact cement. Press the paper fully onto the board on the entire surface; you can use a small roller to press firmly so that the glue fully contacts. Use a socket to press the paper into the depressions for the wire access holes. Cut the access holes with a razor knife.
The engine's immediate start after 35 years! 8) :D
Your photo of the WW panel placed on top of your original shows that the WW panel is cut for a later, fresh air heater engine compartment. The bottom edge of the firewall above the transmission is cut more like a uniform "C" on yours, and a shallow "D" on the WW one. Reason why the firewall received that raised bottom edge is so that the 40 hp engine with the heater boxes installed would clear the bottom of the firewall during engine removal at the dealer (finished bodies were set down vertically onto the completed pan during assembly). If you try to install an engine with the fresh air HB installed into a 36 hp engine compartment, and even an early 40 hp one that originally had the stale air HB, the tops of the fresh air HB will hit with firewall bottom edge and prevent the engine from being pushed forward.
The rear apron's inside paint looks excellent. Will you try to remove the dark blue paint from the body so that you end up with that light blue original color all over? There are numerous threads on doing this in the Body/Paint forum. |
That's some good info! Thank you.
I have been looking at them and thinking about cleaning them up but they are in tough shape. I am going to try your suggestions and see what I end up with. I will post pictures with what I get accomplished.
I did clean up the rear apron, I am not sure if the original color is azure blue or horizon blue. At this point I am planning on giving it a good buff and see how she looks. The interior was not repainted. The left rear fender was replaced and is green under the blue. I need to get this on the road and then will see where it goes. I have a lot of cars to get running before I die, running out of time. |
|
| Back to top |
|
|
brr42
Samba Member
Joined: January 17, 2006
Posts: 123
|
| Posted: Tue Dec 01, 2020 8:04 pm Post subject: Re: 1957 Oval engine bay sound absorbers |
|
|
| Rome wrote: |
Your original tar board looks savable. Here are some ideas. Take the board outdoors if you still have some warm days coming. Lay it either on the flat driveway or on a flat utility table and let it warm up by sunlight. Spray a MIST of SimpleGreen evenly onto the surface and let it sit about 2-3 minutes. Give the surface a light brush, not even a "scrub", but light strokes with a soft nylon kitchen dish brush. You don't want to saturate the surface material so that it can start to loosen from the moisture, just get the SG into the material pores. Tilt the table slightly and spray the cleaner off with a gentle MIST of water. Wipe the surface with an old shop towel, and let dry thoroughly.
Secure the split sections by turning the board over and gluing some aluminum flashing onto both sides of the split. Make the patch extend about 3" onto each side. Apply contact cement to the area and to the patch, then press the patch firmly onto the surface.
Once everything is dry and cured, buy some heavy black felt/paper roofing paper. Place the tar board onto the roofing paper and trace the edges. Cut out the paper and glue it to the tar board with contact cement. Press the paper fully onto the board on the entire surface; you can use a small roller to press firmly so that the glue fully contacts. Use a socket to press the paper into the depressions for the wire access holes. Cut the access holes with a razor knife.
The engine's immediate start after 35 years! 8) :D
Your photo of the WW panel placed on top of your original shows that the WW panel is cut for a later, fresh air heater engine compartment. The bottom edge of the firewall above the transmission is cut more like a uniform "C" on yours, and a shallow "D" on the WW one. Reason why the firewall received that raised bottom edge is so that the 40 hp engine with the heater boxes installed would clear the bottom of the firewall during engine removal at the dealer (finished bodies were set down vertically onto the completed pan during assembly). If you try to install an engine with the fresh air HB installed into a 36 hp engine compartment, and even an early 40 hp one that originally had the stale air HB, the tops of the fresh air HB will hit with firewall bottom edge and prevent the engine from being pushed forward.
The rear apron's inside paint looks excellent. Will you try to remove the dark blue paint from the body so that you end up with that light blue original color all over? There are numerous threads on doing this in the Body/Paint forum. |
I decided to attempt a repair on my original tar board. I could not find a reproduction that matched the bottom profile. I followed some of Rome's suggestions and while far from perfect it came together better than I expected. Plenty good for getting my 57 back on the road.
|
|
| Back to top |
|
|
Snort
Samba Member
Joined: April 02, 2005
Posts: 1957
Location: Seattle, WA
|
| Posted: Wed Dec 02, 2020 8:12 am Post subject: Re: 1957 Oval engine bay sound absorbers |
|
|
Nicely done.
Is that an extra piece that is added to the top of your original? If so would you be able to show any photo details of how it is made or attached?
I'm not sure why WW decided to make their tarboards to fit the Bug fresh air engine bay. It seems to me like a no-brainer to make them fit the 36hp design and have the later Bug owners cut them down to fit. |
|
| Back to top |
|
|
brr42
Samba Member
Joined: January 17, 2006
Posts: 123
|
| Posted: Wed Dec 02, 2020 10:03 am Post subject: Re: 1957 Oval engine bay sound absorbers |
|
|
| Snort wrote: |
Nicely done.
Is that an extra piece that is added to the top of your original? If so would you be able to show any photo details of how it is made or attached?
I'm not sure why WW decided to make their tarboards to fit the Bug fresh air engine bay. It seems to me like a no-brainer to make them fit the 36hp design and have the later Bug owners cut them down to fit. |
There is a piece of original tar board that is folded down at the top. The fold is about 1 1/4" and slides behind the "slot" at the top of the firewall. The original board appears to be a double layer of thin material with a "fabric" material sandwiched between them. The folded section is about the same thickness as the main body and I did not look close enough to see exactly how it was constructed. It was real dicey getting my reconstruction into place as it was dry and brittle. I plan on asking WW about the lack of choice. I agree with your thinking on cutting down a board that is too big. |
|
| Back to top |
|
|
Snort
Samba Member
Joined: April 02, 2005
Posts: 1957
Location: Seattle, WA
|
| Posted: Wed Dec 02, 2020 10:16 am Post subject: Re: 1957 Oval engine bay sound absorbers |
|
|
I could see how if you were making your own out of roofing multiple thin layers of felt (tar paper) you could make the back piece long and fold it over the top when you're done. Would that be a close approximation of how yours is constructed on that top piece?
edit: hey look, 1957 posts today! Does that mean I'm done?
|
|
| Back to top |
|
|
brr42
Samba Member
Joined: January 17, 2006
Posts: 123
|
| Posted: Wed Dec 02, 2020 10:32 am Post subject: Re: 1957 Oval engine bay sound absorbers |
|
|
| Snort wrote: |
I could see how if you were making your own out of roofing multiple thin layers of felt (tar paper) you could make the back piece long and fold it over the top when you're done. Would that be a close approximation of how yours is constructed on that top piece?
edit: hey look, 1957 posts today! Does that mean I'm done?
|
Cool on the 1957 posts!
Exactly on the thinking of the back piece and the fold. I am not sure how thick roofing felt is but I would hazard a guess that 30# would be best. I didn't attempt using some as I wasn't going to buy a roll of it just for this project. I will find a source someday for some scraps and maybe try building my own. |
|
| Back to top |
|
|
Rome
Samba Member
Joined: June 02, 2004
Posts: 9641
Location: Pearl River, NY
|
| Posted: Sat Dec 05, 2020 9:32 am Post subject: Re: 1957 Oval engine bay sound absorbers |
|
|
Big improvement, brr!  |
|
| Back to top |
|
|
scotty timmerman
Samba Member
Joined: January 10, 2010
Posts: 1000
Location: gigharbor W.A
|
|
| Back to top |
|
|
ZENVWDRIVER
Samba Member

Joined: November 07, 2008
Posts: 3340
Location: N.E. Oklahoma
|
| Posted: Thu Nov 18, 2021 10:22 am Post subject: Re: 1957 Oval engine bay sound absorbers |
|
|
We usually, just eliminate, the tar board and stand-off insulation, all together - looks cleaner and not noticeably louder - z
_________________
5/50, pastel green 11G - SOLD
8/50, gray 11A Beetle
6/52, pastel green 11C - SOLD
11/4/52, black Zwitter - SOLD to my little bro.
1954 Porsche, pre A, with VW 36 horse- SOLD
1/54, black 11C Beetle - TRADED
2/55 Iceland green Beetle, on a 1965 pan
3/55 113 Beetle, stratos silver
1955 Messerschmitt KR175 - SOLD, sadly
1960 single cab
1962 SO33, with SO 42 interior
9/63 Pacific blue, Ghia
'87 Toyota MR2
'02 WestFORDia E-150, GAVE TO OUR SON
All super-heroes, wear a MASK |
|
| Back to top |
|
|
Iowa Mark
Samba Member

Joined: May 06, 2004
Posts: 1071
|
| Posted: Thu Nov 18, 2021 4:22 pm Post subject: Re: 1957 Oval engine bay sound absorbers |
|
|
| You might try a construction supply store and ask for concrete expansion joint sheet material. It can be bought in various thicknesses and I have gotten 4' x 4' sheets. This used to be called tar impregnated fiberboard. Inexpensive and a close match to the old material. |
|
| Back to top |
|
|
5500
Samba Member
Joined: October 16, 2020
Posts: 112
Location: Cape Cod
|
| Posted: Fri Nov 19, 2021 7:06 am Post subject: Re: 1957 Oval engine bay sound absorbers |
|
|
| www.classicvwbugs.com sells reproduction tarboards that they claim are true to the originals. |
|
| Back to top |
|
|
splitjunkie
Samba Member
Joined: April 04, 2006
Posts: 4092
|
| Posted: Fri Nov 19, 2021 7:18 am Post subject: Re: 1957 Oval engine bay sound absorbers |
|
|
| 5500 wrote: |
| www.classicvwbugs.com sells reproduction tarboards that they claim are true to the originals. |
You mean these?
Not even close.
_________________
Chris
You know, a lot of these scratches will buff right out... Jerry Seinfeld |
|
| Back to top |
|
|
5500
Samba Member
Joined: October 16, 2020
Posts: 112
Location: Cape Cod
|
| Posted: Fri Nov 19, 2021 7:27 am Post subject: Re: 1957 Oval engine bay sound absorbers |
|
|
| splitjunkie wrote: |
| 5500 wrote: |
| www.classicvwbugs.com sells reproduction tarboards that they claim are true to the originals. |
You mean these?
Not even close. |
Yikes! They look like floormats! |
|
| Back to top |
|
|
pig-pen
Samba Member

Joined: December 04, 2012
Posts: 570
Location: United Kingdom
|
| Posted: Mon May 16, 2022 9:04 am Post subject: Re: 1957 Oval engine bay sound absorbers |
|
|
Hi all,
thought this might be of interest...
So I got some new tar boards (CSP) and they also are the wrong shape.
So borrowing the picture of an original above, I layered this in photoshop to show me the difference...
printed it out and laid it onto the board to show me where I could cut...
from this I worked out that I would need to lose 40mm from the top of the board to give enough material at the bottom to make the new shape.
transferred this to card, and did some fitting in the car...
made some adjustments and fed through wiring etc to check..
then went back and put all this onto the tar board.
added some 4mm cement board to the top, in hindsight something more flexible would have been better... and I taped it on with aluminium / bitumen flashing tape, the kind used for temporary roofing repairs. taped front and back (forgot to take a photo of this).
I thought I would put cuts where all my pegs were with my card template, however this was a waste of time as everything changed a little when I eventually fitted the board.
tidy wiring.
board in. I bent the pegs upwards. I see some folks bend them down, however I think up is better against gravity...
I had to do some trimming along the bottom edge, I dunno, everything changed a little when I got the actual board in there so I just went with it. I reckon I could have only added 30mm at the top... making an almost invisible addition.
and here is a pic of the extra material and tape, which is mainly up in the recess, the top pins being through the board.
a bit of a chore, but I think better to have the shape at the bottom better and a line at the top that you have to look for, than something that really does not fit!
_________________
1954 L227 Type 113
1964 L31 Type 265 |
|
| Back to top |
|
|
sunroof
Samba Member

Joined: October 06, 2006
Posts: 1773
Location: Winnipeg
|
| Posted: Mon May 16, 2022 10:15 am Post subject: Re: 1957 Oval engine bay sound absorbers |
|
|
Congratulations on a good job. I opted for laziness and just installed the WW panels. They were actually better than I was expecting but of course the bottom edge is the wrong shape. When I got the car the tar board was long gone so I felt like I could do what I wanted. It would be appreciated if someone put in the effort and reproduced them correctly. BTW the brown fibre is coconut fibre.
I also put in a layer of heat and sound insulator.
Oh well it will have to do.
Don
_________________
Better and better mistakes! |
|
| Back to top |
|
|
scotty timmerman
Samba Member
Joined: January 10, 2010
Posts: 1000
Location: gigharbor W.A
|
|
| Back to top |
|
|
Bub
Samba Member
Joined: June 10, 2004
Posts: 1154
Location: Central Washington
|
| Posted: Tue May 17, 2022 11:53 am Post subject: Re: 1957 Oval engine bay sound absorbers |
|
|
What I'd like to know is whether the wires - especially on the right side- to the tail lights go under/ hidden the tar board or are they exposed?
Vintage pictures of cars back in these times usually show the wires are hidden, but lots of factory literature like the owners manual shows that sometimes they're exposed.
I know there are a few people with unrestored properly original cars with exposed wires on the side...
Seems like more often than not they're hidden, but I wouldn't think some high-end resto's would overlook this little detail..?
https://www.oldbug.com/humlap55.htm
_________________
| hitest wrote: |
| Had a girlfriend once who shall we say, nearly arrived at the mere sight of a semaphore in action- easy to please she was... |
|
|
| Back to top |
|
|
type241
Samba Member

Joined: June 02, 2006
Posts: 972
Location: MOSES LAKE, WA
|
| Posted: Tue May 17, 2022 12:04 pm Post subject: Re: 1957 Oval engine bay sound absorbers |
|
|
On my old 56 Bug it had the taillight wires behind the tarboard.
|
|
| Back to top |
|
|
|


