| Author |
Message |
fredybear
Samba Member
Joined: March 02, 2004
Posts: 695
Location: Ca

|
 Posted: Wed Jan 06, 2021 6:23 pm Post subject: Re: 1973 Bubbled Rear Apron & Restoration Thread Posted: Wed Jan 06, 2021 6:23 pm Post subject: Re: 1973 Bubbled Rear Apron & Restoration Thread |
 |
|
The body dolly is made, the cheap version 
Ready |
|
| Back to top |
|
 |
fredybear
Samba Member
Joined: March 02, 2004
Posts: 695
Location: Ca
|
| Posted: Fri Jan 08, 2021 12:47 pm Post subject: Re: 1973 Bubbled Rear Apron & Restoration Thread |
|
|
How to remove body by your self, its a pain in the 
Look at that 2x4 flexin
|
|
| Back to top |
|
|
jeffrey8164 
Samba Member
Joined: January 06, 2018
Posts: 3819
Location: Georgia
|
| Posted: Fri Jan 08, 2021 1:29 pm Post subject: Re: 1973 Bubbled Rear Apron & Restoration Thread |
|
|
If you want to change the title of your post, contact the moderator they can do it for you if its been too long and you cant edit it yourself.
But this definitely needs to be a rebuild thread.
If you had paid attention when you were sanding and stripping it couldve been an awesome little patina bug.
Now I guess youre going all the way with it.
Looking forward to the progress.
_________________
Volkswagen!
Turning owners into mechanics since 1938.
Let he that is without oil throw the first rod
(Compression 8.7:1) |
|
| Back to top |
|
|
Buggeee
Samba Member

Joined: December 22, 2016
Posts: 4421
Location: Stuck in Ohio
|
| Posted: Fri Jan 08, 2021 2:32 pm Post subject: Re: 1973 Bubbled Rear Apron & Restoration Thread |
|
|
For the love of all that is virtuous and good please, immediately, get those cinderblocks out of your shop and put them out back by the firepit for stools where they belong.
When a cinderblock fails, and it will because it is not designed to bear load that way, it will simply explode without warning and whatever is under the object will be crushed immediately.
It is traumatic scary thing when it happens. I almost lost a hand had I not happened to reach back for a wrench when a split window bus with no wheels hit the floor on a pile of gravel that had been a cinderblock the moment before. I was probably fourteen years old out there in the garage by myself and even as a half-centurian I remember the sound and anxiety like it was yesterday every time I see that in a picture.
Ok. Duty discharged. Brother that is a motivating step to see a body come off a pan. I've got to get out in the shop this weekend and make some progress! 
_________________
1966 Sportsmobile Camper https://www.thesamba.com/vw/forum/viewtopic.php?t=...mp;start=0
72 Super Duper http://www.thesamba.com/vw/forum/viewtopic.php?t=672387
(adopted out) 61 Turkis Pile https://www.thesamba.com/vw/forum/viewtopic.php?t=728764
| SnowDaySyncro wrote: |
| Every setback is an opportunity to learn stuff and to buy new tools. |
|
|
| Back to top |
|
|
fredybear
Samba Member
Joined: March 02, 2004
Posts: 695
Location: Ca
|
| Posted: Fri Jan 08, 2021 4:25 pm Post subject: Re: 1973 Bubbled Rear Apron & Restoration Thread |
|
|
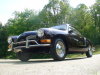
I was a careful with the blocks, it took awhile to do that. There is not that much weight on the shell. A full body is another story.
Pic time  
Look at that tunnel, sweetness. |
|
| Back to top |
|
|
fredybear
Samba Member
Joined: March 02, 2004
Posts: 695
Location: Ca
|
| Posted: Mon Jan 11, 2021 11:16 am Post subject: Re: 1973 Bubbled Rear Apron & Restoration Thread |
|
|
Workin the original
|
|
| Back to top |
|
|
fredybear
Samba Member
Joined: March 02, 2004
Posts: 695
Location: Ca
|
| Posted: Mon Jan 18, 2021 12:53 pm Post subject: Re: 1973 Bubbled Rear Apron & Restoration Thread |
|
|
Workin it
I have an orange buggie.....yukkie hmmmm
What color is this? Blood Orange? Kasan Red? Brilliant Orange? How do I know exactly?
Clean that trunk back to original....
All wiring removed, too much wires and tubes in theses new beetles
Removing gobs of seam sealer
Now on to the cleansing
|
|
| Back to top |
|
|
fredybear
Samba Member
Joined: March 02, 2004
Posts: 695
Location: Ca
|
| Posted: Fri Jan 22, 2021 12:34 pm Post subject: Re: 1973 Bubbled Rear Apron & Restoration Thread |
|
|
Workin the original 
Should I just repaint it 
The red is tuff stuff |
|
| Back to top |
|
|
fredybear
Samba Member
Joined: March 02, 2004
Posts: 695
Location: Ca
|
| Posted: Sat Feb 06, 2021 6:27 pm Post subject: Re: 1973 Bubbled Rear Apron & Restoration Thread |
|
|
Someone was asking about this....
How to remove the undercoating.....
Like so..Harbor Frieght thing with scraper blade
Im gonna have a shinny new buggie
I woulda took 2500 for it. Driveable, registered, legal, ugly
Than I took it apart
I could still melt it down and make a paper weight out of it |
|
| Back to top |
|
|
fredybear
Samba Member
Joined: March 02, 2004
Posts: 695
Location: Ca
|
| Posted: Wed Feb 10, 2021 4:44 pm Post subject: Re: 1973 Bubbled Rear Apron & Restoration Thread |
|
|
The painful process of the crappy chemical stripper. Slow and steady wins the race.
Guess when they torched the outside, musta cought on fire. Crispy
Strippin away
I killed the hood
Now this, maybe ill break out the harbor freight blaster and make a mess
|
|
| Back to top |
|
|
fredybear
Samba Member
Joined: March 02, 2004
Posts: 695
Location: Ca
|
| Posted: Wed Feb 10, 2021 4:45 pm Post subject: Re: 1973 Bubbled Rear Apron & Restoration Thread |
|
|
| Anyone know what that T thing with the screws is for???? |
|
| Back to top |
|
|
Rome
Samba Member
Joined: June 02, 2004
Posts: 9654
Location: Pearl River, NY
|
| Posted: Thu Feb 11, 2021 5:54 am Post subject: Re: 1973 Bubbled Rear Apron & Restoration Thread |
|
|
| Factory diagnostic plug for the VW workshop tool. The plug was attached with the top 2 screws, and it appears a ground wire lug was at the bottom screw. Here's a shot of the plug in a well kept original '74 Beetle. |
|
| Back to top |
|
|
fredybear
Samba Member
Joined: March 02, 2004
Posts: 695
Location: Ca
|
| Posted: Thu Feb 11, 2021 1:39 pm Post subject: Re: 1973 Bubbled Rear Apron & Restoration Thread |
|
|
Cool ness, do I need one of those for originality???
The Blaster Ready for the destruction with my toxic sand
I will destroy U HaHa He He HoHo
|
|
| Back to top |
|
|
fredybear
Samba Member
Joined: March 02, 2004
Posts: 695
Location: Ca
|
| Posted: Thu Feb 11, 2021 5:20 pm Post subject: Re: 1973 Bubbled Rear Apron & Restoration Thread |
|
|
But First
How many peoples scrub this clean before painting
Just Nasty and a pain. Cleanse before the blast
|
|
| Back to top |
|
|
fredybear
Samba Member
Joined: March 02, 2004
Posts: 695
Location: Ca
|
| Posted: Sat Feb 20, 2021 6:07 pm Post subject: Re: 1973 Bubbled Rear Apron & Restoration Thread |
|
|
Some Channel Time. CBS,ABC,FOX
Template with some 10g wire
This channel has to heated and formed, drilled and welded. BooHoo
Anyone ever done this?
|
|
| Back to top |
|
|
fredybear
Samba Member
Joined: March 02, 2004
Posts: 695
Location: Ca
|
| Posted: Sat Feb 27, 2021 2:25 pm Post subject: Re: 1973 Bubbled Rear Apron & Restoration Thread |
|
|
73 Time
Workin the Harbor Freight Blaster......Lookin Good so far
Need some moisture filters to finish the job... |
|
| Back to top |
|
|
fredybear
Samba Member
Joined: March 02, 2004
Posts: 695
Location: Ca
|
| Posted: Sun Feb 28, 2021 4:16 pm Post subject: Re: 1973 Bubbled Rear Apron & Restoration Thread |
|
|
Lookin better, need to fab an extention for proper clensing
|
|
| Back to top |
|
|
fredybear
Samba Member
Joined: March 02, 2004
Posts: 695
Location: Ca
|
| Posted: Wed Mar 03, 2021 6:26 pm Post subject: Re: 1973 Bubbled Rear Apron & Restoration Thread |
|
|
The blasting extention
Steel tip drilled for 1/4 inch tube, JB Welded
Look at that rig to bend that channel to correct position
Lets see what happens |
|
| Back to top |
|
|
fredybear
Samba Member
Joined: March 02, 2004
Posts: 695
Location: Ca
|
| Posted: Thu Mar 04, 2021 5:24 pm Post subject: Re: 1973 Bubbled Rear Apron & Restoration Thread |
|
|
Flowin quite smoo oo oo oooth
Keepin my Homies Updated |
|
| Back to top |
|
|
fredybear
Samba Member
Joined: March 02, 2004
Posts: 695
Location: Ca
|
| Posted: Thu Mar 04, 2021 6:52 pm Post subject: Re: 1973 Bubbled Rear Apron & Restoration Thread |
|
|
Sweetness
Cleaned up and Holes Drilled Drillin Hole
New .030 wire for the welder
Ready to weld it on  |
|
| Back to top |
|
|
|


