| Author |
Message |
zwillisgosteli
Samba Member
Joined: February 04, 2008
Posts: 77
Location: puyallup

|
 Posted: Wed Jan 27, 2021 11:15 am Post subject: Re: UN-baja-ing a 1960 Type 1 Posted: Wed Jan 27, 2021 11:15 am Post subject: Re: UN-baja-ing a 1960 Type 1 |
 |
|
Once the sheet metal work is all fixed we will be moving onto paint and painting.
I have a new wiring harness and headlights and taillights waiting. |
|
| Back to top |
|
 |
TinCanFab
Samba Member
Joined: April 04, 2006
Posts: 2743
Location: Waterford, California
|
|
| Back to top |
|
|
zwillisgosteli
Samba Member
Joined: February 04, 2008
Posts: 77
Location: puyallup
|
| Posted: Wed Jan 27, 2021 12:22 pm Post subject: Re: UN-baja-ing a 1960 Type 1 |
|
|
| they should actually be flipped. I don't think my buddy knew the taper was reversed. We still have to finish up the chassis so I'll make sure I fix that before its driven at all. |
|
| Back to top |
|
|
zwillisgosteli
Samba Member
Joined: February 04, 2008
Posts: 77
Location: puyallup
|
| Posted: Wed Jan 27, 2021 12:32 pm Post subject: Re: UN-baja-ing a 1960 Type 1 |
|
|
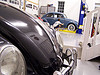
Here is a few photos of where the previous owner cut the body for the Baja kit.
The other pictures show the body with a proper front and rear clip. Front clip is from a 65 so it has some more work to be done. Rear clip is from a 65 but we have sourced the proper H apron.
Before
After
Here is the rear clip when it arrived.
Last edited by zwillisgosteli on Thu Jan 28, 2021 10:39 am; edited 1 time in total |
|
| Back to top |
|
|
bad91teg
Samba Member
Joined: February 13, 2007
Posts: 473
Location: florida
|
| Posted: Wed Jan 27, 2021 6:10 pm Post subject: Re: UN-baja-ing a 1960 Type 1: Build Thread |
|
|
| you saved that bug . great job |
|
| Back to top |
|
|
zwillisgosteli
Samba Member
Joined: February 04, 2008
Posts: 77
Location: puyallup
|
| Posted: Wed Jan 27, 2021 6:28 pm Post subject: Re: UN-baja-ing a 1960 Type 1: Build Thread |
|
|
| bad91teg wrote: |
| you saved that bug . great job |
Thanks! It was in quite a bad place before. It has a long way to go still. |
|
| Back to top |
|
|
zwillisgosteli
Samba Member
Joined: February 04, 2008
Posts: 77
Location: puyallup
|
| Posted: Wed Jan 27, 2021 6:29 pm Post subject: Re: UN-baja-ing a 1960 Type 1: Build Thread |
|
|
The welds need to be cleaned up and a lot of finish work is still in process, but it is looking more like a complete car.
|
|
| Back to top |
|
|
bk63rag
Samba Member

Joined: February 26, 2004
Posts: 883
Location: Martinez ,ca
|
| Posted: Wed Jan 27, 2021 9:03 pm Post subject: Re: UN-baja-ing a 1960 Type 1: Build Thread |
|
|
Looking good ! That a big transfomation before and after .
_________________
63 rag under construction for 30 years and counting. |
|
| Back to top |
|
|
scrivyscriv
Samba Electrician

Joined: October 04, 2011
Posts: 2922
Location: Memphis
|
| Posted: Wed Jan 27, 2021 11:32 pm Post subject: Re: UN-baja-ing a 1960 Type 1: Build Thread |
|
|
Very impressed.. I've got to say, you're years ahead of every other thread that starts out "got a free baja bug i want to fix up'

_________________
Robert in Memphis
Dünkelgrügen 1967 Java Green bug thread
Engine rebuild thread
If you're ever in the Memphis area, you are welcome to stop by for advice and help. |
|
| Back to top |
|
|
zwillisgosteli
Samba Member
Joined: February 04, 2008
Posts: 77
Location: puyallup
|
| Posted: Wed Jan 27, 2021 11:35 pm Post subject: Re: UN-baja-ing a 1960 Type 1: Build Thread |
|
|
Thanks for the kind words.
I'm still getting the hang of posting all the photos into the gallery then copying the link. I have a lot more photos to post. My buddy Corey is an iron worker so he's doing all the welding. That aside this is our first attempt at body work. It's a fun experience and it will be in better shape than it ever would be otherwise. |
|
| Back to top |
|
|
zwillisgosteli
Samba Member
Joined: February 04, 2008
Posts: 77
Location: puyallup
|
| Posted: Wed Jan 27, 2021 11:47 pm Post subject: Re: UN-baja-ing a 1960 Type 1: Build Thread |
|
|
We are building 2 different engines. I traded a bus engine for a couple bug engines. Here is a 40 horse power that is partially reassembled. We lapped the vales after we cleaned up the heads. We cleaned the pistons and honed the cylinders and installed all new gaskets. Its converted to a 12v alternator as you can see.
There is also a 1600 s/p in the works. I had a clutch kit laying around and bought a top end kit. Soon it will have all new gaskets, new top end, and a rebuild fuel pump and carb.
Some of the 40 hp parts cleaned up pretty nice.
There are a few finishing touches to put on the carb. It was rebuilt.
The fuel pump was rebuilt as well. A spacer was added between the intake and carb to accommodate the 12v alternator conversion.
Last edited by zwillisgosteli on Thu Jan 28, 2021 10:41 am; edited 4 times in total |
|
| Back to top |
|
|
zwillisgosteli
Samba Member
Joined: February 04, 2008
Posts: 77
Location: puyallup
|
| Posted: Wed Jan 27, 2021 11:48 pm Post subject: Re: UN-baja-ing a 1960 Type 1: Build Thread |
|
|
I'm recovering phots out of order. Here is an interior shot of the pans and heater channels in test fitting the body. You can see the replaced rear cross members Corey welded in as well. Stuff still needs to get cleaned up and finished but we are just working on getting rid of all the rust first. This also shows the replaced lower A-Pillar sections.
Has anyone located any interior pieces for lower the B pillars? You can see the rotted metal in the photo on the right side above the heater channel.
You can also see how the drivers seat track came a little crooked and will need to be fixed. I paid more to get pans that weren't the lowest quality, but next time I think I'll go German. All the other body panels I got are "top quality" many are from Denmark and I seem to have a lot better luck
Last edited by zwillisgosteli on Thu Jan 28, 2021 10:34 am; edited 2 times in total |
|
| Back to top |
|
|
zwillisgosteli
Samba Member
Joined: February 04, 2008
Posts: 77
Location: puyallup
|
| Posted: Wed Jan 27, 2021 11:52 pm Post subject: Re: UN-baja-ing a 1960 Type 1: Build Thread |
|
|
Decided to test out some "stained glass yellow" paint on the inside of some lenses that were laying around.
|
|
| Back to top |
|
|
zwillisgosteli
Samba Member
Joined: February 04, 2008
Posts: 77
Location: puyallup
|
| Posted: Wed Jan 27, 2021 11:54 pm Post subject: Re: UN-baja-ing a 1960 Type 1: Build Thread |
|
|
| bk63rag wrote: |
| Looking good ! That a big transfomation before and after . |
Thanks. Lots more to come but it Lotts better on a weekly basis. |
|
| Back to top |
|
|
zwillisgosteli
Samba Member
Joined: February 04, 2008
Posts: 77
Location: puyallup
|
| Posted: Thu Jan 28, 2021 12:03 am Post subject: Re: UN-baja-ing a 1960 Type 1: Build Thread |
|
|
We dismantled a few engines and kept all the worthy parts.
This photo shows the valves numbered while were were rebuilding the heads.
Here is another shot of a cleaned up head
And some tin just after it was dry.
Last edited by zwillisgosteli on Thu Jan 28, 2021 12:20 am; edited 1 time in total |
|
| Back to top |
|
|
zwillisgosteli
Samba Member
Joined: February 04, 2008
Posts: 77
Location: puyallup
|
| Posted: Thu Jan 28, 2021 12:17 am Post subject: Re: UN-baja-ing a 1960 Type 1: Build Thread |
|
|
The doors turned out to be in decent shape compared to a lot of the metal on the body. a few small rust holes need to be patched towards the bottom.
The doors have paint stripper on them here to remove the cheap white paint job that was only applied to the outside.
Last edited by zwillisgosteli on Thu Jan 28, 2021 1:34 am; edited 1 time in total |
|
| Back to top |
|
|
zwillisgosteli
Samba Member
Joined: February 04, 2008
Posts: 77
Location: puyallup
|
| Posted: Thu Jan 28, 2021 12:26 am Post subject: Re: UN-baja-ing a 1960 Type 1: Build Thread |
|
|
The seats that came in the Baja were worn out high backs so we scored some era correct low backs. I also found some nice tweed seat covers on the classifieds here on the samba.
One seat frame will have to be cleaned up. The springs are in pretty goos shape and I'll have a foam kit on order soon.
|
|
| Back to top |
|
|
Dibaltic
Samba Member
Joined: May 06, 2007
Posts: 564
Location: Chambersburg, Pennsylvania
|
| Posted: Thu Jan 28, 2021 7:30 am Post subject: Re: UN-baja-ing a 1960 Type 1: Build Thread |
|
|
| zwillisgosteli wrote: |
| Has anyone located any interior pieces for lower the B pillars? You can see the rotted metal in the photo on the right side above the heater channel. |
You'll need to make those pieces or find good donor metal. I'm surprised no one is making that area yet since it always rusts there. |
|
| Back to top |
|
|
TDCTDI
Samba Advocatus Diaboli

Joined: August 31, 2013
Posts: 12861
Location: North Carolina
|
| Posted: Thu Jan 28, 2021 8:42 am Post subject: Re: UN-baja-ing a 1960 Type 1: Build Thread |
|
|
| zwillisgosteli wrote: |
Decided to test out some "stained glass yellow" paint on the inside of some lenses that were laying around.
|
It works ok, I used it on the outside of the lens (a set of foglights.) but it faded within a few months. Perhaps it will last longer when on the inside of the lens.
_________________
Everybody born before 1975 has a story, good, bad, or indifferent, about a VW.
GOFUNDYOURSELF, quit asking everyone to do it for you!
An air cooled VW will make you a hoarder.
Do something, anything, to your project every day, and you will eventually complete it. |
|
| Back to top |
|
|
zwillisgosteli
Samba Member
Joined: February 04, 2008
Posts: 77
Location: puyallup
|
| Posted: Thu Jan 28, 2021 10:09 am Post subject: Re: UN-baja-ing a 1960 Type 1: Build Thread |
|
|
| Dibaltic wrote: |
| zwillisgosteli wrote: |
| Has anyone located any interior pieces for lower the B pillars? You can see the rotted metal in the photo on the right side above the heater channel. |
You'll need to make those pieces or find good donor metal. I'm surprised no one is making that area yet since it always rusts there. |
Thats what I figured. I fond them for an early convertible, but those pieces are way different and very expensive. Its just odd they aren't more readily available for a standard considering they make replacements for the metal panel on the opposite side (quarter panel) and below (heater channel) this piece. |
|
| Back to top |
|
|
|


