| Author |
Message |
Kb65single
Samba Member
Joined: July 24, 2019
Posts: 270
Location: Obxnc

|
 Posted: Sun May 30, 2021 1:42 pm Post subject: Rusty 65 SC restoration Posted: Sun May 30, 2021 1:42 pm Post subject: Rusty 65 SC restoration |
 |
|
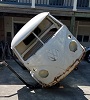
July 2019. Leaving Alexandria VA. Heading home with my latest project.
|
|
| Back to top |
|
 |
Kb65single
Samba Member
Joined: July 24, 2019
Posts: 270
Location: Obxnc
|
| Posted: Mon May 31, 2021 4:13 am Post subject: Re: Rusty 65 SC restoration |
|
|
Bus was brush painted . Previous owner tried to sand some of it off but the amount of Bondo and rust in this bus doesn't make it a strong preservation candidate. Motor ran but not very good . I was able to drive it on the trailer but only had emergency brakes. When I got it home I thought I would get it running and stopping and enjoy it the way it is. This will be my story of what path this bus actually takes.
Vehicle I.D.
dogleg damage
rear rust
typical window rust
nose rust
front floor rust
|
|
| Back to top |
|
|
mtnbus
Samba Member
Joined: July 01, 2007
Posts: 733
Location: Colorado
|
| Posted: Mon May 31, 2021 7:21 am Post subject: Re: Rusty 65 SC restoration |
|
|
great SC !
have fun with it |
|
| Back to top |
|
|
crukab
Samba Chef

Joined: December 13, 2002
Posts: 6116
Location: Vermont
|
| Posted: Mon May 31, 2021 8:31 am Post subject: Re: Rusty 65 SC restoration |
|
|
A Dual Chester too !!
Looks like a do-able resto. Did it come w/ seats & Bumpers ??
_________________
Tom
My Pops:
http://www.thesamba.com/vw/forum/viewtopic.php?t=604100&highlight=
I know you will always be with me, rest in peace with no more pain. 8/13/14.....
In the yard right now:
'51 Dodge 5 window truck
'65 Bug
'66 Singlecab
'82 Rabbit Truck Diesel from CALI 
'86 Doublecab W/T
'91 Vanagon carat/wolfsbrg.Tiico
'88 Dodge Ram pickup
'11 Jetta Wagon |
|
| Back to top |
|
|
Kb65single
Samba Member
Joined: July 24, 2019
Posts: 270
Location: Obxnc
|
| Posted: Mon May 31, 2021 1:17 pm Post subject: Re: Rusty 65 SC restoration |
|
|
Crukab Yes seats, and bumpers are in the back . 14" rims were also included. Spent a lot of time cleaning the bus at first. The SC was undercoated a long time ago so most of it came off fairly easy. Plenty of grease at the usual places, front end and transaxle. This is my 1st bus in a long time, have restored 3 beetles ,65 66 and 54. Still have the 66. I also spent a lot of time researching the build threads and purchased the 63-67 Bentley workshop manual. the guy I bought it from said that the motor didn't run very well and as I was driving it onto the trailer it seamed that it was starving fuel. The muffler was toast too. As I Was removing the muffler and the checking the plugs I discovered acorn shells. That usually isn't a good discovery, so I pulled the motor. Cool part about buses is pulling the motor is a hell of a lot easier than beetles. I'm glad I pulled the motor. Can anybody guess the color from the inside of the decklid.
motor is 73 beetle dualport
muffler off
acorns and mouse nest stuff
more acorns and stuff
mouse stuff between cylinders
engine fire a possibility
battery tray area more on that later
more rust
D-pillar rust get the welder warmed up
|
|
| Back to top |
|
|
CamBiscuit
Samba Member

Joined: February 27, 2012
Posts: 82
Location: Adelaide Australia
|
| Posted: Tue Jun 01, 2021 3:48 am Post subject: Re: Rusty 65 SC restoration |
|
|
Great thread 
_________________
1965 ratty single cab
Instagram @cambiscuit |
|
| Back to top |
|
|
Kb65single
Samba Member
Joined: July 24, 2019
Posts: 270
Location: Obxnc
|
| Posted: Wed Jun 02, 2021 10:21 am Post subject: Re: Rusty 65 SC restoration |
|
|
Since the mice decided to use this motor as a condo, getting the sheet metal sandblasted and painted was the next step. As I was doing that a fellow VW friend contacted me about some parts that I had left over from my 54 beetle restoration. The good part about that was he also has VW engine rebuilding skills. We worked out a trade for some parts and cash to look at my long block and rebuild if necessary. The exterior of the motor looked like hell and the previous owner didn't know the history of it. Small problem was, I live in NC and he lives in Mich. Only solution to the problem was a road trip . So I packed the long block 3 ribbed doors and a bunch of other parts in my Honda HRV. We both got to save on the shipping cost and gas was cheap at the time. Total fuel cost was 140 $ there and back. My brother lives in Ohio so there wasn't any lodging. Sometimes things just work out. Here are a few pictures of my friends handy work.
I.D.#
Necessary parts
assembly and adjustment
final product
Getting the motor back home some months later was accomplished in the same way. This time some early 50's beetle seats front and back and more misc. parts were part of the payload. Plus I got to visit my brother again. Engine case was good along with the crankshaft the rest of the parts were junk according to the mechanic and probably wouldn't have lasted very much longer. I'm glad I pulled the motor. |
|
| Back to top |
|
|
Kb65single
Samba Member
Joined: July 24, 2019
Posts: 270
Location: Obxnc
|
| Posted: Thu Jun 03, 2021 4:53 am Post subject: Re: Rusty 65 SC restoration |
|
|
mtnbus
Thanks
CamBiscuit
Thanks
I delivered the motor to Mich. 11/21/19 and picked it up 6/22/20 so I had plenty of time to do other things. Next logical step was the gas tank because of how poorly the engine ran when I was driving onto the trailer. Draining the gas tank took me forever to do , there ended up being 3 gal. in the tank but 2 hrs. to accomplish it seemed excessive. After getting the gas tank out I found the problem , the metal screen inside the tank was corroded and was surrounded by 50+ years of gas tank funk and a little rust. Now I know why the engine ran so poorly it was starving for fuel. Overall the inside was in really great shape considering it's age. I cleaned up the outside of the tank with fiber wheels and sandblasting and painted it with Rust-oleum Farm & Implement rattle can paint ( Massey Ferguson Gray ). Paint is available at Tractor Supply . Found the color selection in the Forums . I thought it was a good shade match and nobody will ever see it except the next person who buys it.
Well the mice were busy around the gas tank area too. The motor was the condo but the gas tank area was 4 story hotel (see pictures ). Yes I did where a respirator while cleaning it up (nasty stuff).
busy little critters
elevator to the 4th floor
notice the creative support for the Bondo (drivers side)
gas tank
gas tank cleaning
painting (Massey Ferguson Gray)
|
|
| Back to top |
|
|
6sixTinBox
Samba Member
Joined: September 30, 2007
Posts: 539
Location: Confinement
|
| Posted: Thu Jun 03, 2021 6:01 am Post subject: Re: Rusty 65 SC restoration |
|
|
Congrats! Nice work!
_________________
1966 13 Window Deluxe
It is what it is |
|
| Back to top |
|
|
scottvw
Samba Member

Joined: November 17, 2004
Posts: 2821
Location: Centennial, CO
|
| Posted: Thu Jun 03, 2021 9:35 am Post subject: Re: Rusty 65 SC restoration |
|
|
| If the area smells where the mice nest was, go to Petsmart and get Natures Miracle Urine destroyer. It saved my bus. I had a ton of nests and it smelled awful once I put water to the areas to clean them. |
|
| Back to top |
|
|
Kb65single
Samba Member
Joined: July 24, 2019
Posts: 270
Location: Obxnc
|
| Posted: Sat Jun 05, 2021 9:45 am Post subject: Re: Rusty 65 SC restoration |
|
|
While waiting for the motor rebuild I finished cleaning underneath and was discovering the real extent of the rust. This led me to the realization that driving it the way it was wasn't a good idea. The front frame had multiple repairs that were poorly done. The history of the transaxle and the fluid leaks everywhere wouldn't have made this bus very reliable for trips outside of my neighborhood. Then Covid came. So a running and stopping bus is going to be delayed for a few years. Pictures help explain it much better.
I-Beam separation from rust
Front Frame rust
Poor rust repairs ( just covering up the rust repairs )
No wonder the front beam was so hard to get off . They welded it to the repair
Horn barely hanging on
rear chassis cross brace repair with sheet metal pop rivets and Bondo
outrigger repairs
front floor repair ( bondo and pop rivets )
driver side engine compartment
cab load bed well used
treasure chest frame load bed on top door on the right
driver side rear wheel well
I guess that's enough pictures to give you the sense that I've got some work to do. Covid helped me stay at it and I am still working on this bus. Now I will try to split the bus into sections that I have worked on. Every restoration seems to be thousands of little jobs all tied together. |
|
| Back to top |
|
|
Captain Pike
Samba Member

Joined: December 30, 2003
Posts: 3342
Location: Talos IV, Piedmont Arizona
|
| Posted: Sat Jun 05, 2021 10:00 am Post subject: Re: Rusty 65 SC restoration |
|
|
Has some rust.
_________________
LEARN TO SELF RESCUE
59 Panel bus, 1966 Single cab. 73' 181. 73 Westy. 91' H6 Vanagon 3.3L.
.....................All Current....................... |
|
| Back to top |
|
|
Kb65single
Samba Member
Joined: July 24, 2019
Posts: 270
Location: Obxnc
|
| Posted: Sat Jun 05, 2021 1:31 pm Post subject: Re: Rusty 65 SC restoration |
|
|
| Captain Pike wrote: |
Has some rust. |
I know when I've been bested. You win in the rust department hands down. Maybe I should use "slightly rusted" in the future. |
|
| Back to top |
|
|
Kb65single
Samba Member
Joined: July 24, 2019
Posts: 270
Location: Obxnc
|
| Posted: Sat Jun 05, 2021 1:43 pm Post subject: Re: Rusty 65 SC restoration |
|
|
| scottvw wrote: |
| If the area smells where the mice nest was, go to Petsmart and get Natures Miracle Urine destroyer. It saved my bus. I had a ton of nests and it smelled awful once I put water to the areas to clean them. |
Thanks, I doused it with lacquer thinner to start. It hasn't smelled yet but it hasn't gotten wet with water but now I know what to do if it ripens up in the future. Thanks again |
|
| Back to top |
|
|
Captain Pike
Samba Member
Joined: December 30, 2003
Posts: 3342
Location: Talos IV, Piedmont Arizona
|
| Posted: Sat Jun 05, 2021 5:04 pm Post subject: Re: Rusty 65 SC restoration |
|
|
| Kb65single wrote: |
| Captain Pike wrote: |
Has some rust. |
I know when I've been bested. You win in the rust department hands down. Maybe I should use "slightly rusted" in the future. |
We all start somewhere.
_________________
LEARN TO SELF RESCUE
59 Panel bus, 1966 Single cab. 73' 181. 73 Westy. 91' H6 Vanagon 3.3L.
.....................All Current....................... |
|
| Back to top |
|
|
Kb65single
Samba Member
Joined: July 24, 2019
Posts: 270
Location: Obxnc
|
| Posted: Sun Jun 06, 2021 4:42 am Post subject: Re: Rusty 65 SC restoration |
|
|
Repairing the front frame had to happen first if I was going to make a rotisserie to do the restoration. Plus I'm 64 years old and while crawling under a car is a good abdominal workout , age "should" bring wisdom.
rust holes in between the front beam bolts
getting to solid metal
cutting it out
making the repair section with proper contours
tacking it in
welding it shut
grind it smooth
|
|
| Back to top |
|
|
Kb65single
Samba Member
Joined: July 24, 2019
Posts: 270
Location: Obxnc
|
| Posted: Sun Jun 06, 2021 6:32 am Post subject: Re: Rusty 65 SC restoration |
|
|
Moving on to the next spot
before
removing the bad. The plate behind the exterior frame metal holds the threaded cylinders that the front beam bolts to. I had to fab both the inside and outside frame plates at the same time . That way you can adjust the thickness of the frame. It also gives you something to clamp to.
fabricating the good (14 gauge metal ) with correct contours
Welded the top picture, to the picture below this at 90 deg. Tacked it in place then finished it on the bench. Welded it on the inside and outside.
welding it in and grinding
on to the inside
Last edited by Kb65single on Sat Jul 10, 2021 2:45 pm; edited 1 time in total |
|
| Back to top |
|
|
c21darrel
Samba Member
Joined: January 22, 2009
Posts: 8211
Location: San Dimas
|
|
| Back to top |
|
|
Kb65single
Samba Member
Joined: July 24, 2019
Posts: 270
Location: Obxnc
|
| Posted: Mon Jun 07, 2021 5:27 am Post subject: Re: Rusty 65 SC restoration |
|
|
On to the inside of the front frame driver side
Before
As it turned out the damage (rust holes here) allowed the moisture to drain and spare the bottom treaded cylinder that the front beam bolts to. I was not so fortunate on the passenger side.
fabrication: The metal thickness changed from 14 gauge on the outside to 16 gauge on the inside. I also always use cardboard templates to get the approximate size and shape of my pieces. I find 12-pack beer cardboard the best, always good to recycle or repurpose. If you need bigger pieces get the 24 case size.
Its easier to make the inside piece before you weld the outside on. Getting the hole location and the front 90 deg. bends is a lot easier without the front section getting in your way. Of course you will have to finalize the inside fit after the outside is fully welded in.
full weld and grinded smooth
I welded all the way around the bottom threaded cylinder which was not what the factory did. Look at the top one, they only welded about a 3/8 inch section.
On to passenger side |
|
| Back to top |
|
|
Kb65single
Samba Member
Joined: July 24, 2019
Posts: 270
Location: Obxnc
|
| Posted: Mon Jun 07, 2021 2:07 pm Post subject: Re: Rusty 65 SC restoration |
|
|
On to the passenger side where some of the same areas were rusted through
The bottom threaded cylinder that holds the front beam bolt was rusted through to the threads (see picture) the black lines are the threads
I used 4 nuts welded together as a substitute (Home Depot doesn't stock threaded metric steel cylinders) In order to hold my 4 nuts welded together in the proper alignment I used the plate that the rotisserie was going to be mounted to the bus. See the pictures with the Silver P below the nuts.
Welded the nuts to the bus but didn't get a picture. The plate was bolted to the bus with all 4 bolts before welding.
After the nuts were welded in I could finish the rest
The inside nut was welded 360 deg. but no picture
full weld and grind
Now that the front frame is repaired I can start the rotisserie and hopefully get off my back. I'm not as young as I think I am. |
|
| Back to top |
|
|
|


