| Author |
Message |
kimkinzie
Samba Member
Joined: December 12, 2021
Posts: 144
Location: Maui, HI

|
 Posted: Sat Jan 15, 2022 8:33 am Post subject: 1969 Karmann Ghia restomod Posted: Sat Jan 15, 2022 8:33 am Post subject: 1969 Karmann Ghia restomod |
 |
|
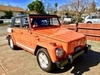
My earliest memories of Volkswagen go back to my grandfather. I actually came across a bundle of photographs from the early 70's and in the middle of the batch was a picture of his beloved coupe. There are distinct textures, sounds, rumbles, and size that bring me back to when he would drive me around the Balboa Peninsula in Southern California as a child, along with my sister in the back rumble seat. It worked great and fit all of us with ease. The first picture is from August of 1966.
The motoring genes were passed onto my uncle, who took up with the LA scene hot rodders. Me? Well... I didn't let the 'car enthusiast' bug bite me until a few years ago ... and ... a 'collection' started. The most recent addition is a 1969 Karmann Ghia that I picked up locally. Interestingly enough, it showed up later that day as a featured car on Daily Turismo.
Amazing looker, but beauty run skin deep. The description is pretty accurate, but there are quite a number of issues that required ironing out. The previous owner warned me against driving on the highway (imbalanced carbs). No dash warning lights (red/green), horn, or functioning instruments. Rusted-through pan. 9 mpg (found out later). Crashy suspension (lowered onto bump stops) and horrid handling (alignment).
"I'll take it!!!"
... and so another project began. I'm still in the middle of the aforementioned list of to-do items, but it is now in a quasi-driveable state. In a stretch move, I braved a late-December trip to the Karmann Ghia Club of North America meet in Danville, California - about 100 miles, mostly highway. It sputtered, spewed, and limped to the Blackhawk museum (was flooding left side of engine due to imbalanced linkage geometry), spewing a burnout-style cloud of smoke behind me every dozen miles as one cylinder (or perhaps bank) belched out the excess fuel and/or oil. Got her home, but yet another lesson learned ... I was hoping to get more background on this vehicle from some of the members (and of course check out the ~amazing~ show-quality Ghias that were also on display. In hindsight, I realize I crashed the party a bit and got onto the show floor). Richard in particular mentioned he had seen this car before. If anyone has any information/history/background about this beauty, it would be greatly appreciated.
Of all the cars in my collection, this one garners the most attention, thumbs up, head nods, raves, questions, and grins. It is the most underpowered, loudest (sound), simplest, lightest, and most fun to drive. Looks-wise, it was best summed up during one exchange at the local Costco gas station where an inquisitive lady exclaimed "Is that a brand new car or a classic one? I just can't tell the difference!" I've got her tuned to the point where it can now test the Highway 1 - La Honda - - Alice's Restaurant - Skyline - Highway 9 - Santa Cruz 'oval track'. I also started scouting for some good scenic backdrop for photos. These are the results:
I will show some of the other custom work that has gone into her over time. The 9 mpg is really killing me (right rear brake caliper sticking it seems). Most of the work should be done to improve functionality and running order.
_________________
'69 Ghia
Last edited by kimkinzie on Sun Jan 16, 2022 6:32 am; edited 10 times in total |
|
| Back to top |
|
 |
kingkarmann
Samba Member

Joined: November 05, 2003
Posts: 4111
|
| Posted: Sat Jan 15, 2022 12:46 pm Post subject: Re: 1969 Karmann Ghia restomod |
|
|
Congrats!
One cannot be a shy owner 
_________________
"Depression is a malfunction of the instrument we use to determine reality.
Mike Gerson
What is your "Bespoke Reality"? |
|
| Back to top |
|
|
kimkinzie
Samba Member
Joined: December 12, 2021
Posts: 144
Location: Maui, HI
|
| Posted: Sun Jan 16, 2022 1:43 pm Post subject: Re: 1969 Karmann Ghia restomod |
|
|
Here is the fuel economy situation quantified. It is literally an uphill battle, where the motto "you can't improve what you can't measure" is only way to check progress.
The first suspect was the breather tube attached to cylinder 1-2 carb. When attempting to balance the idle and link geometry, the intake filters were removed and the right side always was oily, grimy, and dusty. I got an Evil Energy AN8 fuel line setup from Amazon to deal with the crankcase pressure and continuous stream of oil vapor. The mounting bracket for a cylindrical object was already in place, so I got a set of reducing couplers from the local hardware store to handle any slop while positioning the canister, maintenance, and eventual parts replacement. Road grime was due to unplugged sheet metal from previous attempts to bolt down equipment, visible in the lower right.
Installed fuel hose fittings and patched holes in sheet metal with duct tape:
While in that same vicinity, I also changed out the fuel delivery system going into the cars with AN6 fuel line and an inline pressure meter. Since this value is only a quick-check for the fuel pump, I hid it back behind the fan shroud along with the tee connection leading to both carburetors.
Jumped into the car and took it for a drive on the test track (flat warm-up along Pacific Coast highway, followed by progressively more technical curvy drive to the top of the mountain ridge). Funny enough, everyone was out to check the tsunami - warnings posted everywhere and parking lots closed to discourage folks from getting to the water. *That* sure worked...
Along the way, magic happened. At first, the engine tone changed completely. It quieted down, smoothed out, and ran much more balanced (noises at the shift coupler went away). Going uphill was a dream with increased torque, and the engine allowed itself to get pushed to the redline above 5000 rpm+. I was followed by a Miata and McLaren at close pace on the uphill technical sequence. Pulled over at Alice's to refuel and check the engine. I hadn't tightened the stop wing nut on the bottom of catch can - so it spewed all over a paper towel roll I placed in the right rear fender well for cleanup. The lot was full of motorcycles and supercars doing their usual thing. I headed downhill - the only issue at this point are some rather booming backfires when lifting off the throttle for engine braking.
As far a oil catch breathers go, this is definitely a winner.
_________________
'69 Ghia |
|
| Back to top |
|
|
kimkinzie
Samba Member
Joined: December 12, 2021
Posts: 144
Location: Maui, HI
|
| Posted: Sun Jan 16, 2022 4:19 pm Post subject: Re: 1969 Karmann Ghia restomod |
|
|
This is a synopsis of other upgrades that were completed in the October - December 2021 timeframe. I leased a storage container which turned out to be a perfect workspace for light work. I added a socket outlet to get electricity from the only 60 watt bulb in the unit. For inspection and access to suspension components, I used a local shop called 'DIY or DIE' (http://diyordietech.com/) that offers hoist time at around $50/hr. Metric and SAE rolling tool chest, fluid disposal, and mechanical advice just in case you get completely stuck. Pricing 'varies' ....
Got a set of B8 Bilstein shocks for lowered rear suspension and B6 Bilstein (for use with standard VW shock towers) for the front. Some issues can be spotted in the rear shocks: rub points for brake lines (and is most likely currently causing the binding after braking and lower mpg). The poor ride quality was due to the lack of suspension travel (note extent of black wear ring).
Fronts required bump stops to be cut down. Took car for a drive and front right rubbed in hard corners. Thanks to the previous owner for installing an adjustable torsion bar ... but ... Yup ... it was *way* over lowered to the point where shocks were useless. 4 bolts and about 30 minutes later, it was back to a useable level and didn't affect the stance whatsoever. I also noticed the front rotors were extremely pitted, so I ordered up a set of Brembo rotors and Timken bearings (future install).
While underneath, you can also notice the seats are bolted directly into the pan. Perhaps it was due to the passenger about to start scraping their butt on the road? As you might guess, that is reason for the wet carpet and a bit of musty smell after it rains (not detectable in photos). Common VW issue .. but .. I don't know how to weld <yet>.
Under the front hood, the real age, color, and patina starts to show. I cleared up most of the wiring issues for the instrument panel, with the only thing remaining the rear view mirror - car door switch overhead light and brake test button to the left of the steering column. Bought a period-correct Blaupunkt radio and various used 1969 parts via craigslist, Ebay, local pick and pull yards, and a multitude of Bug shops. A nice cover came from JBugs and I used magnetic purse clasps and thin wire to attach along sides and to the bulkhead. The Karmann Ghia logo from the boot lid was a great final touch of class and cleaned up the entire front luggage area.
At the end of December (having gone through the wettest on record), I moved out when the rent was raised from $300/month to $400/month. This is the scam most storage companies use nowadays once you are moved in ...
_________________
'69 Ghia
Last edited by kimkinzie on Sun Jan 23, 2022 8:38 am; edited 1 time in total |
|
| Back to top |
|
|
Rome
Samba Member
Joined: June 02, 2004
Posts: 9640
Location: Pearl River, NY
|
| Posted: Sun Jan 16, 2022 10:56 pm Post subject: Re: 1969 Karmann Ghia restomod |
|
|
Welcome to the Ghia world! I can imagine that your Ghia's suspension design and the stronger engine makes it very fun to drive on winding roads.
Have you been on Rt 130- Mt. Hamilton Road east of San Jose? I drove up to the observatory in a modern, excellent handling car in the '90's and thought it was thrilling. 
Emergency brake cables: The rub marks on your shocks looks like the cables are routed way too high. Do you have rear disc brakes? If not, and just using stock drums, the cables should be held to the sturdy metal collars where the bottoms of the shock absorbers mount. That collar has an approx. 1/2" round hole in which you place these clips- https://www2.cip1.com/c24-113-501-595-pr/ Place the clip around each cable, then move it to the metal collar and push hard to snap it into the hole.
Backfires upon deceleration are often due to a leak in the exhaust system. Look under your car with a flashlight for signs of black soot either at the flanges of the header to your heads, or between the mufflers to the header. Once you find the soot, that's the telltale where the joint is not tight so that air is getting sucked into the joint and igniting with unburnt fuel that's coming out of the combustion chamber.
What is your gauge showing as to fuel pressure to the carbs when the engine is running and idling?
Those holes on the right side engine surround panel were from the crude removal of the original air cleaner metal pedestal, corresponding to the factory spot welds. Too bad your Ghia had some minor rear damage in the past, seen by the waviness of the rear closing panel behind the engine. |
|
| Back to top |
|
|
kimkinzie
Samba Member
Joined: December 12, 2021
Posts: 144
Location: Maui, HI
|
| Posted: Mon Jan 17, 2022 1:14 am Post subject: Re: 1969 Karmann Ghia restomod |
|
|
| Rome wrote: |
Have you been on Rt 130- Mt. Hamilton Road east of San Jose? I drove up to the observatory in a modern, excellent handling car in the '90's and thought it was thrilling.
|
The observatory route is definitely at the top of my to-drive list in the Bay Area. I haven't made the trek from San Jose to Mt. Hamilton, but have spent much time on the connecting road - Mines Road in Livermore out and back to The Junction Grill at the ridge top. And yes, in a modern-ish, brilliantly handling 90's vehicle (DB7).
| Rome wrote: |
| Emergency brake cables: The rub marks on your shocks looks like the cables are routed way too high. Do you have rear disc brakes? |
I have CBPerformance rear disk brakes, and agree completely the routing is messed up. I didn't realize those where the emergency brake cables - yout insight keeps me from going the route of replacing the (normal) brake lines. I'll have a look this week...
| Rome wrote: |
Backfires upon deceleration are often due to a leak in the exhaust system. Look under your car with a flashlight for signs of black soot either at the flanges of the header to your heads, or between the mufflers to the header. Once you find the soot, that's the telltale where the joint is not tight so that air is getting sucked into the joint and igniting with unburnt fuel that's coming out of the combustion chamber.
|
I am happy with the shape of the rear Quietpack mufflers - they need to be ceramic coated (rattle can). I'll go ahead and order a gasket kit for the headers and a 3-bole triangle (stinger-style) for the merged connection. When removing I'll check for the scorch marks to find the location of leak(s).
| Rome wrote: |
| What is your gauge showing as to fuel pressure to the carbs when the engine is running and idling? |
just below 3 psi
| Rome wrote: |
| Those holes on the right side engine surround panel were from the crude removal of the original air cleaner metal pedestal, corresponding to the factory spot welds. Too bad your Ghia had some minor rear damage in the past, seen by the waviness of the rear closing panel behind the engine. |
Yes, the rear apron is a bit crinkled - and have no idea what when down. The battery burned through left side and a patch panel was tack-welded in place. The right side is Swiss cheese, as you mentioned, from someone using brute force. I have only soldered circuit boards in the past and am clueless about MIG, TIG, and fine detail metal working. It is skill I need to definitely learn in the future ...
_________________
'69 Ghia |
|
| Back to top |
|
|
Rome
Samba Member
Joined: June 02, 2004
Posts: 9640
Location: Pearl River, NY
|
| Posted: Mon Jan 17, 2022 7:55 am Post subject: Re: 1969 Karmann Ghia restomod |
|
|
| Quote: |
| order a gasket kit for the headers and a 3-bole triangle (stinger-style) for the merged connection. When removing I'll check for the scorch marks to find the location of leak(s). |
When you have the original header and dual mufflers off, hold a metal straight edge along the 2 flanges where the header upper pipes attach to the heads. You want to check for warping; sometimes the attachment holes in the flange are bent slightly forwards. This warped shape creates a high spot along the center of the flange, which might not be fully filled by the gasket. If you see warping, either bend/hammer it flat, or flatten with a metal file. Do this work before you take the unit for coating.
Next, run an M8 x 1.25 die over the 4 exhaust studs on the heads, to restore the threads or at least make sure that new nuts spin freely by hand.
When you are ready to install everything again, use anti-seize grease on every stud (heads) or bolt (header/muffler triangle flange) so that the nuts are loosened easily "next time" instead of rusting together. Use either a wavy washer under the bolt head if you have locknuts, or a flat washer just to spread the tightening torque across the flange.
With your rear disc brakes, the routing of the hand brake cable might not lend itself to keep it away from the shocks. I have no experience with rear disc kits. Though you could try making a simple guide out of stiff wire, by bending one end into a loop that fits around the cable, and the other end into another loop that attaches to an existing nut somewhere.
Your Ghia has the potential of being a good curvy road driver, if you know its limits. I think that with some skill and your enhanced brakes and wider tires, a well driven Ghia can keep up with a modern sports car with a lower-ability driver.
I've never driven on the small roads on the San Francisco Peninsula. The closest I've been was on the southern end, on Rt 17 when my Ghia good friend Bill S and I flew out to attend a Kelley Park VW meet in San Jose nearly 20 years ago. We rented a car and drove to Aptos along the coast on 17 to view an original pastel green '50 split window Beetle being sold, which Bill bought and had shipped to his home state of Connecticut. I remember Rt 17 was a more modern/developed road with gentler grades and wider curves than the small roads you described farther up the Peninsula. |
|
| Back to top |
|
|
kimkinzie
Samba Member
Joined: December 12, 2021
Posts: 144
Location: Maui, HI
|
| Posted: Mon Jan 17, 2022 8:59 am Post subject: Re: 1969 Karmann Ghia restomod |
|
|
thanks for all the insight, @Rome - your input and guidance is well received. Anti-seize is in my right hand, copper high-heat gasket seal in other to take up any slop. I am also looking to install a wideband O2 sensor at the stinger tip flange and route a digital compression readout to the dash to get a better idea of what the engine is doing across the entire rev range.
Here is a layout of the roads - Santa Cruz, California is the launch for some of the most exciting test tracks around. It is not uncommon to come across loads of Lamborghinis, Ferraris, Porsches, McLaren, etc. while cruising - the supercars are often in 'brigades' and mostly come up from Silicon Valley and cross over Skyline. *Everyone* uses Alice's as the stopping point. Rice rockets abound in the parking lot. Some of the access 'bridges' are marked in yellow on the map. They all offer fantastic in-motion meditation sessions . The huge CZU complex fire sparked by dry lightning in August 2020 cut off access to Big Basin Park and some of the most majestic redwood hiking in California (truly heartbreaking). You can see highway 17 you mentioned on lower right.
Click here for interactive Goole Map
_________________
'69 Ghia |
|
| Back to top |
|
|
kimkinzie
Samba Member
Joined: December 12, 2021
Posts: 144
Location: Maui, HI
|
| Posted: Mon Jan 17, 2022 10:16 am Post subject: Re: 1969 Karmann Ghia restomod |
|
|
Just a little background on my driving endeavors... I was born in Los Angeles, and the mechanical wonders of the world opened up when our family moved to Switzerland at the end of 1969. Soap box racing was a *big* thing back then - if you wanted to race, the official organization would send you out a front and rear axle, wheel/tire combo for all 4 corners, along with a steering wheel/shaft as the basis for your build. You were not allowed to modify these components, but your design could run wild up to a certain weight limit. Steering linkage and braking were first ... wheelbase next ... and from there the sky is the limit for looks. I truly wish I had pictures of those days. It was magical.
I learned about physics - potential and kinetic energy. My stepfather and I designed a torque-vectoring braking system to assist with cornering that could be operated with two independent left-right foot pedals. A hand brake was built for past the finishing line (there were lots of crashes in the run-out section). Steering linkage was a cable to pull the front axle back and forth along a central pivot. I learned early to max out weight (potential energy) along the floor pan with moveable weights for fine tuning. Slap together a front aerodynamic shield (like a small bobsled) on top of a plywood pan and we're off to the races ....
In an American soap car derby, racing was head-to-head with two cars placed behind a gate holding both for the start (like in motocross) and the race was straight line down the hill. Designs were all the same due to excessive regulations. In European soap box racing, it was all based on individual time trials. I quickly came to realize that my steering / braking skills needed to be honed to minimize directional movement (cornering lines), and *avoid* braking. If I had to, braking was used only on the inside bend of sharp curves with a single of two pedals. I never competed seriously, but experience of a build, excitement of race prep, and the driving improvement regiment were some of the most wonderful in my early life. The thrill of design and learning!
Forward to modern day - my driving style is 100% momentum. I like nothing better than to power to the top of a ridge and coast down, delicately handling the wheel, only engine braking (using transmission), and reliving my childhood memories. Power is only to build potential energy .. from there you play with gravity. My game is to keep tires 100% within yellow lines (unlike the sloppy Europeans, especially Brits). It might also explain why I still adore skiing, kiteboarding, skateboarding (my local commuter is an Inboard M1), and any type of flow-oriented experience . Highway 17 has been that test track for over 30 years - from the summit you can drive the entire downhill section without touching the brakes at the speed limit in full traffic. There are only 3 inclines to climb along the entire route. A perfect 50mph glide .. and they recently repaved the road to be smooth as silk. I first drove the road back in my 1966 VW Beetle with bald rear tires (slicks) and would drift all the corners without even thinking (brainless) when it rained. A late night full spin-out on Mount Hermann road before a bridge put an and to ~that~ stupidity. I sold my bug to my uncle later that year.
_________________
'69 Ghia
Last edited by kimkinzie on Mon Jan 24, 2022 9:36 am; edited 1 time in total |
|
| Back to top |
|
|
kimkinzie
Samba Member
Joined: December 12, 2021
Posts: 144
Location: Maui, HI
|
| Posted: Mon Jan 17, 2022 11:00 am Post subject: Re: 1969 Karmann Ghia restomod |
|
|
@Rome - rummaged though some of the hoist time PPI (post-purchase inspection) photos and came up with this possible exhaust culprit (welded bung hole???) and shot of merged header setup. The number of issues is overwhelming - the last owner removed the heat ducts and left *everything* exposed (zero heat zone isolation) at the fan housing and heat exchangers:
Here is a left-right rear suspension setup showing the shoddy brake line routing and rubbing:
_________________
'69 Ghia |
|
| Back to top |
|
|
kimkinzie
Samba Member
Joined: December 12, 2021
Posts: 144
Location: Maui, HI
|
| Posted: Thu Jan 20, 2022 2:51 pm Post subject: Re: 1969 Karmann Ghia restomod |
|
|
Oil breather update
Here is the evidence that I was looking for the following questions:
* Do oil catch cans work at all?
* What size should I have to be effective?
* Should I be worried about crankcase ventilation??
* What kind of garbage am I feeding directly into right bank of carburetors? and not other - a significant source of imbalance?
* What is *NOT* discernible on the engine rack, but only shows when various components interact at the limits?
I took a mild run of ~120 miles (2 fill-ups), small hard push above 5000 rpm to test limits of pressure on the Evil Energy breather hoses. The engine runs strong - I was driving the equivalent of 90 mph (on speedometer, engine RPM-wise, tire size is off -> most likely around 75-80 mph) over a stretch of 15 miles of highway. There was a significant oil drip when parking from the right fender well. I re-stuffed it with paper towels to trace the source of the leak (hoses, connections, breather filter, or oil pressure blow-off), drove home on mild throttle, put down an oil basin on road, and let it cool down overnight. Here are the results - I stopped once the plastic glass was full, 750 ml total capacity:
Yes, oil breathers / catch cans *work*. Oil at the dipstick is clear and clean after being changed less than 500 miles ago (dinosaur Motul 20w-50 for stroker engine). The paper towels flagged that my breather filter wasn't clamped hard enough. Towels at bottom where the oil is disposed was also showing overfill (of catch can and/or tightening issue with the twist close NPT threads. Finally, the right rear fender cavity is now very rust protected with a shiny coat of oil. Lesson learned, debugging continues ...
_________________
'69 Ghia |
|
| Back to top |
|
|
Rome
Samba Member
Joined: June 02, 2004
Posts: 9640
Location: Pearl River, NY
|
| Posted: Fri Jan 21, 2022 12:31 am Post subject: Re: 1969 Karmann Ghia restomod |
|
|
Egads- THAT much oil in the cup from the fast highway drive?!
Big red flag is driving the car with no forced air going through the heat exchangers/heater boxes! The HB hold in a lot of very hot air from the exhaust. This air rises and can get the bottom of the head and the cylinders too hot.
Another probable issue with the HB is that your 2054 cc engine (per your Daily Turismo site link) was probably built with larger-valve heads. You can get an initial idea of this by pulling off either valve cover and checking the head below the rocker arm shaft where the head part number or even type (e.g., "044") is cast. Your HB look like they can be the original style, possibly even German with their thick internal heat sink fins. Those HB were designed for the stock 35 x 32 mm valve sizes. Larger valve sizes, especially exhaust that are larger such as 35 mm create a flow restriction when the exhaust gases are forced into the somewhat small HB pipes.
I recommend the very next activity for you is to use a rear breast plate that has the two large outer holes for the fan shroud air hoses such as seen in the DT link photo, and add such air hoses. The paper+aluminum based hoses can be gently squeezed if needed to slip past the upper header pipes so that they line up with and can be slipped onto the HB neck. The "welded bung" photo shows a clip on the underside of the breast plate which could be how the large holes might be covered and fastened. With that cooling hardware in place, you at least have constant air blowing through the HB even when you have the heater control lever at the handbrake fully down (heat off), though it's likely that the PO did not even bother connecting the HB actuation levers to the heater cables coming out of the tunnel.
A more permanent solution would be to replace the HB entirely and use simple pipes called "J-tubes" or "J-pipes" that have absolutely no heating effects. You can find some made from larger diameter pipes, but then you have to make sure the rear ends of the pipes fit into your current header. Another solution would be to invest in some HB which are made with larger diameter pipes yet still have the outer sheetmetal shells so that there is still the potential of vehicle interior heat. But for those, you once again need the fresh air hoses in place to blow air into the HB. Those larger-diameter HB, just like your current ones, have a "vent" up front at the highest part of the assembly through which the forced air from the fan shroud leaves the HB when the heater control lever is off.
The welded bung at the #3 header flange is probably not the cause of the backfire, as there is no trace of black soot coming out of that hole on the side. You'd see a "lick" of soot at the air leak.
With your photo of the rear shocks and brake calipers/hubs, you can probably use one of the existing bolts "for something" to use as an anchor for a thick wire to support the handbrake cable and get them away from the rear shocks. Or use a small clamp attached to the bottom of the body's quarter panel channel above and slightly to the rear of the cable, and use that as the anchor for the thick wire. You could also drill that channel with a single hole, apply paint to the hole edges for rust protection, and use the hole to hook the thick wire's end into it. |
|
| Back to top |
|
|
kimkinzie
Samba Member
Joined: December 12, 2021
Posts: 144
Location: Maui, HI
|
| Posted: Fri Jan 21, 2022 7:54 am Post subject: Re: 1969 Karmann Ghia restomod |
|
|
I went back and filled that cup one more time after taking the time to get the gallon recycle container, take pictures of the fine Guiness Stout, and get a glass jar (for future pics). Emptying the 750 ml tank produced a clean run - it was full and leaking out the filter seal. I believe that during the hard run I may have caused the oil pressure relief valve to open (port just below the alternator above raised ignition sequence designation) and spew oil over the back of the boot lid. Maybe due to the heavy oil or just heavy foot, just dunno...
I don't really need heat - California is mild. For all of January (after December deluge) the mornings are moist (limits of tires/traction), days are mild (low 60's), and evenings for pictures (magnificent sunsets). I left the stock heat exchangers on because of the engine tin (with labels), and have no idea if the exhaust pipes are just standard. From the looks of it, however, the AS41 Brazilian crate engine seems to have the right stuff - much like these engine specs. Claude's Buggies - CBPerformance stuff everywhere. Just juicy underneath ...
Ghia Patina beneath rear seats - the cable are *not* taught.
_________________
'69 Ghia |
|
| Back to top |
|
|
kimkinzie
Samba Member
Joined: December 12, 2021
Posts: 144
Location: Maui, HI
|
| Posted: Fri Jan 21, 2022 8:26 am Post subject: Re: 1969 Karmann Ghia restomod |
|
|
Engine Starting Point
This was the first picture I captured of the engine bay. The previous owner removed the heat exchanger ducts and left some holes in the fan shroud and rear engine tin. These are the first attempts to get the car drivable using aluminum fence post caps and roof tin flashing.
_________________
'69 Ghia |
|
| Back to top |
|
|
kimkinzie
Samba Member
Joined: December 12, 2021
Posts: 144
Location: Maui, HI
|
| Posted: Fri Jan 21, 2022 11:26 pm Post subject: Re: 1969 Karmann Ghia restomod |
|
|
Capturing the Machine
For car photography, I take inspiration from the Youtube channel "Capturing the Machine", and the most recent video is entitled "Three Ways to Stand Out on Bring-A-Trailer in 2022" was the basis for today's outing. I took to heart some of his tips for listing on BaT, and fired up the Ghia out for a longer drive to tune up the carburetors. The destination would be Paso Robles - about 150 miles of driving down the Pacific Coast Highway. The wineries, majestic hill sides, and sunset exposure would make for a good backdrop. Just for yucks, I gassed up in Seaside just before the Monterey Peninsula and got my usual 9.9 mpg. fine.
Gene Berg delivered a set of 50 and 55 idle jets - the 60's that were previously in there caused the mixture screws on #3-#4 cylinders to bottom out (completely turned in) - way too large. I swapped out to 55's all around before heading out. Pulled over, balanced Weber 44 carbs using snail flow meter, and leaned up the fuel mixture as much as possible. Driving-style was to use goose (accelerate up hills or maintain speed with pulls to 4000 rpm) and glide (shift to neutral on downhills, going in to curves, slowing down). Gas tank of 10 gal, 2 stations total along highway 1 before San Simeon, and a big climb at the end from sea level to 1,000 feet crest with no place to refuel. "Incentive".
Halfway up, I found a decent location and started shooting just as the sun was setting. By this point, the needle was bouncing towards reserve, but there was no way I would miss the golden hour. Got the assignment photos - elevated shots for a BaT listing. No, I'm not selling, but this was the intended audience. Details are in the video, with these results - the first image is absolutely my favorite money shot:
Goose & glide over 150 miles of rolling Pacific Coast Highway gave back 15.1 mpg. I kicked it back into 3k - 5k rpm range for the ride back at a spirited 70-90 mph (on speedometer) while drafting behind a tall Ford Transit van. 120 miles at 12.7 mpg. Next comes a spark plug change, ColorTune for fuel mixture, and compression testing. The muck draining from the bibcock at bottom of oil catch is now mostly clear, but it smells too much like fuel so I ordered a one-way 8AN check valve from Amazon to discourage any gas from being sucked out of the right carb into catch can. The other fix would be to install a taller air filter and/or velocity stacks. Progress.
_________________
'69 Ghia |
|
| Back to top |
|
|
kimkinzie
Samba Member
Joined: December 12, 2021
Posts: 144
Location: Maui, HI
|
| Posted: Sat Jan 22, 2022 7:11 am Post subject: Re: 1969 Karmann Ghia restomod |
|
|
Big Sur Fire
Made the full circuit without running into this fire on Bixby Creek in Big Sur, California. The route is shown with fuel-ups at B, C, and just before D. The fire location is circled in red. I can reassure you that the cause was *not* the backfiring from my mufflers.
Overall favorite 'story' picture from photo session:
_________________
'69 Ghia |
|
| Back to top |
|
|
74 Thing
Samba Member
Joined: September 02, 2004
Posts: 7389
|
| Posted: Sat Jan 22, 2022 1:02 pm Post subject: Re: 1969 Karmann Ghia restomod |
|
|
2 suggestions:
1. Oil filler breather-remove the oil cap and feel on the inside of the lip where the opening for the breather hose is. I bet it is on the bottom where the hose connection is currently located. What you are doing as oil gets pushed up during a rev is blocking the breather with oil. Reposition the oil filler breather with the hose connection up top and then position the hose so it does not interfere with your linkage. It should either go to the carb top or a box that is higher than the breather nipple so oil mist can drain back down.
2. Don't put towels in the engine compartment they can get into the fan or belt and then you will kick yourself for doing so. |
|
| Back to top |
|
|
kimkinzie
Samba Member
Joined: December 12, 2021
Posts: 144
Location: Maui, HI
|
| Posted: Sat Jan 22, 2022 1:23 pm Post subject: Re: 1969 Karmann Ghia restomod |
|
|
1. I couldn't agree more. The exit from the oil filler neck was changed to a more horizontal plane to avoid a dip in the path to oil catch can. Stuffed paper towels were used to pin-point leak at the filter connection and blow-out of the lower bibcock drain. All for debugging (also the hard local run > 5000 RPM) - it went from 3 points of failure to over a dozen. It also holds the glass emptying bottle for inspection.
2. temporary. Also helped with oil intrusion diagnosis and confirm air seals
Here is the result from the 300 mile run after carburetor balancing and hose re-routing. The oil breather was allowed to drain overnight. It smells mostly of petrol, and therefore the ordered one-way valve. It will be inserted between the carburetor and top of the oil catch can where it attaches to the 10AN fittings.
_________________
'69 Ghia |
|
| Back to top |
|
|
74 Thing
Samba Member
Joined: September 02, 2004
Posts: 7389
|
|
| Back to top |
|
|
kimkinzie
Samba Member
Joined: December 12, 2021
Posts: 144
Location: Maui, HI
|
|
| Back to top |
|
|
|


