| Author |
Message |
OTO X58
Samba Member

Joined: March 27, 2004
Posts: 3205
Location: Santa Cruz, CA

|
 Posted: Sat Jun 21, 2025 9:09 pm Post subject: 66 Kombi - Family road trip project Posted: Sat Jun 21, 2025 9:09 pm Post subject: 66 Kombi - Family road trip project |
 |
|
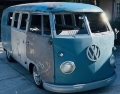
We picked up this 66 walkthrough Kombi in Long Beach last weekend. From what I gathered from the seller, it came from the Midwest where it was purchased with 3 other buses. Ours is the green and black one on the left. Does anyone recognize it or have more information on it?
I traded a 57 Ghia for the Bus. (ghia thread)
I only know a tiny bit about the engine.
1915cc 69x94, build around 3-5 years ago?
Heads with 42x37 valves were installed recently
Solid shafts with ratio rockers
Seems like an aggressive cam
40 Weber IDfs
Pertronix flamethrower 009 distributor
Vintagespeed exhaust
It seems to make more power up high than torque down low, maybe not ideal for a Bus.
The Lowlight was my dream car, and I'm really sad to see it go. But my wife had to give up her 60 Doubledoor Bus a few years back to help make the downpayment on our house, and she has wanted another bus really badly. So when this trade came up, I jumped on it. She more than deserves it.
Our goal for the Bus is to build something for family road trips. car shows and camping. She'll take the kids to school with it sometimes, soccer practice, grocery shopping, etc. So it needs to be drivable, reliable, fairly quiet, and safe. Bonus points for heat and AC.
It already has disk brakes, dropped spindles and a straightaxle, most of the rust repair, a nice shifting transmission, all the eletrical works, and it has a modern stereo cut into the dash. Those are all positives for what we want. She also loves the front and rear safaris.
On the cons side, it's totally gutted on the interior, it's SUPER loud inside to where your ears ring, and the bottom half of the body has been rattle canned flat black.
I can work with that! I'll document the light duty build in this thread. I more than welcome suggestions, criticisms, and comments.
_________________
RIP HBB
Autocrossing the 58 Rag
60 DoubleDoor
57 Gazelle Beige Ghia
66 Kombi - Family project
Last edited by OTO X58 on Sat Jun 21, 2025 11:08 pm; edited 1 time in total |
|
| Back to top |
|
 |
OTO X58
Samba Member
Joined: March 27, 2004
Posts: 3205
Location: Santa Cruz, CA
|
| Posted: Sat Jun 21, 2025 9:40 pm Post subject: Re: 66 Kombi - Family road trip project |
|
|
As soon as I got it home, we gave it a bath and got a closer look. We took the rack off and think it looks better this way.
I originally assumed this was Velvet Green, but it's not. The M code plate is missing, but I've gathered this was originally a solid Pearl White bus that was resprayed a random emerald green at some point. The flat black was added more recently, probably when the panels and bodywork were done. I would prefer it be OG paint, but I can make this work.
It's had a handful of Gerson's funky green panels welded into it. Some of the bodywork wasn't completely finished.
I might need to get after that battery tray.
apron has some bondo chunks missing in each corner.
found a bit of rot in the bottom of the passenger door.
driver's louvers need some finishing. I don't think there's a bunch of bondo here, I think it was just speared into the louvers when that panel was replaced and just wasn't finish sanded.
weird hole in the front floor, but otherwise it's solid
Took a bit of wax to its forehead and it actually shined up pretty nicely! We're thinking of picking a color for the bottom half and repainting that but leaving this green on top. Maybe a lighter green color, or maybe even an a yellow/orange? open to suggestions!
_________________
RIP HBB
Autocrossing the 58 Rag
60 DoubleDoor
57 Gazelle Beige Ghia
66 Kombi - Family project |
|
| Back to top |
|
|
panel
Samba Member

Joined: December 02, 2001
Posts: 1222
Location: Victoria B.C. Canada
|
| Posted: Sat Jun 21, 2025 10:02 pm Post subject: Re: 66 Kombi - Family road trip project |
|
|
I love the full length rack , just not how it mounted to the bus  Gotta be a better more stock/OEM mounting solution. Gotta be a better more stock/OEM mounting solution.
_________________
My '65 Bus~Subaru EJ20 Megasquirted Turbo conversion |
|
| Back to top |
|
|
OTO X58
Samba Member
Joined: March 27, 2004
Posts: 3205
Location: Santa Cruz, CA
|
| Posted: Sat Jun 21, 2025 10:44 pm Post subject: Re: 66 Kombi - Family road trip project |
|
|
| panel wrote: |
| I love the full length rack , just not how it mounted to the bus Gotta be a better more stock/OEM mounting solution. |
Yeah those clamps ain’t right!
We’ve had the bus for a week now, and my wife has driven the kids to school a few times. She loves her bus!
https://imgur.com/a/hBOg1kf
But then tragedy struck.
It lost power and got really loud. I popped off the valve covers and found two intake valves way out of adjustment. Specifically, the intake valves on cylinders #1 and #3.
I’m pretty certain the cam went flat.
https://imgur.com/a/hBOg1kf
We got about 50 miles on this bus, tops. And now it needs a rebuild (which is not in the budget!)
So I’m not sure which way I’m going to go. For now, I’ve put the rack and the wheels up for sale, to try and get some funds together. I never loved the motor anyway, it’s a bit too aggressive for what we want. But I was hoping to be able to sell it to fund the next one. Oh well, we’ll get there.
_________________
RIP HBB
Autocrossing the 58 Rag
60 DoubleDoor
57 Gazelle Beige Ghia
66 Kombi - Family project |
|
| Back to top |
|
|
Eric&Barb
Samba Member

Joined: September 19, 2004
Posts: 26193
Location: Olympia Wash Rinse & Repeat
|
| Posted: Sun Jun 22, 2025 10:20 am Post subject: Re: 66 Kombi - Family road trip project |
|
|
| OTO X58 wrote: |
| We got about 50 miles on this bus, tops. And now it needs a rebuild (which is not in the budget!) |
No guarantee, but more than likely you just need to repair the engine, not rebuild it. Take the engine apart and mark/set out in such a way as to make sure things that move go back just the same way they came out like pistons and cylinders.
Looking forward to more about this bus!!
_________________
In Stereo, Where Available! |
|
| Back to top |
|
|
OTO X58
Samba Member
Joined: March 27, 2004
Posts: 3205
Location: Santa Cruz, CA
|
| Posted: Tue Aug 19, 2025 3:20 pm Post subject: Re: 66 Kombi - Family road trip project |
|
|
I thought about repairing the engine by just putting a new cam and bearings in it, but at the end of the day it's not an engine that I really want in the bus.
It was a 1915cc with a stock bottom end, 4 dowel crank, unknown (mild) cam. But it had huge valve 42x37.5 heads, Scat 1.25 rockers, 40 IDF carbs, and a VintageSpeed exhaust. The bottom end could have been a decent grunt motor, but the top end was all high rpm/horsepower.- pretty mis-matched.
crazy die cast porosity on one cylinder of the heads, but they were beautiful otherwise.
If I had fixed it, I would have wanted to put a small 74mm crank in it (2054cc), a torque cam, smaller valve heads, and also swap the carbs for a single throttle body fuel injection. It would have ended up costing too much to do all that and I'd be getting rid of half the engine anyway.
I ended up stripping the engine down and parting it out, and actually made about $3k from the parts. I am going to use that money to do a Subaru swap. It'll cost less than the 2054, make more power, smoother power, and be much more care-free and reliable for my wife to drive. I might even add an air conditioner, since we truly want to do family road trips in this thing.
_________________
RIP HBB
Autocrossing the 58 Rag
60 DoubleDoor
57 Gazelle Beige Ghia
66 Kombi - Family project |
|
| Back to top |
|
|
OTO X58
Samba Member
Joined: March 27, 2004
Posts: 3205
Location: Santa Cruz, CA
|
| Posted: Tue Aug 19, 2025 3:52 pm Post subject: Re: 66 Kombi - Family road trip project |
|
|
But the Subaru swap will take a while, and she wants to drive it for the next few months of summer. So I figured I'd stick a stock 1600 in there for now.
A friend of mine had a couple of broken engines which he sold me for next to nothing, with the idea that maybe I could make one running engine out of whatever was salvageable. One had a spun bearing and the other had a dropped seat. Sounded simple enough, just slap a head on and drive it. So I gave it a shot..
When I showed up to pick up the engines, it turns out that they were in worse shape than he remembered, and there were three of them. I loaded it all up anyway...
Got it all home and got a closer look. Oof, pretty rough!
Engine 1 melted a piston and some damage in the head (not shown) from aluminum chunks.
Engine 2 It broke a valve which beat the heck out of the head and likely hurt the rod bearing.
Engine 3 (not pictured) was a short block with no heads, and was super hard to rotate. I didn't use any of it, but I might steal the deep sump off this one.
So I kept the two best heads (one from engine #1, one from engine #2), swapped one piston/cylinder in to replace one that had bad scoring, and picked the bottom end which didn't appear to have any impact damage from the broken valve. All the time, shaking my head. LOL This isn't the right way to do it, but it should work for a little while.
I threw all the best stuff into my hillbilly parts washer. It turned out better than expected, using just regular dishwasher soap after wire brushing some of the gnarliest parts with Simple Green ahead of time:
After soaking the rings in ATF for a couple of days and a quick dingleball honing on the cylinders, I got it all put together with new seals. The longblock turned out decently clean.
I threw some paint at it, bolted on all the old parts, and got it to fire. It ran pretty poorly with the old junky carb and DVDA with a bad advance pod. But as soon as I knew that it didn't knock, I ordered a new carb and distributor. I also sprung for an alternator and a 30mm Melling pump because I suspect the inside of this thing is all tired.
So now it runs! Still need to get it tuned properly, and I might need to return the Chinese PICT34 because it pukes gas past the needle valve. But it drove to the gas station and back and made decent power. I hope I don't end up having to put a new longblock in here, but that might happen.
Hopefully now I can focus on getting an interior into it, and sorting out how it steers, shifts, looks and stops... before doing the Subaru swap.
_________________
RIP HBB
Autocrossing the 58 Rag
60 DoubleDoor
57 Gazelle Beige Ghia
66 Kombi - Family project |
|
| Back to top |
|
|
OTO X58
Samba Member
Joined: March 27, 2004
Posts: 3205
Location: Santa Cruz, CA
|
| Posted: Mon Sep 08, 2025 12:12 pm Post subject: Re: 66 Kombi - Family road trip project |
|
|
I got the engine tuned and running well. It's slow, but that's to be expected from a stock 1600. Good enough to load up the bikes and go riding!
We've been cruising the bus around town. The kids love it!
I've been searching for seats, because the back of the bus is still empty. I bought this Vanagon rear seat with a cool little camper kit, hoping that I could trim it down a bit to fit.
But then I found a baywindow rear seat that should be a lot easier to fit, so I will re-sell this Vanagon seat.
I already had this brown full-width baywindow middle seat in my parts stash, and now that I found a brown rear one, I'll have a matching pair. So I ordered a bunch of mounting hardware from WW, including the plates and brackets to weld on the floor. They're missing in the areas where my floor was patched. I'll hopefully get to that this weekend.
The brackets don't seem to fit quite right. Seems like I'll just need to trim the tangs down a little so they sit down in the rectangular recess, to match the stock rear set mount. Unless I'm missing something?
Oh yeah, my wife didn't like the Empi center caps, so I bought some stickers from Dave Barton. He does Prancing Moose stickers for Volvos (they mandate a "moose avoidance test" when testing their cars). He had these Porsche-looking stickers with a moose instead of the Stuttgart horse, which I thought seemed funny for a bus. Nobody will ever notice, but I like it.
_________________
RIP HBB
Autocrossing the 58 Rag
60 DoubleDoor
57 Gazelle Beige Ghia
66 Kombi - Family project |
|
| Back to top |
|
|
Shoyrtt
Samba Member
Joined: August 21, 2010
Posts: 1136
Location: Redlands, CA
|
| Posted: Mon Sep 08, 2025 4:19 pm Post subject: Re: 66 Kombi - Family road trip project |
|
|
Congratulations on the Bus! I like how you and the family are driving it as you go through the items you want to improve on. I just recently installed those seat brackets in the middle and rear of my frankenbus. I think they just fit in the factory indents in my floor (bus was panel originally) without trimming. I can send you a few pictures for reference if you would like.
Let me know if you have any questions with the Subaru swap when you get there. 
Jim |
|
| Back to top |
|
|
ottovu
Samba Member
Joined: November 17, 2005
Posts: 69
Location: Tucson Arizona
|
| Posted: Tue Sep 09, 2025 4:04 pm Post subject: Re: 66 Kombi - Family road trip project |
|
|
| Great bus! Whats the story on the Chevy wagon? Still around? Keith |
|
| Back to top |
|
|
OTO X58
Samba Member
Joined: March 27, 2004
Posts: 3205
Location: Santa Cruz, CA
|
| Posted: Tue Sep 09, 2025 9:00 pm Post subject: Re: 66 Kombi - Family road trip project |
|
|
Thanks guys!! I’m hoping to hit the bus a little harder soon and make some progress. Been limited on time lately.
The Chevy wagon is going up for sale, reluctantly. It’s our current family road trip car and has been phenomenal, but my wife doesn’t like driving it. Maybe we’ll enjoy our trips more in the bus- or if not at least it’ll be a different experience.
The wagon is a 62 Biscayne with an LS swap. 4L60E trans, LSD rear, disc brakes, tubular arms, vintage air, manual brakes and steering, with stock patina and an original (worn out) interior. It’s not perfect but that makes it so great to just hop in and drive. I’ve towed a vintage camp trailer with it, towed VWs around, slept in the back, bikes on the roof, moved furniture.. it’s great!
PM me if you’re interested.
Imgur album with pics: https://imgur.com/gallery/1962-biscayne-ls-swapped...re-FMHysYr
_________________
RIP HBB
Autocrossing the 58 Rag
60 DoubleDoor
57 Gazelle Beige Ghia
66 Kombi - Family project |
|
| Back to top |
|
|
Mr Margaret Scratcher
Samba Member
Joined: February 10, 2013
Posts: 373
Location: Cambridge UK

|
| Posted: Wed Sep 10, 2025 2:59 pm Post subject: Re: 66 Kombi - Family road trip project |
|
|
| That is a sweet wagon! |
|
| Back to top |
|
|
OTO X58
Samba Member
Joined: March 27, 2004
Posts: 3205
Location: Santa Cruz, CA
|
| Posted: Sun Sep 14, 2025 9:55 pm Post subject: Re: 66 Kombi - Family road trip project |
|
|
Check out that professional worksite! 
I got to work today, building a basic hippie nest. Just a platform to hold up a mattress.
My son’s school is doing a 2 night camp event coming up, so I’m going to camp with him in the bus. This platform will allow for a full queen mattress. I’m too sore and old to sleep on a z-bed these days, so I went big. 
It is attached to the bus with just the two rear seat T-bolts. I’ll put wingnuts on them so that I can just install the hippie platform when we want to camp.
After I was done, we took the bus down to Santa Cruz for a bike ride and a cruise down west cliff. Great day!
_________________
RIP HBB
Autocrossing the 58 Rag
60 DoubleDoor
57 Gazelle Beige Ghia
66 Kombi - Family project |
|
| Back to top |
|
|
OTO X58
Samba Member
Joined: March 27, 2004
Posts: 3205
Location: Santa Cruz, CA
|
| Posted: Wed Sep 17, 2025 2:36 pm Post subject: Re: 66 Kombi - Family road trip project |
|
|
small update
I'm going to take my son camping this weekend. So I'm doing a little prep work.
An empty metal bus is so loud inside. The stock engine helped a lot compared to the 2 liter, but it's still super loud. So I got started on the soundproofing.
And I found someone giving away a few leftover boxes of laminate flooring for free on Craigslist, so that's going to go in there tonight. I think I'll just cut holes for the seat mounts with a holesaw, once I weld those seat mounts in place.
Wouldn't have maybe been my first choice, but I like that it's grey.
I'm trying to decide on interior panels. I genuinely prefer the fiber panels that Clara makes, but I think the ABS panels might be better for a family camper. Either way, I'll add some thick carpet padding under the panels.
Just curious if anyone has expeience with those ABS panels?
_________________
RIP HBB
Autocrossing the 58 Rag
60 DoubleDoor
57 Gazelle Beige Ghia
66 Kombi - Family project |
|
| Back to top |
|
|
OTO X58
Samba Member
Joined: March 27, 2004
Posts: 3205
Location: Santa Cruz, CA
|
| Posted: Wed Sep 17, 2025 7:50 pm Post subject: Re: 66 Kombi - Family road trip project |
|
|
Got the floor done today after work and went for a test drive. Wow! It’s so much quieter inside. It’s really a pretty huge improvement. Now I won’t feel guilty driving my kids around with their little pristine ears and amazing hearing.
The hole saw holes above the seat mounts worked perfectly. Looks clean and gives plenty of access for the T bolts.
I’ll pull the floor back up later, to add holes for the middle seat mounts.
_________________
RIP HBB
Autocrossing the 58 Rag
60 DoubleDoor
57 Gazelle Beige Ghia
66 Kombi - Family project |
|
| Back to top |
|
|
70bus 
Samba Member

Joined: July 15, 2004
Posts: 1642
Location: P.O.
|
| Posted: Wed Sep 17, 2025 9:00 pm Post subject: Re: 66 Kombi - Family road trip project |
|
|
That laminate is prettty thick; you will likely need to find the longer seat bolts. I was putting in my middle seat and discovered that I had 4 different sizes of those T bolts, and some are a good deal longer than others. Don't know if they are late bay, Vanagon, or?
_________________
Craig K
70 Neunsitzer
65 Pritschenwagen
"If Von Dutch was alive, he'd walk in there with a pistol and shoot these people." - Robert Williams
Raoul the 65 singlecab
Karl the 70 nine-seater |
|
| Back to top |
|
|
OTO X58
Samba Member
Joined: March 27, 2004
Posts: 3205
Location: Santa Cruz, CA
|
| Posted: Thu Sep 18, 2025 8:25 am Post subject: Re: 66 Kombi - Family road trip project |
|
|
| 70bus wrote: |
| That laminate is prettty thick; you will likely need to find the longer seat bolts. I was putting in my middle seat and discovered that I had 4 different sizes of those T bolts, and some are a good deal longer than others. Don't know if they are late bay, Vanagon, or? |
That’s a really good point, thanks for the heads up. I don’t have the rear seat here at home to test it, and I haven’t welded in the middle seat mounts.
These T bolts only came in one length from Wolfsburg West. I hope it’s the longest length but I don’t know. If they’re too short, I’ll either ditch the flooring in favor of a stock rubber mat, or maybe make some longer T bolts out of some hardware store hex bolts.. I’ll have to cross that bridge when I get there.
_________________
RIP HBB
Autocrossing the 58 Rag
60 DoubleDoor
57 Gazelle Beige Ghia
66 Kombi - Family project |
|
| Back to top |
|
|
Shoyrtt
Samba Member
Joined: August 21, 2010
Posts: 1136
Location: Redlands, CA
|
| Posted: Thu Sep 18, 2025 12:11 pm Post subject: Re: 66 Kombi - Family road trip project |
|
|
I was just at Wolfsburg West this morning picking up supplies. Mike at the front counter told me they make two different length t-bolts. The longer bolts are for the middle seats and the shorter are for the rear. The middle seat uses wing nuts and the rear standard nuts. One of the guys in the shop saw Mike walking with a small bag with two standard nuts and was teased about having a tiny nutsack.
I'm not sure if you saw the PM I sent you with pictures of the mounting plates. |
|
| Back to top |
|
|
OTO X58
Samba Member
Joined: March 27, 2004
Posts: 3205
Location: Santa Cruz, CA
|
| Posted: Thu Sep 18, 2025 12:28 pm Post subject: Re: 66 Kombi - Family road trip project |
|
|
| Shoyrtt wrote: |
I was just at Wolfsburg West this morning picking up supplies. Mike at the front counter told me they make two different length t-bolts. The longer bolts are for the middle seats and the shorter are for the rear. The middle seat uses wing nuts and the rear standard nuts. One of the guys in the shop saw Mike walking with a small bag with two standard nuts and was teased about having a tiny nutsack.
I'm not sure if you saw the PM I sent you with pictures of the mounting plates. |
I ordered a tiny nutsack of my own from WW!
Great to know about the different length bolts! If mine end up being too short, I will give them a call and make sure I get the longer ones.
I bought wingnuts for the middle seat, along with the taller clamps. I also bought nuts for the rear seat with the shorter clamps. That's what appeared to be the right stuff on their website- they actually have installation kits for middle vs rear seats. But all the T-bolts that I got are the same length. I didn't see the two sizes on their website, so I will call them next time.
And yeah, thanks for the mounting plate pics. That definitely helps!
I'm pretty certain that the rectangular pockets in my cargo floor are a little smaller than original, so the mounting plates don't sit all the way down. No big deal, it'll just take a little trimming and then it should be all good.
Thanks again!
_________________
RIP HBB
Autocrossing the 58 Rag
60 DoubleDoor
57 Gazelle Beige Ghia
66 Kombi - Family project |
|
| Back to top |
|
|
70bus
Samba Member
Joined: July 15, 2004
Posts: 1642
Location: P.O.
|
| Posted: Thu Sep 18, 2025 12:39 pm Post subject: Re: 66 Kombi - Family road trip project |
|
|
Various bolt sizes. Rightmost is thicker. I assume head and shaft variations are differing manufacturers.
Mounting plate differences
More on middle seats
https://www.thesamba.com/vw/forum/viewtopic.php?t=...highlight=
Your bay middle will mostly fit. One leg doesn’t line up IIRC
_________________
Craig K
70 Neunsitzer
65 Pritschenwagen
"If Von Dutch was alive, he'd walk in there with a pistol and shoot these people." - Robert Williams
Raoul the 65 singlecab
Karl the 70 nine-seater |
|
| Back to top |
|
|
|


