| Author |
Message |
brokengun
Samba Member
Joined: August 11, 2009
Posts: 188
Location: Maine

|
 Posted: Sat Jan 01, 2011 6:32 pm Post subject: 1973 Weekender Project Posted: Sat Jan 01, 2011 6:32 pm Post subject: 1973 Weekender Project |
 |
|
I plan on updating this thread with my progress as I go. Hope you all enjoy.
First, the story....
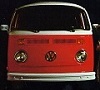
So, a friend of mine's mother had (who lives in Aroostook county Maine) this bus. They bought it new (I believe) and drove it for a few years in California. They drove the bus across the country and up to Aroostook county in the early 80's. The bus was driven for one winter and then parked (they didn't tell us why) in a field. So obviously something was wrong with it for them to park it, guess we'll find out more on that soon. Anyways, she told me I could have it if I come up and get it. So, a U-haul rental and a couple of willing family members (thanks guys!) made the trip with me to go haul it out of the field.
To my surprise, the bus was in pretty decent shape really. The floor is hardly rusted (for being in Maine so long), there are some dents and it was missing a window (one is broken as well) but hey that's minor!
After some cranking on the comealong and using boards to slide the left rear wheel (which was stuck) we got it on the trailer.
Here is where the bus sat for 20 ish years or so...
Pops crankin' away.
Unloading was much easier
First order of business was to unstick the rear wheel. We tried a few things but couldn't get it to turn. Eventually we took the big hammer approach until this happened.
Picked up a sandblaster from Harbor Freight, it was a good deal anyways and it was on sale when we bought it. Should be getting plenty of use for this project for sure.
I redid the rear brake components, put some paint on them and installed new wheel cylinders as well as new e-brake cables (the old ones were stuck and not looking good).
The sliding door wasn't sliding and the handle had broken off so I picked up a used one from another forum member. Also found a newer bus at a local junkyard and I took basically everything I could off of it. I got another side window out of it, it's not the same as the original with the screen but I kind of like it.
Reader's Beware: This is NOT a complete restoration, I will not be turning everything back to original. So, if you don't like that... too bad.
Anyways...
As luck would have it there were just enough parts between the one in the yard and mine to make a functional door sliding assembly. Nice. It's not perfect, but it lets me get in and out alright. The plastic piece really needs to be replaced.
I am currently attending school a couple hours away from home (where the bus is), so I work on it when I can. I managed to get a new starter in it at the end of the summer and got it to turn over but it hasn't started.
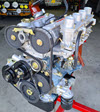
This break we pulled the engine and transmission so I can clean it all up. I'll have to do something to the gas tank as it had no cap on it and is probably pretty rusty on the inside. It was the first time me or my dad had ever removed a VW engine but it all went pretty smooth following the ratwell instructions and a little common sense.
I removed the carbs, which appear to be the original 35mm Solex carbs. How do I tell if these are savable? I spoke with a local VW enthusist and he said "If the inside of them looks white, then they're junk." They don't really look white on the inside. I plan on rebuilding the engine to be a 2 liter (not exactly sure what displacement I will end up going with) so I will probably put larger carbs on it as well.
We have used so much PB Blaster on the bus so far that we just bought a whole gallon of it. Here is a bunch of the tools I used to take the engine out.
We're about to put the bus back outside for the rest of the winter, but here is a picture of the bus in the fall. It contrasts pretty nicely with the leaves, eh?
Looking forward to cleaning up the engine and rebuilding it.
_________________
1984 Vanagon Adventurewagen with EJ22 conversion
1975 Beetle - Big whole in the floorboards
1974 Westy - Will be on the road one day!
1973 Bus - sold |
|
| Back to top |
|
 |
VDubTech
Samba Member

Joined: December 29, 2002
Posts: 9156
Location: Syracuse, NY
|
| Posted: Sat Jan 01, 2011 6:40 pm Post subject: |
|
|
Talk to Keifernet on the carbs, he can rebuild them. If you need any parts drop me a line, I have a couple sets of those kickin around here. My current DD I pulled out of a field in Nashville,IN 3 years ago. It was parked there after it quit running on the original owner and she had no one to work on it. Turned out to be a broken rotor. I've put over 30K miles on it since dragging it 700+ miles back home.
_________________
First Trip in the RustyBus:
http://www.thesamba.com/vw/forum/viewtopic.php?t=279077&highlight=
| borninabus wrote: |
| a measurement of your rod would be extremely useful. |
| notchboy wrote: |
| my dad wasnt a belittling cock when he tought me how to wrench on cars. |
| EverettB wrote: |
One photo = good for reference.
10 photos = douchebaggery |
|
|
| Back to top |
|
|
Kirk
Samba Member

Joined: December 05, 2003
Posts: 5492
Location: North Texas
|
| Posted: Sun Jan 02, 2011 10:37 am Post subject: |
|
|
Looks cool. I like hard top campers. Good luck on putting it back on the road.
_________________
MAKE FORUMS GREAT AGAIN
Bear
Fasty
Super |
|
| Back to top |
|
|
Chazbot
Samba Member

Joined: August 30, 2009
Posts: 197
Location: New Jersey
|
| Posted: Sun Jan 02, 2011 4:06 pm Post subject: |
|
|
| Best of luck with the new project. Looking forward to watching your progress. |
|
| Back to top |
|
|
sneakyjack
Samba Member

Joined: January 14, 2010
Posts: 560
Location: SOuthern VT
|
| Posted: Sun Jan 02, 2011 4:39 pm Post subject: |
|
|
keep on the pics - they'll help you later too- Injoy!
_________________
Nothin left to do....
www.idolmakerfilms.com |
|
| Back to top |
|
|
SGKent 
Samba Member
Joined: October 30, 2007
Posts: 42861
Location: at the beach
|
| Posted: Sun Jan 02, 2011 4:50 pm Post subject: |
|
|
we have a small HF cabinet. These folks are here in Sacramento. They have an inexpensive pickup tube they make that just about tripled the effectiveness of the HF gun. A glass bead gun relies on beads being picked up from the hopper. The HF pickup is really poor. Their style lets more air in which keeps the beads more fluid so more come thru. Also - before you use the HF blast cabinet, run a really good bead of caulk everywhere there is a seam. It will help prevent a mess. Because broken beads are highly cancerous like asbestos, make sure you get a good quality vacuum or bead seperator and vacuum. Look for a local source of beads as they will work better than the HF ones. These folks also have excellent replacement gloves. Summit Racing does also.
http://gritguy.com/
_________________
George Carlin:
"Most people don't know what they're doing, and a lot of them are really good at it."
Skills@EuroCarsPlus:
"never time to do it right but always time to do it twice"  |
|
| Back to top |
|
|
Sawsalesman
Samba Member

Joined: May 27, 2009
Posts: 796
Location: Ashland, NH
|
| Posted: Sun Jan 02, 2011 5:14 pm Post subject: |
|
|
| Nice to see another enthusiast in New England. Where in Maine are you? I travel up there on a regular basis for my job. |
|
| Back to top |
|
|
brokengun
Samba Member
Joined: August 11, 2009
Posts: 188
Location: Maine
|
| Posted: Sun Jan 02, 2011 5:36 pm Post subject: |
|
|
Thanks everyone, I'll be sure to keep the posts coming. Just took the gas tank out today, going to see about getting some rust removed from the inside.
SG Kent: So far it's been functioning alright. We used plenty of caulking when we put it together and it hasn't leaked any yet. I expect after a few years of use we may have to seal it again but that's what you get when you buy something at such a discount. Thanks for the heads up on that other gun though. I'll keep that in mind.
Sawsalesman: I'm from Central Maine, Litchfield actually. It's funny, I've always got to do a double take when I read on VW forums and see people talking about Litchfield, CT (there is a pretty large Bug-In there I guess).
_________________
1984 Vanagon Adventurewagen with EJ22 conversion
1975 Beetle - Big whole in the floorboards
1974 Westy - Will be on the road one day!
1973 Bus - sold |
|
| Back to top |
|
|
Sawsalesman
Samba Member
Joined: May 27, 2009
Posts: 796
Location: Ashland, NH
|
| Posted: Sun Jan 02, 2011 5:44 pm Post subject: |
|
|
| Cool. I was just in Gardiner the other day. I will be watching your process. By the way, get to the Litchfield, CT show. You will not be dissapointed. I'm not missing it this year. |
|
| Back to top |
|
|
thewalrus
Big Jack
Joined: March 27, 2006
Posts: 3014
Location: Belchertown, MA
|
| Posted: Mon Jan 03, 2011 8:03 am Post subject: |
|
|
| Sawsalesman wrote: |
| Nice to see another enthusiast in New England. |
X2! I love Maine. Don't get up there enough though. It's like a completly different world compared to Mass.
I'm guessing your bus is a '73 too. Very nice! I have a '75 weekender that I've been working on for almost 5 years. They're a labor of love 
Stumbled across this in the Vangaon forum a while ago. Lot of Maine people chiming in:
http://www.thesamba.com/vw/forum/viewtopic.php?t=411661&highlight=
_________________
'73 Transporter 1.7L Dual Carb
| notchboy wrote: |
| You ran over some #Vanlife'ers hopes and dreams? |
| 60vwnewengland wrote: |
| Looking forward to next weekend, weed, krunk juice, hookers, blow, hanging with bums, philly, ...the awards! |
|
|
| Back to top |
|
|
jtauxe
Samba Member

Joined: September 30, 2004
Posts: 5978
Location: Los Alamos, New Mexico, USA
|
| Posted: Mon Jan 03, 2011 8:22 pm Post subject: |
|
|
I love the dusky orange patina. Get all the mechanicals straightened out and just leave that lovely color on there.
_________________
John
"Travelling in a fried-out Kombi, on a hippie trail, head full of zombie..." - Colin Hay and Ron Strykert
http://vw.tauxe.net
1969 Transporter, 1971 Westfalia, 1976, 1977, 1976, 1977, 1971, 1973, 1977 Westfalias,
1979 Champagne Sunroof, 1974 Westfalia Automatic, 1979 Transporter, 1972 Sportsmobile, 1973 Transporter Wild Westerner, 1974 Westfalia parts bus, 1975 Mexican single cab *FOR SALE*, 1978 Irish 4-door double cab RHD
|
|
| Back to top |
|
|
SGKent
Samba Member
Joined: October 30, 2007
Posts: 42861
Location: at the beach
|
| Posted: Mon Jan 03, 2011 8:57 pm Post subject: |
|
|
it isn't a gun, it is a pick up tube. I used a glass bead machine for a living years ago and had no idea this little HF freight one could work as good as a professional one just by changing the pickup tube. Also use professional beads. They are less costly than HF Chinese ones and they are made here in the USA. There are several diameters and you can get any finish you want from looking like glass to really rough.
_________________
George Carlin:
"Most people don't know what they're doing, and a lot of them are really good at it."
Skills@EuroCarsPlus:
"never time to do it right but always time to do it twice" |
|
| Back to top |
|
|
dcdubs
Samba Member
Joined: January 29, 2003
Posts: 860
Location: the Great Northwest
|
| Posted: Mon Jan 03, 2011 9:09 pm Post subject: |
|
|
eyes on the prize nothins more fun than spending the summer campin in a bus you brought back to life keep rockin
side note ...kinda funny how busses always get dinged in the same places....rear bumper, lower sides, nose mine had a nose punch and a slider door crease, and my buddies bus had the rear bumper ding d'oh!
_________________
dcdubs/glcustoms
AllRightGarageDoorsNW.com |
|
| Back to top |
|
|
brokengun
Samba Member
Joined: August 11, 2009
Posts: 188
Location: Maine
|
| Posted: Tue Jan 04, 2011 8:32 pm Post subject: |
|
|
dcdubs: That's very true. I've noticed that with many of the projects on here. However, this one has a nice big dent in the roof that my pictures don't show that well. I'll be sure to document it once I get to the body work.
jtauxe: That's the plan... at least for a while!
_________________
1984 Vanagon Adventurewagen with EJ22 conversion
1975 Beetle - Big whole in the floorboards
1974 Westy - Will be on the road one day!
1973 Bus - sold |
|
| Back to top |
|
|
camit34
Samba Member

Joined: January 14, 2006
Posts: 1567
Location: Chula Vista, CA
|
| Posted: Wed Jan 05, 2011 12:22 pm Post subject: |
|
|
Cool find! Keep up the great work!
_________________
In search of a Vanagon
1971 Westy (SOLD)
1971 Deluxe (SOLD)
1967 Freedom Camper (SOLD)
1965 Bug (SOLD) |
|
| Back to top |
|
|
Davala
Samba Member

Joined: June 15, 2008
Posts: 93
Location: Banks, OR
|
| Posted: Wed Jan 05, 2011 12:40 pm Post subject: |
|
|
| Sawsalesman wrote: |
| Cool. I was just in Gardiner the other day. I will be watching your process. By the way, get to the Litchfield, CT show. You will not be dissapointed. I'm not missing it this year. |
Oh..... and the homesickness kicks in. . . . . I grew up in Gardiner for my first 18 years. . . Left in 2000. I miss it soo much. Although the Pacific NW where I live now is gentler on Vw's.
Oh gardiner... Tilbury Park.. . 
see ya,
Matt Davala |
|
| Back to top |
|
|
brokengun
Samba Member
Joined: August 11, 2009
Posts: 188
Location: Maine
|
| Posted: Tue May 10, 2011 5:57 pm Post subject: |
|
|
Update: So, over spring break I was able to start tearing the engine down a bit to have a closer look. There was a good amount of hay and what was probably a mouse nest on one of the cylinders. A lot of hay had been laying in between the cooling fins and a good amount of it was in the duct work where the fan is.
Anyways, so I got the heads off and to my surprise.... it looks pretty good. There was no ridge on the inside of the cylinder and everything was very clean. The tops of the pistons looked pristine and the valves look good too.
I'll be cleaning these up and having the valve springs replaced since the engine has been sitting for so long. I also plan on having them tested for flatness by a nearby machinist/VW fanatic.
The other day my dad and I stopped in and had a chat with a VW engine guru and man did we learn a lot! My father and I measured the inner diameter of the cylinders and it appeared to be larger than stock. They actually measured roughly 3.75 inches (a little over 94mm) when measured with a snap-gauge. Originally I was planning on rebuilding this engine to be a 2.0L but to my surprise... it already is! Awesome!
However, the man we spoke with said that the pistons in the engine might be aftermarket because they are marked "STD". He says that VW never marked their pistons "STD" but rather with a measurement such as "93MM". Can anyone confirm that? So, while the displacement is larger than I previously thought, now I am wondering what else may have been changed. The case has also a reconditioned one, which I found out when I was looking for the number.
Just wondering if anyone had anything to say about this corrosion I found when we separated the engine and transmission. Look closely and there is a white spot on the top of the flywheel. Is it anything to worry about? The seal between the two seemed fine and I would've thought if it was an issue the corrosion would be far worse after many years.
Trying to focus on getting the engine back together and running. The engine looks to be in such good shape that I may not bother to rebuild after all and I may just stick with the Solex carbs after they are rebuilt.
_________________
1984 Vanagon Adventurewagen with EJ22 conversion
1975 Beetle - Big whole in the floorboards
1974 Westy - Will be on the road one day!
1973 Bus - sold |
|
| Back to top |
|
|
busdaddy
Samba Member

Joined: February 12, 2004
Posts: 53097
Location: Surrey B.C. Canada, but thinking of Ukraine
|
| Posted: Tue May 10, 2011 8:08 pm Post subject: |
|
|
There's no such thing as a 2l case with a fuel pump pad in North America, sure it's not an 1800? What do the rods look like?
Clean up the corrosion and then post a pic, as long as most of the face is flat where it bolts to the trans. don't worry, it doesn't have to seal.
_________________
Rust NEVER sleeps and stock never goes out of style.
Please don't PM technical questions, ask your problem in public so everyone can play along. If you think it's too stupid post it here
Stop dead photo links! Post your photos to The Samba Gallery!
Слава Україні! |
|
| Back to top |
|
|
guanella74
Samba Member

Joined: March 13, 2009
Posts: 520
Location: Boulder, CO
|
| Posted: Tue May 10, 2011 10:03 pm Post subject: |
|
|
Looks like you pulled the engine and trans together - great. I'd hook the trans back up and check the compression before just calling it good and rolling it. Things might look fine, but a compression test will really tell you what you can get away with on the engine....
_________________
- Travis
1974 Westy CampMobile - the OG!
1979 Transporter
1979 Transporter
1977 Transporter
1974 Transporter
1973 Transporter
1971 Westy |
|
| Back to top |
|
|
brokengun
Samba Member
Joined: August 11, 2009
Posts: 188
Location: Maine
|
| Posted: Sat May 28, 2011 8:39 pm Post subject: |
|
|
Well my dad and I have been learning a lot thanks to a friendly VW nut/ Machinist we met. He's been doing VW stuff the better part of his life and has an eye for precision. We ended up having him look over the engine and he immediately picked up on the big bore cylinders, which are notorious for issues with their thin walls. After a bit of discussion, he recommended that I chuck those and avoid any future issues I may have with them.
I've basically decided that I want to go with 93mm pistons to make an 1800 motor. I plan to use Mahle pistons and cylinders and I'll have the machinist do the appropriate head work. He'll be changing the valve springs, checking the valves and checking for flatness.
We also checked the endplay and it seemed to be quite a bit more than expected. However, we discovered that it wasn't properly shimmed so that was probably why there was so much endplay.
Well, we thought initially that the engine had original pistons in it... after all they were marked Standard. Wait a minute, this is a german car!
Grimy case:
So, we tore into it...
After more conversation with the VW guy, we pulled the lifters and figured our best option may be to have them reground (as well as the cam) so we know we're working with VW parts and besides that they were in decent condition and could be reused.
Inside the case, the center bearing is still in the case and it showing a bit of wear. Does this bearing need to be replaced? It is showing a little color.
After a little cleaning, one side is starting to show some promise. You never really realize how rough the casting on a case is until you try to clean it.
Finally, a bunch of parts....
Now it's time to crack into the piggy bank and start ordering some parts and send out the cam and lifters. Still have been working on sandblasting and painting the engine tins and various components. Lots of time to refinish everything.
_________________
1984 Vanagon Adventurewagen with EJ22 conversion
1975 Beetle - Big whole in the floorboards
1974 Westy - Will be on the road one day!
1973 Bus - sold |
|
| Back to top |
|
|
|


