| Author |
Message |
tondemonai
Samba Member

Joined: January 08, 2008
Posts: 364
Location: Memphis, TN

|
 Posted: Tue Jan 18, 2011 9:38 pm Post subject: Posted: Tue Jan 18, 2011 9:38 pm Post subject: |
 |
|
Damn impressive work, LT!
However- you're taking all the NOS for '57! What am I gonna do for my ghia?

_________________
(O= i =O) One day, lad, this car will be yours. |
|
| Back to top |
|
 |
Last Triumph
Samba Member

Joined: October 10, 2006
Posts: 915
Location: Wirral, United Kingdom
|
| Posted: Wed Jan 19, 2011 1:49 am Post subject: |
|
|
| tondemonai wrote: |
Damn impressive work, LT!
However- you're taking all the NOS for '57! What am I gonna do for my ghia?
|
Yeah, the crack habit now looks to be the cheaper option.... |
|
| Back to top |
|
|
Last Triumph
Samba Member
Joined: October 10, 2006
Posts: 915
Location: Wirral, United Kingdom
|
| Posted: Wed Jan 19, 2011 2:02 pm Post subject: |
|
|
Right then - bit more progress for you...
Please forgive this rather dull and photo hungry post, it's just that often, step by step, component by component pictures of a procedure can be very helpful so here goes...
With the brakes now built up on the backing plates, it was now time to build up the rear hubs and bearings and here's how I chose to do it.
First up was to give all the original components a thorough clean, especially the bearing. This was done in a pot of brake cleaner. The rear bearings were in perfect condition with no slop, play or grittiness.
Another extremely convenient find from the NOS abyss was a pair of rear axle and hub seal kits. Splendid!
Here are all the components laid out in the order they will be fitted with the outside on the left.
First assembly part is to fit the new outer seal into the bearing carrier. It is essential that the bearing goes in to the correct depth and most importantly to prevent leaks, it must be 'square' and true in the housing. Pounding this in with a hammer is not an option, and as I didn't have access to the press in work, I had to be inventive.
A rather fortunate discovery was that the outer race of one of the front wheel bearings is the exact same size as the seal...
Which means that with careful planning, I could use this as a 'press' with my vice to insert the seal. To prevent damage to the bearing carrier, I faced it with a black of wood and using the front bearing race, carefully and slowly eased it into position. I found this a very satisfying and controlled way to do it. Make sure the seal is well oiled before you try and insert it as it's a tight fit.
This seal fits at a precise depth in the carrier and Bentley specify it must be within 4.75mm and 5.00mm of the top of the shoulder. Now - the worst thing you can ever give me is a tolerance like that, as I then spent..... lets just say, 'far too long' making sure that it was absolutely bang in the middle all the way round the seal, but not one to give up, I got it just about perfectly in the middle.... Just can't help it.
And there it is, ready for the next stage. Gotta love original blue VW seals.
And so - to the rear axle area which is bear, thoroughly clean and hungry for parts.
At this point we'll assume that every part fitted is perfectly clean and oiled when fitted. First on the shaft is the inner spacer who's curved side butts up against the machined radius on the axle.
Followed by the first paper gasket to seal the axle tube to the back of the backing plate. I coated it with Curil K2 sealant to be extra secure.
Followed by the bearing...
Then the bearing washer...
Followed by the inner O-ring seal...
Which sits in the chamfered recess on the main outer spacer...
Which allows the main brake backing plate to be offered up in to position, but is just resting in place...
Then the larger outer O ring seal fits in the space between a machined recess between the backing plate and the axle tube housing...
Which now allows it all to be held in place by bolting on the main seal and bearing housing, which also has a gasket...
Torque these four 14mm bolts up in a criss cross pattern to gently ease the inner lip of the seal over the outer spacer ring to form the main oil seal. These get torqued to 30 ft lbs.
At this point I quickly flipped the shoes downwards to fit the handbrake cable to the lever arm and secured the support bracket for the handbrake in place leaving us with a finished rear brake!
The cleaned drum went on perfectly and all is well!
The other side is just the same and is also all complete now.
Like I say, sorry for the dullness, but it might just be a help to anyone who is maybe a little intimidated about how this lot all fits together.
As long as you take your time, make sure everything is clean and oiled and goes on straight, it's really not a difficult job.
That's all for now folks! |
|
| Back to top |
|
|
Wiggy
Samba Member
Joined: April 17, 2003
Posts: 6606
Location: Downingtown, PA
|
|
| Back to top |
|
|
Erik G
Samba Member

Joined: October 16, 2002
Posts: 13580
Location: Tejas!
|
|
| Back to top |
|
|
MODIFIER
Samba Member

Joined: December 09, 2006
Posts: 1560
Location: Summerville SC
|
| Posted: Wed Jan 19, 2011 4:44 pm Post subject: |
|
|
So your wheel cylinder is on the bottom of the backing plate?
I guess they swapped them to the top for later models.
_________________
Happyasshell
USC USMC DAD OORAH!
ASE MASTER TECH BODY/PAINT and MECHANICAL
62 Beetle
63 Vert
64 Beetle
https://www.facebook.com/SmartFarmServices |
|
| Back to top |
|
|
BlueJayScout
Samba Member
Joined: April 03, 2010
Posts: 192
Location: Abilene Texas
|
| Posted: Wed Jan 19, 2011 6:09 pm Post subject: |
|
|
| Great work as always. |
|
| Back to top |
|
|
surewriting
Samba Member
Joined: September 17, 2009
Posts: 138
Location: Buford, Ga
|
| Posted: Wed Jan 19, 2011 9:21 pm Post subject: |
|
|
| Please keep it up with the photo-heavy posts! They are an extremely helpful reference tool, not to mention pure heaven to view. Excellent job, as always. |
|
| Back to top |
|
|
silvertonguedevil
Samba Member

Joined: September 26, 2010
Posts: 1697
Location: Vale, OR
|
| Posted: Thu Jan 20, 2011 7:38 am Post subject: |
|
|
| surewriting wrote: |
| Please keep it up with the photo-heavy posts! They are an extremely helpful reference tool, not to mention pure heaven to view. Excellent job, as always. |
X2!! I will be at this step soon and this was by far the best step-by-step I've seen. Keep the photo-heavy posts coming!!
_________________
-Greg |
|
| Back to top |
|
|
bunkington
Samba Member
Joined: February 03, 2009
Posts: 285
Location: Bethesda, MD
|
| Posted: Thu Jan 20, 2011 9:17 am Post subject: |
|
|
| Ignorant question - isn't that bearing supposed to be packed with grease? |
|
| Back to top |
|
|
jvulich
Samba Member
Joined: May 06, 2010
Posts: 215
Location: Clovis
|
| Posted: Thu Jan 20, 2011 9:20 am Post subject: |
|
|
| On the later IRS cars yes, but on the early swing axle cars they are fed with gear oil from the transaxle through the axle tube. |
|
| Back to top |
|
|
Flavio
Samba Member

Joined: May 14, 2008
Posts: 414
Location: Madeira Island, Portugal
|
| Posted: Thu Jan 20, 2011 10:46 am Post subject: |
|
|
Hello LT
Amazing and shared job. Thanks for your service to us.
One question: regarding the rear brakes and that long and retangular piece of metal where the bottom horizontal spring sits, it has a long concavity for the spring. In your case is facing down. Right ? In the right side brakes does the spring "uses" that concavity or is it reversed ?
Thanks in advance |
|
| Back to top |
|
|
Last Triumph
Samba Member
Joined: October 10, 2006
Posts: 915
Location: Wirral, United Kingdom
|
| Posted: Thu Jan 20, 2011 12:21 pm Post subject: |
|
|
| Flavio wrote: |
Hello LT
Amazing and shared job. Thanks for your service to us.
One question: regarding the rear brakes and that long and retangular piece of metal where the bottom horizontal spring sits, it has a long concavity for the spring. In your case is facing down. Right ? In the right side brakes does the spring "uses" that concavity or is it reversed ?
Thanks in advance |
Yes, spring sits in the concavity on both sides facing downwards, held in place with a spring clip.
On another note - the steering box seal is leaking at the top where the steering column shaft comes out so I guess you'll see a step by step early steering box rebuild soon!
Where can I get a top shaft seal from then as they are different from the '61> seals....?
Please, can we keep the proposed use of grease out of this discussion, as it ain't happenin'..... |
|
| Back to top |
|
|
vwrides.com
Samba Member

Joined: January 31, 2006
Posts: 191
Location: Central MS
|
|
| Back to top |
|
|
Last Triumph
Samba Member
Joined: October 10, 2006
Posts: 915
Location: Wirral, United Kingdom
|
| Posted: Fri Jan 21, 2011 2:12 pm Post subject: |
|
|
You want photos? I got photo's for ya, so buckle up for a treat of a trip into automotive astonishment.... in the mean time, here's an update!
I noticed the other day a nice a damp patch of oil on the floor under the steering box and thought it might be a good idea to fix this before everything goes back on the car.
The Bentley manual says it is wise to bolt the steering box to a tube similar in diameter to the front beam to allow it to be worked on easily.
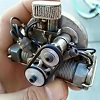
This sounded like a great idea, so in the absence of a tube of the correct diameter, I tried to 'think outside the box' for a moment and came up with this idea....
This next picture shows where the oil was seeping from. You'll notice a damp and shiny patch under where the steering column input shaft sticks out.
First up is to remove the top cover. I removed the 19mm drain plug. For reference, when bolted in the car and on level ground, the level should be filled to the bottom of the threads with EP90 transmission oil only.
Followed by the four 14mm bolts that hold the top cover in place.... The gasket is in perfect condition which was a nice surprise.
I was delighted with how clean and un-worn everything looked in there!
I then removed the pre load spring and pin from the main shaft....
Which leaves a nice hole at the top of the shaft...
I then released the pinch bolt that secures the adjustable input shaft and seal carrier - 17mm for the record.
To release and remove the main shaft, you must first release the pitman arm from the bottom. It won't come off due to the lower beam tube being in the way, but is released when you pull the shaft up from above. Slackening the box clamps to the top tube and rotating it on the tube would allow it to come off, but as the shaft is coming out anyway, I decided to leave the box in it's pre-aligned position.
Lifting the shaft up releases the ball jointed upper part of the worm drive which is an interesting piece of kit....
The arm just pulls out at this point.
Note the recessed section half way down it's length? This is to allow oil to surround the shaft which drains to the shaft via a hole in the lower side wall of the main reservoir. You can see this hole half way down the tube on second and third pic in this sequence...
At this point I wanted to be 100% sure of exactly where the leak was coming from, so I tilted the axle back to level the steering box and force the now low oil level up the input shaft to the seal and see what happened.
After a few turns lock to lock, it was pretty clear that the input seal was the culprit...
The seal is housed in an intermediate housing with a helically machined groove that the pinch bolt sits in. By turning this shaft with a large 27mm spanner, you actually push it in or out of the box to keep it firmly against the bearing which sits within the box.
Waggling it back and forth also helps to release it and pull it clear. These next two pictures are of it sitting on the end of the shaft as if I'd just removed it, but you'll notice that it's clean as I'd already cleaned it up to inspect it and the bearing before I'd remembered to take these two shots.
Here, you can just make out the position of the bearing at the end of the main housing.
And here it is....
The seal in the end is a very disappointing affair being a basic pressed tin cup with a felt 'bush' in to act as a seal. No wonder they are prone to leaking. I guess they didn't make lip seals that small back in the day? It is pressed into the end of the shaft and just pops out with a drift.
Having phoned all the specialists I could think of and being told that the seal is no longer available and that I should 'upgrade' to the later '61> steering box, I decided that I'd accept the challenge and find one.
A morning spent on the phone to all my old engineering contacts plus a few new ones seemed like it was going nowhere - maybe they were right - maybe you just can't get this seal any more? After a bit of a wild goose chase I eventually found a supplier who, after checking in their stores came up with the perfect sized nitrile NBR lip seal!!!
Result!!!
And yes - I bought them all!
Early steering boxes are safe now boys and girls!
As soon as they arrive in the post, I'll put it all back together and report my findings.
That is all. |
|
| Back to top |
|
|
Kjell Roar
Samba Member

Joined: December 08, 2008
Posts: 1333
Location: Norway
|
| Posted: Fri Jan 21, 2011 3:16 pm Post subject: |
|
|
Do you have the dimension for the seal? (outer/inner/wide).
The seal is probably easy to get from specialists/industry suppliers. I have sold a lot of different seals and o-rings on my former work.
_________________
I got a historic car, every scratch got a history...
My car, Aug. 4th, 1955 / an early 56: http://www.thesamba.com/vw/forum/album_page.php?pic_id=610438 |
|
| Back to top |
|
|
Seb67
Samba Member

Joined: December 02, 2003
Posts: 1012
Location: New England
|
| Posted: Fri Jan 21, 2011 6:09 pm Post subject: |
|
|
I wonder if that material is related to the stuff found in the oil bath air cleaners? Or perhaps the same felt found in Distributors? Seems like you could find the correct replacement material and re-use the metal bit. Anyhow -- this thread is chuffing brilliant!
_________________
1964 Type 1 |
|
| Back to top |
|
|
3foldfolly
Samba Member
Joined: March 08, 2009
Posts: 894
Location: Edwardsville, Il
|
| Posted: Fri Jan 21, 2011 6:18 pm Post subject: |
|
|
| Most excellent LT. Thanks for the guided tour through vintage beetle no mans land. I need one of those seals too. Please keep us updated. Thanks |
|
| Back to top |
|
|
Last Triumph
Samba Member
Joined: October 10, 2006
Posts: 915
Location: Wirral, United Kingdom
|
| Posted: Sat Jan 22, 2011 1:12 am Post subject: |
|
|
The problem with the felt seal is that it is intrinsically a poor design for this purpose - sooner or later it is going to leak.
If these new seals I've bought actually fit and work when they arrive, I'll sell the remaining items and we can go from there.
Let's see that they are suitable before we get too excited. |
|
| Back to top |
|
|
nick696
Samba Member

Joined: June 25, 2009
Posts: 198
Location: Belgium
|
| Posted: Sat Jan 22, 2011 3:26 am Post subject: |
|
|
Had the same problem and fixed it the same way by buying a NBR lip seal, they do the job  |
|
| Back to top |
|
|
|


